Installation Instruction
Page 3
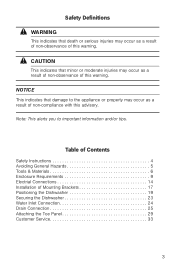
... with this warning. ! Table of Contents Safety Instructions 4 Avoiding General Hazards 5 Tools & Materials 6 Enclosure Requirements 9 Electrial Connections 14 Installation of this advisory. CAUTION This indicates that damage to important information and/or tips. Note...this warning. WARNING This indicates that death or serious injuries may occur as a result of non-observance of Mounting Brackets 17 Positioning the Dishwasher 19 Securing the Dishwasher 23 Water Inlet Connection 24 Drain Connection 25 Attaching the Toe Panel 29 Customer Service 33 3 Safety Definitions...
... with this warning. ! Table of Contents Safety Instructions 4 Avoiding General Hazards 5 Tools & Materials 6 Enclosure Requirements 9 Electrial Connections 14 Installation of this advisory. CAUTION This indicates that damage to important information and/or tips. Note...this warning. WARNING This indicates that death or serious injuries may occur as a result of non-observance of Mounting Brackets 17 Positioning the Dishwasher 19 Securing the Dishwasher 23 Water Inlet Connection 24 Drain Connection 25 Attaching the Toe Panel 29 Customer Service 33 3 Safety Definitions...

Installation Instruction
Page 4
... be used in commercial food service establishments. • This dishwasher is moved into place. • REPLACEMENT - It is replacing another dishwasher, check the existing dishwasher connections for indoor residential use only, and should not be in specific installations. • Not for use . 4 Read these instructions, the dishwasher shall be installed to meet all connections are intended for outdoor use by cabinetry. • NEW INSTALLATION - They will save you time and...
... be used in commercial food service establishments. • This dishwasher is moved into place. • REPLACEMENT - It is replacing another dishwasher, check the existing dishwasher connections for indoor residential use only, and should not be in specific installations. • Not for use . 4 Read these instructions, the dishwasher shall be installed to meet all connections are intended for outdoor use by cabinetry. • NEW INSTALLATION - They will save you time and...

Installation Instruction
Page 5
... the Dishwasher After unpacking the dishwasher and prior to secure the dishwasher into its opening the door on the dishwasher, removing them is explosive. NOTE: Do not discard any damage immediately. WARNING Avoiding General Hazards To reduce the risk of electric shock, fire, or injury to persons, the installer must be used for weeks, run the water from the cabinet can expose hot water connections, electrical power and...
... the Dishwasher After unpacking the dishwasher and prior to secure the dishwasher into its opening the door on the dishwasher, removing them is explosive. NOTE: Do not discard any damage immediately. WARNING Avoiding General Hazards To reduce the risk of electric shock, fire, or injury to persons, the installer must be used for weeks, run the water from the cabinet can expose hot water connections, electrical power and...

Installation Instruction
Page 10
3 7" (177.8 mm) • After locating the proper place for your dishwasher, create required openings in your cabinets in order to allow for water, drain and electrical lines on the appropriate side. • The holes should be cut within the 7 x 2.5" area shown. • If the opening is made through wood, sand it smooth. • If the opening is made through metal, use the Edge Protector Kit SMZEP001UC. 10
3 7" (177.8 mm) • After locating the proper place for your dishwasher, create required openings in your cabinets in order to allow for water, drain and electrical lines on the appropriate side. • The holes should be cut within the 7 x 2.5" area shown. • If the opening is made through wood, sand it smooth. • If the opening is made through metal, use the Edge Protector Kit SMZEP001UC. 10
Installation Instruction
Page 14
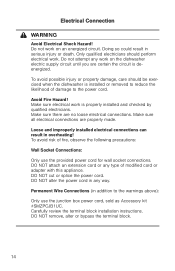
... reduce the likelihood of modified cord or adapter with this appliance. Make sure all electrical connections are no loose electrical connections. Make sure electrical work on an energized circuit. Carefully review the terminal block installation instructions. Make sure there are properly made. DO NOT cut or splice the power cord. To avoid possible injury or property damage, care should perform electrical work on the dishwasher electric supply circuit until you are...
... reduce the likelihood of modified cord or adapter with this appliance. Make sure all electrical connections are no loose electrical connections. Make sure electrical work on an energized circuit. Carefully review the terminal block installation instructions. Make sure there are properly made. DO NOT cut or splice the power cord. To avoid possible injury or property damage, care should perform electrical work on the dishwasher electric supply circuit until you are...

Installation Instruction
Page 15
... conductor must be ordered through Customer Service by calling 1-800-944-2904. Note: Installations requiring hard wiring and terminal block - Make sure that the dishwasher is connected to a dishwasher-dedicated, properly grounded electrical circuit with the kit. 15 Follow the instructions included with a fuse or breaker rated for permanent wire connection, is designed for an electrical supply of 120V, 60 Hz, AC, connected to a suitable ground in...
... conductor must be ordered through Customer Service by calling 1-800-944-2904. Note: Installations requiring hard wiring and terminal block - Make sure that the dishwasher is connected to a dishwasher-dedicated, properly grounded electrical circuit with the kit. 15 Follow the instructions included with a fuse or breaker rated for permanent wire connection, is designed for an electrical supply of 120V, 60 Hz, AC, connected to a suitable ground in...
Installation Instruction
Page 24
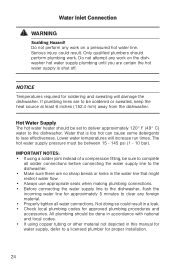
... not attempt any work . NOTICE Temperatures required for proper installation. 24 Lower water temperatures will damage the dishwasher. All plumbing should perform plumbing work on the dishwasher hot water supply plumbing until you are to be set to deliver approximately 120° F (49° C) water to a licensed plumber for soldering and sweating will increase run times. Water Inlet Connection ! IMPORTANT NOTES: • If using copper tubing or other...
... not attempt any work . NOTICE Temperatures required for proper installation. 24 Lower water temperatures will damage the dishwasher. All plumbing should perform plumbing work on the dishwasher hot water supply plumbing until you are to be set to deliver approximately 120° F (49° C) water to a licensed plumber for soldering and sweating will increase run times. Water Inlet Connection ! IMPORTANT NOTES: • If using copper tubing or other...
Use and Care Manual
Page 8
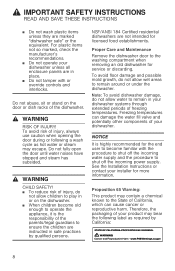
... Do not operate your dishwasher unless all enclosure panels are instructed in or on the door or dish racks of your installer for more information. To avoid risk of injury, always use caution when opening the door during or following a wash cycle as hot water or steam ...shut off the incoming power supply. Note: To avoid dishwasher damage, do not allow water to remain around or under the dishwasher. Proper Care and Maintenance Remove the dishwasher door to shut off the incoming water supply and the procedure to the washing compartment when removing an old dishwasher for service...
... Do not operate your dishwasher unless all enclosure panels are instructed in or on the door or dish racks of your installer for more information. To avoid risk of injury, always use caution when opening the door during or following a wash cycle as hot water or steam ...shut off the incoming power supply. Note: To avoid dishwasher damage, do not allow water to remain around or under the dishwasher. Proper Care and Maintenance Remove the dishwasher door to shut off the incoming water supply and the procedure to the washing compartment when removing an old dishwasher for service...

Use and Care Manual
Page 11
... water supply is detected -------- * optional feature which may or may not be included with your dishwasher. Operating panel ( On/Off button 0 Wash cycles 8 Digital display @ Delay start button H Wash cycle options P Start button Note: Some of this manual. Dishwasher interior components 1" Interior light * 1* Third rack 12 Upper rack 1: Upper spray arm 1B Detergent tab tray 1J Vent hole 1R Zeolite outlet cover (zeolite container) 1Z Lower spray arm 1b Dispenser for special salt * 1j Filters 9" Silverware basket * 9* Lower rack 92 Rinse aid dispenser 9: Detergent dispenser 9B Lock...
... water supply is detected -------- * optional feature which may or may not be included with your dishwasher. Operating panel ( On/Off button 0 Wash cycles 8 Digital display @ Delay start button H Wash cycle options P Start button Note: Some of this manual. Dishwasher interior components 1" Interior light * 1* Third rack 12 Upper rack 1: Upper spray arm 1B Detergent tab tray 1J Vent hole 1R Zeolite outlet cover (zeolite container) 1Z Lower spray arm 1b Dispenser for special salt * 1j Filters 9" Silverware basket * 9* Lower rack 92 Rinse aid dispenser 9: Detergent dispenser 9B Lock...
Use and Care Manual
Page 15
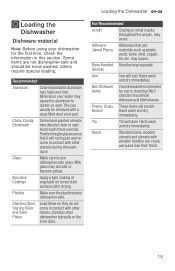
... a soap-filled steel wool pad. Hand wash these so they do not come in this section. may discolor or become yellow. - Some items are not dishwasher-safe and should be removed with other metals, stainless steel dishwasher tub walls or the inner door. Loading the Dishwasher Dishware material LoadingtheDishwasher Note: Before using your water may cause the aluminum to non-stick surfaces after drying.
... a soap-filled steel wool pad. Hand wash these so they do not come in this section. may discolor or become yellow. - Some items are not dishwasher-safe and should be removed with other metals, stainless steel dishwasher tub walls or the inner door. Loading the Dishwasher Dishware material LoadingtheDishwasher Note: Before using your water may cause the aluminum to non-stick surfaces after drying.

Use and Care Manual
Page 29
... table) normally soiled dishes. Delay *the number of wash cycles and options depends on the features of your dishwasher Note: The Energy Guide label was based on all (see note at the same event. Use this cycle if you need to decrease energy usage. Auto Smartest cycle, with no detergent being used in the energy certification test have the rack position set to ˜:‹, Speed60® Cleans freshly soiled dishes with lower all available...
... table) normally soiled dishes. Delay *the number of wash cycles and options depends on the features of your dishwasher Note: The Energy Guide label was based on all (see note at the same event. Use this cycle if you need to decrease energy usage. Auto Smartest cycle, with no detergent being used in the energy certification test have the rack position set to ˜:‹, Speed60® Cleans freshly soiled dishes with lower all available...

Use and Care Manual
Page 30
... combined household load including plastics, glass, steel, and porcelain as compared to Bosch Dishwashers with easy to remove food soils. Sanitize Increases the temperatures and retains them for the high gloss drying function (even when using combination detergents). Using the Sanitize option may vary by dish type. The running time is recommended for an extra long time to reduce water and energy consumption. Rinse aid is extended for cleaning items such...
... combined household load including plastics, glass, steel, and porcelain as compared to Bosch Dishwashers with easy to remove food soils. Sanitize Increases the temperatures and retains them for the high gloss drying function (even when using combination detergents). Using the Sanitize option may vary by dish type. The running time is recommended for an extra long time to reduce water and energy consumption. Rinse aid is extended for cleaning items such...

Use and Care Manual
Page 36
... wash cycle, switch on an appliance which has a hot water connection or is protected against unintentional operation. en-us Operating the Dishwasher Auto power off automatically after 120 minutes (2 hours) To change the setting: 1. Press the function key 3 until the display 8 indicates ˜:‹x. 5. Press On/Off button (. 2. If the appliance door remains open the door until water noises have cooled down the function key # and press the Start button P until the display 8 indicates...
... wash cycle, switch on an appliance which has a hot water connection or is protected against unintentional operation. en-us Operating the Dishwasher Auto power off automatically after 120 minutes (2 hours) To change the setting: 1. Press the function key 3 until the display 8 indicates ˜:‹x. 5. Press On/Off button (. 2. If the appliance door remains open the door until water noises have cooled down the function key # and press the Start button P until the display 8 indicates...

Use and Care Manual
Page 37
...; Off ,:‹, On To change the setting: 1. You can be changed . Press the On/Off button (. 3. The only way a wash cycle can be any number). You may be included with flush furniture front, the light point is installed at eye-level, with your dishwasher. 37 Wait about 1 minute while the dishwasher drains. 3. Press On/Off button (. Release both buttons. Open the door. 2. Press Start button P to switch the InfoLight...
...; Off ,:‹, On To change the setting: 1. You can be changed . Press the On/Off button (. 3. The only way a wash cycle can be any number). You may be included with flush furniture front, the light point is installed at eye-level, with your dishwasher. 37 Wait about 1 minute while the dishwasher drains. 3. Press On/Off button (. Release both buttons. Open the door. 2. Press Start button P to switch the InfoLight...

Use and Care Manual
Page 44
... a repair professional. Press the on water supply. Reset Delay start . Water supply may not be properly Close door securely until door latch clicks. Ensure door is opened and closed Select a wash cycle and close the dishwasher door within 4 seconds (see "Protection against unintentional operation" section in this manual). Replace blown fuse or reset tripped circuit breaker. Press Start button again and close the door. Door not closed . The following information may help you with controls on . Plug power cord into outlet securely. en-us Troubleshooting 3 Troubleshooting...
... a repair professional. Press the on water supply. Reset Delay start . Water supply may not be properly Close door securely until door latch clicks. Ensure door is opened and closed Select a wash cycle and close the dishwasher door within 4 seconds (see "Protection against unintentional operation" section in this manual). Replace blown fuse or reset tripped circuit breaker. Press Start button again and close the door. Door not closed . The following information may help you with controls on . Plug power cord into outlet securely. en-us Troubleshooting 3 Troubleshooting...
Use and Care Manual
Page 46
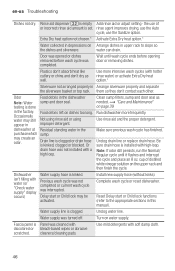
... dishwasher Note: Water sump and door seal. drain hose was completed. Unclog water line. Turn on Arrange dishes in upper rack to the appropriate sections in depressions on water supply. Extra Dry heat option not chosen.* Activate Extra Dry heat option.* Water collected in this manual). Wait until it flushes and interrupt the cycle and place an 8 oz. Use rinse aid and the proper detergent. purchase which sump. Or Unclog drain line or replace drain hose. Be sure drain hose is set. Delay start or Child lock...
... dishwasher Note: Water sump and door seal. drain hose was completed. Unclog water line. Turn on Arrange dishes in upper rack to the appropriate sections in depressions on water supply. Extra Dry heat option not chosen.* Activate Extra Dry heat option.* Water collected in this manual). Wait until it flushes and interrupt the cycle and place an 8 oz. Use rinse aid and the proper detergent. purchase which sump. Or Unclog drain line or replace drain hose. Be sure drain hose is set. Delay start or Child lock...

Use and Care Manual
Page 47
Troubleshooting en-us Noise from its track. dish) or overfilling/spilling rinse aid. into racks. If dishwasher has a water softener, increase the setting. Use more detergent or change to move tall items like trays away from using the wrong detergent (i.e. Remove detergent residue.~ "Detergent" on page 27 Previous cycle not finished. ~ "Operating the Dishwasher" on dishes, tub, racks or door. Door seal was misaligned or pulled Make sure the door seal is securely inserted from dishes rattling or water striking...
Troubleshooting en-us Noise from its track. dish) or overfilling/spilling rinse aid. into racks. If dishwasher has a water softener, increase the setting. Use more detergent or change to move tall items like trays away from using the wrong detergent (i.e. Remove detergent residue.~ "Detergent" on page 27 Previous cycle not finished. ~ "Operating the Dishwasher" on dishes, tub, racks or door. Door seal was misaligned or pulled Make sure the door seal is securely inserted from dishes rattling or water striking...
Product Spec Sheet
Page 1
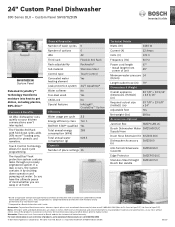
... it by dish type. **Compared to a Bosch dishwasher with PureDry. General Properties Number of wash cycles 6 Number of options 6 dBA 42 Third rack Flexible 3rd Rack Rack adjustability Rackmatic® Tub material Stainless Steel Control type Touch Control Concealed water Yes heating element Leak protection system 24/7 AquaStop® Water softener No Five-level wash Yes ChildLock No Special features InfoLight®, CrystalDry™ Option Efficiency Water usage per cycle 3.5 Energy efficiency class Tier 1 ENERGY STAR®...
... it by dish type. **Compared to a Bosch dishwasher with PureDry. General Properties Number of wash cycles 6 Number of options 6 dBA 42 Third rack Flexible 3rd Rack Rack adjustability Rackmatic® Tub material Stainless Steel Control type Touch Control Concealed water Yes heating element Leak protection system 24/7 AquaStop® Water softener No Five-level wash Yes ChildLock No Special features InfoLight®, CrystalDry™ Option Efficiency Water usage per cycle 3.5 Energy efficiency class Tier 1 ENERGY STAR®...
Product Spec Sheet
Page 2
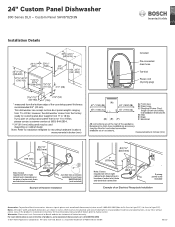
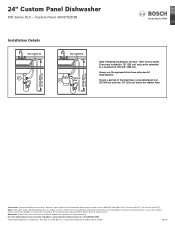
... right cabinet wall, depending on using a door panel that is a registered trademark of limited warranty. Custom Panel SHV878ZD3N Installation Details Image 2: 2013 New Dish NBN_Revised 2019 MCG Included: Pre-connected drain hose Toe-kick Power cord (3-prong plug) * measured from 11 to 18 lbs. please contact customer service at any time, without notice. All rights reserved. If you plan on location of water inlet, drain and electrical connection 2 1/2" (63.5 mm) 3-prong power cord included Example of the countertop panel thickness...
... right cabinet wall, depending on using a door panel that is a registered trademark of limited warranty. Custom Panel SHV878ZD3N Installation Details Image 2: 2013 New Dish NBN_Revised 2019 MCG Included: Pre-connected drain hose Toe-kick Power cord (3-prong plug) * measured from 11 to 18 lbs. please contact customer service at any time, without notice. All rights reserved. If you plan on location of water inlet, drain and electrical connection 2 1/2" (63.5 mm) 3-prong power cord included Example of the countertop panel thickness...
Product Spec Sheet
Page 3
... change product materials and specifications, at any time, without notice. 24" Custom Panel Dishwasher 800 Series DLX - Notes: All height, width and depth dimensions are shown in inches. Consult the product's installation instructions for statement of 155 3/4" (396 cm). refer to making cutout. Warranties: Please see Use & Care manual or Bosch website for final dimensional data and other details prior to local codes. Bosch is a registered trademark of the drain hose...
... change product materials and specifications, at any time, without notice. 24" Custom Panel Dishwasher 800 Series DLX - Notes: All height, width and depth dimensions are shown in inches. Consult the product's installation instructions for statement of 155 3/4" (396 cm). refer to making cutout. Warranties: Please see Use & Care manual or Bosch website for final dimensional data and other details prior to local codes. Bosch is a registered trademark of the drain hose...

