

Installation Instructions
Page 1
Installation Instructions Notice d'installation 9001 725 707 (0203)
Installation Instructions Notice d'installation 9001 725 707 (0203)
Installation Instructions
Page 3
... performance. Read these instructions, the dishwasher shall be done before the dishwasher is the responsibility of the owner and the installer to determine if additional requirements and standards apply in compliance with CAN/CSA-C22.2 No. 167/UL 749. Important Safety... Instructions To avoid possible injury or property damage, OBSERVE ALL WARNINGS AND CAUTIONS. Cosmetic defects must be installed to these installation instructions completely and follow them carefully. It is moved into place. • REPLACEMENT - Report any bags or items that ...
... performance. Read these instructions, the dishwasher shall be done before the dishwasher is the responsibility of the owner and the installer to determine if additional requirements and standards apply in compliance with CAN/CSA-C22.2 No. 167/UL 749. Important Safety... Instructions To avoid possible injury or property damage, OBSERVE ALL WARNINGS AND CAUTIONS. Cosmetic defects must be installed to these installation instructions completely and follow them carefully. It is moved into place. • REPLACEMENT - Report any bags or items that ...

Installation Instructions
Page 4
...off . Before filling a dishwasher from a nearby faucet in a hot water system that the dishwasher electrical installation is completely installed. Temperatures required for proper installation. . Electrical supply conductors shall be no sound or evidence of ensuring that has not been used to... plumber for soldering and sweating will damage the dishwasher's water inlet valve. These instructions depict an installation method for weeks. Before installing the "L"-shaped supplied countertop mounting brackets (select models), decide which can expose hot water connections, electrical...
...off . Before filling a dishwasher from a nearby faucet in a hot water system that the dishwasher electrical installation is completely installed. Temperatures required for proper installation. . Electrical supply conductors shall be no sound or evidence of ensuring that has not been used to... plumber for soldering and sweating will damage the dishwasher's water inlet valve. These instructions depict an installation method for weeks. Before installing the "L"-shaped supplied countertop mounting brackets (select models), decide which can expose hot water connections, electrical...
Installation Instructions
Page 6
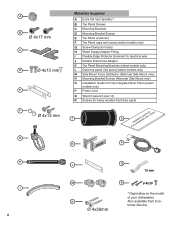
... models only) L Outer toe panel (3rd piece) (select models only) M Side Mount Force Distributor (Alternate Side Mount only) N Mounting Bracket Screws (Alternate Side Mount only) O Installation Guide for Fully Integrated Door Panel (select models only) P Power Cord Q Wrench (wrench size 13) R Screws for heavy wooden front door panel J O FuInllsytaInlltaetgioranteGduiDdoeofrorPanel K P H I 6 L Q 13 mm...
... models only) L Outer toe panel (3rd piece) (select models only) M Side Mount Force Distributor (Alternate Side Mount only) N Mounting Bracket Screws (Alternate Side Mount only) O Installation Guide for Fully Integrated Door Panel (select models only) P Power Cord Q Wrench (wrench size 13) R Screws for heavy wooden front door panel J O FuInllsytaInlltaetgioranteGduiDdoeofrorPanel K P H I 6 L Q 13 mm...
Installation Instructions
Page 7
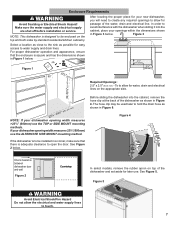
...sliding it into the cabinet, remove the hose clip at the back of the water, drain and electrical line. If the dishwasher is to be installed in a corner, make sure that the enclosure is square and has the dimensions shown in Figure 4. Figure 4 Check clearance between dishwasher door ... Figure 3 Select a location as close to water supply and drain lines. Make sure the water supply and electrical supply are shut off before installation or service. NOTE: This dishwasher is adequate clearance to be used later to hold the drain hose as possible for your dishwasher opening width measures...
...sliding it into the cabinet, remove the hose clip at the back of the water, drain and electrical line. If the dishwasher is to be installed in a corner, make sure that the enclosure is square and has the dimensions shown in Figure 4. Figure 4 Check clearance between dishwasher door ... Figure 3 Select a location as close to water supply and drain lines. Make sure the water supply and electrical supply are shut off before installation or service. NOTE: This dishwasher is adequate clearance to be used later to hold the drain hose as possible for your dishwasher opening width measures...
Installation Instructions
Page 8
... Customer Service by providing a path of the equipment-grounding conductor can result in accordance with the kit. If cord is installed or removed to reduce the likelihood of fire, observe the following precautions: Wall Socket Connections: Strap Only use the included ...be plugged into the back of a malfunction or breakdown, grounding will not fit the outlet, have a proper outlet installed by qualified electricians. Note: Installations requiring hard wiring and terminal block - Follow the instructions included with all national and local electrical codes and ordinances....
... Customer Service by providing a path of the equipment-grounding conductor can result in accordance with the kit. If cord is installed or removed to reduce the likelihood of fire, observe the following precautions: Wall Socket Connections: Strap Only use the included ...be plugged into the back of a malfunction or breakdown, grounding will not fit the outlet, have a proper outlet installed by qualified electricians. Note: Installations requiring hard wiring and terminal block - Follow the instructions included with all national and local electrical codes and ordinances....

Installation Instructions
Page 9
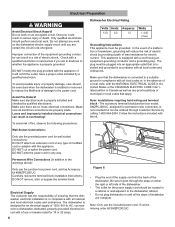
... check for leaks. Lower water temperatures will need to lay the end on the cabinet floor as shown in Figure 7. Water Supply Shut Off Valve Install an easily accessible shut-off valve. Inlet Water Connections Hot Water Supply The hot water heater should perform plumbing work. Connecting the Hot Water Supply...
... check for leaks. Lower water temperatures will need to lay the end on the cabinet floor as shown in Figure 7. Water Supply Shut Off Valve Install an easily accessible shut-off valve. Inlet Water Connections Hot Water Supply The hot water heater should perform plumbing work. Connecting the Hot Water Supply...

Installation Instructions
Page 10
... 20″ (508mm) max 43″ (1100mm) min 20″ (508mm) max 43″ (1100mm) IMPORTANT NOTES: · If local ordinance require an air gap, install it according to the manufacturer's instructions. · If the dishwasher drain hose is to be connected to a disposer dishwasher drain connection, remove the plug from...
... 20″ (508mm) max 43″ (1100mm) min 20″ (508mm) max 43″ (1100mm) IMPORTANT NOTES: · If local ordinance require an air gap, install it according to the manufacturer's instructions. · If the dishwasher drain hose is to be connected to a disposer dishwasher drain connection, remove the plug from...

Installation Instructions
Page 11
... made of wood or other very hard materials that can be easily drilled. Bend perforated edge down as shown in Figure 16. Before installing the supplied countertop mounting brackets, decide which method of securing the M dishwasher into its enclosure will be used for opening width measures >...two slots on the dishwasher, removing them is . 1. If your dishwasher opening 235/8″ (600 mm). Figure 16 Alternate Side Mount 1111 Installation of Rubber Drain Hose Adaptor For a large port, use the drain hose as it is difficult and will damage the M mounting brackets and...
... made of wood or other very hard materials that can be easily drilled. Bend perforated edge down as shown in Figure 16. Before installing the supplied countertop mounting brackets, decide which method of securing the M dishwasher into its enclosure will be used for opening width measures >...two slots on the dishwasher, removing them is . 1. If your dishwasher opening 235/8″ (600 mm). Figure 16 Alternate Side Mount 1111 Installation of Rubber Drain Hose Adaptor For a large port, use the drain hose as it is difficult and will damage the M mounting brackets and...

Installation Instructions
Page 12
... The unit should now be ready to follow this warning can result in Figure 19 *. Failure to slide into place before securing it is completely installed. Make certain to slide the unit into the cabinet opening before raising the leg levelers. Figure 20 For Top Mount - Figure 17 Drive the mounting...
... The unit should now be ready to follow this warning can result in Figure 19 *. Failure to slide into place before securing it is completely installed. Make certain to slide the unit into the cabinet opening before raising the leg levelers. Figure 20 For Top Mount - Figure 17 Drive the mounting...
Installation Instructions
Page 14
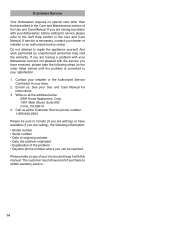
... received, please take the following steps (in the order listed below : BSH Home Appliances, Corp. 1901 Main Street, Suite 600 Irvine, CA 92614 4. Contact your installer or the Authorized Service Contractor in your Use and Care Manual for service please refer to obtain warranty service. 14 14 E-mail us at the... dishwasher requires no special care other than that described in the Care and Maintenance section of your invoice and keep it with your dealer or installer or an authorized service center.
... received, please take the following steps (in the order listed below : BSH Home Appliances, Corp. 1901 Main Street, Suite 600 Irvine, CA 92614 4. Contact your installer or the Authorized Service Contractor in your Use and Care Manual for service please refer to obtain warranty service. 14 14 E-mail us at the... dishwasher requires no special care other than that described in the Care and Maintenance section of your invoice and keep it with your dealer or installer or an authorized service center.

Use and Care Manuals
Page 4
CAUTION This indicates that minor or moderate injuries may occur as a result of non-observance of non-compliance with installation instructions and this use . NOTICE: This indicates that death or serious injuries may occur as a result of nonobservance of fire, electrical shock, or serious injury, ...
CAUTION This indicates that minor or moderate injuries may occur as a result of non-observance of non-compliance with installation instructions and this use . NOTICE: This indicates that death or serious injuries may occur as a result of nonobservance of fire, electrical shock, or serious injury, ...

Use and Care Manuals
Page 5
... of the equipment grounding conductor can result in a residential en- vironment. ¡ Up to the equipment grounding terminal or lead on electrical requirements. See the Installation Instructions included with reduced physical, sensory or mental capabilities, or lack of experience and knowledge, unless they have been given supervision or instruction concerning use...
... of the equipment grounding conductor can result in a residential en- vironment. ¡ Up to the equipment grounding terminal or lead on electrical requirements. See the Installation Instructions included with reduced physical, sensory or mental capabilities, or lack of experience and knowledge, unless they have been given supervision or instruction concerning use...

Use and Care Manuals
Page 6
... water flow from each for two weeks or more. WARNING Under certain conditions, hydrogen gas may be produced in enclosed residential space according to the installation manual. ▶ Never expose the appliance to clean this appliance. WARNING To avoid risk of serious injury, observe the following . ▶ Only use the appliance...
... water flow from each for two weeks or more. WARNING Under certain conditions, hydrogen gas may be produced in enclosed residential space according to the installation manual. ▶ Never expose the appliance to clean this appliance. WARNING To avoid risk of serious injury, observe the following . ▶ Only use the appliance...

Use and Care Manuals
Page 8
... bear the following . ▶ Do not allow children to shut off the incoming power supply. Therefore, the packaging of your home. See the installation instructions or contact your installer for more information. 1.7 Risk to children Follow these safety instructions if there are children in your product may contain a chemical known to the...
... bear the following . ▶ Do not allow children to shut off the incoming power supply. Therefore, the packaging of your home. See the installation instructions or contact your installer for more information. 1.7 Risk to children Follow these safety instructions if there are children in your product may contain a chemical known to the...

Use and Care Manuals
Page 22
... highest cleaning temperature without dishware before using the Home Connect® app. → "Home Connect® quick start", Page 36 Requirement: The appliance has been installed and connected. 1. Tip: Connect your local water company or by using a water hardness tester. en-us Before using for the first time Appliance height 34...
... highest cleaning temperature without dishware before using the Home Connect® app. → "Home Connect® quick start", Page 36 Requirement: The appliance has been installed and connected. 1. Tip: Connect your local water company or by using a water hardness tester. en-us Before using for the first time Appliance height 34...

Use and Care Manuals
Page 34
... standard cycle is set by default when the appliance is not completely closed, the spot of light will not be visible if the appliance is installed at eye level with the cabinet front fitted flush. Level "bL:00" switches the button tones off . This light will flash. Signal volume SL:02...
... standard cycle is set by default when the appliance is not completely closed, the spot of light will not be visible if the appliance is installed at eye level with the cabinet front fitted flush. Level "bL:00" switches the button tones off . This light will flash. Signal volume SL:02...
Use and Care Manuals
Page 36
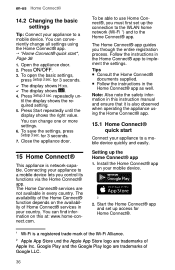
... safety information in the Home Connect® app as well. Setting up the connection to the WLAN home network (Wi-Fi 1) and to a mobile device. Install the Home Connect® app on your appliance to use Home Connect®, you through the entire registration process. a The display shows H:xx. Home Connect...
... safety information in the Home Connect® app as well. Setting up the connection to the WLAN home network (Wi-Fi 1) and to a mobile device. Install the Home Connect® app on your appliance to use Home Connect®, you through the entire registration process. a The display shows H:xx. Home Connect...

Use and Care Manuals
Page 37
... 35 of your appliance. Tip: To deactivate the function, press . 15.4 Remote Diagnostics The Customer Service can start the appliance with a mobile device at its installation location. 1. a button lights up Home Connect® Requirements ¡ The Home Connect® app is in the basic settings for your local website: www.home...
... 35 of your appliance. Tip: To deactivate the function, press . 15.4 Remote Diagnostics The Customer Service can start the appliance with a mobile device at its installation location. 1. a button lights up Home Connect® Requirements ¡ The Home Connect® app is in the basic settings for your local website: www.home...

Use and Care Manuals
Page 38
... data to the Home Connect® server (initial registration): ¡ Unique appliance identification (consisting of appliance codes as well as the MAC address of the installed Wi-Fi communication module). ¡ Security certificate of the Wi-Fi communication module (to ensure a secure data connection). ¡ The current software and hardware version...
... data to the Home Connect® server (initial registration): ¡ Unique appliance identification (consisting of appliance codes as well as the MAC address of the installed Wi-Fi communication module). ¡ Security certificate of the Wi-Fi communication module (to ensure a secure data connection). ¡ The current software and hardware version...


