User Guide
Page 2
... the first time. Thank you use your dishwasher for selecting a Bosch dishwasher.You have any questions or comments, please contact us at: 1-800-944-2904 or write to us at : www.boschappliances.com (U.S.A) OR www.bosch-appliances.ca (Canada) If you from their dishwashers. This manual was written with your dishwasher and available accessories, as well as...
... the first time. Thank you use your dishwasher for selecting a Bosch dishwasher.You have any questions or comments, please contact us at: 1-800-944-2904 or write to us at : www.boschappliances.com (U.S.A) OR www.bosch-appliances.ca (Canada) If you from their dishwashers. This manual was written with your dishwasher and available accessories, as well as...
User Guide
Page 3
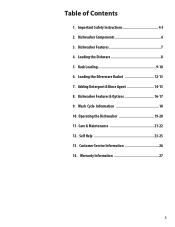
Dishwasher Components 6 3. Operating the Dishwasher 19-20 11. Customer Service Information 26 14. Important Safety Instructions 4-5 2. Wash Cycle Information 18 10. Dishwasher Features 7 4. Self Help 23-25 13. Dishwasher Features & Options 16-17 9. Warranty Information 27 3 Loading the Silverware Basket 12-13 7. Adding Detergent & Rinse Agent 14-15 8. Care & Maintenance 21-22 12. Table of Contents 1. Loading the Dishware 8 5. Rack Loading 9-10 6.
Dishwasher Components 6 3. Operating the Dishwasher 19-20 11. Customer Service Information 26 14. Important Safety Instructions 4-5 2. Wash Cycle Information 18 10. Dishwasher Features 7 4. Self Help 23-25 13. Dishwasher Features & Options 16-17 9. Warranty Information 27 3 Loading the Silverware Basket 12-13 7. Adding Detergent & Rinse Agent 14-15 8. Care & Maintenance 21-22 12. Table of Contents 1. Loading the Dishware 8 5. Rack Loading 9-10 6.
User Guide
Page 4
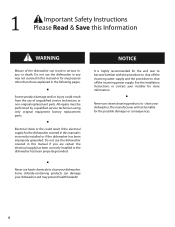
... and/or injury could result from the use harsh chemicals to clean your installer for more information. ■ Never use the dishwasher covered in serious injury or death. 1 Important Safety Instructions Please Read & Save this Information WARNING Misuse of unqualified service technicians ...or non-original replacement parts. NOTICE It is incorrectly installed or if the dishwasher has been improperly grounded. Do not use steam cleaning products to shut off the incoming power supply. Some chloride-containing ...
... and/or injury could result from the use harsh chemicals to clean your installer for more information. ■ Never use the dishwasher covered in serious injury or death. 1 Important Safety Instructions Please Read & Save this Information WARNING Misuse of unqualified service technicians ...or non-original replacement parts. NOTICE It is incorrectly installed or if the dishwasher has been improperly grounded. Do not use steam cleaning products to shut off the incoming power supply. Some chloride-containing ...
User Guide
Page 5
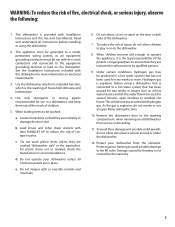
...areas to a metal, permanent wiring system, or an equipment grounding conductor must be run with this Use and Care Manual. Protect your dishwasher unless all enclosure panels are instructed in a hot water system that has not been used for its intended function, which is the legal... to reduce the risk of household dishware and kitchenware. 4. Use only detergents or rinsing agents recommended for several minutes, open flame during this dishwasher only for two weeks or more information on the door or dish racks of fire, electrical shock, or serious injury, observe the following: ...
...areas to a metal, permanent wiring system, or an equipment grounding conductor must be run with this Use and Care Manual. Protect your dishwasher unless all enclosure panels are instructed in a hot water system that has not been used for its intended function, which is the legal... to reduce the risk of household dishware and kitchenware. 4. Use only detergents or rinsing agents recommended for several minutes, open flame during this dishwasher only for two weeks or more information on the door or dish racks of fire, electrical shock, or serious injury, observe the following: ...
User Guide
Page 7
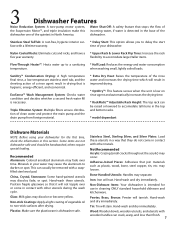
... can be handwashed; Adhesive-Joined Pieces: Adhesives that it will not topple over time. Hand-wash and dry immediately. Non-Dishware Items: Your dishwasher is hygienic, energy efficient, and economical. Pewter, Brass, Bronze: Pewter will stain. Wood: Wooden bowls, wooden utensils, and utensils with ..., and the sheeting action of a rinse agent result in drying that is intended for the first time, check the information in this dishwasher one of vegetable oil to a sanitizing * Half Load: Reduces the energy and water consumption temperature. EcoSense™ Wash Management System:...
... can be handwashed; Adhesive-Joined Pieces: Adhesives that it will not topple over time. Hand-wash and dry immediately. Non-Dishware Items: Your dishwasher is hygienic, energy efficient, and economical. Pewter, Brass, Bronze: Pewter will stain. Wood: Wooden bowls, wooden utensils, and utensils with ..., and the sheeting action of a rinse agent result in drying that is intended for the first time, check the information in this dishwasher one of vegetable oil to a sanitizing * Half Load: Reduces the energy and water consumption temperature. EcoSense™ Wash Management System:...
User Guide
Page 8
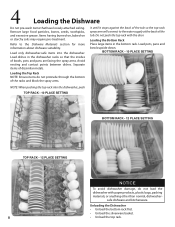
..., pans and bowls upside down. safe dishware and kitchenware. Unloading the Dishwasher • Unload the bottom rack first. • Unload the silverware basket. 8 • Unload the top rack. Load only dishwasher-safe items into the dishwasher, push TOP RACK - 10 PLACE SETTING BOTTOM RACK - 12 PLACE ...not push the top rack with paper products, plastic bags, packing materials, or anything other than normal, dishwasher- Loading the Bottom Rack Place large items in the dishwasher racks so that have loosely attached soiling. Refer to the water supply at the back of the tub....
..., pans and bowls upside down. safe dishware and kitchenware. Unloading the Dishwasher • Unload the bottom rack first. • Unload the silverware basket. 8 • Unload the top rack. Load only dishwasher-safe items into the dishwasher, push TOP RACK - 10 PLACE SETTING BOTTOM RACK - 12 PLACE ...not push the top rack with paper products, plastic bags, packing materials, or anything other than normal, dishwasher- Loading the Bottom Rack Place large items in the dishwasher racks so that have loosely attached soiling. Refer to the water supply at the back of the tub....
User Guide
Page 9
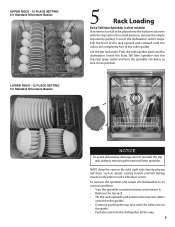
.... NOTE: Keep the vent on the tub's right side clear by pulling it out of the roller guides. Push the roller guides back into the dishwasher. Insert the Extra Tall Item Sprinkler into the top rack spray outlet and turn the sprinkler clockwise to lock it stops. UPPER RACK - 12 PLACE... onto the roller guides. • Continue pushing the top rack until the rollers are on the bottom rack's left side,or center. NOTICE To avoid dishwasher damage, do not reinstall the top rack without removing the extra tall item sprinkler. Pull the front of the rack upward and outward until the...
.... NOTE: Keep the vent on the tub's right side clear by pulling it out of the roller guides. Push the roller guides back into the dishwasher. Insert the Extra Tall Item Sprinkler into the top rack spray outlet and turn the sprinkler clockwise to lock it stops. UPPER RACK - 12 PLACE... onto the roller guides. • Continue pushing the top rack until the rollers are on the bottom rack's left side,or center. NOTICE To avoid dishwasher damage, do not reinstall the top rack without removing the extra tall item sprinkler. Pull the front of the rack upward and outward until the...
User Guide
Page 10
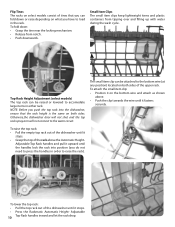
... press the handles in the rack. Adjustable Top Rack handles and pull it upward until it stops. • Press the Rackmatic Automatic Height- Otherwise,the dishwasher door will not shut and the top rack spray arm will not connect to accomodate large items in either rack. To raise the top rack...: • Pull the empty top rack out of the dishwasher until it stops. • Grasp the top of the rack above . • Push the clip towards the wire until it fastens securely. The small item...
... press the handles in the rack. Adjustable Top Rack handles and pull it upward until it stops. • Press the Rackmatic Automatic Height- Otherwise,the dishwasher door will not shut and the top rack spray arm will not connect to accomodate large items in either rack. To raise the top rack...: • Pull the empty top rack out of the dishwasher until it stops. • Grasp the top of the rack above . • Push the clip towards the wire until it fastens securely. The small item...
User Guide
Page 11
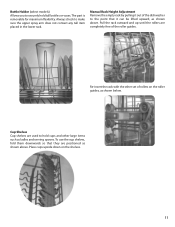
... up until the rollers are positioned as ladles and serving spoons. To use the cup shelves, fold them downwards so that it out of the dishwasher to hold tall bottles or vases. Bottle Holder (select models) Allows you to make sure the upper spray arm does not contact any tall item...
... up until the rollers are positioned as ladles and serving spoons. To use the cup shelves, fold them downwards so that it out of the dishwasher to hold tall bottles or vases. Bottle Holder (select models) Allows you to make sure the upper spray arm does not contact any tall item...
User Guide
Page 14
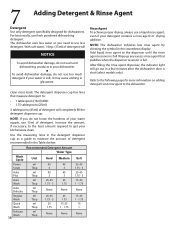
... to: • 1 tablespoon (15ml) AND • 1.75 tablespoons (25ml) 3 tablespoons (45ml) of detergent will NOTICE To avoid dishwasher damage, do not use too much detergent if your kitchenware clean. Increase the amount, if necessary, to the least amount required to get your ...loads. 7 Adding Detergent & Rinse Agent Detergent Use only detergent specifically designed for more information on adding detergent and rinse agent to the dishwasher. Use the measuring lines in the detergent dispenser cup as a guide to measure the amount of your detergent contains a rinse agent ...
... to: • 1 tablespoon (15ml) AND • 1.75 tablespoons (25ml) 3 tablespoons (45ml) of detergent will NOTICE To avoid dishwasher damage, do not use too much detergent if your kitchenware clean. Increase the amount, if necessary, to the least amount required to get your ...loads. 7 Adding Detergent & Rinse Agent Detergent Use only detergent specifically designed for more information on adding detergent and rinse agent to the dishwasher. Use the measuring lines in the detergent dispenser cup as a guide to measure the amount of your detergent contains a rinse agent ...
User Guide
Page 16
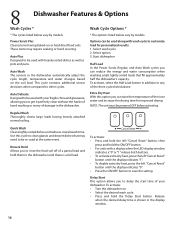
... until the display indicates "1". • To disable extra dry heat, press the left "Cancel Reset" button until there is shown in the dishwasher automatically adjust the cycle length, temperature and water changes based on the soil load. Regular Wash Thoroughly cleans large loads having baked-on . &#...loads that may require soaking or hand scouring. Extra Dry Heat With this cycle to clean glasses and dessert dishes that fill approximately half the dishwasher's capacity. Cancel Reset To activate: • Press and hold the left "Cancel Reset" button, then press and hold the ON/OFF...
... until the display indicates "1". • To disable extra dry heat, press the left "Cancel Reset" button until there is shown in the dishwasher automatically adjust the cycle length, temperature and water changes based on the soil load. Regular Wash Thoroughly cleans large loads having baked-on . &#...loads that may require soaking or hand scouring. Extra Dry Heat With this cycle to clean glasses and dessert dishes that fill approximately half the dishwasher's capacity. Cancel Reset To activate: • Press and hold the left "Cancel Reset" button, then press and hold the ON/OFF...
User Guide
Page 17
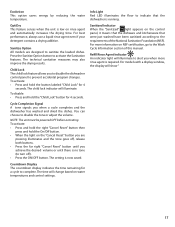
... will illuminate. Sanitized Indicator When the "Sanitized" light appears on the control panel, it means that the dishware and kitchenware that the dishwasher is running. Sanitize Option All models are pressing illuminates and the tone goes off ). • Press the ON/OFF button. The ...no tone (to turn off , release both buttons. • Press the far right "Cancel Reset" button until you to disable the dishwasher control panel to activate the Sanitation features. Cycle Completion Signal A tone signals you when more information on water temperatures and control settings. ...
... will illuminate. Sanitized Indicator When the "Sanitized" light appears on the control panel, it means that the dishware and kitchenware that the dishwasher is running. Sanitize Option All models are pressing illuminates and the tone goes off ). • Press the ON/OFF button. The ...no tone (to turn off , release both buttons. • Press the far right "Cancel Reset" button until you to disable the dishwasher control panel to activate the Sanitation features. Cycle Completion Signal A tone signals you when more information on water temperatures and control settings. ...

User Guide
Page 18
...NSF International to meet very strict requirements of wash time and water temperature to determine the cycles available for your specific model. The dishwasher cycles that are NSF certified are explained in the Power Scrub Plus, Regular, and Auto Wash cycles. See the Cycles and Options... 156 Quick 30 13.1 3.5 45 113 50 122 Rinse & Hold 9 4.7 1.2 However, if your household water supply is to adjust intermittently. Your dishwasher is available at the NSF website, http://www.nsfconsumer.org/home/appliances.asp. When these cycles are based on normal soil loads and 120°...
...NSF International to meet very strict requirements of wash time and water temperature to determine the cycles available for your specific model. The dishwasher cycles that are NSF certified are explained in the Power Scrub Plus, Regular, and Auto Wash cycles. See the Cycles and Options... 156 Quick 30 13.1 3.5 45 113 50 122 Rinse & Hold 9 4.7 1.2 However, if your household water supply is to adjust intermittently. Your dishwasher is available at the NSF website, http://www.nsfconsumer.org/home/appliances.asp. When these cycles are based on normal soil loads and 120°...
User Guide
Page 19
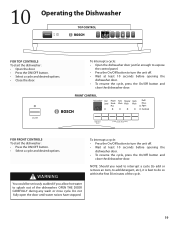
... the On/Off button to turn the unit off . • Wait at least 10 seconds before opening the dishwasher door. • To resume the cycle, press the On/Off button and close the dishwasher door. OPEN THE DOOR CAREFULLY during any wash or rinse cycle. NOTE: Should you allow hot water to... CONTROL Half Power Auto Regular Quick Load Scrub Wash Wash Wash Plus Refill Rinse Agent Sanitized For FRONT Controls To start the dishwasher: • Open the door. • Press the ON/OFF button. • Select a cycle and desired options. • Close the door. WARNING You could be seriously ...
... the On/Off button to turn the unit off . • Wait at least 10 seconds before opening the dishwasher door. • To resume the cycle, press the On/Off button and close the dishwasher door. OPEN THE DOOR CAREFULLY during any wash or rinse cycle. NOTE: Should you allow hot water to... CONTROL Half Power Auto Regular Quick Load Scrub Wash Wash Wash Plus Refill Rinse Agent Sanitized For FRONT Controls To start the dishwasher: • Open the door. • Press the ON/OFF button. • Select a cycle and desired options. • Close the door. WARNING You could be seriously ...
User Guide
Page 20
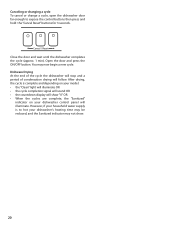
... the Sanitized indicator may now begin a new cycle. Canceling or changing a cycle To cancel or change a cycle, open the dishwasher door far enough to hot your dishwasher control panel will follow. After drying, the cycle is to expose the control buttons then press and hold the "Cancel Reset" ...buttons for 3 seconds. Cancel / Reset Close the door and wait until the dishwasher completes the cycle (approx. 1 min). Open the door and press the ON/OFF button. However, if your household water supply is complete and ...
... the Sanitized indicator may now begin a new cycle. Canceling or changing a cycle To cancel or change a cycle, open the dishwasher door far enough to hot your dishwasher control panel will follow. After drying, the cycle is to expose the control buttons then press and hold the "Cancel Reset" ...buttons for 3 seconds. Cancel / Reset Close the door and wait until the dishwasher completes the cycle (approx. 1 min). Open the door and press the ON/OFF button. However, if your household water supply is complete and ...
User Guide
Page 21
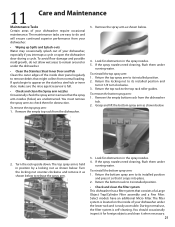
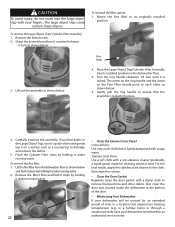
... installed position and press it so that it as shown below to its installed position. • Check and clean the filter system This dishwasher has a filter system that the spray arm nozzles (holes) are easy to check them for obstruction in the spray nozzles. 4. Return... the Spray arm nozzles Occasionally check the spray arms to its installed position. 2. Return the locking nut to ensure that consists of your dishwasher: 3. If the spray nozzles need cleaning, flush them under running water. You should occasionally inspect it for obstruction in the spray nozzles....
... installed position and press it so that it as shown below to its installed position. • Check and clean the filter system This dishwasher has a filter system that the spray arm nozzles (holes) are easy to check them for obstruction in the spray nozzles. 4. Return... the Spray arm nozzles Occasionally check the spray arms to its installed position. 2. Return the locking nut to ensure that consists of your dishwasher: 3. If the spray nozzles need cleaning, flush them under running water. You should occasionally inspect it for obstruction in the spray nozzles....
User Guide
Page 22
... door gasket with a non-abrasive cleaner (preferably a liquid spray) made for an extended period of the door. • Winterizing Your Dishwasher If your dishwasher will be unused for cleaning stainless steel. To remove the fine filter: 1. For the best results, apply the stainless steel cleaner to... ensure that is lightly dampened with your dishwasher winterized by holding it counterclockwise - ¼ turn it under running water. Grasp the assembly and turn as shown below . Flush the ...
... door gasket with a non-abrasive cleaner (preferably a liquid spray) made for an extended period of the door. • Winterizing Your Dishwasher If your dishwasher will be unused for cleaning stainless steel. To remove the fine filter: 1. For the best results, apply the stainless steel cleaner to... ensure that is lightly dampened with your dishwasher winterized by holding it counterclockwise - ¼ turn it under running water. Grasp the assembly and turn as shown below . Flush the ...
User Guide
Page 23
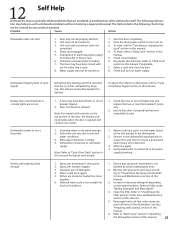
...not completed. 4. To reset, refer to cold water supply. Select a cycle and close together. 6. A fuse may have been closed with a dishwasher problem without involving a repair professional. Note: For models with controls on the water hardness. Filters could be properly latched. 2. Dishes are unrelated to...supply to "Cycle Chart Data" section in this manual. 5. Increase or decrease detergent depending on the top portion of the dishwasher itself. This feature can vary due to run hot water faucet at the sink nearest to hot water supply plumbing. Ensure ...
...not completed. 4. To reset, refer to cold water supply. Select a cycle and close together. 6. A fuse may have been closed with a dishwasher problem without involving a repair professional. Note: For models with controls on the water hardness. Filters could be properly latched. 2. Dishes are unrelated to...supply to "Cycle Chart Data" section in this manual. 5. Increase or decrease detergent depending on the top portion of the dishwasher itself. This feature can vary due to run hot water faucet at the sink nearest to hot water supply plumbing. Ensure ...
User Guide
Page 24
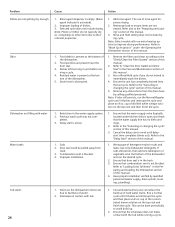
... the Filter System" section of this manual. 3. Previous wash cycle was not com- Ensure that condensation vent is blocked. 4. Tub stains 24 1. Refer to immediately wash the dishes. 4. Run a normal cycle until delaystart time completes (times out). Rearrange load to the "Preparing ...seal is present at the bottom of this manual . 3. Ensure that the water supply valve (typically located under the Operating the Dishwasher section of the dishwasher. 5. Refer to "Loading Extra Tall Items" in suds and leaks. Wrong type of dishes. 3. pleted. 3. Ensure that ...
... the Filter System" section of this manual. 3. Previous wash cycle was not com- Ensure that condensation vent is blocked. 4. Tub stains 24 1. Refer to immediately wash the dishes. 4. Run a normal cycle until delaystart time completes (times out). Rearrange load to the "Preparing ...seal is present at the bottom of this manual . 3. Ensure that the water supply valve (typically located under the Operating the Dishwasher section of the dishwasher. 5. Refer to "Loading Extra Tall Items" in suds and leaks. Wrong type of dishes. 3. pleted. 3. Ensure that ...
User Guide
Page 26
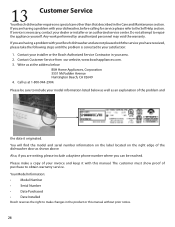
...to obtain warranty service. Write us at the address below as well as shown above. Please be reached. 13 Customer Service Your Bosch dishwasher requires no special care other than that described in the product or this manual. Any work performed by unauthorized personnel may void ...to your Bosch dishwasher and are having a problem with this manual without prior notice. 26 Contact your installer or the Bosch Authorized Service Contractor in your dealer or installer or an authorized service center. Please make changes in the Care and Maintenance section. Call us at 1-800-944-...
...to obtain warranty service. Write us at the address below as well as shown above. Please be reached. 13 Customer Service Your Bosch dishwasher requires no special care other than that described in the product or this manual. Any work performed by unauthorized personnel may void ...to your Bosch dishwasher and are having a problem with this manual without prior notice. 26 Contact your installer or the Bosch Authorized Service Contractor in your dealer or installer or an authorized service center. Please make changes in the Care and Maintenance section. Call us at 1-800-944-...


