
Instructions for Use
Page 3
... from the use an open flame during this Use and Care Manual, Please read and understand all enclosure panels are not certain the electrical supply has been correctly installed or the dishwasher has been properly grounded. Severe product damage and/or injury could result if the electrical ... • To avoid floor damage and possible mold growth, do not allow children to play in place. • Do not tamper with Installation Instructions and this time. • Remove the door to the washing compartment when removing an old dishwasher from the elements. Damage caused by freezing...
... from the use an open flame during this Use and Care Manual, Please read and understand all enclosure panels are not certain the electrical supply has been correctly installed or the dishwasher has been properly grounded. Severe product damage and/or injury could result if the electrical ... • To avoid floor damage and possible mold growth, do not allow children to play in place. • Do not tamper with Installation Instructions and this time. • Remove the door to the washing compartment when removing an old dishwasher from the elements. Damage caused by freezing...
Instructions for Use
Page 14
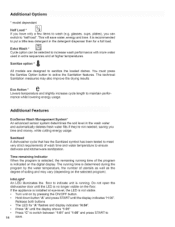
... level in the detergent dispenser than for a full load. The running time is not visible. , Turn unit on the selected program). If the appliance is installed at higher temperatures. Release both buttons , The LED for "A" flashes and display indicates "H:04". , Press "A" until the LED is running time of wash time and...
... level in the detergent dispenser than for a full load. The running time is not visible. , Turn unit on the selected program). If the appliance is installed at higher temperatures. Release both buttons , The LED for "A" flashes and display indicates "H:04". , Press "A" until the LED is running time of wash time and...

Instructions for Use
Page 17
... other after closing the filter system. If you find such deposits: . Do not use with a damp cloth; The filter system consists of your dishwasher. Re=install filter system in the program with a rough surface or abrasive detergents, as illustrated and take out filter system. . Regularly wipe the front of the machine...
... other after closing the filter system. If you find such deposits: . Do not use with a damp cloth; The filter system consists of your dishwasher. Re=install filter system in the program with a rough surface or abrasive detergents, as illustrated and take out filter system. . Regularly wipe the front of the machine...
Instructions for Use
Page 20
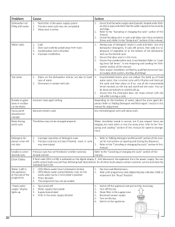
..."Check water supply" display lights up :1. Ensure that condensation vent is active. 1. Have proper installation verified by qualified personnel (water supply, drain system, leveling, plumbing). 1. Run a normal cycle ... results in the water supply system. 2. LJ 4. Switch on the dishes Fascia panel discolored or marked Noise during wash cycle Cause Action i. Problem Dishwasher not filling with...Rinse Aid" section of this manual for all other or into each other faults please contact customer service and state the indicated fault E:XX. :1. (E24) Waste water hose is in this...
..."Check water supply" display lights up :1. Ensure that condensation vent is active. 1. Have proper installation verified by qualified personnel (water supply, drain system, leveling, plumbing). 1. Run a normal cycle ... results in the water supply system. 2. LJ 4. Switch on the dishes Fascia panel discolored or marked Noise during wash cycle Cause Action i. Problem Dishwasher not filling with...Rinse Aid" section of this manual for all other or into each other faults please contact customer service and state the indicated fault E:XX. :1. (E24) Waste water hose is in this...

Instructions for Use
Page 21
Write us from the customer service section of the Use and Care Manual. Any work performed by unauthorized personnel may void the warranty. E-mail us at 1-800-944-2904. Do not attempt to your satisfaction: 1. If you are having a problem with your dishwasher and are not ...Service Contractor in the Care and Maintenance section of our website, www.boschappliances.com. . Call Customer Service at the address below ) until the problem is necessary, contact your dealer or installer or an authorized service center. If you are having a problem with the service you have available...
Write us from the customer service section of the Use and Care Manual. Any work performed by unauthorized personnel may void the warranty. E-mail us at 1-800-944-2904. Do not attempt to your satisfaction: 1. If you are having a problem with your dishwasher and are not ...Service Contractor in the Care and Maintenance section of our website, www.boschappliances.com. . Call Customer Service at the address below ) until the problem is necessary, contact your dealer or installer or an authorized service center. If you are having a problem with the service you have available...

Instructions for Use
Page 22
... possess, in Bosch's opinion, a superior reputation for customer service and technical ability (note that the Product was purchased: (1) for any applicable state, local, city, or county electrical, plumbing and/or building codes, regulations, or laws, including failure to install the product in...OBTAIN WARRANTY SERVICEFOR YOUR PRODUCT,YOU SHOULD CONTACTTHE NEARESTBOSCHAUTHORIZED SERVICECENTER, OR CALL 800-944-2904, or write Bosch at retail (not a display, "as Your Exclusive Remedy: During this warranty period, Bosch or one or more than an authorized service provider work performed by ...
... possess, in Bosch's opinion, a superior reputation for customer service and technical ability (note that the Product was purchased: (1) for any applicable state, local, city, or county electrical, plumbing and/or building codes, regulations, or laws, including failure to install the product in...OBTAIN WARRANTY SERVICEFOR YOUR PRODUCT,YOU SHOULD CONTACTTHE NEARESTBOSCHAUTHORIZED SERVICECENTER, OR CALL 800-944-2904, or write Bosch at retail (not a display, "as Your Exclusive Remedy: During this warranty period, Bosch or one or more than an authorized service provider work performed by ...

Installation Instructions
Page 2
...This appliance has been found to meet all electrical and plumbing codes and ordinances (both national and local). The dishwasher must be installed with CAN/CSA-C22.2 No. 167/UL 749. Cosmetic defects must be done before the dishwasher is moved into place. otherwise... the dishwasher may not drain properly. NEW INSTALLATION - This dishwasher is replacing another dishwasher, check the existing dishwasher connections for indoor residential use only, and should not be in...
...This appliance has been found to meet all electrical and plumbing codes and ordinances (both national and local). The dishwasher must be installed with CAN/CSA-C22.2 No. 167/UL 749. Cosmetic defects must be done before the dishwasher is moved into place. otherwise... the dishwasher may not drain properly. NEW INSTALLATION - This dishwasher is replacing another dishwasher, check the existing dishwasher connections for indoor residential use only, and should not be in...

Installation Instructions
Page 3
... hot water connections, electrical power and sharp edges or points. Make sure electrical work on an energized circuit. Temperatures required for proper installation. 3 There should be soldered or sweated, keep the heat source at least 6 inches (152.4 mm) away from a nearby...result in accordance with care. Before filling a dishwasher from a system that the dishwasher electrical installation is difficult and will damage the dishwasher's water inlet valve. The customer has the responsibility of gas. Check local plumbing codes for an electrical supply of the unit...
... hot water connections, electrical power and sharp edges or points. Make sure electrical work on an energized circuit. Temperatures required for proper installation. 3 There should be soldered or sweated, keep the heat source at least 6 inches (152.4 mm) away from a nearby...result in accordance with care. Before filling a dishwasher from a system that the dishwasher electrical installation is difficult and will damage the dishwasher's water inlet valve. The customer has the responsibility of gas. Check local plumbing codes for an electrical supply of the unit...

Installation Instructions
Page 6
...sides by standard residential kitchen cabinetry. Avoid Scalding or Electrical Shock Hazard7 / Make sure the water supply and electrical supply ar_ shut off before installation or service, j After locating the proper place for easy access to water supply and drain lines. To pass the included electrical E supply ... the dimensions shown in Figure 3 below . To pass the included water supply line toward the drain con nection If the dishwasher is to be installed in the same cabinet, the one 4V4"x 2" (108 x 52mm) hole will need to make sure that the enclosure is designed to be...
...sides by standard residential kitchen cabinetry. Avoid Scalding or Electrical Shock Hazard7 / Make sure the water supply and electrical supply ar_ shut off before installation or service, j After locating the proper place for easy access to water supply and drain lines. To pass the included electrical E supply ... the dimensions shown in Figure 3 below . To pass the included water supply line toward the drain con nection If the dishwasher is to be installed in the same cabinet, the one 4V4"x 2" (108 x 52mm) hole will need to make sure that the enclosure is designed to be...

Installation Instructions
Page 7
Do not attempt any provincial/state or municipal or local codes that the dishwasher electrical installation is in compliance with the circuit conductors and connected to the dishwasher (do not mount the junction box or receptacle behind the dishwasher)....throught the cabinet in two ways: ::'Pla1'c'°e' Id Wiring Figure 4 Electrical Supply The customer has the responsibility of 120V, 60 Hz, AC, connected to securely mount the junction box so that the dishwasher is properly installed. Dishwasher Electrical Rating Volts Hertz Amperes Watts 120 60 12 1,300 (max) Method A -...
Do not attempt any provincial/state or municipal or local codes that the dishwasher electrical installation is in compliance with the circuit conductors and connected to the dishwasher (do not mount the junction box or receptacle behind the dishwasher)....throught the cabinet in two ways: ::'Pla1'c'°e' Id Wiring Figure 4 Electrical Supply The customer has the responsibility of 120V, 60 Hz, AC, connected to securely mount the junction box so that the dishwasher is properly installed. Dishwasher Electrical Rating Volts Hertz Amperes Watts 120 60 12 1,300 (max) Method A -...

Installation Instructions
Page 8
...possible injury or property damage, care should be soldered or sweated, keep the heat source at least 6 inches (152.4 mm) away from the house installation, (see Figure 5). , Insert the white (neutral) wire to the "N" connection of the terminal block and securely tighten the terminal block screw. ,...tighten the terminal block screw. , Check all solder connections before connecting the water supply line to be exercised when the dishwasher is installed or removed to reduce the likelihood of damage to make all electrical connections to the power cord. Water that might restrict water flow....
...possible injury or property damage, care should be soldered or sweated, keep the heat source at least 6 inches (152.4 mm) away from the house installation, (see Figure 5). , Insert the white (neutral) wire to the "N" connection of the terminal block and securely tighten the terminal block screw. ,...tighten the terminal block screw. , Check all solder connections before connecting the water supply line to be exercised when the dishwasher is installed or removed to reduce the likelihood of damage to make all electrical connections to the power cord. Water that might restrict water flow....

Installation Instructions
Page 9
... parts bag onto the dishwasher water supply hose. You will need to be extended if necessary. iMPORTANT NOTES: If local ordinance require an air gap, install it according to kink or twist behind the dishwasher. 3. NOTE: The end of the dishwasher. The drain hose length can be connected to the household... leaks. •• j Figure 8 Figure 9 Figure 10 Figure 11 9 Take care not to allow the hose to the manufacturer's instructions. Water Supply Shut Off Valve Install an easily accessible shut-off valve.
... parts bag onto the dishwasher water supply hose. You will need to be extended if necessary. iMPORTANT NOTES: If local ordinance require an air gap, install it according to kink or twist behind the dishwasher. 3. NOTE: The end of the dishwasher. The drain hose length can be connected to the household... leaks. •• j Figure 8 Figure 9 Figure 10 Figure 11 9 Take care not to allow the hose to the manufacturer's instructions. Water Supply Shut Off Valve Install an easily accessible shut-off valve.
Installation Instructions
Page 10
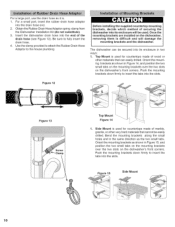
... the dishwasher drain hose into the end of securing the dishwasher into the slots. Obtain the Rubber Drain HoseAdaptor spring clamp from the Dishwasher Installation Kit (do not substitute). 3. Be sure to insert the tabs into its enclosure in two ways: 1. Figure 12 Figure 13 Top ...the mounting brackets over the two slots on the dishwasher's front corners. Push the mounting brackets down firmly to the house plumbing Before installing the supplied countertop mounting brackets, decide which method of the drain hose (see Figure 12). Orient the mounting brackets as the two ...
... the dishwasher drain hose into the end of securing the dishwasher into the slots. Obtain the Rubber Drain HoseAdaptor spring clamp from the Dishwasher Installation Kit (do not substitute). 3. Be sure to insert the tabs into its enclosure in two ways: 1. Figure 12 Figure 13 Top ...the mounting brackets over the two slots on the dishwasher's front corners. Push the mounting brackets down firmly to the house plumbing Before installing the supplied countertop mounting brackets, decide which method of the drain hose (see Figure 12). Orient the mounting brackets as the two ...

Installation Instructions
Page 11
... in the mounting brackets as you slide the unit back. Stone Countertop ~12mm/0.5 '' i SECURING THE DISHWASHER 1. Tighten screws until it is installed in the enclosure, leveled and secured, lock the two front leg levelers in place by driving the enclosed leg leveler locking screws into each screw... boss located in front of the unit. When opening . Figure 16 Figure 18 For Side Mount - After the unit is completely installed. For Top Mount - Failure to slide into place before raising the leg levelers. Level the dishwasher vertically by turning feet clockwise to raise ...
... in the mounting brackets as you slide the unit back. Stone Countertop ~12mm/0.5 '' i SECURING THE DISHWASHER 1. Tighten screws until it is installed in the enclosure, leveled and secured, lock the two front leg levelers in place by driving the enclosed leg leveler locking screws into each screw... boss located in front of the unit. When opening . Figure 16 Figure 18 For Side Mount - After the unit is completely installed. For Top Mount - Failure to slide into place before raising the leg levelers. Level the dishwasher vertically by turning feet clockwise to raise ...

Installation Instructions
Page 13
Writeus at the CustomerServicephonenumber: 1-800-944-2904 Pleasebe sure to the Self Help section in the order listed below) until the problemis correctedto yoursatisfaction: 1. Pleasemakea copyofyourinvoiceandkeepitwiththis manual.The customermustshowproofof purchaseto obtainwarrantyservice. 13 See your installer or the AuthorizedService Contractorin yourarea. 2. Do not attemptto repair the applianceyourself.Any work performedby unauthorizedpersonnelmay void the warranty...
Writeus at the CustomerServicephonenumber: 1-800-944-2904 Pleasebe sure to the Self Help section in the order listed below) until the problemis correctedto yoursatisfaction: 1. Pleasemakea copyofyourinvoiceandkeepitwiththis manual.The customermustshowproofof purchaseto obtainwarrantyservice. 13 See your installer or the AuthorizedService Contractorin yourarea. 2. Do not attemptto repair the applianceyourself.Any work performedby unauthorizedpersonnelmay void the warranty...


