Instructions for Use
Page 3
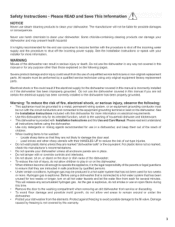
... been improperly grounded. See the Installation Instructions or speak with the circuit conductors and connected to the equipment grounding terminal or lead on all enclosure panels are in this manual is connected to reduce the risk of unqualified service technicians or non-original replacement parts. For plastic items not so marked...
... been improperly grounded. See the Installation Instructions or speak with the circuit conductors and connected to the equipment grounding terminal or lead on all enclosure panels are in this manual is connected to reduce the risk of unqualified service technicians or non-original replacement parts. For plastic items not so marked...
Instructions for Use
Page 20
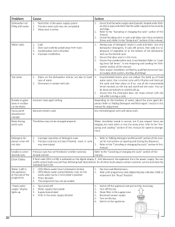
...6. Reconnect power supply. 5. Refer to the "Canceling or changing the cycle" section of this manual for all other or into each other faults please contact customer service and state the indicated fault E:XX. :1. (E24) Waste water hose is blocked or kinked. 2. (E25) Waste water pump blocked, cover on... the waste water pump is left in position 3. Suds 2. Stains on the dishes Fascia panel discolored or marked Noise during wash cycle Cause Action i. Refer to the "Canceling or changing the cycle" section of the dishwasher and run the ...
...6. Reconnect power supply. 5. Refer to the "Canceling or changing the cycle" section of this manual for all other or into each other faults please contact customer service and state the indicated fault E:XX. :1. (E24) Waste water hose is blocked or kinked. 2. (E25) Waste water pump blocked, cover on... the waste water pump is left in position 3. Suds 2. Stains on the dishes Fascia panel discolored or marked Noise during wash cycle Cause Action i. Refer to the "Canceling or changing the cycle" section of the dishwasher and run the ...
Installation Instructions
Page 5
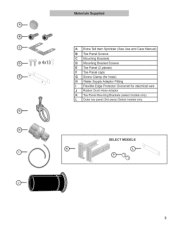
_ I_:_:i A Extra Tall Item Sprinkler (See Use and Care Manual) B Toe Panel Screws C Mounting Brackets D Mounting Bracket Screws E Toe Panel (2 pieces) F Toe Panel caps G Screw Clamp (for hose) H Water Supply Adaptor Fitting I Flexible Edge Protector Grommet for electrical wire J Rubber Drain Hose Adaptor K Toe Panel Mounting Brackets (select models only) L Outer toe panel (3rd piece) Select models only. SELECT MODELS H JHH_ 0 5
_ I_:_:i A Extra Tall Item Sprinkler (See Use and Care Manual) B Toe Panel Screws C Mounting Brackets D Mounting Bracket Screws E Toe Panel (2 pieces) F Toe Panel caps G Screw Clamp (for hose) H Water Supply Adaptor Fitting I Flexible Edge Protector Grommet for electrical wire J Rubber Drain Hose Adaptor K Toe Panel Mounting Brackets (select models only) L Outer toe panel (3rd piece) Select models only. SELECT MODELS H JHH_ 0 5

Installation Instructions
Page 12
...should remain behind the outer toe panel. See Figure 19. 4. Attach the outer toe panel (L) onto the brackets and drive the screws provided in the toe panel to secure the toe panel. Re-insert the brackets. 6. This ensures that the toe panel wont slide in further than you... S % % % A % Figure 20 12 NOTE: Once you need. 5. For models with a three-piece toe panel(select models) to avoid damaging the dishwasher. Your dishwasher comes with outer toe panel (3rd piece) slide the brackets (A) provided, into the slots of the dishwasher. 3. Use the supplied screws to allow ...
...should remain behind the outer toe panel. See Figure 19. 4. Attach the outer toe panel (L) onto the brackets and drive the screws provided in the toe panel to secure the toe panel. Re-insert the brackets. 6. This ensures that the toe panel wont slide in further than you... S % % % A % Figure 20 12 NOTE: Once you need. 5. For models with a three-piece toe panel(select models) to avoid damaging the dishwasher. Your dishwasher comes with outer toe panel (3rd piece) slide the brackets (A) provided, into the slots of the dishwasher. 3. Use the supplied screws to allow ...


