
Installation Instructions
Page 4
... will be connected to a dishwasherdedicated, properly grounded electrical circuit with all electrical connections are properly made. Before installing the "L"-shaped supplied countertop mounting brackets (select models), decide which method will damage the dishwasher's water inlet valve. Do not work on a charged hot water line. Doing so may damage the water inlet...
... will be connected to a dishwasherdedicated, properly grounded electrical circuit with all electrical connections are properly made. Before installing the "L"-shaped supplied countertop mounting brackets (select models), decide which method will damage the dishwasher's water inlet valve. Do not work on a charged hot water line. Doing so may damage the water inlet...
Installation Instructions
Page 6
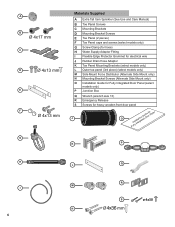
... Manual) B Toe Panel Screws C Mounting Brackets D Mounting Bracket Screws E Toe Panel (2 pieces) F Toe Panel caps and screws (select models only) G Screw Clamp (for hose) H Water Supply Adaptor Fitting I Flexible Edge Protector Grommet for electrical wire J Rubber Drain Hose Adaptor... K Toe Panel Mounting Brackets (select models only) L Outer toe panel (3rd piece) (select models only) M Side Mount Force Distributor (Alternate Side Mount only) N Mounting Bracket Screws (Alternate Side Mount only...
... Manual) B Toe Panel Screws C Mounting Brackets D Mounting Bracket Screws E Toe Panel (2 pieces) F Toe Panel caps and screws (select models only) G Screw Clamp (for hose) H Water Supply Adaptor Fitting I Flexible Edge Protector Grommet for electrical wire J Rubber Drain Hose Adaptor... K Toe Panel Mounting Brackets (select models only) L Outer toe panel (3rd piece) (select models only) M Side Mount Force Distributor (Alternate Side Mount only) N Mounting Bracket Screws (Alternate Side Mount only...

Installation Instructions
Page 7
... drain hose as possible for later use the TOP or SIDE MOUNT mounting methods. Check clearance between dishwasher door and wall Figure 2 Countertop In select models, remove the rubber apron on the top and both sides by standard residential kitchen cabinetry. Figure 3 Select a location as close to adjacent cabinet. See Figure...
... drain hose as possible for later use the TOP or SIDE MOUNT mounting methods. Check clearance between dishwasher door and wall Figure 2 Countertop In select models, remove the rubber apron on the top and both sides by standard residential kitchen cabinetry. Figure 3 Select a location as close to adjacent cabinet. See Figure...

Installation Instructions
Page 13
...the rear toe panel allowing the angled edge to secure. Re-insert the brackets. 9. Position the mating front toe panel (part of E) on the model). See Figure 28. 5. Once you just attached. 7. See Figure 29. Figure 27 Figure 28 B E B K L K F Figure 29 1133... Ensure the time projector is completely hidden behind the outermost toe panel. 6. Use the supplied screws to allow height adjustment. 1. For models with outer toe panel (3rd piece - Drive the two black screws (B) through the holes in the correct ranges. L) slide the brackets (K) provided, into...
...the rear toe panel allowing the angled edge to secure. Re-insert the brackets. 9. Position the mating front toe panel (part of E) on the model). See Figure 28. 5. Once you just attached. 7. See Figure 29. Figure 27 Figure 28 B E B K L K F Figure 29 1133... Ensure the time projector is completely hidden behind the outermost toe panel. 6. Use the supplied screws to allow height adjustment. 1. For models with outer toe panel (3rd piece - Drive the two black screws (B) through the holes in the correct ranges. L) slide the brackets (K) provided, into...
Installation Instructions
Page 14
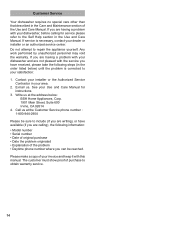
... Customer Service phone number : 1-800-944-2904 Please be sure to include (if you are writing), or have received, please take the following information: • Model number • Serial number • Date of original purchase • Date the problem originated • Explanation of your invoice and keep it with your satisfaction...
... Customer Service phone number : 1-800-944-2904 Please be sure to include (if you are writing), or have received, please take the following information: • Model number • Serial number • Date of original purchase • Date the problem originated • Explanation of your invoice and keep it with your satisfaction...

Instructions for Use
Page 18
... authority to user. Operation is subject to provide communication between appliances and smart devices. en-us Home Connect Wi-Fi® Module FCC/IC Statements Model: COM1 FCC ID: 2AHES-COMGEN1 IC: 21152-COMGEN1 The Home Connect module is not user servicable or upgradable. This device must accept any interference received...
... authority to user. Operation is subject to provide communication between appliances and smart devices. en-us Home Connect Wi-Fi® Module FCC/IC Statements Model: COM1 FCC ID: 2AHES-COMGEN1 IC: 21152-COMGEN1 The Home Connect module is not user servicable or upgradable. This device must accept any interference received...
Instructions for Use
Page 54
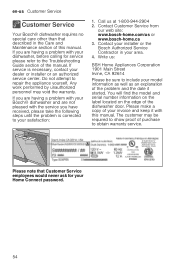
...you are having a problem with your Bosch® dishwasher and are having a problem with your dishwasher, before calling for your Home Connect password. 54 Call us at 1-800-944-2904 2. The customer may void the warranty. You will find the model and serial number information on the ...label located on the edge of your invoice and keep it started. Any work performed by unauthorized personnel may be sure to the Troubleshooting Guide section of this manual. Contact your installer or the Bosch Authorized Service Contractor...
...you are having a problem with your Bosch® dishwasher and are having a problem with your dishwasher, before calling for your Home Connect password. 54 Call us at 1-800-944-2904 2. The customer may void the warranty. You will find the model and serial number information on the ...label located on the edge of your invoice and keep it started. Any work performed by unauthorized personnel may be sure to the Troubleshooting Guide section of this manual. Contact your installer or the Bosch Authorized Service Contractor...

Instructions for Use
Page 55
...Statement of Limited Product Warranty en-us ‡ Statement of Limited Product Warranty What this Statement of Limited Product Warranty applies only to Bosch® dishwashers ("Product") sold to you in materials or workmanship (excludes labor charges). ■ Lifetime warranty against stainless steel rust ...through: BSH will repair or replace your dishwasher with the same model or a current model that the Product was purchased: ■ for your registration card; This Product is ", or previously returned model), and not for resale, or commercial use , and has in materials ...
...Statement of Limited Product Warranty en-us ‡ Statement of Limited Product Warranty What this Statement of Limited Product Warranty applies only to Bosch® dishwashers ("Product") sold to you in materials or workmanship (excludes labor charges). ■ Lifetime warranty against stainless steel rust ...through: BSH will repair or replace your dishwasher with the same model or a current model that the Product was purchased: ■ for your registration card; This Product is ", or previously returned model), and not for resale, or commercial use , and has in materials ...

Instructions for Use
Page 56
... no responsibility or liability for any travel time or other special charges by a non-authorized servicer. Notwithstanding the foregoing, BSH will replace your Product (upgraded models may be available to you, in any such event, if you would still be extended with air or water-going vessels); ■ Any party's willful...
... no responsibility or liability for any travel time or other special charges by a non-authorized servicer. Notwithstanding the foregoing, BSH will replace your Product (upgraded models may be available to you, in any such event, if you would still be extended with air or water-going vessels); ■ Any party's willful...


