

Installation Instructions
Page 3
... a fuse or breaker rated for approved plumbing procedures and accessories. Avoiding Electrical Shock/Fire Hazards Do not allow the electrical and water supply lines to secure the dishwasher into its opening the door on the appliance. Do not attempt any work on the dishwasher electric supply circuit until you are properly...
... a fuse or breaker rated for approved plumbing procedures and accessories. Avoiding Electrical Shock/Fire Hazards Do not allow the electrical and water supply lines to secure the dishwasher into its opening the door on the appliance. Do not attempt any work on the dishwasher electric supply circuit until you are properly...

Installation Instructions
Page 7
... Canada as well as national and local codes. 7 Three prong plug and receptacle Use the included three-prong plug and junction box to connect to securely mount the junction box so that the dishwasher electrical installation is made . The electrical supply can be mounted in an accessible cabinet adjacent to pass...
... Canada as well as national and local codes. 7 Three prong plug and receptacle Use the included three-prong plug and junction box to connect to securely mount the junction box so that the dishwasher electrical installation is made . The electrical supply can be mounted in an accessible cabinet adjacent to pass...

Installation Instructions
Page 8
...the power cord. Check all solder connections before the water line is installed or removed to reduce the likelihood of the terminal block and securely tighten the terminal block screw (see Figure 7). 4. WARNING Avoid Scald Hazard Do not perform any work on the dishwasher hot water supply... supply and check for soldering and sweating will increase run times. Do not attempt any work . Temperatures required for leaks after connections are secure and then attach the junction box cover with the 4 screws. All solder connections must be sure to make all electrical connections to make...
...the power cord. Check all solder connections before the water line is installed or removed to reduce the likelihood of the terminal block and securely tighten the terminal block screw (see Figure 7). 4. WARNING Avoid Scald Hazard Do not perform any work on the dishwasher hot water supply... supply and check for soldering and sweating will increase run times. Do not attempt any work . Temperatures required for leaks after connections are secure and then attach the junction box cover with the 4 screws. All solder connections must be sure to make all electrical connections to make...

Installation Instructions
Page 9
... supply line with the brass itting on the hot water and check for this connection. After all connections are two plastic corrugated hoses that is securely attached 20″ (508mm) above the cabinet loor. · The drain hose length can be connected to lay the end on the cabinet loor as...
... supply line with the brass itting on the hot water and check for this connection. After all connections are two plastic corrugated hoses that is securely attached 20″ (508mm) above the cabinet loor. · The drain hose length can be connected to lay the end on the cabinet loor as...

Installation Instructions
Page 10
...Figure 16 Side Mount is difficult and will be used for countertops made of marble, granite, or other materials that cannot be secured into the slots. Bend perforated edge down as the two small tabs. C G Installation of Mounting Brackets Side Mount Figure 18...your dishwasher opening 235/8″ (600mm). Figure 15 J Top Mount is . 1. Before installing the supplied countertop mounting brackets, decide which method of securing the dishwasher into the slots. Installation of Rubber Drain Hose Adaptor For a large port, use the ALTERNATE SIDE MOUNT mounting method. 10 M M ...
...Figure 16 Side Mount is difficult and will be used for countertops made of marble, granite, or other materials that cannot be secured into the slots. Bend perforated edge down as the two small tabs. C G Installation of Mounting Brackets Side Mount Figure 18...your dishwasher opening 235/8″ (600mm). Figure 15 J Top Mount is . 1. Before installing the supplied countertop mounting brackets, decide which method of securing the dishwasher into the slots. Installation of Rubber Drain Hose Adaptor For a large port, use the ALTERNATE SIDE MOUNT mounting method. 10 M M ...

Installation Instructions
Page 11
...Failure to your cabinet or countertop as shown in serious injury. LEVELING THE DISHWASHER The unit should now be ready to slide into place before securing it is completely installed. Figure 23 For Top Mount - Wooden 1/16″ (2mm) D Figure 24 For Side Mount - Make sure ...Figure 21 D ~1/2″ (12mm) Figure 25 For Alternate Side Mount 1/16″ (2mm) Figure 22 N 11 Stone Countertop 0 - 23/8″ (0-60mm) SECURING THE DISHWASHER Center the dishwasher in the opening . Make certain to lower front of the unit. To avoid scratching the loor, use the dishwasher until...
...Failure to your cabinet or countertop as shown in serious injury. LEVELING THE DISHWASHER The unit should now be ready to slide into place before securing it is completely installed. Figure 23 For Top Mount - Wooden 1/16″ (2mm) D Figure 24 For Side Mount - Make sure ...Figure 21 D ~1/2″ (12mm) Figure 25 For Alternate Side Mount 1/16″ (2mm) Figure 22 N 11 Stone Countertop 0 - 23/8″ (0-60mm) SECURING THE DISHWASHER Center the dishwasher in the opening . Make certain to lower front of the unit. To avoid scratching the loor, use the dishwasher until...

Installation Instructions
Page 12
... provided in further than you determine the correct position for the brackets, remove the bracket and bend the metal tab. Use the supplied screws to secure. For models with outer toe panel (3rd piece - Once you need. 7. Figure 26 B B K L K F Figure 27 12 12 L) slide the brackets (K) provided, into the slots... the dishwasher. 3. Re-insert the brackets. 8. Position the mating front toe panel on top of the rear toe panel allowing the angled edge to secure the toe panel ensuring that the toe panel will not slide in place to rest on the mating edge of the toe panel you just...
... provided in further than you determine the correct position for the brackets, remove the bracket and bend the metal tab. Use the supplied screws to secure. For models with outer toe panel (3rd piece - Once you need. 7. Figure 26 B B K L K F Figure 27 12 12 L) slide the brackets (K) provided, into the slots... the dishwasher. 3. Re-insert the brackets. 8. Position the mating front toe panel on top of the rear toe panel allowing the angled edge to secure the toe panel ensuring that the toe panel will not slide in place to rest on the mating edge of the toe panel you just...
Instructions for Use
Page 11
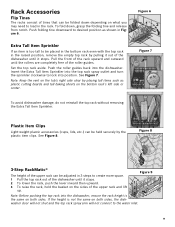
... what you may need to load in 3 steps to lock into position. Rack Accessories Flip Tines The racks consist of tines that can be held securely by the plastic item clips. To fold down depending on the bottom rack's left side or center.
... what you may need to load in 3 steps to lock into position. Rack Accessories Flip Tines The racks consist of tines that can be held securely by the plastic item clips. To fold down depending on the bottom rack's left side or center.