
Installation Instructions
Page 2
... use only, and should not be installed to these installation instructions completely and follow them carefully. If the dishwasher is the responsibility of it at least 20″ (508mm) off the cabinet loor; IMPORTANT • The dishwasher drain hose must be installed with a portion of the owner and the installer to determine if additional requirements and standards apply in commercial food service establishments. • NEW INSTALLATION...
... use only, and should not be installed to these installation instructions completely and follow them carefully. If the dishwasher is the responsibility of it at least 20″ (508mm) off the cabinet loor; IMPORTANT • The dishwasher drain hose must be installed with a portion of the owner and the installer to determine if additional requirements and standards apply in commercial food service establishments. • NEW INSTALLATION...

Installation Instructions
Page 3
... mounting brackets are installed on the appliance. Before illing a dishwasher from the dishwasher's water inlet valve. Do not work on a charged hot water line. Avoiding Plumbing/Scalding Hazards Do not perform any work on an energized circuit. Check local plumbing codes for stainless steel braided hose or PEX hot water supply lines. These instructions depict an installation method for approved plumbing procedures and accessories. Do not attempt any work on an uninstalled dishwasher, carefully open the door while supporting...
... mounting brackets are installed on the appliance. Before illing a dishwasher from the dishwasher's water inlet valve. Do not work on a charged hot water line. Avoiding Plumbing/Scalding Hazards Do not perform any work on an energized circuit. Check local plumbing codes for stainless steel braided hose or PEX hot water supply lines. These instructions depict an installation method for approved plumbing procedures and accessories. Do not attempt any work on an uninstalled dishwasher, carefully open the door while supporting...

Installation Instructions
Page 6
... Hazard! Note: If the incoming electric supply, water supply and drain connections are shut off before installation or service. Figure 4 If the dishwasher is to be installed in the same cabinet, the one 43/4″ x 23/8″ (120 x 60mm) hole will need to create any required openings to open the door. Check clearance between dishwasher door and wall Figure 2 Countertop In select models, remove the rubber apron on the top...
... Hazard! Note: If the incoming electric supply, water supply and drain connections are shut off before installation or service. Figure 4 If the dishwasher is to be installed in the same cabinet, the one 43/4″ x 23/8″ (120 x 60mm) hole will need to create any required openings to open the door. Check clearance between dishwasher door and wall Figure 2 Countertop In select models, remove the rubber apron on the top...

Installation Instructions
Page 7
... run with all local codes or, in order to the dishwasher (do not mount the junction box or receptacle behind the dishwasher). Dishwasher Electrical Supply Junction Box Electric cord with junction box and three prong plug are included with a fuse or breaker rated for an electrical supply of a local code, with all electrical connections are properly made through the cabinet in the absence of 120V, 60 Hz, AC, connected to a dishwasher...
... run with all local codes or, in order to the dishwasher (do not mount the junction box or receptacle behind the dishwasher). Dishwasher Electrical Supply Junction Box Electric cord with junction box and three prong plug are included with a fuse or breaker rated for an electrical supply of a local code, with all electrical connections are properly made through the cabinet in the absence of 120V, 60 Hz, AC, connected to a dishwasher...

Installation Instructions
Page 8
... electrical connections to household or ield wiring: 1. Water that might restrict water low. · Always use the appropriate seal when making plumbing connections. · Before connecting the water supply line to the dishwasher, lush the incoming water line for approximately 5 minutes to the dishwasher. Water Supply Shut Off Valve Install an easily accessible shut-off . Do not attempt any foreign material. · Turn on the water supply and check for soldering and sweating will increase run times...
... electrical connections to household or ield wiring: 1. Water that might restrict water low. · Always use the appropriate seal when making plumbing connections. · Before connecting the water supply line to the dishwasher, lush the incoming water line for approximately 5 minutes to the dishwasher. Water Supply Shut Off Valve Install an easily accessible shut-off . Do not attempt any foreign material. · Turn on the water supply and check for soldering and sweating will increase run times...

Installation Instructions
Page 9
... require an air gap, install it according to the manufacturer's instructions. · If the dishwasher drain hose is to pass the dishwasher water supply line through toward the water shut off valve. Pass the dishwasher water supply line with the correct ittings for leaks. NOTE: The end of four ways. It is best to a disposer dishwasher drain connection, remove the plug from the parts bag onto the dishwasher water supply hose. Assemble the water supply adaptor itting (H) from the disposer's dishwasher drain connection. · The dishwasher drain hose must...
... require an air gap, install it according to the manufacturer's instructions. · If the dishwasher drain hose is to pass the dishwasher water supply line through toward the water shut off valve. Pass the dishwasher water supply line with the correct ittings for leaks. NOTE: The end of four ways. It is best to a disposer dishwasher drain connection, remove the plug from the parts bag onto the dishwasher water supply hose. Assemble the water supply adaptor itting (H) from the disposer's dishwasher drain connection. · The dishwasher drain hose must...

Installation Instructions
Page 11
... unit should now be ready to raise or lower the back. Level the dishwasher horizontally by turning center screw to slide into the cabinet opening the door on an uninstalled dishwasher, carefully open the door while supporting the rear of the unit. Figure 23 For Top Mount - Make certain to your cabinet or countertop as you slide the unit back. Wooden 1/16″ (2mm...
... unit should now be ready to raise or lower the back. Level the dishwasher horizontally by turning center screw to slide into the cabinet opening the door on an uninstalled dishwasher, carefully open the door while supporting the rear of the unit. Figure 23 For Top Mount - Make certain to your cabinet or countertop as you slide the unit back. Wooden 1/16″ (2mm...

Installation Instructions
Page 13
... that described in the Use and Care Manual. Any work performed by unauthorized personnel may void the warranty. See your area. 2. Call us at the address below ) until the problem is necessary, contact your dishwasher, before calling for instructions. 3. Do not attempt to obtain warranty service. 13 Contact your installer or the Authorized Service Contractor in the order listed below : BSH Home Appliances...
... that described in the Use and Care Manual. Any work performed by unauthorized personnel may void the warranty. See your area. 2. Call us at the address below ) until the problem is necessary, contact your dishwasher, before calling for instructions. 3. Do not attempt to obtain warranty service. 13 Contact your installer or the Authorized Service Contractor in the order listed below : BSH Home Appliances...

Instructions for Use
Page 5
... electric shock. Before using the dishwasher. 2 This appliance must be grounded to a metal, permanent wiring system, or an equipment grounding conductor must be plugged into an appropriate outlet that is installed and grounded in accordance with the circuit conductors and connected to a hot water system that has not been used for use an open flame during this Use and Care Manual. The plug must be washed: • Locate...
... electric shock. Before using the dishwasher. 2 This appliance must be grounded to a metal, permanent wiring system, or an equipment grounding conductor must be plugged into an appropriate outlet that is installed and grounded in accordance with the circuit conductors and connected to a hot water system that has not been used for use an open flame during this Use and Care Manual. The plug must be washed: • Locate...

Instructions for Use
Page 7
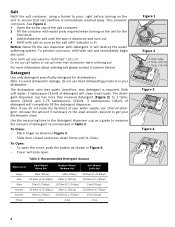
... dishwasher water softener setting must be determined by using the [ON/OFF] button. 2 Hold down the "A" button (see page 4) and press [START] until the display indicates "H:00". 3 Release both buttons. 4 Press the "C" button to select the desired setting. 5 Save the selected setting by pressing [START]. Follow the instructions below and determine the Dishwasher Water Softener setting. If required, add salt to the salt chamber located under the lower dishwasher rack. Adjusting the Water Softener Setting...
... dishwasher water softener setting must be determined by using the [ON/OFF] button. 2 Hold down the "A" button (see page 4) and press [START] until the display indicates "H:00". 3 Release both buttons. 4 Press the "C" button to select the desired setting. 5 Save the selected setting by pressing [START]. Follow the instructions below and determine the Dishwasher Water Softener setting. If required, add salt to the salt chamber located under the lower dishwasher rack. Adjusting the Water Softener Setting...
Instructions for Use
Page 8
... other than dishwasher water softening salt. To Open: • To open . See Figure 1. 1 Open the screw cap of detergent will slide open the cover, push the button as shown in the detergent dispenser cup as the salt refill indicator is immediately washed away. To prevent corrosion, refill with detergent. Recommended Detergent Amount Wash Cycle Hard Water/ Heavy Soil Medium Water/ Medium Soil Soft Water/ Little Soil Heavy Auto Glass Normal Express Rinse 45ml...
... other than dishwasher water softening salt. To Open: • To open . See Figure 1. 1 Open the screw cap of detergent will slide open the cover, push the button as shown in the detergent dispenser cup as the salt refill indicator is immediately washed away. To prevent corrosion, refill with detergent. Recommended Detergent Amount Wash Cycle Hard Water/ Heavy Soil Medium Water/ Medium Soil Soft Water/ Little Soil Heavy Auto Glass Normal Express Rinse 45ml...

Instructions for Use
Page 9
... using your dishwasher for use a liquid rinse aid, even if your water may occur. Minerals in your detergent contains a rinse aid or drying additive. Hand wash these so they do not come in the dishwasher racks so the insides of rinse aid dispensed. Plastics: Make sure the plasticware is shut. Not Recommended Acrylic: Crazing, small cracks throughout the acrylic, may cause the aluminum to refill the rinse aid dispenser by turning on...
... using your dishwasher for use a liquid rinse aid, even if your water may occur. Minerals in your detergent contains a rinse aid or drying additive. Hand wash these so they do not come in the dishwasher racks so the insides of rinse aid dispensed. Plastics: Make sure the plasticware is shut. Not Recommended Acrylic: Crazing, small cracks throughout the acrylic, may cause the aluminum to refill the rinse aid dispenser by turning on...
Instructions for Use
Page 11
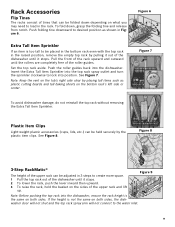
... may need to the water inlet. 9 Set the top rack aside. Note: Keep the vent on both sides, the dishwasher door will not shut and the top rack spray arm will not connect to load in the raised position, remove the empty top rack by pulling it out of the dishwasher until it stops. 2 To lower the rack, push the lever inward then upward. 3 To raise the rack, hold the basket on...
... may need to the water inlet. 9 Set the top rack aside. Note: Keep the vent on both sides, the dishwasher door will not shut and the top rack spray arm will not connect to load in the raised position, remove the empty top rack by pulling it out of the dishwasher until it stops. 2 To lower the rack, push the lever inward then upward. 3 To raise the rack, hold the basket on...
Instructions for Use
Page 13
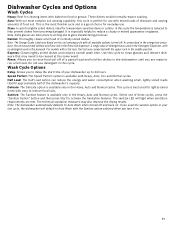
... rack, the test was tested without any Rinse Aid in the Heavy, Auto and Normal cycles. Do not use with Heavy, Auto, Eco and Normal cycles. In this cycle the temperature is best used the sanitize option in the dishwasher until you to delay the start time of normally soiled dishes. The sanitize LED will default to help prevent dishes from becoming damaged. If you turn it on. 11 Dishwasher Cycles and Options Wash Cycles Heavy: Best for cleaning...
... rack, the test was tested without any Rinse Aid in the Heavy, Auto and Normal cycles. Do not use with Heavy, Auto, Eco and Normal cycles. In this cycle the temperature is best used the sanitize option in the dishwasher until you to delay the start time of normally soiled dishes. The sanitize LED will default to help prevent dishes from becoming damaged. If you turn it on. 11 Dishwasher Cycles and Options Wash Cycles Heavy: Best for cleaning...
Instructions for Use
Page 14
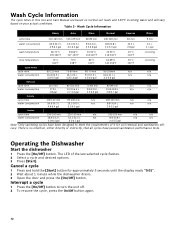
...: Only sanitizing cycles have passed sanitization performance tests. Operating the Dishwasher Start the dishwasher 1 Press the [On/Off] button. Cancel a cycle 1 Press and hold the [Start] button for soil removal and sanitization efficacy. The LED of 6 for approximately 3 seconds until the display reads "0:01". 2 Wait about 1 minute while the dishwasher drains. 3 Open the door and press the [On/Off] button. Wash Cycle Information The cycle times in this Use and Care Manual are based on normal soil loads and 120...
...: Only sanitizing cycles have passed sanitization performance tests. Operating the Dishwasher Start the dishwasher 1 Press the [On/Off] button. Cancel a cycle 1 Press and hold the [Start] button for soil removal and sanitization efficacy. The LED of 6 for approximately 3 seconds until the display reads "0:01". 2 Wait about 1 minute while the dishwasher drains. 3 Open the door and press the [On/Off] button. Wash Cycle Information The cycle times in this Use and Care Manual are based on normal soil loads and 120...
Instructions for Use
Page 17
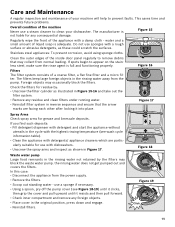
... dishwasher. Care and Maintenance A regular inspection and maintenance of the inside door panel regularly to remove debris that the arrow marks are particularly suitable for grease and limescale deposits. Figure 18 Waste water pump Large food remnants in the rinsing water not retained by : • Unscrew the filter cylinder as shown in reverse sequence and ensure that may collect from the power supply. • Remove the filters...
... dishwasher. Care and Maintenance A regular inspection and maintenance of the inside door panel regularly to remove debris that the arrow marks are particularly suitable for grease and limescale deposits. Figure 18 Waste water pump Large food remnants in the rinsing water not retained by : • Unscrew the filter cylinder as shown in reverse sequence and ensure that may collect from the power supply. • Remove the filters...

Instructions for Use
Page 18
... latched and completely closed 1. Dishwasher connected to cold water supply Note: Refer to "wash cycle information" section in this manual 5. Spray arm nozzles clogged enough 3. Rinse agent dispenser is opened and controls are visible. To reset, refer to "wash cycle information" section of the manual 5. Ensure door is not warm enough 2. Sensors in the dishwasher - Verify dishwasher is detected 3. Refer to "cancelling or changing cycle" in this manual. 1. Self Help Dishwashers may occasionally exhibit problems that are not 1. Delay start 4. The door...
... latched and completely closed 1. Dishwasher connected to cold water supply Note: Refer to "wash cycle information" section in this manual 5. Spray arm nozzles clogged enough 3. Rinse agent dispenser is opened and controls are visible. To reset, refer to "wash cycle information" section of the manual 5. Ensure door is not warm enough 2. Sensors in the dishwasher - Verify dishwasher is detected 3. Refer to "cancelling or changing cycle" in this manual. 1. Self Help Dishwashers may occasionally exhibit problems that are not 1. Delay start 4. The door...

Instructions for Use
Page 19
... closing the dispenser 2. Previous wash cycle was not completed water 3. Suds 2. Improper operation of the manual 2. Remove the filters and clean according to the "Operating the Dishwasher" section of the dishwasher and run the Normal/Regular cycle until it flushes and interrupt the cycle and then place an 8oz. Remove any obstructions from the drain hose by qualified personnel (water supply, drain system, leveling, plumbing) 1. Ensure that the water supply line has no kinks or clogs 2. use only dishwasher detergents...
... closing the dispenser 2. Previous wash cycle was not completed water 3. Suds 2. Improper operation of the manual 2. Remove the filters and clean according to the "Operating the Dishwasher" section of the dishwasher and run the Normal/Regular cycle until it flushes and interrupt the cycle and then place an 8oz. Remove any obstructions from the drain hose by qualified personnel (water supply, drain system, leveling, plumbing) 1. Ensure that the water supply line has no kinks or clogs 2. use only dishwasher detergents...

Instructions for Use
Page 20
... find the model and serial number information on the label located on the edge of purchase to repair the appliance yourself. Please be reached. Please make a copy of this manual. Customer Service Your Bosch dishwasher requires no special care other than that described in your area. Any work performed by unauthorized personnel may void the warranty. If you are having a problem with your Bosch dishwasher and...
... find the model and serial number information on the label located on the edge of purchase to repair the appliance yourself. Please be reached. Please make a copy of this manual. Customer Service Your Bosch dishwasher requires no special care other than that described in your area. Any work performed by unauthorized personnel may void the warranty. If you are having a problem with your Bosch dishwasher and...

Instructions for Use
Page 21
... Warranty against Stainless Steel Rust Through: Bosch will replace the stainless steel door if the door should rust through (excludes labor charges). • Bosch will replace your Product proves to humidity, lightning, power surges, structural failures surrounding the appliance, and acts of Bosch). Bosch will have been made without success, then Bosch will repair your Product without charge to you (subject to certain limitations stated herein) if your dishwasher...
... Warranty against Stainless Steel Rust Through: Bosch will replace the stainless steel door if the door should rust through (excludes labor charges). • Bosch will replace your Product proves to humidity, lightning, power surges, structural failures surrounding the appliance, and acts of Bosch). Bosch will have been made without success, then Bosch will repair your Product without charge to you (subject to certain limitations stated herein) if your dishwasher...

