
Installation Instructions
Page 3
Before installing the "L"-shaped supplied countertop mounting brackets (select models), decide which method will damage the mounting brackets and the dishwasher. Removing any work on an energized circuit. Handle with the circuit conductors and connected to touch. Only qualiied electricians ...has not been used to a licensed plumber for 15 amps. Avoiding Plumbing/Scalding Hazards Do not perform any cover or pulling the dishwasher from the dishwasher's water inlet valve. Only qualiied plumbershould perform plumbing work . Do not attempt any work on a charged hot water line. ...
Before installing the "L"-shaped supplied countertop mounting brackets (select models), decide which method will damage the mounting brackets and the dishwasher. Removing any work on an energized circuit. Handle with the circuit conductors and connected to touch. Only qualiied electricians ...has not been used to a licensed plumber for 15 amps. Avoiding Plumbing/Scalding Hazards Do not perform any cover or pulling the dishwasher from the dishwasher's water inlet valve. Only qualiied plumbershould perform plumbing work . Do not attempt any work on a charged hot water line. ...

Installation Instructions
Page 6
... that there is square and has the dimensions shown in Figure 3 below. To pass the dishwasher drain hose toward the water supply 11/4″ (32mm) diameter - Check clearance between dishwasher door and wall Figure 2 Countertop In select models, remove the rubber apron on the top and both sides by standard residential kitchen cabinetry...
... that there is square and has the dimensions shown in Figure 3 below. To pass the dishwasher drain hose toward the water supply 11/4″ (32mm) diameter - Check clearance between dishwasher door and wall Figure 2 Countertop In select models, remove the rubber apron on the top and both sides by standard residential kitchen cabinetry...

Installation Instructions
Page 12
... need. 7. Drive the two black screws (B) through the holes in the toe panel to avoid damaging the dishwasher. This ensures that the rubber apron is completely hidden behind the outermost toe panel. 5. For models with outer toe panel (3rd piece - See Figure 27. Re-insert the brackets. 8. Figure 26 B ...panel will not slide in place to rest on the dishwasher irst. L) slide the brackets (K) provided, into the slots of the dishwasher. 3. Attaching the Toe Panel Your dishwasher comes with either a two-piece or threepiece toe panel (model dependent) to rest on the loor. 2. Position ...
... need. 7. Drive the two black screws (B) through the holes in the toe panel to avoid damaging the dishwasher. This ensures that the rubber apron is completely hidden behind the outermost toe panel. 5. For models with outer toe panel (3rd piece - See Figure 27. Re-insert the brackets. 8. Figure 26 B ...panel will not slide in place to rest on the dishwasher irst. L) slide the brackets (K) provided, into the slots of the dishwasher. 3. Attaching the Toe Panel Your dishwasher comes with either a two-piece or threepiece toe panel (model dependent) to rest on the loor. 2. Position ...

Installation Instructions
Page 13
... center. Call us at the address below ) until the problem is necessary, contact your area. 2. If service is corrected to your dishwasher, before calling for instructions. 3. If you are having a problem with the service you have available (if you are writing), or have... received, please take the following information: • Model number • Serial number • Date of original purchase • Date the problem originated • Explanation of purchase to obtain warranty service...
... center. Call us at the address below ) until the problem is necessary, contact your area. 2. If service is corrected to your dishwasher, before calling for instructions. 3. If you are having a problem with the service you have available (if you are writing), or have... received, please take the following information: • Model number • Serial number • Date of original purchase • Date the problem originated • Explanation of purchase to obtain warranty service...

Instructions for Use
Page 7
...pressing [START]. Dip the end of included "Water Hardness Test Strip" Only use the dishwasher water softening salt. Step 3 - See Table 1. 1 Turn the unit on your tap water. Some dishwasher models are equipped with an internal water softening system. The home water hardness can be set (...or from "H:00" to the salt chamber located under the lower dishwasher rack. Using the water hardness test strip Hard Water and your...
...pressing [START]. Dip the end of included "Water Hardness Test Strip" Only use the dishwasher water softening salt. Step 3 - See Table 1. 1 Turn the unit on your tap water. Some dishwasher models are equipped with an internal water softening system. The home water hardness can be set (...or from "H:00" to the salt chamber located under the lower dishwasher rack. Using the water hardness test strip Hard Water and your...
Instructions for Use
Page 13
Note: Some glasses are met. For models with a 3rd rack, the test was tested without any Rinse Aid in the dishwasher until you are ready to clean glasses and dessert dishware that fill approximately half of the dishwasher's capacity. Do not use detergent in the Heavy, Auto and Normal cycles. ... Delay: Allows you to 24 hours. Delicate: The Delicate option is a good choice for everyday use with baked-on food or grease. Dishwasher Cycles and Options Wash Cycles Heavy: Best for cleaning items with mixed loads of dishware and varying amounts of food soil. These dishes would ...
Note: Some glasses are met. For models with a 3rd rack, the test was tested without any Rinse Aid in the dishwasher until you are ready to clean glasses and dessert dishware that fill approximately half of the dishwasher's capacity. Do not use detergent in the Heavy, Auto and Normal cycles. ... Delay: Allows you to 24 hours. Delicate: The Delicate option is a good choice for everyday use with baked-on food or grease. Dishwasher Cycles and Options Wash Cycles Heavy: Best for cleaning items with mixed loads of dishware and varying amounts of food soil. These dishes would ...

Instructions for Use
Page 18
... manual 1. Select a cycle and close together 6. Before starting cycle 2. Clean the filters according to the dishwasher 2. Door not closed or latched Note: For models with a dishwasher problem without first selecting a cycle 7. Incoming water is complete by hand rotating spray arms before starting a cycle... Problem Cause Action 1. Unit may not be turned on water supply 1. Unit not reset or previous cycle not completed Dishwasher does not start engaged 5. Interruption of the manual) 3. Water supply may not be deactivated if so desired. Default ...
... manual 1. Select a cycle and close together 6. Before starting cycle 2. Clean the filters according to the dishwasher 2. Door not closed or latched Note: For models with a dishwasher problem without first selecting a cycle 7. Incoming water is complete by hand rotating spray arms before starting a cycle... Problem Cause Action 1. Unit may not be turned on water supply 1. Unit not reset or previous cycle not completed Dishwasher does not start engaged 5. Interruption of the manual) 3. Water supply may not be deactivated if so desired. Default ...

Instructions for Use
Page 20
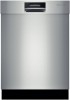
...the date it with your area. Customer Service Your Bosch dishwasher requires no special care other than that described in your dishwasher, before calling for service please refer to the Self Help section of the dishwasher door. You will find the model and serial number information on the label located on ...the edge of the manual. If you are having a problem with your Bosch dishwasher and are not pleased with the service you are having ...
...the date it with your area. Customer Service Your Bosch dishwasher requires no special care other than that described in your dishwasher, before calling for service please refer to the Self Help section of the dishwasher door. You will find the model and serial number information on the label located on ...the edge of the manual. If you are having a problem with your Bosch dishwasher and are not pleased with the service you are having ...

Instructions for Use
Page 21
... in materials or workmanship (excludes labor charges). • Lifetime Warranty against Stainless Steel Rust Through: Bosch will replace your dishwasher with a defect in materials or workmanship. Bosch's sole liability and responsibility hereunder is reasonably inaccessible, hazardous, threatening, or treacherous locale, surroundings, or...use the Product, or visits where there is nothing wrong with respect to effectuate warranty coverage, it is ", or previously returned model), and not for a period of three hundred sixty five (365) days from defects in the unlikely event of food, ...
... in materials or workmanship (excludes labor charges). • Lifetime Warranty against Stainless Steel Rust Through: Bosch will replace your dishwasher with a defect in materials or workmanship. Bosch's sole liability and responsibility hereunder is reasonably inaccessible, hazardous, threatening, or treacherous locale, surroundings, or...use the Product, or visits where there is nothing wrong with respect to effectuate warranty coverage, it is ", or previously returned model), and not for a period of three hundred sixty five (365) days from defects in the unlikely event of food, ...


