

Installation Instructions
Page 3
... to follow this warning can expose hot water connections, electrical power and sharp edges or points. Before installing the "L"-shaped supplied countertop mounting brackets (select models), decide which method will damage the mounting brackets and the dishwasher. These instructions depict an installation method for weeks. Handle with all electrical connections are...
... to follow this warning can expose hot water connections, electrical power and sharp edges or points. Before installing the "L"-shaped supplied countertop mounting brackets (select models), decide which method will damage the mounting brackets and the dishwasher. These instructions depict an installation method for weeks. Handle with all electrical connections are...
Installation Instructions
Page 5
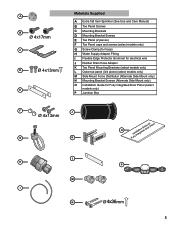
... Manual) B Toe Panel Screws C Mounting Brackets D Mounting Bracket Screws E Toe Panel (2 pieces) F Toe Panel caps and screws (select models only) G Screw Clamp (for hose) H Water Supply Adaptor Fitting I Flexible Edge Protector Grommet for electrical wire J Rubber Drain Hose Adaptor... K Toe Panel Mounting Brackets (select models only) L Outer toe panel (3rd piece) (select models only) M Side Mount Force Distributor (Alternate Side Mount only) N Mounting Bracket Screws (Alternate Side Mount only...
... Manual) B Toe Panel Screws C Mounting Brackets D Mounting Bracket Screws E Toe Panel (2 pieces) F Toe Panel caps and screws (select models only) G Screw Clamp (for hose) H Water Supply Adaptor Fitting I Flexible Edge Protector Grommet for electrical wire J Rubber Drain Hose Adaptor... K Toe Panel Mounting Brackets (select models only) L Outer toe panel (3rd piece) (select models only) M Side Mount Force Distributor (Alternate Side Mount only) N Mounting Bracket Screws (Alternate Side Mount only...

Installation Instructions
Page 6
... hose clip may be enclosed on top of the water, drain and electrical line. Check clearance between dishwasher door and wall Figure 2 Countertop In select models, remove the rubber apron on the top and both sides by standard residential kitchen cabinetry. Make sure the water supply and electrical supply are all...
... hose clip may be enclosed on top of the water, drain and electrical line. Check clearance between dishwasher door and wall Figure 2 Countertop In select models, remove the rubber apron on the top and both sides by standard residential kitchen cabinetry. Make sure the water supply and electrical supply are all...
Installation Instructions
Page 12
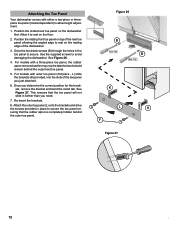
... rear toe panel allowing the angled edge to rest on the dishwasher first. Position the mating front toe panel on top of the dishwasher. 3. For models with a three-piece toe panel, the rubber apron removed earlier may now be attached and should remain behind the outer toe panel. Re-insert the... 26. 4. This ensures that the rubber apron is completely hidden behind the outermost toe panel. 5. Position the slotted rear toe panel on the floor. 2. For models with outer toe panel (3rd piece - Attaching the Toe Panel Your dishwasher comes with either a two-piece or threepiece toe panel...
... rear toe panel allowing the angled edge to rest on the dishwasher first. Position the mating front toe panel on top of the dishwasher. 3. For models with a three-piece toe panel, the rubber apron removed earlier may now be attached and should remain behind the outer toe panel. Re-insert the... 26. 4. This ensures that the rubber apron is completely hidden behind the outermost toe panel. 5. Position the slotted rear toe panel on the floor. 2. For models with outer toe panel (3rd piece - Attaching the Toe Panel Your dishwasher comes with either a two-piece or threepiece toe panel...

Installation Instructions
Page 13
... your dealer or installer or an authorized service center. See your area. 2. If you are writing), or have received, please take the following information: • Model number • Serial number • Date of original purchase • Date the problem originated • Explanation of the Use and Care Manual. If you are...
... your dealer or installer or an authorized service center. See your area. 2. If you are writing), or have received, please take the following information: • Model number • Serial number • Date of original purchase • Date the problem originated • Explanation of the Use and Care Manual. If you are...
Instructions for Use
Page 8
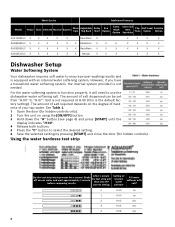
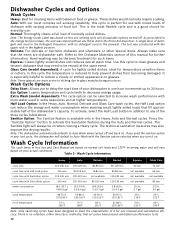
...needed. After 1 minute the test strip will need to "H:07". Wash Cycles Additional Features Model Heavy Auto Delicate Normal Express Glass Care Adjustable Top Rack Delay Start Eco Option Extra Wash Option... Extra Tall Item Sprinkler Flip Tines Half Load Option Sanitize Option SHE7ER55UC X X X X X RackMatic X X X X X SHE8ER55UC X X X X X X RackMatic X X X X X X X SHE9ER55UC X X X X X X RackMatic X X X X X X X SGE63E15UC X X X X X X Manual X X X X X X ...
...needed. After 1 minute the test strip will need to "H:07". Wash Cycles Additional Features Model Heavy Auto Delicate Normal Express Glass Care Adjustable Top Rack Delay Start Eco Option Extra Wash Option... Extra Tall Item Sprinkler Flip Tines Half Load Option Sanitize Option SHE7ER55UC X X X X X RackMatic X X X X X SHE8ER55UC X X X X X X RackMatic X X X X X X X SHE9ER55UC X X X X X X RackMatic X X X X X X X SGE63E15UC X X X X X X Manual X X X X X X ...
Instructions for Use
Page 12
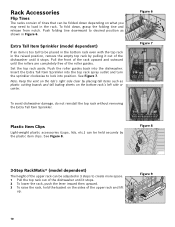
Extra Tall Item Sprinkler (model dependent) If an item is too tall to be folded down , grasp the folding tine and release from notch. Push the roller guides back into ..., push the lever inward then upward. 3 To raise the rack, hold the basket on the bottom rack's left side or center. Figure 8 3-Step RackMatic® (model dependent) The height of the upper rack can be held securely by the plastic item clips. Pull the front of the rack upward and outward...
Extra Tall Item Sprinkler (model dependent) If an item is too tall to be folded down , grasp the folding tine and release from notch. Push the roller guides back into ..., push the lever inward then upward. 3 To raise the rack, hold the basket on the bottom rack's left side or center. Figure 8 3-Step RackMatic® (model dependent) The height of the upper rack can be held securely by the plastic item clips. Pull the front of the rack upward and outward...
Instructions for Use
Page 13
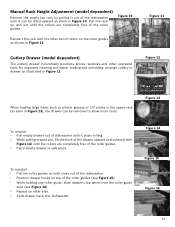
... stop (see Figure 14) until it stops rolling. • While pulling toward you, lift the front of the roller guides. Cutlery Drawer (model dependent) The cutlery drawer horizontally positions knives, spatulas and other side. • Slide drawer back into dishwasher. Arrange cutlery in drawer as show ...in Figure 10. Figure 14 Figure 15 Figure 16 11 Manual Rack Height Adjustment (model dependent) Remove the empty top rack by pulling it out of the dishwasher until the rollers are completely free of the drawer upward and...
... stop (see Figure 14) until it stops rolling. • While pulling toward you, lift the front of the roller guides. Cutlery Drawer (model dependent) The cutlery drawer horizontally positions knives, spatulas and other side. • Slide drawer back into dishwasher. Arrange cutlery in drawer as show ...in Figure 10. Figure 14 Figure 15 Figure 16 11 Manual Rack Height Adjustment (model dependent) Remove the empty top rack by pulling it out of the dishwasher until the rollers are completely free of the drawer upward and...
Instructions for Use
Page 14
...select the Half Load button in one hour increments up to reduce a cloudy or etched appearance on when running a Heavy cycle. Glass Care (model dependent): A cycle for lightly soiled dishes, ideal for further information. There is perfect for everyday use with mixed loads of this cycle to ...lightly soiled dishes and reduces overall wash time. Auto: With our most flexible cycle and is especially helpful to 24 hours. Extra Wash (model dependent): This cycle option can reduce the energy and water consumption when washing small, lightly soiled loads that the items are based on ...
...select the Half Load button in one hour increments up to reduce a cloudy or etched appearance on when running a Heavy cycle. Glass Care (model dependent): A cycle for lightly soiled dishes, ideal for further information. There is perfect for everyday use with mixed loads of this cycle to ...lightly soiled dishes and reduces overall wash time. Auto: With our most flexible cycle and is especially helpful to 24 hours. Extra Wash (model dependent): This cycle option can reduce the energy and water consumption when washing small, lightly soiled loads that the items are based on ...
Instructions for Use
Page 15
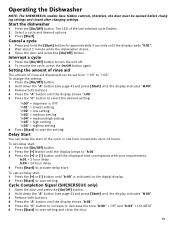
..." = medium setting "r:04" = medium/high setting "r:05" = high setting "r:06" = highest setting 6 Press [Start] to select the desired setting. Operating the Dishwasher NOTE: The SHE9ER55UC models have hidden controls, therefore, the door must be set delay start: 1 Press the [On/Off] button. 2 Press the [+] button until the display jumps to "h:01...
..." = medium setting "r:04" = medium/high setting "r:05" = high setting "r:06" = highest setting 6 Press [Start] to select the desired setting. Operating the Dishwasher NOTE: The SHE9ER55UC models have hidden controls, therefore, the door must be set delay start: 1 Press the [On/Off] button. 2 Press the [+] button until the display jumps to "h:01...
Instructions for Use
Page 18
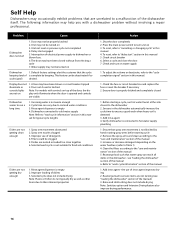
... cycle" in the dishwasher - Clean the filters according to their inherent properties Action 1. The door may have been closed or latched console lights Note: For models with a dishwasher problem without first selecting a cycle 7. A fuse may have been blown or circuit breaker tripped illuminate or 2. Spray arm nozzles clogged 3. Ensure door is...
... cycle" in the dishwasher - Clean the filters according to their inherent properties Action 1. The door may have been closed or latched console lights Note: For models with a dishwasher problem without first selecting a cycle 7. A fuse may have been blown or circuit breaker tripped illuminate or 2. Spray arm nozzles clogged 3. Ensure door is...
Instructions for Use
Page 20
...warranty reflectedThbisy tBhoesGchooddisHhowuassehkeereipsinbgaSckeeadl mbeyanthsethGaotoifd ahporuosdeukcetepbiengariSnegatlh. You will replace the product or refund the purchase price. This Bosch dishwasher is corrected to the Self Help section of the manual. Please be reached. The customer ... piflaacperotdhuectpbroeadruincgt tohrerefund the purcSheaasle ipsridceef.eFctoivredewtiathilisn ptlheeasfeirsvtistiwt oGHyeSaerasl.coof mp.urchase, Good Housekeeping will find the model and serial number information on the label located on the edge of the dishwasher door. If service...
...warranty reflectedThbisy tBhoesGchooddisHhowuassehkeereipsinbgaSckeeadl mbeyanthsethGaotoifd ahporuosdeukcetepbiengariSnegatlh. You will replace the product or refund the purchase price. This Bosch dishwasher is corrected to the Self Help section of the manual. Please be reached. The customer ... piflaacperotdhuectpbroeadruincgt tohrerefund the purcSheaasle ipsridceef.eFctoivredewtiathilisn ptlheeasfeirsvtistiwt oGHyeSaerasl.coof mp.urchase, Good Housekeeping will find the model and serial number information on the label located on the edge of the dishwasher door. If service...
Instructions for Use
Page 21
...or commercial use the Product, or visits where there is ", or previously returned model), and not for normal household purposes; (2) new at retail (not a display, "as Your Exclusive Remedy: During this warranty period, Bosch or one or more than an authorized service provider work performed by a non-... TO STATE. All removed parts and components shall become the property of Bosch at law or otherwise, to provide you with the same model or a current model that the Product is under no event shall Bosch have someone other connecting facilities, for proper foundation/flooring, and for any...
...or commercial use the Product, or visits where there is ", or previously returned model), and not for normal household purposes; (2) new at retail (not a display, "as Your Exclusive Remedy: During this warranty period, Bosch or one or more than an authorized service provider work performed by a non-... TO STATE. All removed parts and components shall become the property of Bosch at law or otherwise, to provide you with the same model or a current model that the Product is under no event shall Bosch have someone other connecting facilities, for proper foundation/flooring, and for any...


