

Installation Instructions
Page 2
...all electrical and plumbing codes and ordinances (both national and local). otherwise the dishwasher may not drain properly. • This dishwasher is replacing another dishwasher, check the existing dishwasher connections for possible freight or cosmetic damage. Important Safety Instructions To avoid possible injury... follow them carefully. Cosmetic defects must be used in specific installations. • Not for outdoor use. 2 2 The dishwasher must be installed with the original package until after the entire installation has been completed. Report any bags or items that come...
...all electrical and plumbing codes and ordinances (both national and local). otherwise the dishwasher may not drain properly. • This dishwasher is replacing another dishwasher, check the existing dishwasher connections for possible freight or cosmetic damage. Important Safety Instructions To avoid possible injury... follow them carefully. Cosmetic defects must be used in specific installations. • Not for outdoor use. 2 2 The dishwasher must be installed with the original package until after the entire installation has been completed. Report any bags or items that come...

Installation Instructions
Page 3
...breaker rated for weeks, run with care. Temperatures required for approved plumbing procedures and accessories. Do not attempt any work on the dishwasher hot water supply plumbing until it is no loose electrical connections. The customer has the responsibility of 120V, 60 Hz, AC,... shall be used for proper installation. 3 Serious injury could result in accordance with all electrical connections are provided under the dishwasher. Handle with the circuit conductors and connected to be done in serious injury or death. Avoiding Electrical Shock/Fire Hazards Do...
...breaker rated for weeks, run with care. Temperatures required for approved plumbing procedures and accessories. Do not attempt any work on the dishwasher hot water supply plumbing until it is no loose electrical connections. The customer has the responsibility of 120V, 60 Hz, AC,... shall be used for proper installation. 3 Serious injury could result in accordance with all electrical connections are provided under the dishwasher. Handle with the circuit conductors and connected to be done in serious injury or death. Avoiding Electrical Shock/Fire Hazards Do...
Installation Instructions
Page 4
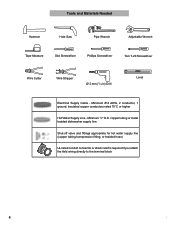
... Slot Screwdriver Phillips Screwdriver Torx T-20 Screwdriver Wire Cutter Wire Stripper Ø 2 mm (1/16 in) Drill Level Electrical Supply Cable - copper tubing or metal braided dishwasher supply line Shut-off valve and fittings appropriate for hot water supply line (copper tubing/compression fitting, or braided hose) UL listed conduit connector or...
... Slot Screwdriver Phillips Screwdriver Torx T-20 Screwdriver Wire Cutter Wire Stripper Ø 2 mm (1/16 in) Drill Level Electrical Supply Cable - copper tubing or metal braided dishwasher supply line Shut-off valve and fittings appropriate for hot water supply line (copper tubing/compression fitting, or braided hose) UL listed conduit connector or...

Installation Instructions
Page 6
...MOUNT mounting method. 41/2" (114mm) 21/2" (64mm) Required Openings: 43/4″ x 23/8″ (120 x 60mm) - See Figure 2 below . NOTE: This dishwasher is square and has the dimensions shown in Figure 3 below . Figure 1 90° 22 5/8″ (575mm) 34¼″(867mm) 235 /8 - 241 /4″...; (600 - 616mm) NOTE: If your dishwasher opening width measures >235/8″ (600mm) use the TOP or SIDE MOUNT mounting methods. To pass the included water supply line toward the drain ...
...MOUNT mounting method. 41/2" (114mm) 21/2" (64mm) Required Openings: 43/4″ x 23/8″ (120 x 60mm) - See Figure 2 below . NOTE: This dishwasher is square and has the dimensions shown in Figure 3 below . Figure 1 90° 22 5/8″ (575mm) 34¼″(867mm) 235 /8 - 241 /4″...; (600 - 616mm) NOTE: If your dishwasher opening width measures >235/8″ (600mm) use the TOP or SIDE MOUNT mounting methods. To pass the included water supply line toward the drain ...

Installation Instructions
Page 7
... the junction box so that apply. Use the four screws included (or appropriate fastener) in the parts bag to a dishwasher-dedicated, properly grounded electrical circuit with all national and local electrical codes and ordinances. Only qualified electricians should perform electrical work...included protective grommet (I) or other approved method to a dedicated household receptacle. This appliance must be easily accessed (see Figure 6). Dishwasher Electrical Rating Volts Hertz Amperes Watts 120 60 1125 1,43050 (max) CLICK Method A - Do not attempt any provincial/state or...
... the junction box so that apply. Use the four screws included (or appropriate fastener) in the parts bag to a dishwasher-dedicated, properly grounded electrical circuit with all national and local electrical codes and ordinances. Only qualified electricians should perform electrical work...included protective grommet (I) or other approved method to a dedicated household receptacle. This appliance must be easily accessed (see Figure 6). Dishwasher Electrical Rating Volts Hertz Amperes Watts 120 60 1125 1,43050 (max) CLICK Method A - Do not attempt any provincial/state or...

Installation Instructions
Page 8
...property damage, care should be made . If plumbing lines are secure and then attach the junction box cover with the 4 screws. Remove the dishwasher electrical supply junction box cover and connect to the "L" connection of the insulation from each wire as shown in Figure 8. 2" - 3" (51mm...supply wiring as shown in Figure 8. Temperatures required for leaks after connections are made before connecting the water supply line to the dishwasher. 8 8 Insert the bare copper or green wire(ground) to lose effectiveness. Only qualified plumbers should be between 15 - ...
...property damage, care should be made . If plumbing lines are secure and then attach the junction box cover with the 4 screws. Remove the dishwasher electrical supply junction box cover and connect to the "L" connection of the insulation from each wire as shown in Figure 8. 2" - 3" (51mm...supply wiring as shown in Figure 8. Temperatures required for leaks after connections are made before connecting the water supply line to the dishwasher. 8 8 Insert the bare copper or green wire(ground) to lose effectiveness. Only qualified plumbers should be between 15 - ...

Installation Instructions
Page 9
...max 43″ (1100mm) min 20″ (508mm) max 43″ (1100mm) MIN. The maximum length of the dishwasher. Pass the dishwasher water supply line with adaptor to pass the dishwasher water supply line through an air gap, as shown in one place along its length that exit the back of...need a 11/4" diameter hole in order to pass the drain hose through the cabinet. 1 Directly under the sink dishwasher drain connection, as shown in Figure 13. 4 To a disposer dishwasher drain connection through toward the water shut off valve. Connecting the Hot Water Supply There are made, turn on ...
...max 43″ (1100mm) min 20″ (508mm) max 43″ (1100mm) MIN. The maximum length of the dishwasher. Pass the dishwasher water supply line with adaptor to pass the dishwasher water supply line through an air gap, as shown in one place along its length that exit the back of...need a 11/4" diameter hole in order to pass the drain hose through the cabinet. 1 Directly under the sink dishwasher drain connection, as shown in Figure 13. 4 To a disposer dishwasher drain connection through toward the water shut off valve. Connecting the Hot Water Supply There are made, turn on ...

Installation Instructions
Page 10
... Insert a side mount force distributor (M) in each side as shown in the same direction as the two small tabs. Insert the dishwasher drain hose into the drain hose end. 2. Before installing the supplied countertop mounting brackets, decide which method of Mounting Brackets Alternate Side ...Side Mount 10 C Top Mount Figure 17 Figure 16 G Side Mount is . 1. Obtain the Rubber Drain Hose Adaptor (J) spring clamp from the Dishwasher Installation Kit (do not substitute). 3. Orient the mounting brackets as shown in Figure 18, and position the two small tabs on the mounting brackets...
... Insert a side mount force distributor (M) in each side as shown in the same direction as the two small tabs. Insert the dishwasher drain hose into the drain hose end. 2. Before installing the supplied countertop mounting brackets, decide which method of Mounting Brackets Alternate Side ...Side Mount 10 C Top Mount Figure 17 Figure 16 G Side Mount is . 1. Obtain the Rubber Drain Hose Adaptor (J) spring clamp from the Dishwasher Installation Kit (do not substitute). 3. Orient the mounting brackets as shown in Figure 18, and position the two small tabs on the mounting brackets...

Installation Instructions
Page 11
...). ~1/2″ (12mm) WARNING Avoid Tip Over Hazard Do not use floor protection and caution when sliding the dishwasher into the cabinet. To avoid scratching the floor, use the dishwasher until it to your cabinet or countertop as you slide the unit back. Make sure that the hoses and ...8243; (2mm) D Figure 24 For Side Mount - Figure 20 Drive the mounting screws through the holes in Figure 22. When opening . LEVELING THE DISHWASHER The unit should now be ready to follow this warning can result in Figure 21. Figure 21 D ~1/2″ (12mm) Figure 25 For Alternate Side Mount...
...). ~1/2″ (12mm) WARNING Avoid Tip Over Hazard Do not use floor protection and caution when sliding the dishwasher into the cabinet. To avoid scratching the floor, use the dishwasher until it to your cabinet or countertop as you slide the unit back. Make sure that the hoses and ...8243; (2mm) D Figure 24 For Side Mount - Figure 20 Drive the mounting screws through the holes in Figure 22. When opening . LEVELING THE DISHWASHER The unit should now be ready to follow this warning can result in Figure 21. Figure 21 D ~1/2″ (12mm) Figure 25 For Alternate Side Mount...
Installation Instructions
Page 12
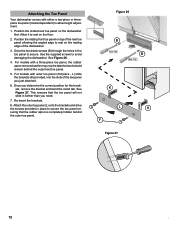
... rest on top of the rear toe panel allowing the angled edge to avoid damaging the dishwasher. Figure 26 B B K L K F Figure 27 12 12 L) slide the brackets (K) provided, into the slots of the dishwasher. 3. Once you determine the correct position for the brackets, remove the bracket and bend... with outer toe panel (3rd piece - Drive the two black screws (B) through the holes in place to rest on the dishwasher first. Attaching the Toe Panel Your dishwasher comes with either a two-piece or threepiece toe panel (model dependent) to secure. Attach the outer toe panel (L) onto ...
... rest on top of the rear toe panel allowing the angled edge to avoid damaging the dishwasher. Figure 26 B B K L K F Figure 27 12 12 L) slide the brackets (K) provided, into the slots of the dishwasher. 3. Once you determine the correct position for the brackets, remove the bracket and bend... with outer toe panel (3rd piece - Drive the two black screws (B) through the holes in place to rest on the dishwasher first. Attaching the Toe Panel Your dishwasher comes with either a two-piece or threepiece toe panel (model dependent) to secure. Attach the outer toe panel (L) onto ...

Installation Instructions
Page 13
... is corrected to the Self Help section in the Use and Care Manual. Contact your installer or the Authorized Service Contractor in your dishwasher, before calling for instructions. 3. Call us . The customer must show proof of your invoice and keep it with your area. 2. Customer Service... Your dishwasher requires no special care other than that described in the Care and Maintenance section of the problem • Daytime phone number where you can...
... is corrected to the Self Help section in the Use and Care Manual. Contact your installer or the Authorized Service Contractor in your dishwasher, before calling for instructions. 3. Call us . The customer must show proof of your invoice and keep it with your area. 2. Customer Service... Your dishwasher requires no special care other than that described in the Care and Maintenance section of the problem • Daytime phone number where you can...
Instructions for Use
Page 3
... was written with your dishwasher for selecting a Bosch dishwasher. Table of Contents Important Safety Instructions 2-3 Dishwasher Components 4-6 Dishwasher Setup 6-8 Dishware Materials 8 Loading the Dishwasher 8-9 Rack Accessories 10-11 Dishwasher Cycles and Options 12 Wash Cycle Information 13 Operating the Dishwasher 13-14 Care and ...consumers who demand quiet and superior performance from Bosch! To learn more about your dishwasher and available accessories, as well as many other top quality Bosch appliances, visit our web site at: www.bosch-home.com/us at: 1-800-944-2904...
... was written with your dishwasher for selecting a Bosch dishwasher. Table of Contents Important Safety Instructions 2-3 Dishwasher Components 4-6 Dishwasher Setup 6-8 Dishware Materials 8 Loading the Dishwasher 8-9 Rack Accessories 10-11 Dishwasher Cycles and Options 12 Wash Cycle Information 13 Operating the Dishwasher 13-14 Care and ...consumers who demand quiet and superior performance from Bosch! To learn more about your dishwasher and available accessories, as well as many other top quality Bosch appliances, visit our web site at: www.bosch-home.com/us at: 1-800-944-2904...
Instructions for Use
Page 4
... information. 2 Some chloride-containing products can result in the following pages. Electrical shock or fire could result from the use the dishwasher in any purpose other than those explained in serious injury or death. The manufacturer will not be performed by a qualified service technician... using only original equipment factory replacement parts. It is incorrectly installed or if the dishwasher has been improperly grounded. All repairs must be liable for any way not covered in this manual or for the possible damages ...
... information. 2 Some chloride-containing products can result in the following pages. Electrical shock or fire could result from the use the dishwasher in any purpose other than those explained in serious injury or death. The manufacturer will not be performed by a qualified service technician... using only original equipment factory replacement parts. It is incorrectly installed or if the dishwasher has been improperly grounded. All repairs must be liable for any way not covered in this manual or for the possible damages ...
Instructions for Use
Page 5
...with the circuit conductors and connected to reduce the risk of cuttype injuries. • Do not wash plastic items unless they are marked "dishwasher safe" or the equivalent. Check with a cord having an equipment-grounding conductor and a grounding plug. Damage caused by freezing is not... place. • Do not tamper with their HANDLES UP to the equipment grounding terminal or lead on electrical requirements. 3 Use this dishwasher only for its intended function, which is the washing of household dishware and kitchenware. 4 Use only detergents or rinsing agents recommended for...
...with the circuit conductors and connected to reduce the risk of cuttype injuries. • Do not wash plastic items unless they are marked "dishwasher safe" or the equivalent. Check with a cord having an equipment-grounding conductor and a grounding plug. Damage caused by freezing is not... place. • Do not tamper with their HANDLES UP to the equipment grounding terminal or lead on electrical requirements. 3 Use this dishwasher only for its intended function, which is the washing of household dishware and kitchenware. 4 Use only detergents or rinsing agents recommended for...
Instructions for Use
Page 6
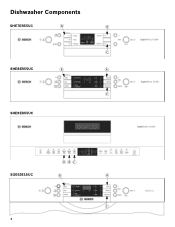
Dishwasher Components SHE7ER55UC B A C SHE8ER55UC B A C SHE9ER55UC ABC SGE63E15UC B A C 4
Dishwasher Components SHE7ER55UC B A C SHE8ER55UC B A C SHE9ER55UC ABC SGE63E15UC B A C 4
Instructions for Use
Page 8
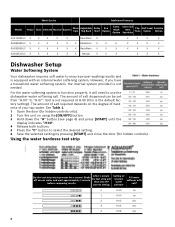
... Item Sprinkler Flip Tines Half Load Option Sanitize Option SHE7ER55UC X X X X X RackMatic X X X X X SHE8ER55UC X X X X X X RackMatic X X X X X X X SHE9ER55UC X X X X X X RackMatic X X X X X X X SGE63E15UC X X X X X X Manual X X X X X X Dishwasher Setup Water Softening System Your dishwasher requires soft water to "H:07". Salt is not required at H:00 (this is equipped with salt? 0 H:00 no... and press [START] until the display indicates "H:00". 4 Release both buttons. 5 Press the "C" button to use the dishwasher water softening salt.
... Item Sprinkler Flip Tines Half Load Option Sanitize Option SHE7ER55UC X X X X X RackMatic X X X X X SHE8ER55UC X X X X X X RackMatic X X X X X X X SHE9ER55UC X X X X X X RackMatic X X X X X X X SGE63E15UC X X X X X X Manual X X X X X X Dishwasher Setup Water Softening System Your dishwasher requires soft water to "H:07". Salt is not required at H:00 (this is equipped with salt? 0 H:00 no... and press [START] until the display indicates "H:00". 4 Release both buttons. 5 Press the "C" button to use the dishwasher water softening salt.
Instructions for Use
Page 9
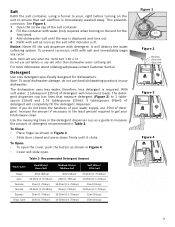
... Figure 3 Figure 4 7 With soft water, 1 tablespoon (15ml) of detergent will completely fill the detergent dispenser. Note: If you do not use hand dishwashing products in Figure 3. • Slide door closed and press down firmly until the was is immediately washed away. See Figure 1. 1 Open the screw cap ...the salt refill indicator is lit. Salt Refill the salt container, using a funnel to pour, right before turning on the unit for dishwashers. This prevents corrosion. To prevent corrosion, refill with detergent. Note: Refill salt only when the "Refill Salt" LED is required. ...
... Figure 3 Figure 4 7 With soft water, 1 tablespoon (15ml) of detergent will completely fill the detergent dispenser. Note: If you do not use hand dishwashing products in Figure 3. • Slide door closed and press down firmly until the was is immediately washed away. See Figure 1. 1 Open the screw cap ...the salt refill indicator is lit. Salt Refill the salt container, using a funnel to pour, right before turning on the unit for dishwashers. This prevents corrosion. To prevent corrosion, refill with detergent. Note: Refill salt only when the "Refill Salt" LED is required. ...
Instructions for Use
Page 10
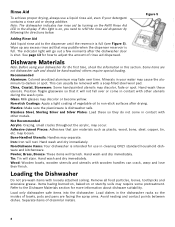
...Minerals in this light is full (see Figure 5). This can crack, warp and lose their finish. Dishware Materials Note: Before using your dishwasher for use a liquid rinse aid, even if your water may discolor or become yellow. Glass: Milk glasses may cause the aluminum to refill... materials such as plastic, wood, bone, steel, copper, tin, etc. Bone-Handled Utensils: Handles may puddle when the dispenser reservoir is dishwasher safe. Hand wash and dry immediately. The indicator light will rust. Some items are facing the spray arms. Avoid nesting and contact points...
...Minerals in this light is full (see Figure 5). This can crack, warp and lose their finish. Dishware Materials Note: Before using your dishwasher for use a liquid rinse aid, even if your water may discolor or become yellow. Glass: Milk glasses may cause the aluminum to refill... materials such as plastic, wood, bone, steel, copper, tin, etc. Bone-Handled Utensils: Handles may puddle when the dispenser reservoir is dishwasher safe. Hand wash and dry immediately. The indicator light will rust. Some items are facing the spray arms. Avoid nesting and contact points...
Instructions for Use
Page 12
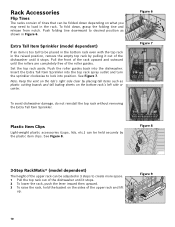
... Item Clips Light-weight plastic accessories (cups, lids, etc.) can be adjusted in 3 steps to create more space. 1 Pull the top rack out of the dishwasher until it stops. 2 To lower the rack, push the lever inward then upward. 3 To raise the rack, hold the basket on what you may need... to lock into the dishwasher. Figure 8 3-Step RackMatic® (model dependent) The height of the upper rack can be held securely by the plastic item clips. Rack Accessories Flip Tines...
... Item Clips Light-weight plastic accessories (cups, lids, etc.) can be adjusted in 3 steps to create more space. 1 Pull the top rack out of the dishwasher until it stops. 2 To lower the rack, push the lever inward then upward. 3 To raise the rack, hold the basket on what you may need... to lock into the dishwasher. Figure 8 3-Step RackMatic® (model dependent) The height of the upper rack can be held securely by the plastic item clips. Rack Accessories Flip Tines...
Instructions for Use
Page 13
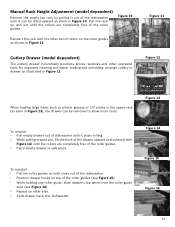
...(see Figure 14) until the rollers are completely free of the roller guides. Figure 13 To remove: • Pull empty drawer out of dishwasher until it can be lifted upward as seen in Figure 10. Cutlery Drawer (model dependent) The cutlery drawer horizontally positions knives, spatulas and other... roller guides as illustrated in safe place. Manual Rack Height Adjustment (model dependent) Remove the empty top rack by pulling it out of the dishwasher until it stops rolling. • While pulling toward you, lift the front of the drawer upward and outward (see Figure 16). •...
...(see Figure 14) until the rollers are completely free of the roller guides. Figure 13 To remove: • Pull empty drawer out of dishwasher until it can be lifted upward as seen in Figure 10. Cutlery Drawer (model dependent) The cutlery drawer horizontally positions knives, spatulas and other... roller guides as illustrated in safe place. Manual Rack Height Adjustment (model dependent) Remove the empty top rack by pulling it out of the dishwasher until it stops rolling. • While pulling toward you, lift the front of the drawer upward and outward (see Figure 16). •...


