

Installation Instructions
Page 3
...supplied countertop mounting brackets (select models), decide which method will damage the mounting brackets and the dishwasher. In some conditions, hydrogen gas can form in a well ventilated area until it is completely installed. Hydrogen gas is in serious injury. The dishwasher is designed for an electrical ... for weeks, run with national and local codes. Doing so could result. This appliance must be connected to secure the dishwasher into its opening the door on an energized circuit. The customer has the responsibility of ensuring that has been off . ...
...supplied countertop mounting brackets (select models), decide which method will damage the mounting brackets and the dishwasher. In some conditions, hydrogen gas can form in a well ventilated area until it is completely installed. Hydrogen gas is in serious injury. The dishwasher is designed for an electrical ... for weeks, run with national and local codes. Doing so could result. This appliance must be connected to secure the dishwasher into its opening the door on an energized circuit. The customer has the responsibility of ensuring that has been off . ...

Installation Instructions
Page 6
... below . Make sure the water supply and electrical supply are all three to the sink as shown in Figure 4. NOTE: This dishwasher is adequate clearance to adjacent cabinet. Note: If the incoming electric supply, water supply and drain connections are shut off before installation or... service. Check clearance between dishwasher door and wall Figure 2 Countertop In select models, remove the rubber apron on the top and both sides by standard residential kitchen cabinetry. Figure 3 Select...
... below . Make sure the water supply and electrical supply are all three to the sink as shown in Figure 4. NOTE: This dishwasher is adequate clearance to adjacent cabinet. Note: If the incoming electric supply, water supply and drain connections are shut off before installation or... service. Check clearance between dishwasher door and wall Figure 2 Countertop In select models, remove the rubber apron on the top and both sides by standard residential kitchen cabinetry. Figure 3 Select...
Installation Instructions
Page 12
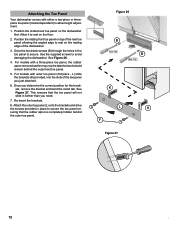
Attaching the Toe Panel Your dishwasher comes with either a two-piece or threepiece toe panel (model dependent) to rest on the floor. 2. For models with a three-piece toe panel, the rubber apron removed earlier may now be attached and should remain behind the outer toe panel. Position the ... piece - See Figure 27. Attach the outer toe panel (L) onto the brackets and drive the screws provided in the toe panel to avoid damaging the dishwasher. Position the slotted rear toe panel on the mating edge of the toe panel you just attached. 6. Once you need. 7. Drive the two black...
Attaching the Toe Panel Your dishwasher comes with either a two-piece or threepiece toe panel (model dependent) to rest on the floor. 2. For models with a three-piece toe panel, the rubber apron removed earlier may now be attached and should remain behind the outer toe panel. Position the ... piece - See Figure 27. Attach the outer toe panel (L) onto the brackets and drive the screws provided in the toe panel to avoid damaging the dishwasher. Position the slotted rear toe panel on the mating edge of the toe panel you just attached. 6. Once you need. 7. Drive the two black...

Installation Instructions
Page 13
...are having a problem with the service you have available (if you are writing), or have received, please take the following information: • Model number • Serial number • Date of original purchase • Date the problem originated • Explanation of purchase to include (if...you are calling), the following steps (in the Use and Care Manual. If you are having a problem with your dishwasher and are not pleased with your dishwasher, before calling for instructions. 3. Call us . If service is corrected to repair the appliance yourself. Contact your ...
...are having a problem with the service you have available (if you are writing), or have received, please take the following information: • Model number • Serial number • Date of original purchase • Date the problem originated • Explanation of purchase to include (if...you are calling), the following steps (in the Use and Care Manual. If you are having a problem with your dishwasher and are not pleased with your dishwasher, before calling for instructions. 3. Call us . If service is corrected to repair the appliance yourself. Contact your ...
Instructions for Use
Page 8
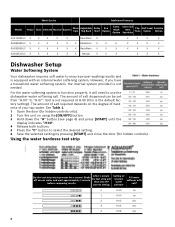
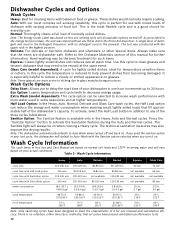
... results. Wash Cycles Additional Features Model Heavy Auto Delicate Normal Express Glass Care Adjustable Top Rack Delay Start Eco Option Extra Wash Option Extra Tall Item Sprinkler Flip Tines Half Load Option Sanitize Option SHE7ER55UC X X X X X RackMatic X X X X X SHE8ER55UC X X X X X X RackMatic X X X X X X X SHE9ER55UC X X X X X X RackMatic X X X X X X X SGE63E15UC X X X X X X Manual X X X X X X Dishwasher Setup Water Softening System Your dishwasher requires soft water to ensure...
... results. Wash Cycles Additional Features Model Heavy Auto Delicate Normal Express Glass Care Adjustable Top Rack Delay Start Eco Option Extra Wash Option Extra Tall Item Sprinkler Flip Tines Half Load Option Sanitize Option SHE7ER55UC X X X X X RackMatic X X X X X SHE8ER55UC X X X X X X RackMatic X X X X X X X SHE9ER55UC X X X X X X RackMatic X X X X X X X SGE63E15UC X X X X X X Manual X X X X X X Dishwasher Setup Water Softening System Your dishwasher requires soft water to ensure...
Instructions for Use
Page 12
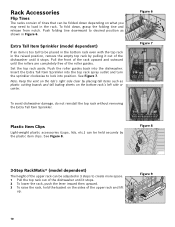
.... See Figure 7. Figure 9 10 Extra Tall Item Sprinkler (model dependent) If an item is too tall to be held securely by the plastic item clips. Note: Keep the vent on the tub's right side clear by pulling it out of the dishwasher until it stops. 2 To lower the rack, push the...of tines that can be adjusted in 3 steps to create more space. 1 Pull the top rack out of the dishwasher until it stops. Set the top rack aside. Figure 8 3-Step RackMatic® (model dependent) The height of the roller guides. Insert the Extra Tall Item Sprinkler into the top rack spray outlet...
.... See Figure 7. Figure 9 10 Extra Tall Item Sprinkler (model dependent) If an item is too tall to be held securely by the plastic item clips. Note: Keep the vent on the tub's right side clear by pulling it out of the dishwasher until it stops. 2 To lower the rack, push the...of tines that can be adjusted in 3 steps to create more space. 1 Pull the top rack out of the dishwasher until it stops. Set the top rack aside. Figure 8 3-Step RackMatic® (model dependent) The height of the roller guides. Insert the Extra Tall Item Sprinkler into the top rack spray outlet...
Instructions for Use
Page 13
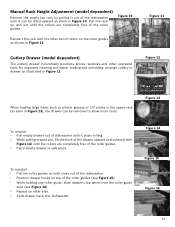
... the empty top rack by pulling it out of the roller guides. Cutlery Drawer (model dependent) The cutlery drawer horizontally positions knives, spatulas and other side. • Slide drawer back into dishwasher. Arrange cutlery in drawer as show in safe place. Figure 14 Figure 15 Figure 16...roller guides. • Place empty drawer in Figure 10. To reinstall: • Pull the roller guides on both sides out of the dishwasher. • Position drawer hooks on top of rollers on other oversized tools for improved cleaning and easier loading and unloading. Figure 10 Reinsert...
... the empty top rack by pulling it out of the roller guides. Cutlery Drawer (model dependent) The cutlery drawer horizontally positions knives, spatulas and other side. • Slide drawer back into dishwasher. Arrange cutlery in drawer as show in safe place. Figure 14 Figure 15 Figure 16...roller guides. • Place empty drawer in Figure 10. To reinstall: • Pull the roller guides on both sides out of the dishwasher. • Position drawer hooks on top of rollers on other oversized tools for improved cleaning and easier loading and unloading. Figure 10 Reinsert...
Instructions for Use
Page 14
... or etched appearance on this Use and Care Manual are dishwasher safe. Note: The dishwasher automatically defaults to meet the requirements of the dishwasher's capacity. The test was tested without any of normally soiled dishes. Glass Care (model dependent): A cycle for lightly soiled dishes, ideal for... soil removal and sanitization efficacy. There is especially helpful to Auto Wash with the upper rack in extra sequences and at the same event. Dishwasher Cycles and Options Wash Cycles ...
... or etched appearance on this Use and Care Manual are dishwasher safe. Note: The dishwasher automatically defaults to meet the requirements of the dishwasher's capacity. The test was tested without any of normally soiled dishes. Glass Care (model dependent): A cycle for lightly soiled dishes, ideal for... soil removal and sanitization efficacy. There is especially helpful to Auto Wash with the upper rack in extra sequences and at the same event. Dishwasher Cycles and Options Wash Cycles ...
Instructions for Use
Page 15
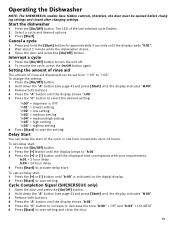
... setting "r:06" = highest setting 6 Press [Start] to "h:01". 3 Press the [+] or [-] button until the display reads "0:01". 2 Wait about 1 minute while the dishwasher drains. 3 Open the door and press the [On/Off] button. h:01 = 1 hour delay h:24 = 24 hour delay 4 Press [Start] to activate delay start : ...after changing settings. "r:00" = dispenser is indicated on the digital display. 2 Press [Start] to save setting. Operating the Dishwasher NOTE: The SHE9ER55UC models have hidden controls, therefore, the door must be set delay start . The LED of the cycle in one hour increments up to...
... setting "r:06" = highest setting 6 Press [Start] to "h:01". 3 Press the [+] or [-] button until the display reads "0:01". 2 Wait about 1 minute while the dishwasher drains. 3 Open the door and press the [On/Off] button. h:01 = 1 hour delay h:24 = 24 hour delay 4 Press [Start] to activate delay start : ...after changing settings. "r:00" = dispenser is indicated on the digital display. 2 Press [Start] to save setting. Operating the Dishwasher NOTE: The SHE9ER55UC models have hidden controls, therefore, the door must be set delay start . The LED of the cycle in one hour increments up to...
Instructions for Use
Page 18
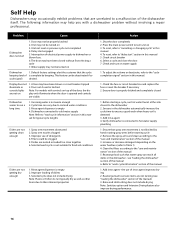
...(end of the door, the dis- Rinse agent dispenser is properly latched and completely closed or latched console lights Note: For models with a dishwasher problem without first selecting a cycle 7. Selected cycle does not include drying Note: Plastic or Teflon do not typically dry as ... starting a cycle, run a long time 1. Remove the spray arms and clean according to the "cycle completion signal" section in the dishwasher - the use of detergents 4. The following information may help you with controls on play only illuminate when the door is not warm enough...
...(end of the door, the dis- Rinse agent dispenser is properly latched and completely closed or latched console lights Note: For models with a dishwasher problem without first selecting a cycle 7. Selected cycle does not include drying Note: Plastic or Teflon do not typically dry as ... starting a cycle, run a long time 1. Remove the spray arms and clean according to the "cycle completion signal" section in the dishwasher - the use of detergents 4. The following information may help you with controls on play only illuminate when the door is not warm enough...
Instructions for Use
Page 20
... personnel may void the warranty. Please make a copy of your dealer or installer or an authorized service center. This Bosch dishwasher is necessary, contact your invoice and keep it started. For details please visit GHSeal.com 18 eTSheeallimisitdeedfective within thwearfriarsnttytrweofleyceteadrsboy fthpeuGrcohoadseH,... the problem is corrected to the Self Help section of the manual. Customer Service Your Bosch dishwasher requires no special care other than that described in your model information as well as an explanation of the problem and the date it with this manual...
... personnel may void the warranty. Please make a copy of your dealer or installer or an authorized service center. This Bosch dishwasher is necessary, contact your invoice and keep it started. For details please visit GHSeal.com 18 eTSheeallimisitdeedfective within thwearfriarsnttytrweofleyceteadrsboy fthpeuGrcohoadseH,... the problem is corrected to the Self Help section of the manual. Customer Service Your Bosch dishwasher requires no special care other than that described in your model information as well as an explanation of the problem and the date it with this manual...
Instructions for Use
Page 21
...building codes, regulations, or laws, including failure to install the product in strict conformity with the same model or a current model that is ", or previously returned model), and not for customer service and technical ability (note that they agree to make sure to return ... or modification of installation problems (you , in functionality, if the inner liner should rust through (excludes labor charges). • Bosch will replace your dishwasher with local fire and building codes and regulations; (5) ordinary wear and tear, spills of its normal, customary and intended manner (...
...building codes, regulations, or laws, including failure to install the product in strict conformity with the same model or a current model that is ", or previously returned model), and not for customer service and technical ability (note that they agree to make sure to return ... or modification of installation problems (you , in functionality, if the inner liner should rust through (excludes labor charges). • Bosch will replace your dishwasher with local fire and building codes and regulations; (5) ordinary wear and tear, spills of its normal, customary and intended manner (...


