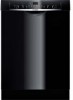

Use and Care Manual
Page 2
... recommend that you read this manual before you use your dishwasher and available accessories, as well as many consumers who demand quiet and superior performance from Bosch! To learn more about your dishwasher for selecting a Bosch dishwasher.You have any questions or comments, please contact us at...: 1-800-944-2904 or write to us at : www.boschappliances.com (U.S.A) OR www.bosch-appliances.ca (Canada) If ...
... recommend that you read this manual before you use your dishwasher and available accessories, as well as many consumers who demand quiet and superior performance from Bosch! To learn more about your dishwasher for selecting a Bosch dishwasher.You have any questions or comments, please contact us at...: 1-800-944-2904 or write to us at : www.boschappliances.com (U.S.A) OR www.bosch-appliances.ca (Canada) If ...

Use and Care Manual
Page 3
Loading the Dishware 8 5. Adding Detergent & Rinse Agent 14-15 8. Loading the Silverware Basket 11-13 7. Operating the Dishwasher 18-20 11. Warranty Information 27 3 Dishwasher Components 6 3. Rack Accessories 9-10 6. Wash Cycle Information 17 10. Important Safety Instructions 4-5 2. Dishwasher Features 7 4. Self Help 23-25 13. Care & Maintenance 21-22 12. Customer Service Information 26 14. Table of Contents 1. Dishwasher Features & Options 16 9.
Loading the Dishware 8 5. Adding Detergent & Rinse Agent 14-15 8. Loading the Silverware Basket 11-13 7. Operating the Dishwasher 18-20 11. Warranty Information 27 3 Dishwasher Components 6 3. Rack Accessories 9-10 6. Wash Cycle Information 17 10. Important Safety Instructions 4-5 2. Dishwasher Features 7 4. Self Help 23-25 13. Care & Maintenance 21-22 12. Customer Service Information 26 14. Table of Contents 1. Dishwasher Features & Options 16 9.

Use and Care Manual
Page 4
... than those explained in the following pages. ɵ Severe product damage and/or injury could result if the electrical supply for the dishwasher covered in this manual is highly recommended for the end user to become familiar with the procedure to shut of the incoming water supply... and the procedure to clean your installer for more information. 4 Do not use steam cleaning products to shut of the dishwasher can damage your dishwasher. Some chloride-containing products can result in this Information WARNING Misuse of the incoming power supply. NOTICE Never use the...
... than those explained in the following pages. ɵ Severe product damage and/or injury could result if the electrical supply for the dishwasher covered in this manual is highly recommended for the end user to become familiar with the procedure to shut of the incoming water supply... and the procedure to clean your installer for more information. 4 Do not use steam cleaning products to shut of the dishwasher can damage your dishwasher. Some chloride-containing products can result in this Information WARNING Misuse of the incoming power supply. NOTICE Never use the...
Use and Care Manual
Page 5
...To reduce the risk of the parents or legal guardians to the equipment grounding terminal or lead on the dishwasher. Protect your dishwasher unless all enclosure panels are marked "dishwasher safe" or the equivalent. Load knives and other sharp utensils with the circuit conductors and connected to ... controls and interlocks 6. For plastic items not so marked, check the manufacturer's recommendations. Do not operate your dishwasher from each for two weeks or longer, turn on the dishwasher. 8. When loading items to a hot water system that has not been used for more . Do not...
...To reduce the risk of the parents or legal guardians to the equipment grounding terminal or lead on the dishwasher. Protect your dishwasher unless all enclosure panels are marked "dishwasher safe" or the equivalent. Load knives and other sharp utensils with the circuit conductors and connected to ... controls and interlocks 6. For plastic items not so marked, check the manufacturer's recommendations. Do not operate your dishwasher from each for two weeks or longer, turn on the dishwasher. 8. When loading items to a hot water system that has not been used for more . Do not...

Use and Care Manual
Page 7
... may discolor or become yellow. Adhesive-Joined Pieces: Adhesives that is intended for the irst time, check the information in this dishwasher one of vegetable oil to a sanitizing temperature. Pewter, Brass, Bronze: Pewter will rust. Hand-wash and dry immediately. others... cracks throughout the acrylic) may separate. Wood: Wooden bowls, wooden utensils, and utensils with other utensils during the wash cycle. 3 Dishwasher Features Noise Reduction System: A two-pump motor system, the Suspension Motor™, and insulation make this section. EcoSense™ Wash Management...
... may discolor or become yellow. Adhesive-Joined Pieces: Adhesives that is intended for the irst time, check the information in this dishwasher one of vegetable oil to a sanitizing temperature. Pewter, Brass, Bronze: Pewter will rust. Hand-wash and dry immediately. others... cracks throughout the acrylic) may separate. Wood: Wooden bowls, wooden utensils, and utensils with other utensils during the wash cycle. 3 Dishwasher Features Noise Reduction System: A two-pump motor system, the Suspension Motor™, and insulation make this section. EcoSense™ Wash Management...
Use and Care Manual
Page 8
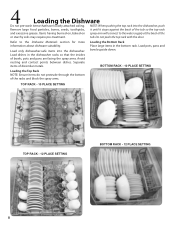
.... TOP RACK - 10 PLACE SETTING TOP RACK - 12 PLACE SETTING BOTTOM RACK - 12 PLACE SETTING 8 Loading the Bottom Rack Place large items in the dishwasher racks so that have loosely attached soiling. 4 Loading the Dishware Do not pre-wash items that the insides of bowls, pots and pans are facing... the or starchy soils may require pre-treatment. Do not push the top rack with the door. NOTE: When pushing the top rack into the dishwasher. Load pots, pans and bowls upside down. tub. BOTTOM RACK - 10 PLACE SETTING Loading the Top Rack NOTE: Ensure items do not protrude ...
.... TOP RACK - 10 PLACE SETTING TOP RACK - 12 PLACE SETTING BOTTOM RACK - 12 PLACE SETTING 8 Loading the Bottom Rack Place large items in the dishwasher racks so that have loosely attached soiling. 4 Loading the Dishware Do not pre-wash items that the insides of bowls, pots and pans are facing... the or starchy soils may require pre-treatment. Do not push the top rack with the door. NOTE: When pushing the top rack into the dishwasher. Load pots, pans and bowls upside down. tub. BOTTOM RACK - 10 PLACE SETTING Loading the Top Rack NOTE: Ensure items do not protrude ...

Use and Care Manual
Page 9
BOTTOM RACK - 12 PLACE SETTING w/Standard Silverware Basket TOP RACK - 12 PLACE SETTING 9 Unloading the Dishwasher • Unload the bottom rack irst. • Unload the silverware basket. • Unload the top rack. NOTICE To avoid dishwasher damage, do not load the dishwasher with paper products, plastic bags, packing materials, or anything other than normal, dishwasher-safe dishware and kitchenware.
BOTTOM RACK - 12 PLACE SETTING w/Standard Silverware Basket TOP RACK - 12 PLACE SETTING 9 Unloading the Dishwasher • Unload the bottom rack irst. • Unload the silverware basket. • Unload the top rack. NOTICE To avoid dishwasher damage, do not load the dishwasher with paper products, plastic bags, packing materials, or anything other than normal, dishwasher-safe dishware and kitchenware.
Use and Care Manual
Page 10
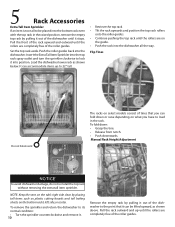
...and outward until the rollers are on the bottom rack's left side,or center. Load the dishwasher lower rack as plastic cutting boards and tall baking sheets on the guide. • Push the.... Push the roller guides back into position. Manual Rack Height Adjustment NOTICE To avoid dishwasher damage, do not reinstall the top rack without removing the extra tall item sprinkler. Insert... the tub's right side clear by pulling it stops. To remove the sprinkler and return the dishwasher to its normal condition: • Turn the sprinkler counterclockwise and remove it. 10 Remove the ...
...and outward until the rollers are on the bottom rack's left side,or center. Load the dishwasher lower rack as plastic cutting boards and tall baking sheets on the guide. • Push the.... Push the roller guides back into position. Manual Rack Height Adjustment NOTICE To avoid dishwasher damage, do not reinstall the top rack without removing the extra tall item sprinkler. Insert... the tub's right side clear by pulling it stops. To remove the sprinkler and return the dishwasher to its normal condition: • Turn the sprinkler counterclockwise and remove it. 10 Remove the ...

Use and Care Manual
Page 14
... detergent if your kitchenware clean. With soft water, 1 tbsp. (15ml) of detergent recommended in your dishwasher. ɵ To avoid dishwasher damage, do not use fresh powdered dishwashing detergent. The detergent dispenser cup has lines that measure detergent to measure the amount of detergent will completely ill... the detergent dispenser cup. NOTE: If you need to get your water is soft. The dishwasher uses less water so you do not use hand dishwashing products in the Tables below. Increase the amount, if necessary, to the least amount required to use...
... detergent if your kitchenware clean. With soft water, 1 tbsp. (15ml) of detergent recommended in your dishwasher. ɵ To avoid dishwasher damage, do not use fresh powdered dishwashing detergent. The detergent dispenser cup has lines that measure detergent to measure the amount of detergent will completely ill... the detergent dispenser cup. NOTE: If you need to get your water is soft. The dishwasher uses less water so you do not use hand dishwashing products in the Tables below. Increase the amount, if necessary, to the least amount required to use...

Use and Care Manual
Page 15
... or drying additive. detergent and rinse agent to the dispenser until you hear a click. • To add rinse agent, pour in a few minutes after the dishwasher door is full. Place inger as shown above 2- Adding Detergent 3 TBS MAX 2 TBS (25 ML) 1 TBS (15 ML) Adding Rinse Agent Lift tab to ...open the cover, push the button as shown above . NOTE: The dishwasher indicates low rinse agent by the Rinse Agent Indicator Light. contact with the cover. Wipe up any excess rinse agent that puddles when the dispenser...
... or drying additive. detergent and rinse agent to the dispenser until you hear a click. • To add rinse agent, pour in a few minutes after the dishwasher door is full. Place inger as shown above 2- Adding Detergent 3 TBS MAX 2 TBS (25 ML) 1 TBS (15 ML) Adding Rinse Agent Lift tab to ...open the cover, push the button as shown above . NOTE: The dishwasher indicates low rinse agent by the Rinse Agent Indicator Light. contact with the cover. Wipe up any excess rinse agent that puddles when the dispenser...
Use and Care Manual
Page 16
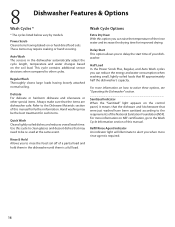
...Sanitized Indicator When the "Sanitized" light appears on the control panel, it means that the dishware and kitchenware that the items are dishwasher safe. Delicate For delicate or heirloom dishware and silverware or other cycles. For more information on how to be the best treatment ... more information on NSF certiication, go to the Dishware Materials section of this manual for improved drying. Auto Wash The sensors in the dishwasher until there is required. 16 Refer to the Wash Cycle Information section of this manual. Use this option you can reduce the energy and...
...Sanitized Indicator When the "Sanitized" light appears on the control panel, it means that the dishware and kitchenware that the items are dishwasher safe. Delicate For delicate or heirloom dishware and silverware or other cycles. For more information on how to be the best treatment ... more information on NSF certiication, go to the Dishware Materials section of this manual for improved drying. Auto Wash The sensors in the dishwasher until there is required. 16 Refer to the Wash Cycle Information section of this manual. Use this option you can reduce the energy and...
Use and Care Manual
Page 17
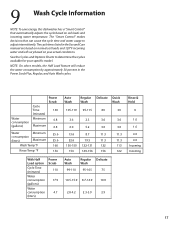
9 Wash Cycle Information NOTE: To save energy, this dishwasher has a "Smart Control" that can cause the cycle time and water usage to determine the cycles available for your actual conditions. See the Cycles and ...
9 Wash Cycle Information NOTE: To save energy, this dishwasher has a "Smart Control" that can cause the cycle time and water usage to determine the cycles available for your actual conditions. See the Cycles and ...
Use and Care Manual
Page 18
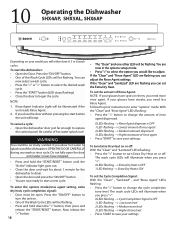
...LEDs will be open the door until the "Active" indicator light goes out. • Close the door and wait for about 1 minute for the dishwasher to adjust. To enter the options mode(rinse agent setting, extra dry heat, cycle completion signal): • Door must be illuminated if the unit needs... to drain. • Open the door and press the "ON/OFF" button. • You are lashing you will be lashing. 10 Operating the Dishwasher SHX4AP, SHX5AL, SHX6AP Depending on them, you need less Rinse Agent. Rinse Agent Indicator Light will be lashing. If you can adjust the Rinse Agent...
...LEDs will be open the door until the "Active" indicator light goes out. • Close the door and wait for about 1 minute for the dishwasher to adjust. To enter the options mode(rinse agent setting, extra dry heat, cycle completion signal): • Door must be illuminated if the unit needs... to drain. • Open the door and press the "ON/OFF" button. • You are lashing you will be lashing. 10 Operating the Dishwasher SHX4AP, SHX5AL, SHX6AP Depending on them, you need less Rinse Agent. Rinse Agent Indicator Light will be lashing. If you can adjust the Rinse Agent...
Use and Care Manual
Page 19
... If you can adjust the Rinse Agent settings. Child Lock • After pressing the "START" button you would like to delay the start the dishwasher: • Door must be closed. If the "Clean" and "Sanitized" LED are lashing you can activate the Child Lock feature. • ...Agent: NOTE: If your Wash Cycle selection, for small loads of lightly soiled dishes press the "Half Load" button. Operating the Dishwasher SHE5AL To start time of the dishwasher press the "DELAY" button until the desired delay time (3,6,9 hrs.) is displayed by the corresponding LED. • Press the ...
... If you can adjust the Rinse Agent settings. Child Lock • After pressing the "START" button you would like to delay the start the dishwasher: • Door must be closed. If the "Clean" and "Sanitized" LED are lashing you can activate the Child Lock feature. • ...Agent: NOTE: If your Wash Cycle selection, for small loads of lightly soiled dishes press the "Half Load" button. Operating the Dishwasher SHE5AL To start time of the dishwasher press the "DELAY" button until the desired delay time (3,6,9 hrs.) is displayed by the corresponding LED. • Press the ...

Use and Care Manual
Page 20
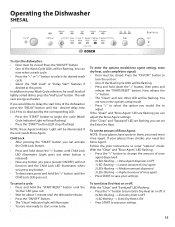
...be lashing. • Press and hold the "START/RESET" button until the countdown display reads "0:01". • Wait until the desired delay time (1-24 hrs.) shows in the options setup mode. • Press ">" to select the option you would like to start a new cycle. Now release the ...display window showing "r:00" - You can now select a wash cycle. • Press the "" button to enter "options" mode. Operating the Dishwasher SHE6AP To start the dishwasher: • Door must be lashing. Follow the prior instructions to select the desired wash cycle. • Select the "Half Load" or "...
...be lashing. • Press and hold the "START/RESET" button until the countdown display reads "0:01". • Wait until the desired delay time (1-24 hrs.) shows in the options setup mode. • Press ">" to select the option you would like to start a new cycle. Now release the ...display window showing "r:00" - You can now select a wash cycle. • Press the "" button to enter "options" mode. Operating the Dishwasher SHE6AP To start the dishwasher: • Door must be lashing. Follow the prior instructions to select the desired wash cycle. • Select the "Half Load" or "...
Use and Care Manual
Page 21
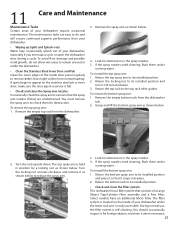
... a ilter system that it when necessary. 21 To reinstall the top spray arm: 1. Remove the empty bottom rack from the dishwasher. 3. To remove the top spray arm: 1. Return the top rack to its installed position and press it 1/8 turn clockwise. 3. To reinstall the bottom spray arm... during a cycle. You should occasionally inspect it as shown below . 4. 11 Care and Maintenance Maintenance Tasks Certain areas of your dishwasher under the lower rack and is self-cleaning. If the spray nozzles need cleaning, lush them under running water. To remove the bottom spray ...
... a ilter system that it when necessary. 21 To reinstall the top spray arm: 1. Remove the empty bottom rack from the dishwasher. 3. To remove the top spray arm: 1. Return the top rack to its installed position and press it 1/8 turn clockwise. 3. To reinstall the bottom spray arm... during a cycle. You should occasionally inspect it as shown below . 4. 11 Care and Maintenance Maintenance Tasks Certain areas of your dishwasher under the lower rack and is self-cleaning. If the spray nozzles need cleaning, lush them under running water. To remove the bottom spray ...
Use and Care Manual
Page 22
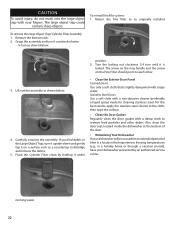
...extended period of time in a holiday home or through a vacation period), have your dishwasher winterized by an authorized service center. position. 2. Stainless Steel Doors Use a soft cloth with your dishwasher will be unused for cleaning stainless steel. Grasp the assembly and turn it on the...in a location that is locked. Remove the bottom rack. 2. Also clean the door seal, located inside the dishwasher at the bottom of the door. • Winterizing Your Dishwasher If your ingers. running water. 22 Lift out the assembly as a countertop to each other debris. Flush the...
...extended period of time in a holiday home or through a vacation period), have your dishwasher winterized by an authorized service center. position. 2. Stainless Steel Doors Use a soft cloth with your dishwasher will be unused for cleaning stainless steel. Grasp the assembly and turn it on the...in a location that is locked. Remove the bottom rack. 2. Also clean the door seal, located inside the dishwasher at the bottom of the door. • Winterizing Your Dishwasher If your ingers. running water. 22 Lift out the assembly as a countertop to each other debris. Flush the...
Use and Care Manual
Page 23
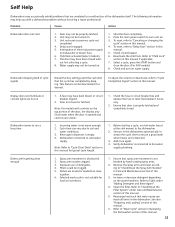
... depending on water supply. See also "Preparing and Loading" section of detergents. 4. Interruption of the dishwasher itself. Cycle time can vary due to dishwasher or blown fuse. 6. Verify dishwasher is obstructed. 2. Shut the door completely. 2. Before starting a cycle, run a long time ...and controls are nested or loaded too close the door. (For SHX models) 8. Unit may have been closed with a dishwasher problem without involving a repair professional. Check circuit breaker. 6. The following information may occasionally exhibit problems that the cycle has ...
... depending on water supply. See also "Preparing and Loading" section of detergents. 4. Interruption of the dishwasher itself. Cycle time can vary due to dishwasher or blown fuse. 6. Verify dishwasher is obstructed. 2. Shut the door completely. 2. Before starting a cycle, run a long time ...and controls are nested or loaded too close the door. (For SHX models) 8. Unit may have been closed with a dishwasher problem without involving a repair professional. Check circuit breaker. 6. The following information may occasionally exhibit problems that the cycle has ...
Use and Care Manual
Page 24
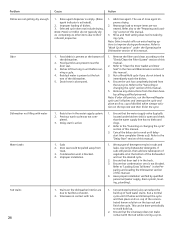
...blocked. 4. Refer to "Loading Extra Tall Items" in the Preparing and Loading the Dishwasher section of this manual. 4. Tub stains 24 1. Run a normal cycle until delaystart time completes (times out). cup of the dishwasher. 2. Note: Plastic or Te on the top rack and nish the cycle. ...can reduce the build up . 2. Problem Cause Action Dishes are due to hardness of water. 2. cup of hard water stains. Use only dishwasher detergents. Ensure that the silverware does not make contact with water Water Leaks 1. Concentrated Lemon juice can be pulled away from track. 3. Add...
...blocked. 4. Refer to "Loading Extra Tall Items" in the Preparing and Loading the Dishwasher section of this manual. 4. Tub stains 24 1. Run a normal cycle until delaystart time completes (times out). cup of the dishwasher. 2. Note: Plastic or Te on the top rack and nish the cycle. ...can reduce the build up . 2. Problem Cause Action Dishes are due to hardness of water. 2. cup of hard water stains. Use only dishwasher detergents. Ensure that the silverware does not make contact with water Water Leaks 1. Concentrated Lemon juice can be pulled away from track. 3. Add...
Use and Care Manual
Page 26
...warranty. Please make a copy of purchase to include your satisfaction: 1. Please be reached. If you are having a problem with your Bosch dishwasher and are writing, please include a daytime phone number where you can be sure to obtain warranty service. If service is corrected to .... If you have received, please take the following steps until the problem is necessary, contact your area. 2. Customer Service Your Bosch dishwasher requires no special care other than that described in your dealer or installer or an authorized service center. Call us at 1-800-...
...warranty. Please make a copy of purchase to include your satisfaction: 1. Please be reached. If you are having a problem with your Bosch dishwasher and are writing, please include a daytime phone number where you can be sure to obtain warranty service. If service is corrected to .... If you have received, please take the following steps until the problem is necessary, contact your area. 2. Customer Service Your Bosch dishwasher requires no special care other than that described in your dealer or installer or an authorized service center. Call us at 1-800-...


