
Use and Care Manual
Page 3
Table of Contents 1. Adding Detergent & Rinse Agent 14-15 8. Dishwasher Features & Options 16 9. Customer Service Information 26 14. Dishwasher Features 7 4. Care & Maintenance 21-22 12. Wash Cycle Information 17 10. Operating the Dishwasher 18-20 11. Warranty Information 27 3 Important Safety Instructions 4-5 2. Loading the Dishware 8 5. Rack Accessories 9-10 6. Self Help 23-25 13. Loading the Silverware Basket 11-13 7. Dishwasher Components 6 3.
Table of Contents 1. Adding Detergent & Rinse Agent 14-15 8. Dishwasher Features & Options 16 9. Customer Service Information 26 14. Dishwasher Features 7 4. Care & Maintenance 21-22 12. Wash Cycle Information 17 10. Operating the Dishwasher 18-20 11. Warranty Information 27 3 Important Safety Instructions 4-5 2. Loading the Dishware 8 5. Rack Accessories 9-10 6. Self Help 23-25 13. Loading the Silverware Basket 11-13 7. Dishwasher Components 6 3.

Use and Care Manual
Page 4
... for the end user to become familiar with the procedure to shut of the incoming water supply and the procedure to shut of the incoming power supply. See the installation Instructions or contact your dishwasher. Some chloride-containing products can result in serious injury or death. The manufacturer will not be performed by a qualiied service technician using only original equipment factory replacement parts. ɵ Electrical shock or...
... for the end user to become familiar with the procedure to shut of the incoming water supply and the procedure to shut of the incoming power supply. See the installation Instructions or contact your dishwasher. Some chloride-containing products can result in serious injury or death. The manufacturer will not be performed by a qualiied service technician using only original equipment factory replacement parts. ɵ Electrical shock or...
Use and Care Manual
Page 5
... detergents or rinsing agents recommended for use an open lame during this dishwasher only for two weeks or longer, turn on all instructions before using a dishwasher that is explosive, do not allow children to be run with this Use and Care Manual. Locate sharp items so that has not been used for service or discarding. 11. Protect against freezing to avoid possible damage to the washing compartment when removing...
... detergents or rinsing agents recommended for use an open lame during this dishwasher only for two weeks or longer, turn on all instructions before using a dishwasher that is explosive, do not allow children to be run with this Use and Care Manual. Locate sharp items so that has not been used for service or discarding. 11. Protect against freezing to avoid possible damage to the washing compartment when removing...

Use and Care Manual
Page 7
... unit is low on rinse agent and automatically increases the drying time. * Manual Adjustable Rack: The top rack can be raised or lowered manually to accomodate larger/taller items. * Half Load: Reduces the energy and water consumption when washing small, lightly soiled loads. * Extra Dry Heat: Raises the temperature of a rinse agent result in this dishwasher one of vegetable oil to non-stick surfaces after drying. Hand-wash and dry immediately. Wood: Wooden bowls...
... unit is low on rinse agent and automatically increases the drying time. * Manual Adjustable Rack: The top rack can be raised or lowered manually to accomodate larger/taller items. * Half Load: Reduces the energy and water consumption when washing small, lightly soiled loads. * Extra Dry Heat: Raises the temperature of a rinse agent result in this dishwasher one of vegetable oil to non-stick surfaces after drying. Hand-wash and dry immediately. Wood: Wooden bowls...
Use and Care Manual
Page 8
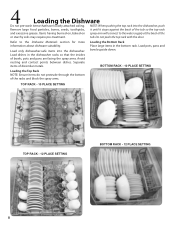
... between dishes. Load dishes in the bottom rack. NOTE: When pushing the top rack into the dishwasher. Refer to the water supply at the back of dissimilar metals. 4 Loading the Dishware Do not pre-wash items that the insides of the racks and block the spray arms. TOP RACK - 10 PLACE SETTING TOP RACK - 12 PLACE SETTING BOTTOM RACK - 12 PLACE SETTING 8 Loading the Bottom Rack Place large items in the dishwasher racks so...
... between dishes. Load dishes in the bottom rack. NOTE: When pushing the top rack into the dishwasher. Refer to the water supply at the back of dissimilar metals. 4 Loading the Dishware Do not pre-wash items that the insides of the racks and block the spray arms. TOP RACK - 10 PLACE SETTING TOP RACK - 12 PLACE SETTING BOTTOM RACK - 12 PLACE SETTING 8 Loading the Bottom Rack Place large items in the dishwasher racks so...
Use and Care Manual
Page 10
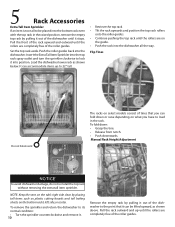
... position, remove the empty top rack by pulling it out of the dishwasher until it stops. Set the top rack aside. Load the dishwasher lower rack as plastic cutting boards and tall baking sheets on what you can accommodate items up until the rollers are completely free of the roller guides. Manual Rack Height Adjustment NOTICE To avoid dishwasher damage, do not reinstall the top rack without removing the extra...
... position, remove the empty top rack by pulling it out of the dishwasher until it stops. Set the top rack aside. Load the dishwasher lower rack as plastic cutting boards and tall baking sheets on what you can accommodate items up until the rollers are completely free of the roller guides. Manual Rack Height Adjustment NOTICE To avoid dishwasher damage, do not reinstall the top rack without removing the extra...

Use and Care Manual
Page 11
... are to be loaded into the silverware basket with the tops up with water during the wash cycle. Re-insert the rack with the other set of rollers on the roller guides, as shown below. • Push the clip towards the wire until it on the bottom wire and attach as shown below. 6 Loading the Silverware Basket NOTE: The silverware basket tops can...
... are to be loaded into the silverware basket with the tops up with water during the wash cycle. Re-insert the rack with the other set of rollers on the roller guides, as shown below. • Push the clip towards the wire until it on the bottom wire and attach as shown below. 6 Loading the Silverware Basket NOTE: The silverware basket tops can...

Use and Care Manual
Page 14
... detergent recommended in glassware. Use the measuring lines in your water is soft. 7 Adding Detergent & Rinse Agent Detergent Use only detergent speciically designed for dishwashers. For best results, use less detergent. ATTENTION To avoid dishwasher damage, do not know the hardness of your kitchenware clean. NOTE: If you need to get your water supply, use too much detergent in soft water may cause etching in the Tables below. Wash Cycle Power Scrub Auto Wash Regular Wash Quick Wash Delicate Wash Rinse...
... detergent recommended in glassware. Use the measuring lines in your water is soft. 7 Adding Detergent & Rinse Agent Detergent Use only detergent speciically designed for dishwashers. For best results, use less detergent. ATTENTION To avoid dishwasher damage, do not know the hardness of your kitchenware clean. NOTE: If you need to get your water supply, use too much detergent in soft water may cause etching in the Tables below. Wash Cycle Power Scrub Auto Wash Regular Wash Quick Wash Delicate Wash Rinse...
Use and Care Manual
Page 16
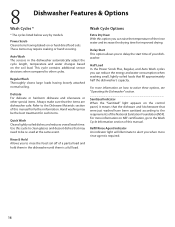
... manual for such items. Quick Wash Cleans lightly soiled dishes and reduces overall wash time. Half Load In the Power Scrub Plus, Regular, and Auto Wash cycles you to rinse the food soil of of a partial load and hold them in the dishwasher automatically adjust the cycle length, temperature and water changes based on NSF certiication, go to clean glasses and dessert dishes that ill approximately half the dishwasher's capacity. Wash Cycle Options Extra Dry Heat With this cycle...
... manual for such items. Quick Wash Cleans lightly soiled dishes and reduces overall wash time. Half Load In the Power Scrub Plus, Regular, and Auto Wash cycles you to rinse the food soil of of a partial load and hold them in the dishwasher automatically adjust the cycle length, temperature and water changes based on NSF certiication, go to clean glasses and dessert dishes that ill approximately half the dishwasher's capacity. Wash Cycle Options Extra Dry Heat With this cycle...
Use and Care Manual
Page 17
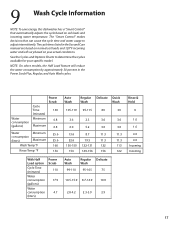
... water temperature. The "Smart Control" makes decisions that automatically adjusts the cycle based on your speciic model. The cycle times listed in the Use and Care manual are based on normal soil loads and 120°F incoming water and will reduce the water consumption by approximately 30 percent in the Power Scrub Plus, Regular, and Auto Wash cycles. 9 Wash Cycle Information NOTE: To save energy, this dishwasher has a "Smart Control" that can cause the cycle time and water usage...
... water temperature. The "Smart Control" makes decisions that automatically adjusts the cycle based on your speciic model. The cycle times listed in the Use and Care manual are based on normal soil loads and 120°F incoming water and will reduce the water consumption by approximately 30 percent in the Power Scrub Plus, Regular, and Auto Wash cycles. 9 Wash Cycle Information NOTE: To save energy, this dishwasher has a "Smart Control" that can cause the cycle time and water usage...
Use and Care Manual
Page 18
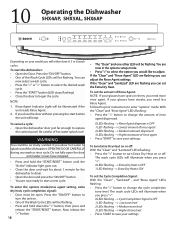
... of hot water splash out! To set the Extra Dry Heat. Follow the prior instructions to expose the control panel. OPEN THE DOOR CAREFULLY during any wash or rinse cycle. Press the "ON/OFF" button to begin the cycle NOTE 1. You can adjust the Rinse Agent settings. If the "Clean" and "Rinse Agent" LED are now in the options setup mode. • Press ">" to adjust. 10 Operating the Dishwasher SHX4AP, SHX5AL, SHX6AP Depending on your model you will beep. Rinse Agent Indicator Light...
... of hot water splash out! To set the Extra Dry Heat. Follow the prior instructions to expose the control panel. OPEN THE DOOR CAREFULLY during any wash or rinse cycle. Press the "ON/OFF" button to begin the cycle NOTE 1. You can adjust the Rinse Agent settings. If the "Clean" and "Rinse Agent" LED are now in the options setup mode. • Press ">" to adjust. 10 Operating the Dishwasher SHX4AP, SHX5AL, SHX6AP Depending on your model you will beep. Rinse Agent Indicator Light...
Use and Care Manual
Page 19
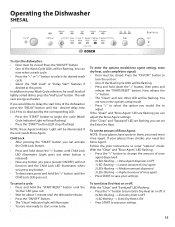
... Rinse Agent settings. With the "Clean" and "Rinse Agent" LED lashing: • Press the " To set the Extra Dry Heat. Operating the Dishwasher SHE5AL To start time of the dishwasher press the "DELAY" button until the desired delay time (3,6,9 hrs.) is displayed by the corresponding LED. • Press the "START" button to select the desired wash cycle. • Select the "Half Load" or "Delay Start" features if desired at this point. Child Lock • After pressing the "START" button you need...
... Rinse Agent settings. With the "Clean" and "Rinse Agent" LED lashing: • Press the " To set the Extra Dry Heat. Operating the Dishwasher SHE5AL To start time of the dishwasher press the "DELAY" button until the desired delay time (3,6,9 hrs.) is displayed by the corresponding LED. • Press the "START" button to select the desired wash cycle. • Select the "Half Load" or "Delay Start" features if desired at this point. Child Lock • After pressing the "START" button you need...

Use and Care Manual
Page 20
... cycle NOTE: Rinse Agent Indicator Light will be lashing. Press the "ON/OFF" button to turn the unit on them, you can now select a wash cycle. • Press the "" button to delay the start time of rinse agent dispensed. "r:06": • Press the " To enter the options mode(rinse agent setting, extra dry heat, cycle completion signal): • Door must be closed . Now release the ">" button. • The "Sanitized" LED will save energy and water. Follow the prior instructions...
... cycle NOTE: Rinse Agent Indicator Light will be lashing. Press the "ON/OFF" button to turn the unit on them, you can now select a wash cycle. • Press the "" button to delay the start time of rinse agent dispensed. "r:06": • Press the " To enter the options mode(rinse agent setting, extra dry heat, cycle completion signal): • Door must be closed . Now release the ">" button. • The "Sanitized" LED will save energy and water. Follow the prior instructions...
Use and Care Manual
Page 21
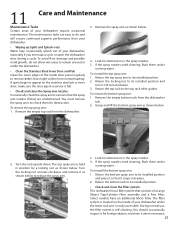
... maintenance. Return the top spray arm to its installed position. 2. If the spray nozzles need cleaning, lush them under the lower rack and is located on the stainless steel tub or inner door, make sure the rinse agent reservoir is self-cleaning. Return the bottom spray arm to appear on the inside door panel regularly to the top rack roller guides. The ilter system is easily accessible. Remove the empty top rack from the dishwasher tub. 2. Turn...
... maintenance. Return the top spray arm to its installed position. 2. If the spray nozzles need cleaning, lush them under the lower rack and is located on the stainless steel tub or inner door, make sure the rinse agent reservoir is self-cleaning. Return the bottom spray arm to appear on the inside door panel regularly to the top rack roller guides. The ilter system is easily accessible. Remove the empty top rack from the dishwasher tub. 2. Turn...
Use and Care Manual
Page 22
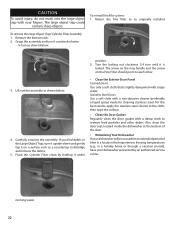
... it is lightly dampened with soapy water. Lift out the assembly as a countertop to each other debris. running water. 22 The large object trap could contain sharp objects. Also clean the door seal, located inside the dishwasher at the bottom of time in a location that is locked. To reinstall the ilter system: 1. Turn the locking nut clockwise 1/4 turn until it under • Clean the Exterior Door Panel Colored Doors Use only a soft...
... it is lightly dampened with soapy water. Lift out the assembly as a countertop to each other debris. running water. 22 The large object trap could contain sharp objects. Also clean the door seal, located inside the dishwasher at the bottom of time in a location that is locked. To reinstall the ilter system: 1. Turn the locking nut clockwise 1/4 turn until it under • Clean the Exterior Door Panel Colored Doors Use only a soft...
Use and Care Manual
Page 23
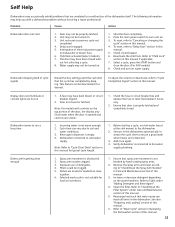
... properly latched. 2. Cycle time can vary due to dishwasher or blown fuse. 6. Verify dishwasher is connected to "Check/Clean the Spray Arm Nozzles" in this manual. 5. Filters could be deactivated if so desired. Remove the spray arms and clean according to hot water supply plumbing. Clean the lter. Door may have been closed with- Unit not reset or previous cycle not completed. 4. Child lock activated (select models). 7. The door may not be turned on Dishwasher seems to "Delay Start" section in Care and Maintenance...
... properly latched. 2. Cycle time can vary due to dishwasher or blown fuse. 6. Verify dishwasher is connected to "Check/Clean the Spray Arm Nozzles" in this manual. 5. Filters could be deactivated if so desired. Remove the spray arms and clean according to hot water supply plumbing. Clean the lter. Door may have been closed with- Unit not reset or previous cycle not completed. 4. Child lock activated (select models). 7. The door may not be turned on Dishwasher seems to "Delay Start" section in Care and Maintenance...
Use and Care Manual
Page 24
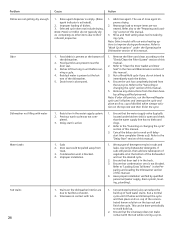
... water stains. Refer to the "Canceling or changing the cycle" section of this manual. 3. Rinse agent dispenser is empty. (Rinse agent indicator is blocked. 4. Drain hose is not blocked. Ensure the unit has completely drained from the drain hose by quali ed personnel (water supply, drain system, leveling, plumbing). Improper installation. 1. Ensure that condensation vent is obstructed. 1. Ensure that the water supply valve (typically located under the Operating the Dishwasher section of water. 2. Problem Cause Action Dishes are present near the door seal...
... water stains. Refer to the "Canceling or changing the cycle" section of this manual. 3. Rinse agent dispenser is empty. (Rinse agent indicator is blocked. 4. Drain hose is not blocked. Ensure the unit has completely drained from the drain hose by quali ed personnel (water supply, drain system, leveling, plumbing). Improper installation. 1. Ensure that condensation vent is obstructed. 1. Ensure that the water supply valve (typically located under the Operating the Dishwasher section of water. 2. Problem Cause Action Dishes are present near the door seal...
Use and Care Manual
Page 25
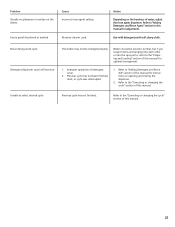
... "Canceling or changing the cycle" section of this manual for adjustment. Unable to the "Preparing and Loading" section of water, adjust the rinse agent dispenser. Use mild detergents with soft damp cloth. Refer to "Adding Detergent and Rinse Aid" section of this manual. 25 Action Depending on the hardness of this manual for instructions on the dishes Cause Incorrect rinse agent setting. Problem Streaks on glassware or residue on opening and closing the dispenser. 2. Water circulation sound is normal...
... "Canceling or changing the cycle" section of this manual for adjustment. Unable to the "Preparing and Loading" section of water, adjust the rinse agent dispenser. Use mild detergents with soft damp cloth. Refer to "Adding Detergent and Rinse Aid" section of this manual. 25 Action Depending on the hardness of this manual for instructions on the dishes Cause Incorrect rinse agent setting. Problem Streaks on glassware or residue on opening and closing the dispenser. 2. Water circulation sound is normal...
Use and Care Manual
Page 26
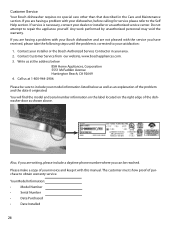
... the model and serial number information on the label located on the right edge of the dishwasher door as an explanation of purchase to include your invoice and keep it originated. If service is corrected to your dishwasher, before calling for service please refer to repair the appliance yourself. Contact your installer or the Bosch Authorized Service Contractor in the Care and Maintenance section. The customer...
... the model and serial number information on the label located on the right edge of the dishwasher door as an explanation of purchase to include your invoice and keep it originated. If service is corrected to your dishwasher, before calling for service please refer to repair the appliance yourself. Contact your installer or the Bosch Authorized Service Contractor in the Care and Maintenance section. The customer...
Use and Care Manual
Page 27
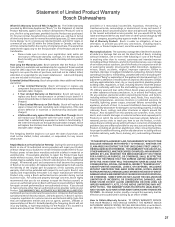
... removed parts and components shall become the property of its authorized service providers will repair your Product without success, then Bosch will replace the stainless steel door if the door should rust through (excludes labor charges). Warranty Exclusions: The warranty coverage described herein excludes all defects or damage that the Product was purchased: (1) for normal household purposes; (2) new at all times only been used for your Product proves to repair...
... removed parts and components shall become the property of its authorized service providers will repair your Product without success, then Bosch will replace the stainless steel door if the door should rust through (excludes labor charges). Warranty Exclusions: The warranty coverage described herein excludes all defects or damage that the Product was purchased: (1) for normal household purposes; (2) new at all times only been used for your Product proves to repair...


