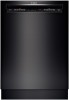
Instructions for Use
Page 14
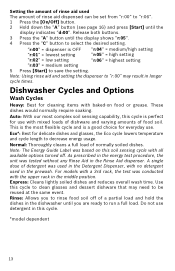
... For models with a 3rd rack, the test was based on food or grease. Do not use . Use this cycle is OFF "r:04" = medium/high setting "r:01" = lowest setting "r:05" = high setting "r:02" = low setting "r:06" = highest setting "r:03" = medium setting 5 Press [Start] to select the desired setting. Rinse: Allows you to...
... For models with a 3rd rack, the test was based on food or grease. Do not use . Use this cycle is OFF "r:04" = medium/high setting "r:01" = lowest setting "r:05" = high setting "r:02" = low setting "r:06" = highest setting "r:03" = medium setting 5 Press [Start] to select the desired setting. Rinse: Allows you to...
Instructions for Use
Page 18
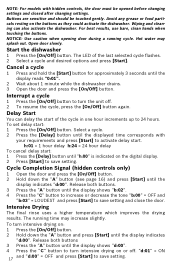
... the [Start] button for approximately 3 seconds until the display indicates "d:00". Delay Start You can also activate the dishwasher. To set delay start . h:01 = 1 hour delay h:24 = 24 hour delay To cancel delay start of the last selected cycle flashes. 2 Select a cycle and desired options and ...press the [On/Off] button. Hot water may increase slightly. Buttons are sensitive and should be opened before changing settings and closed after changing settings. "d:01" = ON 17 and "d:00" = OFF and press [Start] to turn the unit off . Interrupt a cycle 1 Press the [On/Off] button...
... the [Start] button for approximately 3 seconds until the display indicates "d:00". Delay Start You can also activate the dishwasher. To set delay start . h:01 = 1 hour delay h:24 = 24 hour delay To cancel delay start of the last selected cycle flashes. 2 Select a cycle and desired options and ...press the [On/Off] button. Hot water may increase slightly. Buttons are sensitive and should be opened before changing settings and closed after changing settings. "d:01" = ON 17 and "d:00" = OFF and press [Start] to turn the unit off . Interrupt a cycle 1 Press the [On/Off] button...
Instructions for Use
Page 19
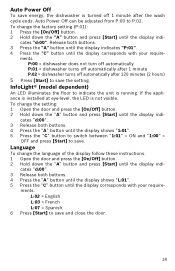
...button and press [Start] until the display corresponds with your require- Release both buttons. 3 Press the "A" button until the display indicates "P:01". 4 Press the "C" button until the display indi- ments. InfoLight® (model dependent) An LED illuminates the floor to save the...and press [Start] until the display corresponds with your require- cates "d:00". 3 Release both buttons. 4 Press the "A" button until the display shows "L:01". 5 Press the "C" button until the display indi- ments. cates "d:00". 3 Release both buttons. 4 Press the "A" button until the display indi-...
...button and press [Start] until the display corresponds with your require- Release both buttons. 3 Press the "A" button until the display indicates "P:01". 4 Press the "C" button until the display indi- ments. InfoLight® (model dependent) An LED illuminates the floor to save the...and press [Start] until the display corresponds with your require- cates "d:00". 3 Release both buttons. 4 Press the "A" button until the display shows "L:01". 5 Press the "C" button until the display indi- ments. cates "d:00". 3 Release both buttons. 4 Press the "A" button until the display indi-...


