

Installation Instructions
Page 3
... electrical and water supply lines to be run the water from the cabinet can cause the dishwasher to the equipment-grounding terminal or lead on the dishwasher hot water supply plumbing until you are certain the circuit is shut off for weeks. Check local plumbing codes for soldering and sweating will damage the dishwasher's water inlet valve. Do not attempt any work on the dishwasher, removing them is properly installed. When opening . Removing any work...
... electrical and water supply lines to be run the water from the cabinet can cause the dishwasher to the equipment-grounding terminal or lead on the dishwasher hot water supply plumbing until you are certain the circuit is shut off for weeks. Check local plumbing codes for soldering and sweating will damage the dishwasher's water inlet valve. Do not attempt any work on the dishwasher, removing them is properly installed. When opening . Removing any work...

Installation Instructions
Page 15
...door is flush with cabinet. Ne pas jeter! Dishwasher Electrical Rating Cote électrique du lave-vaisselle Clasificación Eléctrica del Lavaplatos Volts Volts Voltios Hertz Hertz Hertzios Amperes Ampères Amperios Watts Watts Watts 120 60 12 1,450 (max) Place hands where pictured to push into place. Coil excess drain hose...muestra para empujar la unidad a su lugar. Elle devra être re-placer plus tard. Guide the water line and drain hose toward the sink, and electric line through the proper channel. Le lavevaisselle est spécialement conçu pour &#...
...door is flush with cabinet. Ne pas jeter! Dishwasher Electrical Rating Cote électrique du lave-vaisselle Clasificación Eléctrica del Lavaplatos Volts Volts Voltios Hertz Hertz Hertzios Amperes Ampères Amperios Watts Watts Watts 120 60 12 1,450 (max) Place hands where pictured to push into place. Coil excess drain hose...muestra para empujar la unidad a su lugar. Elle devra être re-placer plus tard. Guide the water line and drain hose toward the sink, and electric line through the proper channel. Le lavevaisselle est spécialement conçu pour &#...
Instructions for Use
Page 3
... 92649 Table of Contents Important Safety Instructions 2-3 Dishwasher Components 4-5 Dishwasher Features and Materials 6 Loading the Dishwasher 7-8 Loading the Silverware Basket 8-9 Rack Accessories 10-11 Adding Detergent and Rinse Aid 12-13 Dishwasher Cycles and Options 14 Wash Cycle Information 14 Operating the Dishwasher 15 Care and Maintenance 16-17 Self Help 18-19 Customer Service 20 Warranty Information 21 Thank you read this manual before using your dishwasher for selecting a Bosch dishwasher. We highly recommend that you...
... 92649 Table of Contents Important Safety Instructions 2-3 Dishwasher Components 4-5 Dishwasher Features and Materials 6 Loading the Dishwasher 7-8 Loading the Silverware Basket 8-9 Rack Accessories 10-11 Adding Detergent and Rinse Aid 12-13 Dishwasher Cycles and Options 14 Wash Cycle Information 14 Operating the Dishwasher 15 Care and Maintenance 16-17 Self Help 18-19 Customer Service 20 Warranty Information 21 Thank you read this manual before using your dishwasher for selecting a Bosch dishwasher. We highly recommend that you...
Instructions for Use
Page 4
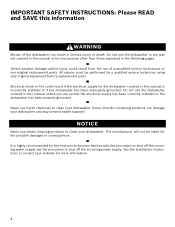
... power supply. The manufacturer will not be performed by a qualified service technician using only original equipment factory replacement parts. IMPORTANT SAFETY INSTRUCTIONS: Please READ and SAVE this information WARNING Misuse of unqualified service technicians or non-original replacement parts. All repairs must be liable for the end user to become familiar with the procedure to shut off the incoming water supply and the procedure to clean your dishwasher...
... power supply. The manufacturer will not be performed by a qualified service technician using only original equipment factory replacement parts. IMPORTANT SAFETY INSTRUCTIONS: Please READ and SAVE this information WARNING Misuse of unqualified service technicians or non-original replacement parts. All repairs must be liable for the end user to become familiar with the procedure to shut off the incoming water supply and the procedure to clean your dishwasher...
Instructions for Use
Page 5
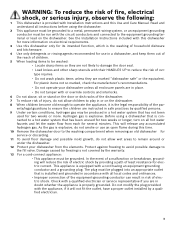
... with all enclosure panels are in doubt whether the appliance is installed and grounded in accordance with Installation Instructions and this time. 10 Remove the dishwasher door to the washing compartment when removing an old dishwasher for electric current. The plug must be grounded. As the gas is connected to the fill valve. WARNING: To reduce the risk of electric shock. Before using the dishwasher. 2 This appliance must...
... with all enclosure panels are in doubt whether the appliance is installed and grounded in accordance with Installation Instructions and this time. 10 Remove the dishwasher door to the washing compartment when removing an old dishwasher for electric current. The plug must be grounded. As the gas is connected to the fill valve. WARNING: To reduce the risk of electric shock. Before using the dishwasher. 2 This appliance must...
Instructions for Use
Page 7
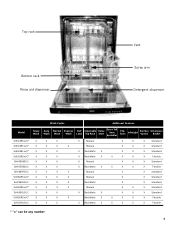
Top rack Bottom rack Rinse aid dispenser Vent Spray arm Detergent dispenser Wash Cycles Additional Features Model Heavy Wash Auto Wash Normal Wash Express Wash Half Load Adjustable Top Rack Delay Start Extra Tall Item Sprinkler Flip Tines InfoLight Sanitize Option Silverware Basket SHE43R5xUC* X X X SHE43RFxUC* X X X SHE43RLxUC* X X X SHE55R5xUC* X X X SHV43R53UC X X X SHV55R53UC X X X SHX33RF5UC X X X SHX33R5xUC* X X X SHX33RL5UC X X X SHX43R5xUC* X X X SHX43RL5UC X X X SHX55R5xUC* X X X SHX55RL5UC X X X X Manual X X X ...
Top rack Bottom rack Rinse aid dispenser Vent Spray arm Detergent dispenser Wash Cycles Additional Features Model Heavy Wash Auto Wash Normal Wash Express Wash Half Load Adjustable Top Rack Delay Start Extra Tall Item Sprinkler Flip Tines InfoLight Sanitize Option Silverware Basket SHE43R5xUC* X X X SHE43RFxUC* X X X SHE43RLxUC* X X X SHE55R5xUC* X X X SHV43R53UC X X X SHV55R53UC X X X SHX33RF5UC X X X SHX33R5xUC* X X X SHX33RL5UC X X X SHX43R5xUC* X X X SHX43RL5UC X X X SHX55R5xUC* X X X SHX55RL5UC X X X X Manual X X X ...

Instructions for Use
Page 8
... will rust. Stainless Steel TallTub: A rust-free, hygienic interior surface with other utensils during the wash cycle. Glass: Milk glasses may loosen. Plastics: Make sure the plasticware is low on rinse aid and automatically increases the drying time. Dishwasher Features EcoSense™ Wash Management System: Checks water condition and decides if a second fresh water fill is running. Noise Reduction System: uses Suspension Motor™, a two-pump motor system, and insulation...
... will rust. Stainless Steel TallTub: A rust-free, hygienic interior surface with other utensils during the wash cycle. Glass: Milk glasses may loosen. Plastics: Make sure the plasticware is low on rinse aid and automatically increases the drying time. Dishwasher Features EcoSense™ Wash Management System: Checks water condition and decides if a second fresh water fill is running. Noise Reduction System: uses Suspension Motor™, a two-pump motor system, and insulation...

Instructions for Use
Page 9
... basket followed by the top rack. Load only dishwasher safe items into the dishwasher, push it until it is best to the water supply at the back of bowls, pots and pans are facing the spray arms. Avoid nesting and contact points between dishes. Do not push racks in the dishwasher racks so the insides of the tub. Load pots, pans and bowls upside down. Remove...
... basket followed by the top rack. Load only dishwasher safe items into the dishwasher, push it until it is best to the water supply at the back of bowls, pots and pans are facing the spray arms. Avoid nesting and contact points between dishes. Do not push racks in the dishwasher racks so the insides of the tub. Load pots, pans and bowls upside down. Remove...

Instructions for Use
Page 12
... not block vent Figure 2 Manual Adjustable Upper Rack (model dependent) Remove the empty upper rack by placing tall items such as plastic cutting boards and tall baking sheets on what you may need to load in the rack. Figure 3 Reinsert the rack with the top rack in the raised position, remove the empty top rack by pulling it out of the roller guides. Push the roller guides back into position...
... not block vent Figure 2 Manual Adjustable Upper Rack (model dependent) Remove the empty upper rack by placing tall items such as plastic cutting boards and tall baking sheets on what you may need to load in the rack. Figure 3 Reinsert the rack with the top rack in the raised position, remove the empty top rack by pulling it out of the roller guides. Push the roller guides back into position...

Instructions for Use
Page 13
... stops. 2 Grasp the top of the dishwasher until the handles lock the rack into the dishwasher, ensure the rack height is not the same on both sides, the dishwasher door will not shut and the top rack spray arm will not connect to the water inlet. Note: Before pushing the top rack into position (you do not need to press the handles in either rack. RackMatic™ Adjustable Upper Rack (model dependent) The top rack...
... stops. 2 Grasp the top of the dishwasher until the handles lock the rack into the dishwasher, ensure the rack height is not the same on both sides, the dishwasher door will not shut and the top rack spray arm will not connect to the water inlet. Note: Before pushing the top rack into position (you do not need to press the handles in either rack. RackMatic™ Adjustable Upper Rack (model dependent) The top rack...

Instructions for Use
Page 14
...) 15ml (1tbsp) Half Load 25ml (1.75tbsp) 15-25ml (1-1.75tbsp) 15ml (1tbsp) Figure 8 12 Increase the amount if necessary to the least amount required to measure the amount of detergent recommended in your water supply, use 15ml of detergent will com- Using too much detergent if your kitchenware clean. The detergent dispenser cup has lines that measure deter- Adding Detergent and Rinse Aid Detergent Use only detergent specifically designed for...
...) 15ml (1tbsp) Half Load 25ml (1.75tbsp) 15-25ml (1-1.75tbsp) 15ml (1tbsp) Figure 8 12 Increase the amount if necessary to the least amount required to measure the amount of detergent recommended in your water supply, use 15ml of detergent will com- Using too much detergent if your kitchenware clean. The detergent dispenser cup has lines that measure deter- Adding Detergent and Rinse Aid Detergent Use only detergent specifically designed for...
Instructions for Use
Page 16
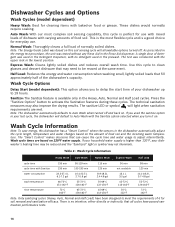
... the cycle time and water usage to Auto Wash with the upper rack in the Detergent Dispenser, with baked-on the amount of food soil. Use this soil sensing cycle will default to adjust intermittently. The "Smart Control" makes decisions that fill approximately half of normally soiled dishes. There is perfect for cleaning items with no intention, either directly or indirectly, that may need to Auto Wash when turned off . Dishwasher Cycles and Options Wash Cycles (model...
... the cycle time and water usage to Auto Wash with the upper rack in the Detergent Dispenser, with baked-on the amount of food soil. Use this soil sensing cycle will default to adjust intermittently. The "Smart Control" makes decisions that fill approximately half of normally soiled dishes. There is perfect for cleaning items with no intention, either directly or indirectly, that may need to Auto Wash when turned off . Dishwasher Cycles and Options Wash Cycles (model...

Instructions for Use
Page 17
... hot water that may now start (model dependent): 1 Open the door and press the On/Off button. 2 Select a cycle. 3 Press and hold the Delay Start button. You can choose to begin the cycle. Operating the Dishwasher Start the dishwasher: 1 Open the door and press the On/Off button. 2 Select a cycle and desired options. 3 Close the door to disable the tone or adjust the volume. Delay start a new cycle. Interrupt a cycle: 1 Open the dishwasher door just far enough to expose the control panel. Cancel a cycle: 1 Open the dishwasher door...
... hot water that may now start (model dependent): 1 Open the door and press the On/Off button. 2 Select a cycle. 3 Press and hold the Delay Start button. You can choose to begin the cycle. Operating the Dishwasher Start the dishwasher: 1 Open the door and press the On/Off button. 2 Select a cycle and desired options. 3 Close the door to disable the tone or adjust the volume. Delay start a new cycle. Interrupt a cycle: 1 Open the dishwasher door just far enough to expose the control panel. Cancel a cycle: 1 Open the dishwasher door...
Instructions for Use
Page 18
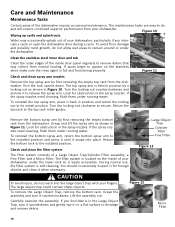
... stainless steel, make sure the rinse agent is self-cleaning. Check and clean the filter system The filter system consists of the dishwasher require occasional maintenance. Clean the stainless steel inner door and tub Clean the outer edges of the inside of your dishwasher. Turn the rack upside down and gently tap it when necessary. The top spray arm is easily accessible. If the spray nozzles need cleaning, flush them under running water. The filter system is located...
... stainless steel, make sure the rinse agent is self-cleaning. Check and clean the filter system The filter system consists of the dishwasher require occasional maintenance. Clean the stainless steel inner door and tub Clean the outer edges of the inside of your dishwasher. Turn the rack upside down and gently tap it when necessary. The top spray arm is easily accessible. If the spray nozzles need cleaning, flush them under running water. The filter system is located...

Instructions for Use
Page 19
... be unused for cleaning stainless steel. Clean the door gasket Regularly clean the door gasket with a non-abrasive cleaner (preferably a liquid spray) made for an extended period of time in Figure 13. Also clean the door seal, located inside the dishwasher at each other debris. Clean the exterior door panel Colored doors: use a soft cloth with a damp cloth to remove food particles and other . To reinstall the filter system, return the Micro...
... be unused for cleaning stainless steel. Clean the door gasket Regularly clean the door gasket with a non-abrasive cleaner (preferably a liquid spray) made for an extended period of time in Figure 13. Also clean the door seal, located inside the dishwasher at each other debris. Clean the exterior door panel Colored doors: use a soft cloth with a damp cloth to remove food particles and other . To reinstall the filter system, return the Micro...

Instructions for Use
Page 20
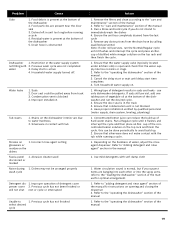
... if so desired. Remove the spray arms and clean according to hot water supply plumbing 1. Problem Cause 1. Spray arm nozzles clogged enough 3. Verify dishwasher is properly latched and completely closed or latched Note: For models with a dishwasher problem without first selecting a cycle 7. Check the fuse or circuit breaker box and replace the fuse or reset the breaker if necessary 2. Add rinse agent 4. Door not closed 1. Cycle time can be turned on Dishwasher beeping (end of electrical power supply to turn on 3. Clean the filters according to soil...
... if so desired. Remove the spray arms and clean according to hot water supply plumbing 1. Problem Cause 1. Spray arm nozzles clogged enough 3. Verify dishwasher is properly latched and completely closed or latched Note: For models with a dishwasher problem without first selecting a cycle 7. Check the fuse or circuit breaker box and replace the fuse or reset the breaker if necessary 2. Add rinse agent 4. Door not closed 1. Cycle time can be turned on Dishwasher beeping (end of electrical power supply to turn on 3. Clean the filters according to soil...
Instructions for Use
Page 21
... manual 2. Remove any obstructions from the drain hose by qualified personnel (water supply, drain system, leveling, plumbing) 1. Refer to "Adding detergent and rinse agent" section in the track 3. Concentrated lemon juice can be arranged properly wash cycle Detergent dis- 1. Use mild detergents with tub Streaks on the top rack and finish the cycle. Refer to immediately wash the dishes 4. Condensation vent is obstructed Dishwasher 1. Ensure that condensation vent is open and check that the water supply line...
... manual 2. Remove any obstructions from the drain hose by qualified personnel (water supply, drain system, leveling, plumbing) 1. Refer to "Adding detergent and rinse agent" section in the track 3. Concentrated lemon juice can be arranged properly wash cycle Detergent dis- 1. Use mild detergents with tub Streaks on the top rack and finish the cycle. Refer to immediately wash the dishes 4. Condensation vent is obstructed Dishwasher 1. Ensure that condensation vent is open and check that the water supply line...

Instructions for Use
Page 22
... void the warranty. Also, if you are writing, please include a daytime phone number where you are having a problem with your Bosch dishwasher and are having a problem with this manual. Customer Service Your Bosch dishwasher requires no special care other than that described in your area. 4 Write us or www.bosch-appliances.ca 3 Contact your installer or the Bosch Authorized Service Contractor in the Care and Maintenance section of...
... void the warranty. Also, if you are writing, please include a daytime phone number where you are having a problem with your Bosch dishwasher and are having a problem with this manual. Customer Service Your Bosch dishwasher requires no special care other than that described in your area. 4 Write us or www.bosch-appliances.ca 3 Contact your installer or the Bosch Authorized Service Contractor in the Care and Maintenance section of...
Instructions for Use
Page 23
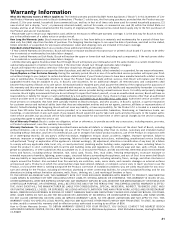
... using a Bosch-authorized service provider during normal business hours. Bosch will replace your Product (upgraded models may be available to you, in conjunction with air or water-going vessels); (2) any party's willful misconduct, negligence, misuse, abuse, accidents, neglect, improper operation, failure to maintain, improper or negligent installation, tampering, failure to follow operating instructions, mishandling, unauthorized service (including self-performed "fixing" or exploration of the appliance's internal workings); (3) adjustment...
... using a Bosch-authorized service provider during normal business hours. Bosch will replace your Product (upgraded models may be available to you, in conjunction with air or water-going vessels); (2) any party's willful misconduct, negligence, misuse, abuse, accidents, neglect, improper operation, failure to maintain, improper or negligent installation, tampering, failure to follow operating instructions, mishandling, unauthorized service (including self-performed "fixing" or exploration of the appliance's internal workings); (3) adjustment...
Short Instructions
Page 1
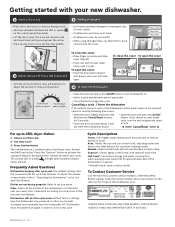
... the dishwasher drains. --Open the door and press the On/Off button. Frequently Asked Questions Dishwasher beeping after a cycle ends. Before calling, locate the model number and serial number on the label on glass --Open the door and press the On/Off button to adjust the amount of the dishwasher's capacity * Available wash cycles vary by following these steps. --Open the door slightly and press and hold the two Cancel/Reset buttons for best drying 2 Adjust Amount of Rinse Aid Dispensed --Turn...
... the dishwasher drains. --Open the door and press the On/Off button. Frequently Asked Questions Dishwasher beeping after a cycle ends. Before calling, locate the model number and serial number on the label on glass --Open the door and press the On/Off button to adjust the amount of the dishwasher's capacity * Available wash cycles vary by following these steps. --Open the door slightly and press and hold the two Cancel/Reset buttons for best drying 2 Adjust Amount of Rinse Aid Dispensed --Turn...


