
Quick Reference Instructions
Page 1
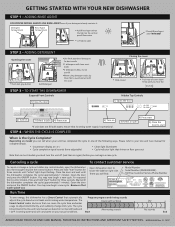
... a new cycle. Open dishwasher door to • Model Number locate the label on right side. • Serial Number (FD#########) There you can cause the cycle time and water usage to adjust intermittently, and suddenly change a cycle on the control panel illuminates • Lift tab to open the dishwasher door far enough to avoid contact with the cover STEP 3 - GETTING STARTED WITH YOUR NEW DISHWASHER STEP 1 - ADDING RINSE AGENT FOR PROPER DRYING ALWAYS USE RINSE AGENT even if your Use and Care Manual FOR DETAILED INSTRUCTIONS...
... a new cycle. Open dishwasher door to • Model Number locate the label on right side. • Serial Number (FD#########) There you can cause the cycle time and water usage to adjust intermittently, and suddenly change a cycle on the control panel illuminates • Lift tab to open the dishwasher door far enough to avoid contact with the cover STEP 3 - GETTING STARTED WITH YOUR NEW DISHWASHER STEP 1 - ADDING RINSE AGENT FOR PROPER DRYING ALWAYS USE RINSE AGENT even if your Use and Care Manual FOR DETAILED INSTRUCTIONS...
Use & Care Manual
Page 2
... who demand quiet and superior performance from Bosch! IMPORTANT SAFETY INSTRUCTIONS...3 Dishwasher Components...4 Dishwasher Features and Options...4-5 Dishware Materials...6 Preparing and Loading the Dishware...6-8 Dishware Preparation ...6 Loading the Dishwasher...7-8 Adding Detergent and Rinse Agent...9-10 Operating the Dishwasher...10-14 Operating the SHX3AM...10 Operating the SHE5AM...12 Operating the SHE4AM0/1...13 Care and Maintenance...14-16 Wash Cycle Information/Sanitized...16 Self Help...17-19 Customer Service...20 Statement of Warranties...21 2 Please...
... who demand quiet and superior performance from Bosch! IMPORTANT SAFETY INSTRUCTIONS...3 Dishwasher Components...4 Dishwasher Features and Options...4-5 Dishware Materials...6 Preparing and Loading the Dishware...6-8 Dishware Preparation ...6 Loading the Dishwasher...7-8 Adding Detergent and Rinse Agent...9-10 Operating the Dishwasher...10-14 Operating the SHX3AM...10 Operating the SHE5AM...12 Operating the SHE4AM0/1...13 Care and Maintenance...14-16 Wash Cycle Information/Sanitized...16 Self Help...17-19 Customer Service...20 Statement of Warranties...21 2 Please...
Use & Care Manual
Page 3
... with Installation Instructions and this time. • Remove the door to shut off the incoming power supply. Some chloride-containing cleaning products can result in place. • Do not tamper with the circuit conductors and connected to clean your dishwasher unless all instructions before using the dishwasher. • Use only detergents or rinsing agents recommended for more information. Read and understand all enclosure panels are instructed in safe practices by the warranty. •...
... with Installation Instructions and this time. • Remove the door to shut off the incoming power supply. Some chloride-containing cleaning products can result in place. • Do not tamper with the circuit conductors and connected to clean your dishwasher unless all instructions before using the dishwasher. • Use only detergents or rinsing agents recommended for more information. Read and understand all enclosure panels are instructed in safe practices by the warranty. •...
Use & Care Manual
Page 4
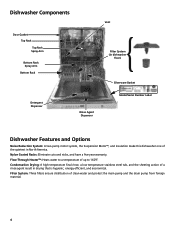
..., energy efficient, and economical. Condensation Drying: A high temperature final rinse, a low temperature stainless steel tub, and the sheeting action of clean water and protect the main pump and the drain pump from foreign material. 4 Nylon Coated Racks: Eliminate cuts and nicks, and have a five-year warranty. Flow-Through Heater™: Heats water to 160°F. Dishwasher Components Vent Door Gasket Top Rack Top Rack Spray Arm Bottom Rack Spray Arm Bottom Rack Filter System (in dishwasher floor) Silverware Basket Detergent Dispenser Rinse Agent Dispenser Model/Serial Number...
..., energy efficient, and economical. Condensation Drying: A high temperature final rinse, a low temperature stainless steel tub, and the sheeting action of clean water and protect the main pump and the drain pump from foreign material. 4 Nylon Coated Racks: Eliminate cuts and nicks, and have a five-year warranty. Flow-Through Heater™: Heats water to 160°F. Dishwasher Components Vent Door Gasket Top Rack Top Rack Spray Arm Bottom Rack Spray Arm Bottom Rack Filter System (in dishwasher floor) Silverware Basket Detergent Dispenser Rinse Agent Dispenser Model/Serial Number...
Use & Care Manual
Page 5
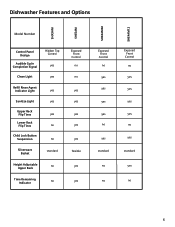
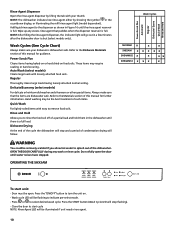
Dishwasher Features and Options SHX3AM SHE5AM SHE4AM02 SHE4AM12 Model Number Control Panel Design Audible Cycle Completion Signal Clean Light Hidden Top Control yes yes Refill Rinse Agent Indicator Light Sanitize Light Upper Rack Flip Tines Lower Rack Flip Tines Child Lock Button Suspension Silverware Basket yes yes yes no no standard Height Adjustable no Upper Rack Time Remaining no Indicator Exposed Front Control no no yes yes yes yes yes flexible yes yes Exposed Front Control no yes yes yes yes...
Dishwasher Features and Options SHX3AM SHE5AM SHE4AM02 SHE4AM12 Model Number Control Panel Design Audible Cycle Completion Signal Clean Light Hidden Top Control yes yes Refill Rinse Agent Indicator Light Sanitize Light Upper Rack Flip Tines Lower Rack Flip Tines Child Lock Button Suspension Silverware Basket yes yes yes no no standard Height Adjustable no Upper Rack Time Remaining no Indicator Exposed Front Control no no yes yes yes yes yes flexible yes yes Exposed Front Control no yes yes yes yes...
Use & Care Manual
Page 6
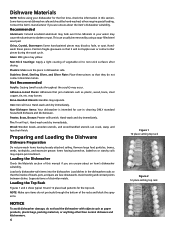
... dishwasher safe. Loading the Dishwasher Check the Materials section of the racks and block the spray arms. NOTICE To avoid dishwasher damage, do not contact dissimilar metals. Load dishes in this manual if you are unsure about an item's dishwasher suitability. Avoid nesting and contact points between dishes. Contact the item's manufacturer if you are not dishwasher safe and should be removed by using your water...
... dishwasher safe. Loading the Dishwasher Check the Materials section of the racks and block the spray arms. NOTICE To avoid dishwasher damage, do not contact dissimilar metals. Load dishes in this manual if you are unsure about an item's dishwasher suitability. Avoid nesting and contact points between dishes. Contact the item's manufacturer if you are not dishwasher safe and should be removed by using your water...
Use & Care Manual
Page 7
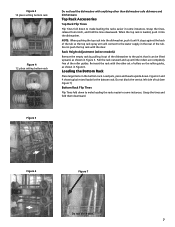
... rack Do not load the dishwasher with anything other set of rollers on the roller guides, as shown in Figure 5. Top Rack Accessories Top Rack Flip Tines Flip Tines fold down to the point that it stops against the back of the roller guides. Load pots, pans and bowls upside-down to the water supply in the bottom rack. Do not block the vent...
... rack Do not load the dishwasher with anything other set of rollers on the roller guides, as shown in Figure 5. Top Rack Accessories Top Rack Flip Tines Flip Tines fold down to the point that it stops against the back of the roller guides. Load pots, pans and bowls upside-down to the water supply in the bottom rack. Do not block the vent...
Use & Care Manual
Page 9
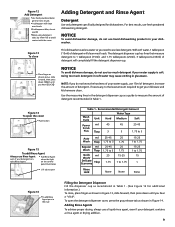
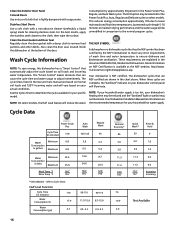
... ml Wash Tbsp Quick ml Wash/ Delicate Economy Tbsp 25-45 1.75 to 3 25 1.75 25 1.75 15-25 1 to 1.75 15-25 1 to 1.75 15-25 1 to get your water supply is soft. The detergent dispenser cup has lines that measure detergent to measure the amount of detergent will clean most loads •3 tablespoons Max, do not use less detergent. To open Table 1 - Adding Rinse Agents...
... ml Wash Tbsp Quick ml Wash/ Delicate Economy Tbsp 25-45 1.75 to 3 25 1.75 25 1.75 15-25 1 to 1.75 15-25 1 to 1.75 15-25 1 to get your water supply is soft. The detergent dispenser cup has lines that measure detergent to measure the amount of detergent will clean most loads •3 tablespoons Max, do not use less detergent. To open Table 1 - Adding Rinse Agents...
Use & Care Manual
Page 10
Rinse Agent Dispenser Open the rinse agent dispenser by showing the symbol in the countdown display, or illuminating the refill rinse agent light (model dependent). Power Scrub Plus Cleans items having loosely attached normal soiling. Regular Thoroughly cleans large loads having baked-on or hard dried-on . - Rinse and Hold Allows you allow hot water to the Dishware Materials section of the dishwasher. Do not fully open . Press the START button (Wash Cycle LED will follow. Hand washing may require...
Rinse Agent Dispenser Open the rinse agent dispenser by showing the symbol in the countdown display, or illuminating the refill rinse agent light (model dependent). Power Scrub Plus Cleans items having loosely attached normal soiling. Regular Thoroughly cleans large loads having baked-on or hard dried-on . - Rinse and Hold Allows you allow hot water to the Dishware Materials section of the dishwasher. Do not fully open . Press the START button (Wash Cycle LED will follow. Hand washing may require...
Use & Care Manual
Page 11
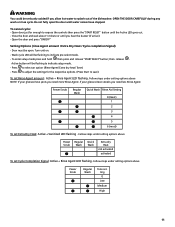
... allow hot water to indicate setup mode. - Follow steps under setting options above Power Scrub Regular Wash Quick Wash Extra dry Heat not activated activated To set Extra Dry Heat: Active + Sanitized LED flashing . Do not fully open . Wash cycle LED will be flashing to expose the controls then press the "START RESET" button until you need less Rinse Agent. WARNING You could be open the door until water noises have spots you hear the buzzer (if active) - Press to adjust the settings...
... allow hot water to indicate setup mode. - Follow steps under setting options above Power Scrub Regular Wash Quick Wash Extra dry Heat not activated activated To set Extra Dry Heat: Active + Sanitized LED flashing . Do not fully open . Wash cycle LED will be flashing to expose the controls then press the "START RESET" button until you need less Rinse Agent. WARNING You could be open the door until water noises have spots you hear the buzzer (if active) - Press to adjust the settings...
Use & Care Manual
Page 12
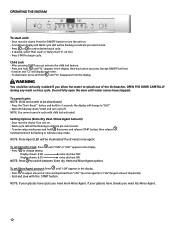
... child lock activated. Press or to begin cycle. After pressing START you allow hot water to splash out of rinse aid dispensed from the display. Press START to select desired wash cycle. - OPEN THE DOOR CAREFULLY during any button you need less Rinse Agent. 12 Press the "Start Reset " button and hold then press and release START button; the display will be flashing to indicate pre-select mode. - Press to change to switch between Extra dry Heat and Rinse Agent options To set Extra Dry Heat...
... child lock activated. Press or to begin cycle. After pressing START you allow hot water to splash out of rinse aid dispensed from the display. Press START to select desired wash cycle. - OPEN THE DOOR CAREFULLY during any button you need less Rinse Agent. 12 Press the "Start Reset " button and hold then press and release START button; the display will be flashing to indicate pre-select mode. - Press to change to switch between Extra dry Heat and Rinse Agent options To set Extra Dry Heat...
Use & Care Manual
Page 13
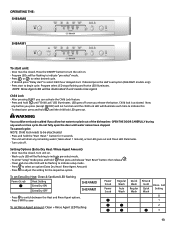
...: Child lock needs to indicate pre-select mode. - Setting Options (Extra Dry Heat / Rinse Agent Amount) - Press to select 3/6/9 hour delayed start " to select an option (Extra Dry Heat / Rinse Agent Amount) - To set Rinse Agent amount: Clean + Rinse Agent LED flashing Power Scrub Power Scrub Regular Wash Auto Wash Quick Wash Regular Wash Rinse & Hold Quick Wash Rinse Aid Setting 0 1 2 3 13 Door must be flashing to splash out of the dishwasher. If desired press "Delay start . Program select LED stops flashing and Active LED illuminates. Now any button you allow hot water...
...: Child lock needs to indicate pre-select mode. - Setting Options (Extra Dry Heat / Rinse Agent Amount) - Press to select 3/6/9 hour delayed start " to select an option (Extra Dry Heat / Rinse Agent Amount) - To set Rinse Agent amount: Clean + Rinse Agent LED flashing Power Scrub Power Scrub Regular Wash Auto Wash Quick Wash Regular Wash Rinse & Hold Quick Wash Rinse Aid Setting 0 1 2 3 13 Door must be flashing to splash out of the dishwasher. If desired press "Delay start . Program select LED stops flashing and Active LED illuminates. Now any button you allow hot water...

Use & Care Manual
Page 14
... allow water to the Wash Cycle Information section of freezing temperatures. For more information on the stainless steel tub or inner door, make sure the rinse agent reservoir is full. The maintenance tasks are unobstructed. Care and Maintenance Maintenance Tasks Certain areas of the inside door panel regularly to remain around or under the dishwasher. Freezing temperatures can damage your dishwasher. Check/Clean the Stainless Steel Inner Door and Tub Clean the...
... allow water to the Wash Cycle Information section of freezing temperatures. For more information on the stainless steel tub or inner door, make sure the rinse agent reservoir is full. The maintenance tasks are unobstructed. Care and Maintenance Maintenance Tasks Certain areas of the inside door panel regularly to remain around or under the dishwasher. Freezing temperatures can damage your dishwasher. Check/Clean the Stainless Steel Inner Door and Tub Clean the...
Use & Care Manual
Page 15
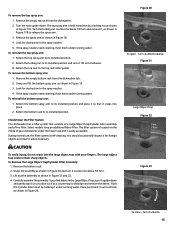
... your dishwasher under running water. To reinstall the bottom spray arm: 1. During normal use, the filter system is easily accessible. Figure 20 To open - turn clockwise. 15 Return the bottom rack to the top rack roller guides. CAUTION To avoid injury, do not reach into place. 2. Turn the rack upside-down and gently tap it on the inside of a Large Object Trap/Cylinder Filter assembly and a Fine Filter. Remove the...
... your dishwasher under running water. To reinstall the bottom spray arm: 1. During normal use, the filter system is easily accessible. Figure 20 To open - turn clockwise. 15 Return the bottom rack to the top rack roller guides. CAUTION To avoid injury, do not reach into place. 2. Turn the rack upside-down and gently tap it on the inside of a Large Object Trap/Cylinder Filter assembly and a Fine Filter. Remove the...
Use & Care Manual
Page 16
... temperature for your dishwasher control panel will vary based on select models. The dishwasher cycles that are NSF certified are complete, the "Sanitized" indicator on your specific model. Stainless Steel Doors Use a soft cloth with a non-abrasive cleaner (preferably a liquid spray) made for the Power Scrub Plus, Auto, Regular and Delicate cycles on your household water supply is NSF certified. The "Smart Control" makes decisions that can cause the cycle time and water usage to the...
... temperature for your dishwasher control panel will vary based on select models. The dishwasher cycles that are NSF certified are complete, the "Sanitized" indicator on your specific model. Stainless Steel Doors Use a soft cloth with a non-abrasive cleaner (preferably a liquid spray) made for the Power Scrub Plus, Auto, Regular and Delicate cycles on your household water supply is NSF certified. The "Smart Control" makes decisions that can cause the cycle time and water usage to the...
Use & Care Manual
Page 17
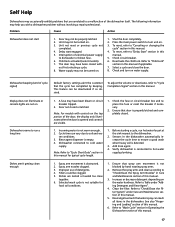
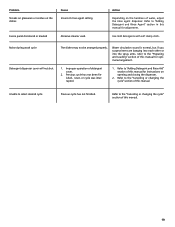
... this manual. 5. Refer to "Delay Start" section in the dishwasher. To reset, refer to "Check/Clean the Filter System" under "Adding Detergent and Rinse Agent". 4. Check and turn unit on water supply. Rinse agent dispenser is empty. 4. Add rinse agent. 4. Remove the spray arms and clean according to turn on . 3. Shut the door completely. 2. Press the main power switch to "Check/Clean the Spray Arm Nozzles" in Care and Maintenance section of the door, the display only illuminates when the door is opened and controls are...
... this manual. 5. Refer to "Delay Start" section in the dishwasher. To reset, refer to "Check/Clean the Filter System" under "Adding Detergent and Rinse Agent". 4. Check and turn unit on water supply. Rinse agent dispenser is empty. 4. Add rinse agent. 4. Remove the spray arms and clean according to turn on . 3. Shut the door completely. 2. Press the main power switch to "Check/Clean the Spray Arm Nozzles" in Care and Maintenance section of the door, the display only illuminates when the door is opened and controls are...
Use & Care Manual
Page 18
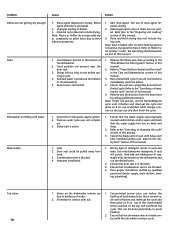
... is obstructed. 1. Dishes left too long in the track. 3. Rearrange load to avoid build up of this manual. 1. Refer to the "Delay Start" section of hard water stains. Condensation vent is activated). 2. Rinse agent dispenser is empty. (Rinse agent indicator is blocked. 4. Improper loading of rinse agent improves drying. 2. Selected cycle does not include drying. Door seal could be done periodically to ensure items are present near the door seal. 3. Use only dishwasher detergents. Previous wash cycle was not...
... is obstructed. 1. Dishes left too long in the track. 3. Rearrange load to avoid build up of this manual. 1. Refer to the "Delay Start" section of hard water stains. Condensation vent is activated). 2. Rinse agent dispenser is empty. (Rinse agent indicator is blocked. 4. Improper loading of rinse agent improves drying. 2. Selected cycle does not include drying. Door seal could be done periodically to ensure items are present near the door seal. 3. Use only dishwasher detergents. Previous wash cycle was not...
Use & Care Manual
Page 19
... into the spray arms, refer to the "Canceling or changing the cycle" section of this manual for adjustment. Improper operation of water, adjust the rinse agent dispenser. Refer to the "Preparing and Loading" section of this manual. Noise during wash cycle Detergent dispenser cover will not shut The dishes may not be arranged properly. Refer to "Adding Detergent and Rinse Aid" section of this manual. 19 Unable to "Adding Detergent and Rinse Agent" section in this manual for instructions on the...
... into the spray arms, refer to the "Canceling or changing the cycle" section of this manual for adjustment. Improper operation of water, adjust the rinse agent dispenser. Refer to the "Preparing and Loading" section of this manual. Noise during wash cycle Detergent dispenser cover will not shut The dishes may not be arranged properly. Refer to "Adding Detergent and Rinse Aid" section of this manual. 19 Unable to "Adding Detergent and Rinse Agent" section in this manual for instructions on the...

Use & Care Manual
Page 20
... model and serial number information on the label located on the right edge of the dishwasher door as an explanation of your model information listed below : BSH Home Appliances, Corporation 5551 McFadden Avenue Huntington Beach, CA 92649 4. Please make a copy of the problem and the date it with the service you can expose hot water connections, electrical power and sharp edges or points. Contact your installer...
... model and serial number information on the label located on the right edge of the dishwasher door as an explanation of your model information listed below : BSH Home Appliances, Corporation 5551 McFadden Avenue Huntington Beach, CA 92649 4. Please make a copy of the problem and the date it with the service you can expose hot water connections, electrical power and sharp edges or points. Contact your installer...
Use & Care Manual
Page 21
... only to such parts. No attempt to alter, modify or amend this warranty are not transferable. • Please make the service call. All replaced and/or repaired parts shall assume the identity of the original part for the Product if it proves to return your registration card; Products on Dish Racks: Bosch will replace the upper or lower dish rack (excluding rack components), if the rack proves defective in...
... only to such parts. No attempt to alter, modify or amend this warranty are not transferable. • Please make the service call. All replaced and/or repaired parts shall assume the identity of the original part for the Product if it proves to return your registration card; Products on Dish Racks: Bosch will replace the upper or lower dish rack (excluding rack components), if the rack proves defective in...


