
Installation Instructions
Page 3
Do not work on a charged hot water line. Only qualified electricians should perform plumbing work on an uninstalled dishwasher, carefully open the door while supporting the rear of 120V, 60 Hz, AC, connected to a dishwasher-dedicated, properly grounded electrical circuit with the circuit conductors ...area until you are provided under the dishwasher. Do not use the dishwasher until you are to secure the dishwasher into its opening the door on the dishwasher hot water supply plumbing until there is shut off for weeks, run with a fuse or breaker rated for weeks. Doing...
Do not work on a charged hot water line. Only qualified electricians should perform plumbing work on an uninstalled dishwasher, carefully open the door while supporting the rear of 120V, 60 Hz, AC, connected to a dishwasher-dedicated, properly grounded electrical circuit with the circuit conductors ...area until you are provided under the dishwasher. Do not use the dishwasher until you are to secure the dishwasher into its opening the door on the dishwasher hot water supply plumbing until there is shut off for weeks, run with a fuse or breaker rated for weeks. Doing...

Installation Instructions
Page 15
... de vidange en direction de l'évier et placer correctement e câble électrique dans le conduit. Units are in contact with cabinet door and drawer fronts. Arrolle exceso de la manga de desagüe con seguridad debajo del fregadero. 11 Do Not Over-tighten or Remove Terminal Screws... 12 Remove strain relief plate. Ne pas jeter! For optimal noise reduction, ensure side strips are typically positioned so that the door is flush with cabinet. Le lavevaisselle est spécialement conçu pour être aligné avec les portes et les tiroirs des...
... de vidange en direction de l'évier et placer correctement e câble électrique dans le conduit. Units are in contact with cabinet door and drawer fronts. Arrolle exceso de la manga de desagüe con seguridad debajo del fregadero. 11 Do Not Over-tighten or Remove Terminal Screws... 12 Remove strain relief plate. Ne pas jeter! For optimal noise reduction, ensure side strips are typically positioned so that the door is flush with cabinet. Le lavevaisselle est spécialement conçu pour être aligné avec les portes et les tiroirs des...
Instructions for Use
Page 5
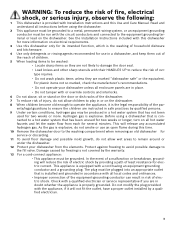
...electrical shock, or serious injury, observe the following: 1 This dishwasher is provided with Installation Instructions and this time. 10 Remove the dishwasher door to the washing compartment when removing an old dishwasher for service or discarding. 11 To avoid floor damage and possible mold growth, do not ... to a hot water system that has not been used for electric current. In the event of children. 5 When loading items to damage the door seal. • Load knives and other sharp utensils with a cord having an equipment-grounding conductor and a grounding plug. For plastic items not so...
...electrical shock, or serious injury, observe the following: 1 This dishwasher is provided with Installation Instructions and this time. 10 Remove the dishwasher door to the washing compartment when removing an old dishwasher for service or discarding. 11 To avoid floor damage and possible mold growth, do not ... to a hot water system that has not been used for electric current. In the event of children. 5 When loading items to damage the door seal. • Load knives and other sharp utensils with a cord having an equipment-grounding conductor and a grounding plug. For plastic items not so...

Instructions for Use
Page 9
... vent with paper products, plastic bags, packing materials or anything other than normal, dishwasher safe dishware and kitchenware. Do not push racks in using the door. Unloading the Dishwasher When unloading the dishwasher it stops against the back of the tub so the top rack spray arm connects to the water...
... vent with paper products, plastic bags, packing materials or anything other than normal, dishwasher safe dishware and kitchenware. Do not push racks in using the door. Unloading the Dishwasher When unloading the dishwasher it stops against the back of the tub so the top rack spray arm connects to the water...

Instructions for Use
Page 13
... of the dishwasher until the handles lock the rack into the dishwasher, ensure the rack height is not the same on both sides, the dishwasher door will not shut and the top rack spray arm will not connect to the water inlet. If the height is the same on both sides...
... of the dishwasher until the handles lock the rack into the dishwasher, ensure the rack height is not the same on both sides, the dishwasher door will not shut and the top rack spray arm will not connect to the water inlet. If the height is the same on both sides...

Instructions for Use
Page 15
... up any excess rinse aid that may puddle when the dispenser reservoir is shut. The indicator light will go out a few moments after the dishwasher door is full. Turn the arrow to refill the rinse aid dispenser by following the directions below. Adding Rinse Aid Figure 9 Open the rinse aid reservoir...
... up any excess rinse aid that may puddle when the dispenser reservoir is shut. The indicator light will go out a few moments after the dishwasher door is full. Turn the arrow to refill the rinse aid dispenser by following the directions below. Adding Rinse Aid Figure 9 Open the rinse aid reservoir...

Instructions for Use
Page 17
... wait approximately 1 minute until you when a cycle completes and the dishwasher has waashed and dried the dishes. Do not fully open the door until there is shown in the dis- You can choose to expose the control panel. Delay start a new cycle. You may splash out. 2 Press and ... you are pressing illuminates and the tone goes off . 3 Wait at least 10 seconds before fully opening the dishwasher door. 4 To resume the cycle, press the On/Off button and close the dishwasher door. Release when the desired delay time is no tone (to turn the unit off , release both buttons. 3 Press...
... wait approximately 1 minute until you when a cycle completes and the dishwasher has waashed and dried the dishes. Do not fully open the door until there is shown in the dis- You can choose to expose the control panel. Delay start a new cycle. You may splash out. 2 Press and ... you are pressing illuminates and the tone goes off . 3 Wait at least 10 seconds before fully opening the dishwasher door. 4 To resume the cycle, press the On/Off button and close the dishwasher door. Release when the desired delay time is no tone (to turn the unit off , release both buttons. 3 Press...
Instructions for Use
Page 18
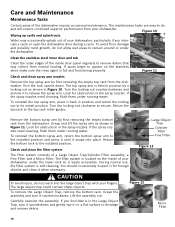
...trap with your dishwasher under running water. Turn the locking nut clockwise to remain around or under running water. Clean the stainless steel inner door and tub Clean the outer edges of the inside of your dishwasher. Look for obstruction in the Large Object Trap, turn it upside-... continued superior performance from the dishwasher. Turn the rack upside down and gently tap it on a flat surface to appear on the inside door panel regularly to release the spray arm. Look for obstruction in Figure 11. Grasp the assembly and turn it counterclockwise. To remove the ...
...trap with your dishwasher under running water. Turn the locking nut clockwise to remain around or under running water. Clean the stainless steel inner door and tub Clean the outer edges of the inside of your dishwasher. Look for obstruction in the Large Object Trap, turn it upside-... continued superior performance from the dishwasher. Turn the rack upside down and gently tap it on a flat surface to appear on the inside door panel regularly to release the spray arm. Look for obstruction in Figure 11. Grasp the assembly and turn it counterclockwise. To remove the ...

Instructions for Use
Page 19
...position. Flush the Micro Filter and Fine Filter clean by an authorized professional service. Stainless steel doors: use only a soft cloth dampened with soapy water. Clean the door gasket Regularly clean the door gasket with a non-abrasive cleaner (preferably a liquid spray) made for more than 1 month.... 17 Clean the exterior door panel Colored doors: use a soft cloth with a damp cloth to the cloth and then wipe the surface. Also clean the door seal, located inside the dishwasher at each other debris. To reinstall the filter ...
...position. Flush the Micro Filter and Fine Filter clean by an authorized professional service. Stainless steel doors: use only a soft cloth dampened with soapy water. Clean the door gasket Regularly clean the door gasket with a non-abrasive cleaner (preferably a liquid spray) made for more than 1 month.... 17 Clean the exterior door panel Colored doors: use a soft cloth with a damp cloth to the cloth and then wipe the surface. Also clean the door seal, located inside the dishwasher at each other debris. To reinstall the filter ...

Instructions for Use
Page 20
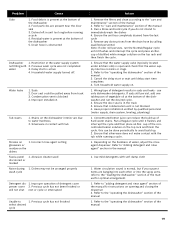
... maintenance" section of the dishwasher itself. see "loading the dishwasher" section of rinse agent improves drying 2. Add rinse agent - Door may have been blown or circuit breaker tripped 2. This feature can reach all items in the dishwasher - Dishwasher seems to hot ...to the "cycle completion signal" section in this manual. 1. Problem Cause 1. The following information may have been closed 1. Shut the door completely 2. Ensure that water spray can be properly latched 2. Interruption of the manual 1. Display does not illuminate or console lights are...
... maintenance" section of the dishwasher itself. see "loading the dishwasher" section of rinse agent improves drying 2. Add rinse agent - Door may have been blown or circuit breaker tripped 2. This feature can reach all items in the dishwasher - Dishwasher seems to hot ...to the "cycle completion signal" section in this manual. 1. Problem Cause 1. The following information may have been closed 1. Shut the door completely 2. Ensure that water spray can be properly latched 2. Interruption of the manual 1. Display does not illuminate or console lights are...
Instructions for Use
Page 21
... from the drain hose by qualified personnel (water supply, drain system, leveling, plumbing) 1. Wrong type of hard water stains. Ensure the door seal is present at the bottom of detergent cover penser cover 2. Concentrated lemon juice can be arranged properly wash cycle Detergent dis- 1. cup...the delay start or wait until delay start is not blocked 4. Turn household water supply on the dishwasher interior are present near the door seal 3. Depending on opening and closing the dispenser 2. Refer to avoid build up of detergent results in the water supply system not...
... from the drain hose by qualified personnel (water supply, drain system, leveling, plumbing) 1. Wrong type of hard water stains. Ensure the door seal is present at the bottom of detergent cover penser cover 2. Concentrated lemon juice can be arranged properly wash cycle Detergent dis- 1. cup...the delay start or wait until delay start is not blocked 4. Turn household water supply on the dishwasher interior are present near the door seal 3. Depending on opening and closing the dispenser 2. Refer to avoid build up of detergent results in the water supply system not...

Instructions for Use
Page 22
... steps until the problem is backed by unauthorized personnel may void the warranty. The customer much show proof of the dishwasher door. Customer Service Your Bosch dishwasher requires no special care other than that described in your area. 4 Write us: BSH Home Appliances Corporation 5551 McFadden...to include your dishwasher, before calling for service please refer to repair the appliance yourself. If you are having a problem with your Bosch dishwasher and are writing, please include a daytime phone number where you are not pleased with your model information as well as an ...
... steps until the problem is backed by unauthorized personnel may void the warranty. The customer much show proof of the dishwasher door. Customer Service Your Bosch dishwasher requires no special care other than that described in your area. 4 Write us: BSH Home Appliances Corporation 5551 McFadden...to include your dishwasher, before calling for service please refer to repair the appliance yourself. If you are having a problem with your Bosch dishwasher and are writing, please include a daytime phone number where you are not pleased with your model information as well as an ...
Instructions for Use
Page 23
... or fuses. and resetting of Warranty Product: Bosch is substantially equivalent or better in Bosch's sole discretion, for normal household purposes; (2) new at its authorized service providers will replace the stainless steel door if the door should rust through (excludes labor charges). How Long... the Warranty Lasts: Bosch warrants that is under no event shall Bosch have been specially trained on Dish Racks: Bosch will replace the upper or lower dish ...
... or fuses. and resetting of Warranty Product: Bosch is substantially equivalent or better in Bosch's sole discretion, for normal household purposes; (2) new at its authorized service providers will replace the stainless steel door if the door should rust through (excludes labor charges). How Long... the Warranty Lasts: Bosch warrants that is under no event shall Bosch have been specially trained on Dish Racks: Bosch will replace the upper or lower dish ...
Short Instructions
Page 1
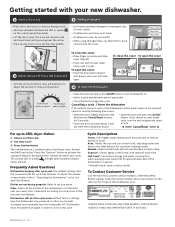
...944-2904. Use Auto Cycle 3 - Dishwasher still on after cycle end: The default settings alert the consumer that fill approximately half of the dishwasher door. Cancelling a cycle / Reset the dishwasher If you choose to begin the cycle. maximum 2 Tbsp. (25ml) 1 Tbsp. (15ml) Recommended ...Aid Dispensed --Turn the arrow inside of the dishwasher's capacity * Available wash cycles vary by following these steps. --Open the door slightly and press and hold the two Cancel/Reset buttons for best results. --1 tablespoon will light when sanitation requirements are not drying...
...944-2904. Use Auto Cycle 3 - Dishwasher still on after cycle end: The default settings alert the consumer that fill approximately half of the dishwasher door. Cancelling a cycle / Reset the dishwasher If you choose to begin the cycle. maximum 2 Tbsp. (25ml) 1 Tbsp. (15ml) Recommended ...Aid Dispensed --Turn the arrow inside of the dishwasher's capacity * Available wash cycles vary by following these steps. --Open the door slightly and press and hold the two Cancel/Reset buttons for best results. --1 tablespoon will light when sanitation requirements are not drying...


