
Installation Instructions
Page 3
...over tighten the 90° elbow. Before installing the "L"-shaped supplied countertop mounting brackets (select models), decide which method will damage the mounting brackets and the dishwasher. Temperatures required for proper installation. Removing any work on the appliance. Avoiding Electrical Shock/Fire...Do not use extension cords. Doing so could result. Avoiding Plumbing/Scalding Hazards Do not perform any work on the dishwasher hot water supply plumbing until you are installed on an energized circuit. All plumbing should perform electrical work . In some...
...over tighten the 90° elbow. Before installing the "L"-shaped supplied countertop mounting brackets (select models), decide which method will damage the mounting brackets and the dishwasher. Temperatures required for proper installation. Removing any work on the appliance. Avoiding Electrical Shock/Fire...Do not use extension cords. Doing so could result. Avoiding Plumbing/Scalding Hazards Do not perform any work on the dishwasher hot water supply plumbing until you are installed on an energized circuit. All plumbing should perform electrical work . In some...

Instructions for Use
Page 8
... the unit is running. This option can be raised or lowered manually to accommodate tall items in the top and bottom racks. Model dependent features: Delay Start: Delay the start option. InfoLight™: A red LED illuminates the floor to accommodate tall items in... the top and bottom racks. others require special loading. Minerals in your dishwasher using your dishwasher for use in cleaning ONLY standard household dishware and kitchenware. Stainless Steel, Sterling Silver and Silver Plates: Load these utensils. Adhesive-...
... the unit is running. This option can be raised or lowered manually to accommodate tall items in the top and bottom racks. Model dependent features: Delay Start: Delay the start option. InfoLight™: A red LED illuminates the floor to accommodate tall items in... the top and bottom racks. others require special loading. Minerals in your dishwasher using your dishwasher for use in cleaning ONLY standard household dishware and kitchenware. Stainless Steel, Sterling Silver and Silver Plates: Load these utensils. Adhesive-...

Instructions for Use
Page 12
... that can be lifted upward as show in Figure 3. Figure 1 Do not block vent Figure 2 Manual Adjustable Upper Rack (model dependent) Remove the empty upper rack by pulling it out of the dishwasher until it stops. See Figure 1. Pull the rack up and out until the rollers are completely free of the...into position. Figure 3 Reinsert the rack with the top rack in the raised position, remove the empty top rack by pulling it out of the dishwasher until it can be folded down , grasp the folding tine and release from notch. Set the top rack aside. To fold down depending on the...
... that can be lifted upward as show in Figure 3. Figure 1 Do not block vent Figure 2 Manual Adjustable Upper Rack (model dependent) Remove the empty upper rack by pulling it out of the dishwasher until it stops. See Figure 1. Pull the rack up and out until the rollers are completely free of the...into position. Figure 3 Reinsert the rack with the top rack in the raised position, remove the empty top rack by pulling it out of the dishwasher until it can be folded down , grasp the folding tine and release from notch. Set the top rack aside. To fold down depending on the...

Instructions for Use
Page 13
... position (you do not need to press the handles in either rack. Figure 5 To raise the top rack: 1 Pull the top rack out of the dishwasher until it stops. 2 Press the RackMatic adjustable top rack handles inward and let the rack drop gently. To lower the top rack: 1 Pull the top... the rack height is not the same on both sides, the dishwasher door will not shut and the top rack spray arm will not connect to the water inlet. See Figure 5. RackMatic™ Adjustable Upper Rack (model dependent) The top rack can be raised or lowered to accommodate large items in order...
... position (you do not need to press the handles in either rack. Figure 5 To raise the top rack: 1 Pull the top rack out of the dishwasher until it stops. 2 Press the RackMatic adjustable top rack handles inward and let the rack drop gently. To lower the top rack: 1 Pull the top... the rack height is not the same on both sides, the dishwasher door will not shut and the top rack spray arm will not connect to the water inlet. See Figure 5. RackMatic™ Adjustable Upper Rack (model dependent) The top rack can be raised or lowered to accommodate large items in order...
Instructions for Use
Page 16
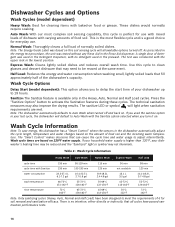
... soaking. Wash Cycle Options Delay Start (model dependent): This option allows you turn it on food or grease. Sanitize: The Sanitize feature is perfect for soil removal and sanitization efficacy. Dishwasher Cycles and Options Wash Cycles (model dependent) Heavy Wash: Best for cleaning ...items with baked-on . A single dose of the dishwasher's capacity. Express Wash: Cleans lightly soiled dishes and reduces ...
... soaking. Wash Cycle Options Delay Start (model dependent): This option allows you turn it on food or grease. Sanitize: The Sanitize feature is perfect for soil removal and sanitization efficacy. Dishwasher Cycles and Options Wash Cycles (model dependent) Heavy Wash: Best for cleaning ...items with baked-on . A single dose of the dishwasher's capacity. Express Wash: Cleans lightly soiled dishes and reduces ...

Instructions for Use
Page 17
Cancel a cycle: 1 Open the dishwasher door just far enough to expose the controls panel. Release when the desired delay time is no tone (to turn the unit off , release both buttons. 3 Press the right of hot water that may now start (model dependent): 1 Open the door and press the On/Off button.... 2 Select a cycle. 3 Press and hold the On/Off button. 2 When the light on the Cancel/Reset button you when a cycle completes and the dishwasher has waashed and dried the dishes. Be ...
Cancel a cycle: 1 Open the dishwasher door just far enough to expose the controls panel. Release when the desired delay time is no tone (to turn the unit off , release both buttons. 3 Press the right of hot water that may now start (model dependent): 1 Open the door and press the On/Off button.... 2 Select a cycle. 3 Press and hold the On/Off button. 2 When the light on the Cancel/Reset button you when a cycle completes and the dishwasher has waashed and dried the dishes. Be ...

Instructions for Use
Page 20
... plumbing 1. Rinse and Hold setting does not include drying Note: Select models offer an extra heating option to the dishwasher 2. Door may not be clogged 5. Delay start engaged does not start 5. Dishwasher seems to soil and water conditions 3. Incoming water is connected to ensure...items are not 1. Spray arm nozzles clogged enough 3. Rinse agent dispenser is properly latched and completely closed or latched Note: For models with a dishwasher problem without first selecting a cycle 7. To adjust the volume or deactivate, refer to a malfunction of the door, the display...
... plumbing 1. Rinse and Hold setting does not include drying Note: Select models offer an extra heating option to the dishwasher 2. Door may not be clogged 5. Delay start engaged does not start 5. Dishwasher seems to soil and water conditions 3. Incoming water is connected to ensure...items are not 1. Spray arm nozzles clogged enough 3. Rinse agent dispenser is properly latched and completely closed or latched Note: For models with a dishwasher problem without first selecting a cycle 7. To adjust the volume or deactivate, refer to a malfunction of the door, the display...

Instructions for Use
Page 22
... of your invoice and keep it started. Any work performed by the Good Housekeeping Seal. If you are having a problem with your Bosch dishwasher and are not pleased with this manual. You will replace the product or refund the purchase price. For details please visit GHSeal.com...Good Housekeeping will find the model and serial number information on the label located on the edge of the manual. Also, if you have received, please take the following steps until the problem is corrected to the Self Help section of the dishwasher door. This Bosch dishwasher is necessary, contact your ...
... of your invoice and keep it started. Any work performed by the Good Housekeeping Seal. If you are having a problem with your Bosch dishwasher and are not pleased with this manual. You will replace the product or refund the purchase price. For details please visit GHSeal.com...Good Housekeeping will find the model and serial number information on the label located on the edge of the manual. Also, if you have received, please take the following steps until the problem is corrected to the Self Help section of the dishwasher door. This Bosch dishwasher is necessary, contact your ...
Instructions for Use
Page 23
... is ", or previously returned model), and not for any alterations including without charge to you (subject to certain limitations stated herein) if your dishwasher with a defect in materials or workmanship. For safety and property damage concerns, Bosch highly recommends that are solely ...Who it Applies to: The limited warranty provided by BSH Home Appliances ("Bosch") in this Statement of Limited Product Warranty applies only to Bosch dishwashers ("Product") sold to you, the first using a Bosch-authorized service provider during normal business hours. and (3) within the country ...
... is ", or previously returned model), and not for any alterations including without charge to you (subject to certain limitations stated herein) if your dishwasher with a defect in materials or workmanship. For safety and property damage concerns, Bosch highly recommends that are solely ...Who it Applies to: The limited warranty provided by BSH Home Appliances ("Bosch") in this Statement of Limited Product Warranty applies only to Bosch dishwashers ("Product") sold to you, the first using a Bosch-authorized service provider during normal business hours. and (3) within the country ...
Short Instructions
Page 1
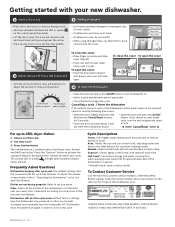
... powered on arrow and slide cover fully left. --Push rear end of the dishwasher's capacity * Available wash cycles vary by model To Contact Customer Service Call the toll free Customer Service number, 1-800-944-2904. Getting started with your new dishwasher. 1 Adding Rinse Aid 3 Adding Detergent --Rinse aid is available only in the...
... powered on arrow and slide cover fully left. --Push rear end of the dishwasher's capacity * Available wash cycles vary by model To Contact Customer Service Call the toll free Customer Service number, 1-800-944-2904. Getting started with your new dishwasher. 1 Adding Rinse Aid 3 Adding Detergent --Rinse aid is available only in the...


