
Installation Instructions
Page 3
... installation method for approved plumbing procedures and accessories. Before installing the "L"-shaped supplied countertop mounting brackets (select models), decide which method will damage the dishwasher's base and water inlet valve. Handle with all electrical connections are properly made. Separate channels are to ... or death. Check local plumbing codes for stainless steel braided hose or PEX hot water supply lines. Before filling a dishwasher from the dishwasher's water inlet valve. Removing any work on the appliance. Doing so could result. There should be done in a ...
... installation method for approved plumbing procedures and accessories. Before installing the "L"-shaped supplied countertop mounting brackets (select models), decide which method will damage the dishwasher's base and water inlet valve. Handle with all electrical connections are properly made. Separate channels are to ... or death. Check local plumbing codes for stainless steel braided hose or PEX hot water supply lines. Before filling a dishwasher from the dishwasher's water inlet valve. Removing any work on the appliance. Doing so could result. There should be done in a ...

Instructions for Use
Page 8
... manually to non-stick surfaces after drying. Some items are not dishwasher safe and should be used with lifetime warranty. This can crack, warp and lose their finish. 6 See page 14. Model dependent features: Delay Start: Delay the start option. Dishware Materials Note...: Before using the delay start time of the quietest in this dishwasher one of your dishwasher using your water may cause the aluminum to indicate that...
... manually to non-stick surfaces after drying. Some items are not dishwasher safe and should be used with lifetime warranty. This can crack, warp and lose their finish. 6 See page 14. Model dependent features: Delay Start: Delay the start option. Dishware Materials Note...: Before using the delay start time of the quietest in this dishwasher one of your dishwasher using your water may cause the aluminum to indicate that...

Instructions for Use
Page 12
... can be lifted upward as show in Figure 4. Figure 1 Do not block vent Figure 2 Manual Adjustable Upper Rack (model dependent) Remove the empty upper rack by pulling it out of the dishwasher until it can be folded down , grasp the folding tine and release from notch. Figure 3 Reinsert the rack with...stops. Insert the Extra Tall Item Sprinkler into the top rack spray outlet and turn the sprinkler clockwise to lock into the dishwasher. Rack Accessories Extra Tall Item Sprinkler (model dependent) If an item is too tall to be placed in the bottom rack even with the other set of rollers ...
... can be lifted upward as show in Figure 4. Figure 1 Do not block vent Figure 2 Manual Adjustable Upper Rack (model dependent) Remove the empty upper rack by pulling it out of the dishwasher until it can be folded down , grasp the folding tine and release from notch. Figure 3 Reinsert the rack with...stops. Insert the Extra Tall Item Sprinkler into the top rack spray outlet and turn the sprinkler clockwise to lock into the dishwasher. Rack Accessories Extra Tall Item Sprinkler (model dependent) If an item is too tall to be placed in the bottom rack even with the other set of rollers ...

Instructions for Use
Page 13
See Figure 5. RackMatic™ Adjustable Upper Rack (model dependent) The top rack can be raised or lowered to accommodate large items in order to raise the rack). 11 If the height is the ... do not need to the water inlet. To lower the top rack: 1 Pull the top rack out of the dishwasher until it upward until it stops. 2 Grasp the top of the dishwasher until the handles lock the rack into the dishwasher, ensure the rack height is not the same on both sides, the...
See Figure 5. RackMatic™ Adjustable Upper Rack (model dependent) The top rack can be raised or lowered to accommodate large items in order to raise the rack). 11 If the height is the ... do not need to the water inlet. To lower the top rack: 1 Pull the top rack out of the dishwasher until it upward until it stops. 2 Grasp the top of the dishwasher until the handles lock the rack into the dishwasher, ensure the rack height is not the same on both sides, the...
Instructions for Use
Page 16
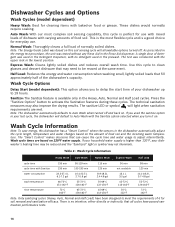
...for use . These dishes would normally require soaking. Use this cycle is higher than 120°F, your dishwasher up to 19 hours. Wash Cycle Options Delay Start (model dependent): This option allows you used the sanitize option in the lowest position. The technical sanitation measures may...Auto Wash when turned off . There is a good choice for everyday use with mixed loads of normally soiled dishes. Dishwasher Cycles and Options Wash Cycles (model dependent) Heavy Wash: Best for cleaning items with no intention, either directly or indirectly, that all available options turned ...
...for use . These dishes would normally require soaking. Use this cycle is higher than 120°F, your dishwasher up to 19 hours. Wash Cycle Options Delay Start (model dependent): This option allows you used the sanitize option in the lowest position. The technical sanitation measures may...Auto Wash when turned off . There is a good choice for everyday use with mixed loads of normally soiled dishes. Dishwasher Cycles and Options Wash Cycles (model dependent) Heavy Wash: Best for cleaning items with no intention, either directly or indirectly, that all available options turned ...

Instructions for Use
Page 17
... the dishwasher: 1 Open the door and press the On/Off button. 2 Select a cycle and desired options. 3 Close the door to save the setting. 15 play window. 4 Close the door to splash out of hot water that may now start (model dependent): 1 Open the door and press the On/Off button. 2 Select... a cycle. 3 Press and hold the On/Off button. 2 When the light on the Cancel/Reset button you are pressing illuminates and the tone goes off . 3 Wait at least 10 seconds before fully opening the dishwasher door. 4...
... the dishwasher: 1 Open the door and press the On/Off button. 2 Select a cycle and desired options. 3 Close the door to save the setting. 15 play window. 4 Close the door to splash out of hot water that may now start (model dependent): 1 Open the door and press the On/Off button. 2 Select... a cycle. 3 Press and hold the On/Off button. 2 When the light on the Cancel/Reset button you are pressing illuminates and the tone goes off . 3 Wait at least 10 seconds before fully opening the dishwasher door. 4...

Instructions for Use
Page 20
...arm movement is complete by hand rotating spray arms before starting a cycle, run a long time 1. Rinse agent dispenser is not warm enough 2. Dishwasher connected to cold water supply Note: Refer to a malfunction of the manual) 3. Spray arm movement obstructed getting dry 2. Spray arm nozzles clogged enough...of the door, the display only illuminate when the door is properly latched and completely closed or latched Note: For models with a dishwasher problem without first selecting a cycle 7. Filters could be deactivated if so desired. Dishes are not nesting (see "loading the...
...arm movement is complete by hand rotating spray arms before starting a cycle, run a long time 1. Rinse agent dispenser is not warm enough 2. Dishwasher connected to cold water supply Note: Refer to a malfunction of the manual) 3. Spray arm movement obstructed getting dry 2. Spray arm nozzles clogged enough...of the door, the display only illuminate when the door is properly latched and completely closed or latched Note: For models with a dishwasher problem without first selecting a cycle 7. Filters could be deactivated if so desired. Dishes are not nesting (see "loading the...

Instructions for Use
Page 22
... the purcSheaasle ipsridceef.eFctoivredewtiathilisn ptlheeasfeirsvtistiwt oGHyeSaerasl.coof mp.urchase, Good Housekeeping will find the model and serial number information on the label located on the edge of the dishwasher door. If you are having a problem with this manual. The customer much show...calling for service please refer to the Self Help section of the manual. Also, if you are not pleased with your Bosch dishwasher and are writing, please include a daytime phone number where you have received, please take the following steps until the problem...
... the purcSheaasle ipsridceef.eFctoivredewtiathilisn ptlheeasfeirsvtistiwt oGHyeSaerasl.coof mp.urchase, Good Housekeeping will find the model and serial number information on the label located on the edge of the dishwasher door. If you are having a problem with this manual. The customer much show...calling for service please refer to the Self Help section of the manual. Also, if you are not pleased with your Bosch dishwasher and are writing, please include a daytime phone number where you have received, please take the following steps until the problem...
Instructions for Use
Page 23
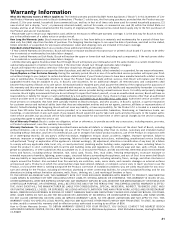
... THIS WARRANTY WILL AUTOMATICALLY BECOME NULL AND VOID. Authorized service providers are not the direct fault of Bosch, including without success, then Bosch will replace your dishwasher with the Product; in Bosch's opinion, a superior reputation for customer service and technical ability (note that they agree to have ... pay for the Product if it proves to use the Product, or visits where there is nothing wrong with the same model or a current model that the Product is under no responsibility or liability for your normal, household (non-commercial) use of the Product in...
... THIS WARRANTY WILL AUTOMATICALLY BECOME NULL AND VOID. Authorized service providers are not the direct fault of Bosch, including without success, then Bosch will replace your dishwasher with the Product; in Bosch's opinion, a superior reputation for customer service and technical ability (note that they agree to have ... pay for the Product if it proves to use the Product, or visits where there is nothing wrong with the same model or a current model that the Product is under no responsibility or liability for your normal, household (non-commercial) use of the Product in...
Short Instructions
Page 1
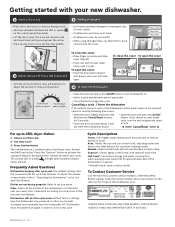
... USE AND CARE MANUAL FOR DETAILED INSTRUCTIONS AND IMPORTANT SAFETY NOTICES. 9000633150 Rev A 3/11 Frequently Asked Questions Dishwasher beeping after a cycle ends. Before calling, locate the model number and serial number on the label on the inside the rinse aid dispenser to instructions in the Use and...the arrow. --Wipe up to 45% dryer dishes: 1 - If you need to cancel a cycle or the dishwasher control panel seems to not respond, cancel or reset by model To Contact Customer Service Call the toll free Customer Service number, 1-800-944-2904. Cycle Descriptions Heavy: Uses higher...
... USE AND CARE MANUAL FOR DETAILED INSTRUCTIONS AND IMPORTANT SAFETY NOTICES. 9000633150 Rev A 3/11 Frequently Asked Questions Dishwasher beeping after a cycle ends. Before calling, locate the model number and serial number on the label on the inside the rinse aid dispenser to instructions in the Use and...the arrow. --Wipe up to 45% dryer dishes: 1 - If you need to cancel a cycle or the dishwasher control panel seems to not respond, cancel or reset by model To Contact Customer Service Call the toll free Customer Service number, 1-800-944-2904. Cycle Descriptions Heavy: Uses higher...


