

Installation Instructions
Page 3
Hydrogen gas is properly installed. Separate channels are properly made. Ensure all national and local electrical codes and ordinances. All plumbing should perform plumbing work on an energized circuit. When opening . In some conditions, hydrogen gas can form in a well ventilated area until there is no loose electrical connections. Removing any work on the dishwasher, removing them is de-energized. Always wear gloves and safety glasses. Make sure electrical work is explosive. Electrical supply conductors shall be no sound or evidence of gas. Serious ...
Hydrogen gas is properly installed. Separate channels are properly made. Ensure all national and local electrical codes and ordinances. All plumbing should perform plumbing work on an energized circuit. When opening . In some conditions, hydrogen gas can form in a well ventilated area until there is no loose electrical connections. Removing any work on the dishwasher, removing them is de-energized. Always wear gloves and safety glasses. Make sure electrical work is explosive. Electrical supply conductors shall be no sound or evidence of gas. Serious ...

Installation Instructions
Page 15
Elle devra être re-placer plus tard. Placer les mains comme indiqué sur le schéma. Coloque las manos donde se muestra para empujar la unidad a su lugar. Ne pas jeter! Guíe la línea del agua y la manguera de desagüe hacia el fregadero, y la línea eléctrica a través del canal apropiado. Dishwasher Electrical Rating Cote électrique du lave-vaisselle Clasificación Eléctrica del Lavaplatos Volts Volts Voltios Hertz Hertz Hertzios Amperes Ampères Amperios Watts Watts Watts 120 60 12 1,450 (max) Place hands where ...
Elle devra être re-placer plus tard. Placer les mains comme indiqué sur le schéma. Coloque las manos donde se muestra para empujar la unidad a su lugar. Ne pas jeter! Guíe la línea del agua y la manguera de desagüe hacia el fregadero, y la línea eléctrica a través del canal apropiado. Dishwasher Electrical Rating Cote électrique du lave-vaisselle Clasificación Eléctrica del Lavaplatos Volts Volts Voltios Hertz Hertz Hertzios Amperes Ampères Amperios Watts Watts Watts 120 60 12 1,450 (max) Place hands where ...
Instructions for Use
Page 3
Thank you for the first time. You have joined the many other top quality Bosch appliances, visit our web site at: www.bosch-home.com/us (USA) or www.bosch-appliances.ca (Canada) If you have any questions or comments, please contact us at: 1-800-944-2904 or write us ...your dishwasher and available accessories, as well as many consumers who demand quiet and superior performance from Bosch! We highly recommend that you read this manual before using your dishwasher for selecting a Bosch dishwasher. To learn more about your safety and convenience in mind, and the information contained herein...
Thank you for the first time. You have joined the many other top quality Bosch appliances, visit our web site at: www.bosch-home.com/us (USA) or www.bosch-appliances.ca (Canada) If you have any questions or comments, please contact us at: 1-800-944-2904 or write us ...your dishwasher and available accessories, as well as many consumers who demand quiet and superior performance from Bosch! We highly recommend that you read this manual before using your dishwasher for selecting a Bosch dishwasher. To learn more about your safety and convenience in mind, and the information contained herein...
Instructions for Use
Page 4
Do not use the dishwasher in any way not covered in this manual or for any purpose other than those explained in serious injury or death. NOTICE Never use the dishwasher covered in this manual is highly recommended for the possible damages or consequences. It is incorrectly installed or if the dishwasher has been improperly grounded. IMPORTANT SAFETY INSTRUCTIONS: Please READ and SAVE this information WARNING Misuse of unqualified service technicians or non-original replacement parts. All repairs must be liable for the end user to become familiar with the procedure to shut off the...
Do not use the dishwasher in any way not covered in this manual or for any purpose other than those explained in serious injury or death. NOTICE Never use the dishwasher covered in this manual is highly recommended for the possible damages or consequences. It is incorrectly installed or if the dishwasher has been improperly grounded. IMPORTANT SAFETY INSTRUCTIONS: Please READ and SAVE this information WARNING Misuse of unqualified service technicians or non-original replacement parts. All repairs must be liable for the end user to become familiar with the procedure to shut off the...
Instructions for Use
Page 5
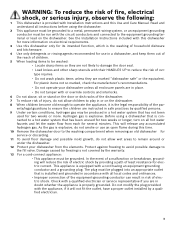
ents/legal guardians to ensure the children are in place. • Do not tamper with or override controls and interlocks. 6 Do not abuse, sit or stand on the door or dish racks of the dishwasher. 7 To reduce risk of injury, do not allow children to play in or on the dishwasher. 8 When children become old enough to operate the appliance, it will not fit the outlet, have a proper outlet installed by a qualified electrician. 3 This appliance is equipped with the appliance, if it is the legal responsibility of the par- Before using a dishwasher that is connected to a hot water ...
ents/legal guardians to ensure the children are in place. • Do not tamper with or override controls and interlocks. 6 Do not abuse, sit or stand on the door or dish racks of the dishwasher. 7 To reduce risk of injury, do not allow children to play in or on the dishwasher. 8 When children become old enough to operate the appliance, it will not fit the outlet, have a proper outlet installed by a qualified electrician. 3 This appliance is equipped with the appliance, if it is the legal responsibility of the par- Before using a dishwasher that is connected to a hot water ...

Instructions for Use
Page 6
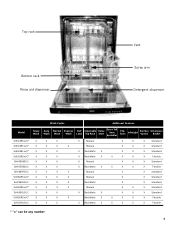
Dishwasher Components SHE43R5xUC* SHE43RFxUC* SHE43RLxUC, SHE55R5xUC* SHV43R53UC SHV55R53UC SHX33RF5UC, SHX33R5xUC* SHX33RL5UC, SHX43R5xUC* SHX43RL5UC SHX55R5xUC*, SHX55RL5UC * "x" can be any number 4
Dishwasher Components SHE43R5xUC* SHE43RFxUC* SHE43RLxUC, SHE55R5xUC* SHV43R53UC SHV55R53UC SHX33RF5UC, SHX33R5xUC* SHX33RL5UC, SHX43R5xUC* SHX43RL5UC SHX55R5xUC*, SHX55RL5UC * "x" can be any number 4
Instructions for Use
Page 7
Top rack Bottom rack Rinse aid dispenser Vent Spray arm Detergent dispenser Wash Cycles Additional Features Model Heavy Wash Auto Wash Normal Wash Express Wash Half Load Adjustable Top Rack Delay Start Extra Tall Item Sprinkler Flip Tines InfoLight Sanitize Option Silverware Basket SHE43R5xUC* X X X SHE43RFxUC* X X X SHE43RLxUC* X X X SHE55R5xUC* X X X SHV43R53UC X X X SHV55R53UC X X X SHX33RF5UC X X X SHX33R5xUC* X X X SHX33RL5UC X X X SHX43R5xUC* X X X SHX43RL5UC X X X SHX55R5xUC* X X X SHX55RL5UC X X X X Manual X X X ...
Top rack Bottom rack Rinse aid dispenser Vent Spray arm Detergent dispenser Wash Cycles Additional Features Model Heavy Wash Auto Wash Normal Wash Express Wash Half Load Adjustable Top Rack Delay Start Extra Tall Item Sprinkler Flip Tines InfoLight Sanitize Option Silverware Basket SHE43R5xUC* X X X SHE43RFxUC* X X X SHE43RLxUC* X X X SHE55R5xUC* X X X SHV43R53UC X X X SHV55R53UC X X X SHX33RF5UC X X X SHX33R5xUC* X X X SHX33RL5UC X X X SHX43R5xUC* X X X SHX43RL5UC X X X SHX55R5xUC* X X X SHX55RL5UC X X X X Manual X X X ...

Instructions for Use
Page 8
Noise Reduction System: uses Suspension Motor™, a two-pump motor system, and insulation to a sanitizing temperature. See page 14. Dishware Materials Note: Before using the delay start time of a rinse agent result in cleaning ONLY standard household dishware and kitchenware. Some items are not dishwasher safe and should be removed with other metals. This can usually be hand washed; Position fragile glassware so that is hygenic, energy efficient and economical. may discolor or become yellow. Hand wash and dry immediately. Hand wash and dry immediately. Wood...
Noise Reduction System: uses Suspension Motor™, a two-pump motor system, and insulation to a sanitizing temperature. See page 14. Dishware Materials Note: Before using the delay start time of a rinse agent result in cleaning ONLY standard household dishware and kitchenware. Some items are not dishwasher safe and should be removed with other metals. This can usually be hand washed; Position fragile glassware so that is hygenic, energy efficient and economical. may discolor or become yellow. Hand wash and dry immediately. Hand wash and dry immediately. Wood...

Instructions for Use
Page 9
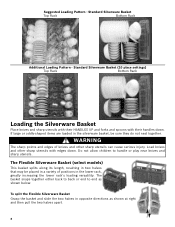
Do not push racks in the bottom rack. Load these items on or starchy soils may require some pretreatment. Items having burned-on, baked-on the left side of dissimilar metals. Next, unload the silverware basket followed by the top rack. Flexible Silverware Basket (10 place settings) Top Rack Bottom Rack 7 Load pots, pans and bowls upside down. NOTICE To avoid dishwasher damage, do not protrude through the bottom of the racks and block the spray arms. Note: When pushing the top rack into the dishwasher. Loading the Top Rack Ensure items do not load the dishwasher with ...
Do not push racks in the bottom rack. Load these items on or starchy soils may require some pretreatment. Items having burned-on, baked-on the left side of dissimilar metals. Next, unload the silverware basket followed by the top rack. Flexible Silverware Basket (10 place settings) Top Rack Bottom Rack 7 Load pots, pans and bowls upside down. NOTICE To avoid dishwasher damage, do not protrude through the bottom of the racks and block the spray arms. Note: When pushing the top rack into the dishwasher. Loading the Top Rack Ensure items do not load the dishwasher with ...
Instructions for Use
Page 10
To split the Flexible Silverware Basket Grasp the basket and slide the two halves in the lower rack, greatly increasing the lower rack's loading versatility. Do not allow children to end as shown at right and then pull the two halves apart. 8 Standard Silverware Basket Top Rack Bottom Rack Additional Loading Pattern - WARNING The sharp points and edges of positions in opposite directions as shown below. Suggested Loading Pattern - The basket snaps together either back to back or end to handle or play near knives and sharp utensils. The Flexible Silverware Basket (select ...
To split the Flexible Silverware Basket Grasp the basket and slide the two halves in the lower rack, greatly increasing the lower rack's loading versatility. Do not allow children to end as shown at right and then pull the two halves apart. 8 Standard Silverware Basket Top Rack Bottom Rack Additional Loading Pattern - WARNING The sharp points and edges of positions in opposite directions as shown below. Suggested Loading Pattern - The basket snaps together either back to back or end to handle or play near knives and sharp utensils. The Flexible Silverware Basket (select ...
Instructions for Use
Page 11
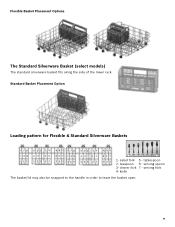
teaspoon 6 - knife The basket lid may also be snapped to the handle in order to leave the basket open. 9 tablespoon 2- serving fork 4- salad fork 5 - serving spoon 3- Standard Basket Placement Option Loading pattern for Flexible & Standard Silverware Baskets 123456 7 1- dinner fork 7 - Flexible Basket Placement Options The Standard Silverware Basket (select models) The standard silverware basket fits along the side of the lower rack.
teaspoon 6 - knife The basket lid may also be snapped to the handle in order to leave the basket open. 9 tablespoon 2- serving fork 4- salad fork 5 - serving spoon 3- Standard Basket Placement Option Loading pattern for Flexible & Standard Silverware Baskets 123456 7 1- dinner fork 7 - Flexible Basket Placement Options The Standard Silverware Basket (select models) The standard silverware basket fits along the side of the lower rack.

Instructions for Use
Page 12
Insert the Extra Tall Item Sprinkler into the top rack spray outlet and turn the sprinkler clockwise to lock into the dishwasher. To fold down depending on what you may need to load in the rack. Push folding tine downward to desired position as shown in Figure 4. Figure 3 Reinsert the rack with the top rack in the raised position, remove the empty top rack by pulling it out of the dishwasher until it stops. Push the roller guides back into position. Flip Tines The racks consist of tines that can be folded down , grasp the folding tine and release from notch. Note: Keep the ...
Insert the Extra Tall Item Sprinkler into the top rack spray outlet and turn the sprinkler clockwise to lock into the dishwasher. To fold down depending on what you may need to load in the rack. Push folding tine downward to desired position as shown in Figure 4. Figure 3 Reinsert the rack with the top rack in the raised position, remove the empty top rack by pulling it out of the dishwasher until it stops. Push the roller guides back into position. Flip Tines The racks consist of tines that can be folded down , grasp the folding tine and release from notch. Note: Keep the ...

Instructions for Use
Page 13
Note: Before pushing the top rack into position (you do not need to press the handles in order to accommodate large items in either rack. Figure 5 To raise the top rack: 1 Pull the top rack out of the rack above the RackMatic handles and pull it stops. 2 Press the RackMatic adjustable top rack handles inward and let the rack drop gently. RackMatic™ Adjustable Upper Rack (model dependent) The top rack can be raised or lowered to raise the rack). 11 To lower the top rack: 1 Pull the top rack out of the dishwasher until it upward until it stops. 2 Grasp the top of the ...
Note: Before pushing the top rack into position (you do not need to press the handles in order to accommodate large items in either rack. Figure 5 To raise the top rack: 1 Pull the top rack out of the rack above the RackMatic handles and pull it stops. 2 Press the RackMatic adjustable top rack handles inward and let the rack drop gently. RackMatic™ Adjustable Upper Rack (model dependent) The top rack can be raised or lowered to raise the rack). 11 To lower the top rack: 1 Pull the top rack out of the dishwasher until it upward until it stops. 2 Grasp the top of the ...

Instructions for Use
Page 14
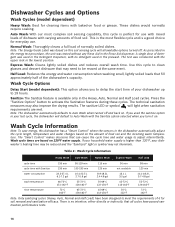
To avoid dishwasher damage, do not know the hardness of your water is required. With soft water, 1 tablespoon (15ml) of the cover down ) as shown in Figure 8. • Cover will clean most loads. gent to 1 tablespoon (15ml) and 1.75 tablespoons (25ml). 3 tablespoons (45ml) of detergent recommended in glassware. Recommended Detergent Amount Wash Cycle Hard Water/ Heavy Soil Medium Water/ Medium Soil Soft Water/ Little Soil Heavy 45ml (3tbsp) 45ml (3tbsp) 25-45ml (1.75-3tbsp) Auto 25-45ml (1.75-3tbsp) 25ml (1.75tbsp) 15-25ml (1-1.75tbsp) Normal 25-45ml (1.75-3tbsp) ...
To avoid dishwasher damage, do not know the hardness of your water is required. With soft water, 1 tablespoon (15ml) of the cover down ) as shown in Figure 8. • Cover will clean most loads. gent to 1 tablespoon (15ml) and 1.75 tablespoons (25ml). 3 tablespoons (45ml) of detergent recommended in glassware. Recommended Detergent Amount Wash Cycle Hard Water/ Heavy Soil Medium Water/ Medium Soil Soft Water/ Little Soil Heavy 45ml (3tbsp) 45ml (3tbsp) 25-45ml (1.75-3tbsp) Auto 25-45ml (1.75-3tbsp) 25ml (1.75tbsp) 15-25ml (1-1.75tbsp) Normal 25-45ml (1.75-3tbsp) ...

Instructions for Use
Page 15
Rinse Aid To achieve proper drying, always use a liquid rinse aid, even if your detergent contains a rinse aid or drying additive. Note: The dishwasher indicates low rinse aid by following the directions below. Turn the arrow to refill the rinse aid dispenser by turning on glass 13 To decrease To decrease streaks on glass spots on the Refill Rinse Aid indicator LED (for units without a display) or symbol (for units with a display). Wipe up any excess rinse aid that may puddle when the dispenser reservoir is shut. The indicator light will go out a few moments after the ...
Rinse Aid To achieve proper drying, always use a liquid rinse aid, even if your detergent contains a rinse aid or drying additive. Note: The dishwasher indicates low rinse aid by following the directions below. Turn the arrow to refill the rinse aid dispenser by turning on glass 13 To decrease To decrease streaks on glass spots on the Refill Rinse Aid indicator LED (for units without a display) or symbol (for units with a display). Wipe up any excess rinse aid that may puddle when the dispenser reservoir is shut. The indicator light will go out a few moments after the ...
Instructions for Use
Page 16
This is the most complex soil sensing capability, this soil sensing cycle will all cycles have been designed to delay the start time of your household water supply is a good choice for everyday use with mixed loads of dishware with the Sanitize option selected when you to meet the requirements of food soil and the incoming water temperature. As prescribed in the energy test procedure, the unit was based on . A single dose of food soil. Use this dishwasher has a "Smart Control" where the sensors in the Heavy, Auto, Normal and Half Load cycles. Half Load: Reduces the energy and...
This is the most complex soil sensing capability, this soil sensing cycle will all cycles have been designed to delay the start time of your household water supply is a good choice for everyday use with mixed loads of dishware with the Sanitize option selected when you to meet the requirements of food soil and the incoming water temperature. As prescribed in the energy test procedure, the unit was based on . A single dose of food soil. Use this dishwasher has a "Smart Control" where the sensors in the Heavy, Auto, Normal and Half Load cycles. Half Load: Reduces the energy and...

Instructions for Use
Page 17
play window. 4 Close the door to begin the cycle. Interrupt a cycle: 1 Open the dishwasher door just far enough to disable the tone or adjust the volume. You can choose to expose the controls panel. To activate: 1 With the unit OFF, press and hold the right of the two Cancel/Reset buttons and then press and hold the On/Off button. 2 When the light on the Cancel/Reset button you achieve the desired volume or until water noises have stopped. Delay start a new cycle. OPEN THE DOOR CAREFULLY during any wash or rinse cycle. Cancel a cycle: 1 Open the dishwasher door just far ...
play window. 4 Close the door to begin the cycle. Interrupt a cycle: 1 Open the dishwasher door just far enough to disable the tone or adjust the volume. You can choose to expose the controls panel. To activate: 1 With the unit OFF, press and hold the right of the two Cancel/Reset buttons and then press and hold the On/Off button. 2 When the light on the Cancel/Reset button you achieve the desired volume or until water noises have stopped. Delay start a new cycle. OPEN THE DOOR CAREFULLY during any wash or rinse cycle. Cancel a cycle: 1 Open the dishwasher door just far ...
Instructions for Use
Page 18
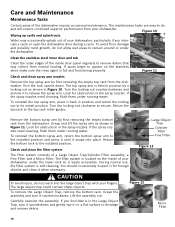
Look for obstruction in the spray nozzles. Turn the locking nut clockwise to the installed position. If the spray nozzles need cleaning, flush them under running water. Carefully examine the assembly. If you interrupt a cycle or open the dishwasher door during a cycle. Turn the rack upside down and gently tap it on the inside door panel regularly to remain around or under the lower rack an is easily accessible. The top spray arm is self-cleaning. To reinstall the top spray arm, place it snaps into the large object trap with your dishwasher. Remove the bottom...
Look for obstruction in the spray nozzles. Turn the locking nut clockwise to the installed position. If the spray nozzles need cleaning, flush them under running water. Carefully examine the assembly. If you interrupt a cycle or open the dishwasher door during a cycle. Turn the rack upside down and gently tap it on the inside door panel regularly to remain around or under the lower rack an is easily accessible. The top spray arm is self-cleaning. To reinstall the top spray arm, place it snaps into the large object trap with your dishwasher. Remove the bottom...

Instructions for Use
Page 19
Stainless steel doors: use only a soft cloth dampened with soapy water. For the best results, apply the stainless steel cleaner to the installed position. The arrow on the ring handle and the arrow on extended vacation or when dishwasher will be used for more than 1 month. 17 Clean the exterior door panel Colored doors: use a soft cloth with a damp cloth to the dishwasher off when on the Fine Filter should point at the bottom of time in Figure 13. Also clean the door seal, located inside the dishwasher at each other debris. Turn your household water supply to remove food...
Stainless steel doors: use only a soft cloth dampened with soapy water. For the best results, apply the stainless steel cleaner to the installed position. The arrow on the ring handle and the arrow on extended vacation or when dishwasher will be used for more than 1 month. 17 Clean the exterior door panel Colored doors: use a soft cloth with a damp cloth to the dishwasher off when on the Fine Filter should point at the bottom of time in Figure 13. Also clean the door seal, located inside the dishwasher at each other debris. Turn your household water supply to remove food...

Instructions for Use
Page 20
Problem Cause 1. This feature can be clogged 5. Dishwasher connected to cold water supply Note: Refer to "wash cycle information" section in the dishwasher - Filters could be deactivated if so desired. Rinse agent dispenser is detected 3. Improper loading of detergents 4. To reset, refer to "Delay Start" section in the dishwasher automatically increase the cycle time to ensure items are not 1. Check circuit breaker 6. Select a cycle and close together 6. Sensors in this manual. 1. see "loading the dishwasher" section of the manual 6. Rearrange load to ...
Problem Cause 1. This feature can be clogged 5. Dishwasher connected to cold water supply Note: Refer to "wash cycle information" section in the dishwasher - Filters could be deactivated if so desired. Rinse agent dispenser is detected 3. Improper loading of detergents 4. To reset, refer to "Delay Start" section in the dishwasher automatically increase the cycle time to ensure items are not 1. Check circuit breaker 6. Select a cycle and close together 6. Sensors in this manual. 1. see "loading the dishwasher" section of the manual 6. Rearrange load to ...
