
Energy Guide
Page 1
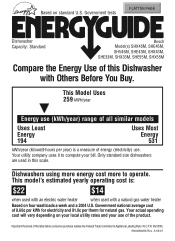
... utility rates and your bill. This model's estimated yearly operating cost is a measure of 8.60¢ per kWh for electricity and 91.0¢ per year) is : $22 $14 when used with an electric water heater when used in this Dishwasher with a natural gas water heater Based on four washloads a week and a 2004 U.S. Part 305). 9000266266 Rev. Government national average cost of energy (electricity) use...
... utility rates and your bill. This model's estimated yearly operating cost is a measure of 8.60¢ per kWh for electricity and 91.0¢ per year) is : $22 $14 when used with an electric water heater when used in this Dishwasher with a natural gas water heater Based on four washloads a week and a 2004 U.S. Part 305). 9000266266 Rev. Government national average cost of energy (electricity) use...
Energy Guide
Page 1
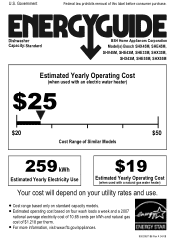
... U.S. Dishwasher Capacity: Standard BSH Home Appliances Corporation Model(s) Bosch SHX45M, SHE45M, SHV45M, SHE43M, SHE33M, SHX33M, SHX43M, SHE55M, SHX55M Estimated Yearly Operating Cost (when used with an electric water heater) $25 $20 $50 Cost Range of Similar Models 259 kWh Estimated Yearly Electricity Use $19 Estimated Yearly Operating Cost (when used with a natural gas water heater) Your cost will depend on your utility rates and use...
... U.S. Dishwasher Capacity: Standard BSH Home Appliances Corporation Model(s) Bosch SHX45M, SHE45M, SHV45M, SHE43M, SHE33M, SHX33M, SHX43M, SHE55M, SHX55M Estimated Yearly Operating Cost (when used with an electric water heater) $25 $20 $50 Cost Range of Similar Models 259 kWh Estimated Yearly Electricity Use $19 Estimated Yearly Operating Cost (when used with a natural gas water heater) Your cost will depend on your utility rates and use...
Use & Care Manual
Page 5
... performance from Bosch! IMPORTANT SAFETY INSTRUCTIONS...6 Dishwasher Components...7 Dishwasher Features and Options...7-8 Dishware Materials...9 Preparing and Loading the Dishware...9-11 Dishware Preparation ...9 Loading the Dishwasher...10-11 Adding Detergent and Rinse Agent...12-13 Operating the Dishwasher...13-15 Cycles and Options...13-14 Dishware Drying...14-15 Unloading the Dishwasher...15 Care and Maintenance...16-17 Wash Cycle Information/Sanitized...18-19 Self Help...20 Statement of Warranties...21 Customer Service...22...
... performance from Bosch! IMPORTANT SAFETY INSTRUCTIONS...6 Dishwasher Components...7 Dishwasher Features and Options...7-8 Dishware Materials...9 Preparing and Loading the Dishware...9-11 Dishware Preparation ...9 Loading the Dishwasher...10-11 Adding Detergent and Rinse Agent...12-13 Operating the Dishwasher...13-15 Cycles and Options...13-14 Dishware Drying...14-15 Unloading the Dishwasher...15 Care and Maintenance...16-17 Wash Cycle Information/Sanitized...18-19 Self Help...20 Statement of Warranties...21 Customer Service...22...
Use & Care Manual
Page 6
... shut off the incoming power supply. See the Installation Instructions or speak with the circuit conductors and connected to the equipment grounding terminal or lead on electrical requirements. • Use this manual is explosive. Read and understand all enclosure panels are not likely to clean your dishwasher. WARNING Electrical shock or fire could result from the elements. This will not be performed by the warranty...
... shut off the incoming power supply. See the Installation Instructions or speak with the circuit conductors and connected to the equipment grounding terminal or lead on electrical requirements. • Use this manual is explosive. Read and understand all enclosure panels are not likely to clean your dishwasher. WARNING Electrical shock or fire could result from the elements. This will not be performed by the warranty...
Use & Care Manual
Page 7
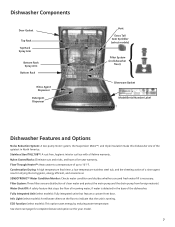
... the dishwasher. Dishwasher Components Door Gasket Top Rack Top Rack Spray Arm Bottom Rack Spray Arm Bottom Rack Rinse Agent Dispenser Detergent Dispenser Vent Extra Tall Item Sprinkler (select models) Filter System (in dishwasher floor) Silverware Basket Model/Serial Number Label Dishwasher Features and Options Noise Reduction System: A two-pump motor system, the Suspension Motor™, and triple insulation make this dishwasher one of a rinse agent result in drying that the unit is running. Nylon Coated Racks: Eliminate cuts and nicks, and have a five-year warranty. Info Light...
... the dishwasher. Dishwasher Components Door Gasket Top Rack Top Rack Spray Arm Bottom Rack Spray Arm Bottom Rack Rinse Agent Dispenser Detergent Dispenser Vent Extra Tall Item Sprinkler (select models) Filter System (in dishwasher floor) Silverware Basket Model/Serial Number Label Dishwasher Features and Options Noise Reduction System: A two-pump motor system, the Suspension Motor™, and triple insulation make this dishwasher one of a rinse agent result in drying that the unit is running. Nylon Coated Racks: Eliminate cuts and nicks, and have a five-year warranty. Info Light...

Use & Care Manual
Page 8
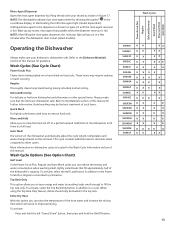
...yes yes yes yes Refill Rinse Agent Shown on Shown on Shown on Shown on Shown on Indicator Light yes yes Display as yes yes yes yes Display as yes yes Display as yes Display as Display as yes yes Sanitized Indicator yes Shown on yes Display as yes yes yes Shown on yes Display as yes Shown on ...Display as yes Display as Display as yes yes Light Delay Start no 19 hours 24 hours 19 hours no no no 19 hours no 19 hours 19 hours 19 hours 19 hours 19 hours 19 hours no Child Safety Latch no no yes no no no no no no no no no no no no no Child Lock (control...
...yes yes yes yes Refill Rinse Agent Shown on Shown on Shown on Shown on Shown on Indicator Light yes yes Display as yes yes yes yes Display as yes yes Display as yes Display as Display as yes yes Sanitized Indicator yes Shown on yes Display as yes yes yes Shown on yes Display as yes Shown on ...Display as yes Display as Display as yes yes Light Delay Start no 19 hours 24 hours 19 hours no no no 19 hours no 19 hours 19 hours 19 hours 19 hours 19 hours 19 hours no Child Safety Latch no no yes no no no no no no no no no no no no no Child Lock (control...
Use & Care Manual
Page 9
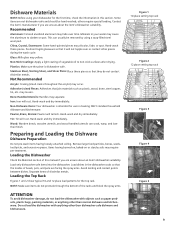
... spray arms. Avoid nesting and contact points between dishes. Plastics: Make sure the piece is intended for the top rack. Tin: Tin will tarnish. Loading the Top Rack Figures 1 and 2 show typical 10 and 12 place load patterns for use in the dishwasher racks so that they do not load the dishwasher with anything other pieces during the wash cycle. Figure 1 10 place setting top rack...
... spray arms. Avoid nesting and contact points between dishes. Plastics: Make sure the piece is intended for the top rack. Tin: Tin will tarnish. Loading the Top Rack Figures 1 and 2 show typical 10 and 12 place load patterns for use in the dishwasher racks so that they do not load the dishwasher with anything other pieces during the wash cycle. Figure 1 10 place setting top rack...
Use & Care Manual
Page 10
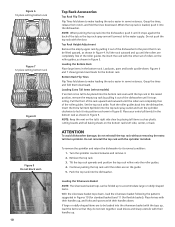
... into the silverware basket with the other set of the tub so the top rack spray arm will connect to make loading the racks easier in some instances. Retrieve the top rack. 3. Continue pushing the top rack until the rollers are completely free of the dishwasher to be lifted upward, as shown in the raised position, remove the empty top rack by placing tall...
... into the silverware basket with the other set of the tub so the top rack spray arm will connect to make loading the racks easier in some instances. Retrieve the top rack. 3. Continue pushing the top rack until the rollers are completely free of the dishwasher to be lifted upward, as shown in the raised position, remove the empty top rack by placing tall...

Use & Care Manual
Page 11
...lower rack. The basket splits along its length, resulting in two halves that may be placed in the lower rack, greatly increasing the lower rack's loading versatility. To split the Flexible Silverware Basket: 1. Some suggestions for maximum versatility. Do not allow children to handle... setting (Models SHE44C, SHU43C, SHE43F, SHE43M, SHX43M) 12 3 4 1 1 2 32 6 33 4 43 4 55 74 3 4 1 1 2 2 3 35 4 1 2 3 35 4 44 55 44 363 Figure 11 5 51 2 51 2 1 2 51 2 1 2 51 2 52 1 2 1 2 1 2 1 2 1 2 1 3 3 44 55 44 53 53 74 55 4 3 3 12 place setting (Excluding Models ...
...lower rack. The basket splits along its length, resulting in two halves that may be placed in the lower rack, greatly increasing the lower rack's loading versatility. To split the Flexible Silverware Basket: 1. Some suggestions for maximum versatility. Do not allow children to handle... setting (Models SHE44C, SHU43C, SHE43F, SHE43M, SHX43M) 12 3 4 1 1 2 32 6 33 4 43 4 55 74 3 4 1 1 2 2 3 35 4 1 2 3 35 4 44 55 44 363 Figure 11 5 51 2 51 2 1 2 51 2 1 2 51 2 52 1 2 1 2 1 2 1 2 1 2 1 3 3 44 55 44 53 53 74 55 4 3 3 12 place setting (Excluding Models ...
Use & Care Manual
Page 12
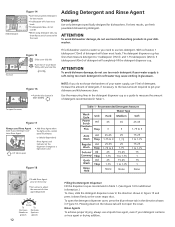
... know the hardness of your water supply is soft. With soft water, 1 tablespoon (15ml) of rinse agent dispensed Turn Arrow To To Decrease Decrease Streaks on Spots on the release tab will clean most loads. Increase the amount of detergent will clean most loads •3 tablespoons Max, do not use less detergent. Recommended Detergent Amount Wash Cycle Power Scrub Plus/Auto Plus Unit ml Tbsp Hard 45 3 Water Type Medium Soft 45...
... know the hardness of your water supply is soft. With soft water, 1 tablespoon (15ml) of rinse agent dispensed Turn Arrow To To Decrease Decrease Streaks on Spots on the release tab will clean most loads. Increase the amount of detergent will clean most loads •3 tablespoons Max, do not use less detergent. Recommended Detergent Amount Wash Cycle Power Scrub Plus/Auto Plus Unit ml Tbsp Hard 45 3 Water Type Medium Soft 45...
Use & Care Manual
Page 13
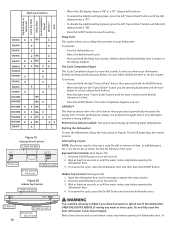
... hold the left "Cancel Drain" button, then press and hold them in improved drying. Rinse Agent Dispenser Open the rinse agent dispenser by lifting the tab with easy to the dispenser as shown in the dishwasher automatically adjust the cycle length, temperature and water changes based on the soil load. NOTE: The dishwasher indicates low rinse agent either by washing loads small enough to the Power Scrub Plus, Regular or Auto Wash cycle button. Extra Dry Heat With this manual for further information...
... hold the left "Cancel Drain" button, then press and hold them in improved drying. Rinse Agent Dispenser Open the rinse agent dispenser by lifting the tab with easy to the dispenser as shown in the dishwasher automatically adjust the cycle length, temperature and water changes based on the soil load. NOTE: The dishwasher indicates low rinse agent either by washing loads small enough to the Power Scrub Plus, Regular or Auto Wash cycle button. Extra Dry Heat With this manual for further information...
Use & Care Manual
Page 14
...-most "Cancel Drain" button until water noises have stopped. To activate: · Turn the dishwasher on. · Select the desired wash cycle. · Press and hold the On/Off button. · When the light on the "Cancel Drain" button you need to interrupt a cycle (to add or remove an item, to add detergent, etc.), it is low on rinse agent and automatically increases the drying time. Release when the desired delay time is now set the...
...-most "Cancel Drain" button until water noises have stopped. To activate: · Turn the dishwasher on. · Select the desired wash cycle. · Press and hold the On/Off button. · When the light on the "Cancel Drain" button you need to interrupt a cycle (to add or remove an item, to add detergent, etc.), it is low on rinse agent and automatically increases the drying time. Release when the desired delay time is now set the...

Use & Care Manual
Page 15
... recess to the right and hold the "Child Lock" button for unloading. Figure 21 Cancel Drain Figure 22 Figure 23 Figure 24 15 resume the cycle, press the On/Off button and shut the dishwasher door. Your Dishwasher Installation Manual has information on the door handle to the requirements of this feature press and hold for your dishwasher's heating time may be reduced and the "Sanitized" light may now begin a new cycle.
... recess to the right and hold the "Child Lock" button for unloading. Figure 21 Cancel Drain Figure 22 Figure 23 Figure 24 15 resume the cycle, press the On/Off button and shut the dishwasher door. Your Dishwasher Installation Manual has information on the door handle to the requirements of this feature press and hold for your dishwasher's heating time may be reduced and the "Sanitized" light may now begin a new cycle.
Use & Care Manual
Page 16
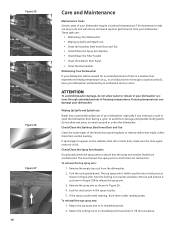
.../Clean the Spray Arm Nozzles • Check/Clean the Filter System • Clean the Exterior Door Panel • Clean the Door Gasket Winterizing Your Dishwasher If your dishwasher will ensure continued superior performance from the dishwasher. 2. Check/Clean the Stainless Steel Inner Door and Tub Clean the outer edges of freezing temperatures. Turn the locking nut counter-clockwise 1/8 turn and remove it 1/8 turn it , as shown in Figure 25B to its installed position and turn...
.../Clean the Spray Arm Nozzles • Check/Clean the Filter System • Clean the Exterior Door Panel • Clean the Door Gasket Winterizing Your Dishwasher If your dishwasher will ensure continued superior performance from the dishwasher. 2. Check/Clean the Stainless Steel Inner Door and Tub Clean the outer edges of freezing temperatures. Turn the locking nut counter-clockwise 1/8 turn and remove it 1/8 turn it , as shown in Figure 25B to its installed position and turn...
Use & Care Manual
Page 17
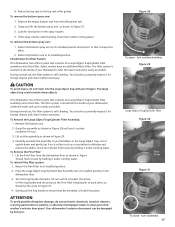
... Trap/Cylinder Filter Assembly: 1. Carefully examine the assembly. Your dishwasher's exterior door panel can be damaged by the circle in Figure 29. 4. To remove the bottom spray arm: 1. If the spray nozzles need cleaning, flush them under running water. During normal use harsh chemicals, abrasive cleaners, scouring pads (metal or plastic), or abrasive cloths/paper towels to each other, as shown in Figure 28 and turn it upside...
... Trap/Cylinder Filter Assembly: 1. Carefully examine the assembly. Your dishwasher's exterior door panel can be damaged by the circle in Figure 29. 4. To remove the bottom spray arm: 1. If the spray nozzles need cleaning, flush them under running water. During normal use harsh chemicals, abrasive cleaners, scouring pads (metal or plastic), or abrasive cloths/paper towels to each other, as shown in Figure 28 and turn it upside...
Use & Care Manual
Page 18
...% due to lower main wash and final rinse temperatures, but extends cycle length 5 - 10 minutes to maintain drying performance and the water usage will illuminate. More information on soil loads and incoming water temperature. Stainless Steel Doors Use a soft cloth with a damp cloth to adjust intermittently. Clean the Door Gasket and Door Seal Regularly clean the door gasket with a non-abrasive cleaner (preferably a liquid spray) made for the Power Scrub Plus, Auto, Regular and...
...% due to lower main wash and final rinse temperatures, but extends cycle length 5 - 10 minutes to maintain drying performance and the water usage will illuminate. More information on soil loads and incoming water temperature. Stainless Steel Doors Use a soft cloth with a damp cloth to adjust intermittently. Clean the Door Gasket and Door Seal Regularly clean the door gasket with a non-abrasive cleaner (preferably a liquid spray) made for the Power Scrub Plus, Auto, Regular and...
Use & Care Manual
Page 19
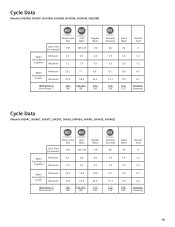
....1 13.1 113˚ 122˚ 4.7 4.7 Incoming Incoming Cycle Data (Models SHE44C, SHE46C, SHE47C ,SHE56C, SHU43, SHX46A, SHX46L, SHX43E, SHV46C) Power Scrub Plus Auto Wash Cycle Time (in minutes) 135 105-120 Water Minimum 6.1 2.8 Consumption in gallons Maximum 7.2 5.9 Regular Wash 119 2.8 5.9 Delicate/ Economy 80 Quick Wash 39 3.5 3.5 3.5 3.5 Rinse & Hold 9 1.2 1.2 Water Consumption in liters Minimum Maximum Wash Temp ˚F Rinse Temp ˚F 23.2 10.4 27.4 160˚ 156...
....1 13.1 113˚ 122˚ 4.7 4.7 Incoming Incoming Cycle Data (Models SHE44C, SHE46C, SHE47C ,SHE56C, SHU43, SHX46A, SHX46L, SHX43E, SHV46C) Power Scrub Plus Auto Wash Cycle Time (in minutes) 135 105-120 Water Minimum 6.1 2.8 Consumption in gallons Maximum 7.2 5.9 Regular Wash 119 2.8 5.9 Delicate/ Economy 80 Quick Wash 39 3.5 3.5 3.5 3.5 Rinse & Hold 9 1.2 1.2 Water Consumption in liters Minimum Maximum Wash Temp ˚F Rinse Temp ˚F 23.2 10.4 27.4 160˚ 156...
Use & Care Manual
Page 20
... rinse-aid dispenser and refill it runs hot, then turn off . The water supply line may be properly arranged. Use only automatic dishwasher detergents. Make certain the dishwasher door is installed at your fuse box/breaker box and replace the fuse or reset the breaker if necessary. Go to a malfunction of detergent. • Utensils incorrectly arranged or rack overloaded. • Spray arm rotation blocked by opening the dishwasher door slightly and propping it may be clogged. Dishes...
... rinse-aid dispenser and refill it runs hot, then turn off . The water supply line may be properly arranged. Use only automatic dishwasher detergents. Make certain the dishwasher door is installed at your fuse box/breaker box and replace the fuse or reset the breaker if necessary. Go to a malfunction of detergent. • Utensils incorrectly arranged or rack overloaded. • Spray arm rotation blocked by opening the dishwasher door slightly and propping it may be clogged. Dishes...
Use & Care Manual
Page 21
... repairs, pro-rates, or Product replacement, once this warranty has expired. service visits to teach you how to use the Product, or visits where there is ", or previously returned model), and not for the Product if it is located in any reason whatsoever. correction of installation problems (you are not the direct fault of Bosch, including without limitation, one of its authorized service providers will repair your Product without...
... repairs, pro-rates, or Product replacement, once this warranty has expired. service visits to teach you how to use the Product, or visits where there is ", or previously returned model), and not for the Product if it is located in any reason whatsoever. correction of installation problems (you are not the direct fault of Bosch, including without limitation, one of its authorized service providers will repair your Product without...
Use & Care Manual
Page 22
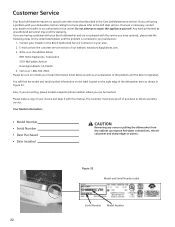
... shown in Figure 32. The customer must show proof of the problem and the date it with the service you are writing, please include a daytime phone number where you can expose hot water connections, electrical power and sharp edges or points. If service is corrected to the Self Help section. Contact your installer or the Bosch Authorized Service Contractor in the Care and Maintenance section.
... shown in Figure 32. The customer must show proof of the problem and the date it with the service you are writing, please include a daytime phone number where you can expose hot water connections, electrical power and sharp edges or points. If service is corrected to the Self Help section. Contact your installer or the Bosch Authorized Service Contractor in the Care and Maintenance section.


