
Installation Instructions
Page 1
Installation Instructions Notice d'installation 9000 901 316 (9311)
Installation Instructions Notice d'installation 9000 901 316 (9311)
Installation Instructions
Page 3
.... It is replacing another dishwasher, check the existing dishwasher connections for compatibility with the original package until after the entire installation has been completed. 1 Inspect the Dishwasher After unpacking the dishwasher and prior to ensure safety and optimum dishwasher performance....replace parts as necessary. otherwise the dishwasher may not drain properly. They will save you time and effort and help to installation, thoroughly inspect the dishwasher for indoor residential use . Important Safety Instructions To avoid possible injury or property damage, OBSERVE ...
.... It is replacing another dishwasher, check the existing dishwasher connections for compatibility with the original package until after the entire installation has been completed. 1 Inspect the Dishwasher After unpacking the dishwasher and prior to ensure safety and optimum dishwasher performance....replace parts as necessary. otherwise the dishwasher may not drain properly. They will save you time and effort and help to installation, thoroughly inspect the dishwasher for indoor residential use . Important Safety Instructions To avoid possible injury or property damage, OBSERVE ...
Installation Instructions
Page 4
...be soldered or sweated, keep the heat source at least 6Ǝ (152.4 mm) away from a system that the dishwasher electrical installation is no loose electrical connections. Temperatures required for soldering and sweating will damage the dishwasher's base and water inlet valve. If using copper... over and result in serious injury or death. All plumbing should perform plumbing work . Do not attempt any work is completely installed. Once these mounting brackets are certain the hot water supply is explosive. Ensure all national and local electrical codes and ordinances. ...
...be soldered or sweated, keep the heat source at least 6Ǝ (152.4 mm) away from a system that the dishwasher electrical installation is no loose electrical connections. Temperatures required for soldering and sweating will damage the dishwasher's base and water inlet valve. If using copper... over and result in serious injury or death. All plumbing should perform plumbing work . Do not attempt any work is completely installed. Once these mounting brackets are certain the hot water supply is explosive. Ensure all national and local electrical codes and ordinances. ...
Installation Instructions
Page 7
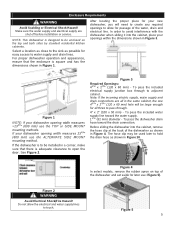
... use (Figure 5). Do not allow for all in the same cabinet, the one 43/4Ǝ x 23/8Ǝ (120 x 60 mm) hole will be installed in Figure 10. Figure 1 NOTE: If your dishwasher opening width measures >235/8Ǝ (600 mm) use the ALTERNATE SIDE MOUNT mounting method. The hose clip... enclosed on top of the water, drain and electrical line. Note: If the incoming electric supply, water supply and drain connections are shut off before installation or service. To pass the dishwasher drain hose toward the water supply. 11/4Ǝ (32 mm) diameter - NOTE: This dishwasher is designed to ...
... use (Figure 5). Do not allow for all in the same cabinet, the one 43/4Ǝ x 23/8Ǝ (120 x 60 mm) hole will be installed in Figure 10. Figure 1 NOTE: If your dishwasher opening width measures >235/8Ǝ (600 mm) use the ALTERNATE SIDE MOUNT mounting method. The hose clip... enclosed on top of the water, drain and electrical line. Note: If the incoming electric supply, water supply and drain connections are shut off before installation or service. To pass the dishwasher drain hose toward the water supply. 11/4Ǝ (32 mm) diameter - NOTE: This dishwasher is designed to ...
Installation Instructions
Page 8
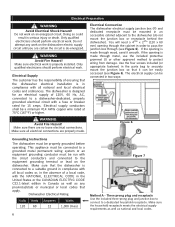
... behind the dishwasher). Do not work on the dishwasher electric supply circuit until you are certain the circuit is properly installed. Doing so could result in compliance with the circuit conductors and connected to securely mount the junction box so that the dishwasher ...electrical installation is made . If the opening is in serious injury or death. Figure 6 Grounding Instructions The dishwasher must be easily accessed (see...
... behind the dishwasher). Do not work on the dishwasher electric supply circuit until you are certain the circuit is properly installed. Doing so could result in compliance with the circuit conductors and connected to securely mount the junction box so that the dishwasher ...electrical installation is made . If the opening is in serious injury or death. Figure 6 Grounding Instructions The dishwasher must be easily accessed (see...

Installation Instructions
Page 9
...wire(ground) to the dishwasher. Only qualified plumbers should be made . Check all solder connections before the water line is installed or removed to reduce the likelihood of damage to the dishwasher. Remove the dishwasher electrical supply junction box cover and connect to... lose effectiveness. Do not perform any foreign material. Water Supply Shut Off Valve Install an easily accessible shut-off . Lower water temperatures will damage the dishwasher. Insert the white (neutral) wire to the dishwasher. ...
...wire(ground) to the dishwasher. Only qualified plumbers should be made . Check all solder connections before the water line is installed or removed to reduce the likelihood of damage to the dishwasher. Remove the dishwasher electrical supply junction box cover and connect to... lose effectiveness. Do not perform any foreign material. Water Supply Shut Off Valve Install an easily accessible shut-off . Lower water temperatures will damage the dishwasher. Insert the white (neutral) wire to the dishwasher. ...

Installation Instructions
Page 10
... the disposer's dishwasher drain connection. Take care not to allow the hose to the manufacturer's instructions. IMPORTANT NOTES: x If local ordinance require an air gap, install it according to kink or twist behind the dishwasher. 3. Drain Connections The dishwasher drain hose may be connected to a disposer dishwasher drain connection, remove the...
... the disposer's dishwasher drain connection. Take care not to allow the hose to the manufacturer's instructions. IMPORTANT NOTES: x If local ordinance require an air gap, install it according to kink or twist behind the dishwasher. 3. Drain Connections The dishwasher drain hose may be connected to a disposer dishwasher drain connection, remove the...
Installation Instructions
Page 11
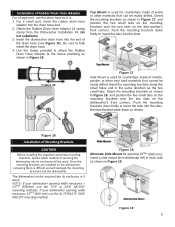
... will be secured into the slots. Be sure to the house plumbing as shown. Obtain the Rubber Drain Hose Adaptor (J) spring clamp from the Dishwasher Installation Kit (do not substitute). 3. Use the clamp provided to attach the Rubber Drain Hose Adaptor to fully insert the drain hose. 4. Top Mount is... SIDE MOUNT mounting method. Figure 18 Alternate Side Mount for countertops made of marble, granite, or other materials that cannot be easily drilled. Installation of Rubber Drain Hose Adaptor For a large port, use the drain hose as shown in Figure 17, and position the two small tabs ...
... will be secured into the slots. Be sure to the house plumbing as shown. Obtain the Rubber Drain Hose Adaptor (J) spring clamp from the Dishwasher Installation Kit (do not substitute). 3. Use the clamp provided to attach the Rubber Drain Hose Adaptor to fully insert the drain hose. 4. Top Mount is... SIDE MOUNT mounting method. Figure 18 Alternate Side Mount for countertops made of marble, granite, or other materials that cannot be easily drilled. Installation of Rubber Drain Hose Adaptor For a large port, use the drain hose as shown in Figure 17, and position the two small tabs ...
Installation Instructions
Page 12
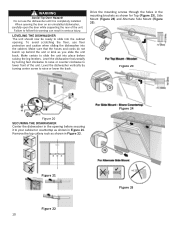
... cabinet opening before raising the leg levelers. Do not use floor protection and caution when sliding the dishwasher into place before securing it is completely installed. Drive the mounting screws through the holes in Figure 22. WARNING Avoid Tip Over Hazard! Failure to slide the unit into the cabinet. Figure 24...
... cabinet opening before raising the leg levelers. Do not use floor protection and caution when sliding the dishwasher into place before securing it is completely installed. Drive the mounting screws through the holes in Figure 22. WARNING Avoid Tip Over Hazard! Failure to slide the unit into the cabinet. Figure 24...
Installation Instructions
Page 14
Contact your installer or the Authorized Service Contractor in the Care and Maintenance section of your invoice and keep it with the service you have available (if you .... Any work performed by unauthorized personnel may void the warranty. E-mail us at the address below ) until the problem is necessary, contact your dealer or installer or an authorized service center. Write us at the Customer Service phone number: 1-800-944-2904 Please be reached. Call us . If you are having...
Contact your installer or the Authorized Service Contractor in the Care and Maintenance section of your invoice and keep it with the service you have available (if you .... Any work performed by unauthorized personnel may void the warranty. E-mail us at the address below ) until the problem is necessary, contact your dealer or installer or an authorized service center. Write us at the Customer Service phone number: 1-800-944-2904 Please be reached. Call us . If you are having...
Instructions for Use
Page 4
... if the dishwasher has been improperly grounded. NSF/ANSI 184 Certified residential dishwashers are certain the electrical supply has been correctly installed and the dishwasher has been properly grounded. Do not use the dishwasher covered in this manual or for the dishwasher covered in... product damage and/or injury could result if the electrical supply for any way not covered in the following pages. See the Installation Instructions or contact your dishwasher and may present health hazards! Never use of the dishwasher can be responsible for licensed food establishments. 2
... if the dishwasher has been improperly grounded. NSF/ANSI 184 Certified residential dishwashers are certain the electrical supply has been correctly installed and the dishwasher has been properly grounded. Do not use the dishwasher covered in this manual or for the dishwasher covered in... product damage and/or injury could result if the electrical supply for any way not covered in the following pages. See the Installation Instructions or contact your dishwasher and may present health hazards! Never use of the dishwasher can be responsible for licensed food establishments. 2
Instructions for Use
Page 5
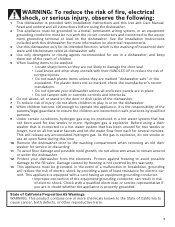
See the Installation Instructions included with this dishwasher for more information on the dishwasher. 8 When children become old enough to operate the appliance, it is the responsibility of ... has been unused for two weeks or more chemicals known to the State of California to cause cancer, birth defects, or other sharp utensils with Installation Instructions and this time. 10 Remove the dishwasher door to the washing compartment when removing an old dishwasher for service or discarding. 11 To avoid...
See the Installation Instructions included with this dishwasher for more information on the dishwasher. 8 When children become old enough to operate the appliance, it is the responsibility of ... has been unused for two weeks or more chemicals known to the State of California to cause cancer, birth defects, or other sharp utensils with Installation Instructions and this time. 10 Remove the dishwasher door to the washing compartment when removing an old dishwasher for service or discarding. 11 To avoid...
Instructions for Use
Page 23
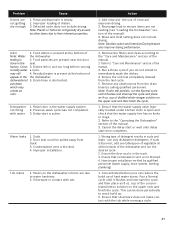
...the water supply valve (typically located under kitchen sink) is open and check that condensation vent is not blocked. 4. Have proper installation verified by calling qualified personnel. Stains on the dishwasher interior are not getting dry enough 1. Note: Sanitize option and Intensive Drying ...running sionally water a cycle. Improper loading of appear in the track. 3. Food debris is in the the dishwasher. Dishwasher 1. Improper installation. Rinse and Hold setting does not include drying. Concentrated lemon juice can be pulled away from the last cycle. 5. Odor 1. Ensure...
...the water supply valve (typically located under kitchen sink) is open and check that condensation vent is not blocked. 4. Have proper installation verified by calling qualified personnel. Stains on the dishwasher interior are not getting dry enough 1. Note: Sanitize option and Intensive Drying ...running sionally water a cycle. Improper loading of appear in the track. 3. Food debris is in the the dishwasher. Dishwasher 1. Improper installation. Rinse and Hold setting does not include drying. Concentrated lemon juice can be pulled away from the last cycle. 5. Odor 1. Ensure...
Instructions for Use
Page 25
...; dishwasher requires no special care other than that described in your area. 4 Write us or www.bosch-home.ca 3 Contact your installer or the Bosch Authorized Service Contractor in the Care and Maintenance section of the problem and the date it with your dishwasher, before calling for... warranty purposes. 23 If you are having a problem with your Bosch® dishwasher and are not pleased with the service ...
...; dishwasher requires no special care other than that described in your area. 4 Write us or www.bosch-home.ca 3 Contact your installer or the Bosch Authorized Service Contractor in the Care and Maintenance section of the problem and the date it with your dishwasher, before calling for... warranty purposes. 23 If you are having a problem with your Bosch® dishwasher and are not pleased with the service ...

Instructions for Use
Page 26
...This Product is also warranted to be available to you (subject to install the product in strict conformity with any concessions, including repairs, prorates, or Product replacement, once this warranty period, Bosch or one or more than its authorized service providers will not incur any... IN EXCESS OF DIRECT DAMAGES WHICH ARE DEFINITIVELY CAUSED EXCLUSIVELY BY BOSCH, OR OTHERWISE. All replaced and/or repaired parts shall assume the identity of the original part for new construction. correction of installation problems (you in writing by the service company, assuming they ...
...This Product is also warranted to be available to you (subject to install the product in strict conformity with any concessions, including repairs, prorates, or Product replacement, once this warranty period, Bosch or one or more than its authorized service providers will not incur any... IN EXCESS OF DIRECT DAMAGES WHICH ARE DEFINITIVELY CAUSED EXCLUSIVELY BY BOSCH, OR OTHERWISE. All replaced and/or repaired parts shall assume the identity of the original part for new construction. correction of installation problems (you in writing by the service company, assuming they ...


