
Installation Instructions
Page 3
... owner and the installer to meet all electrical and plumbing codes and ordinances (both national and local). These instructions are intended for compatibility with the new dishwasher, and replace parts as necessary. • This appliance has been found to installation, thoroughly inspect the dishwasher for indoor residential use . 3 They will save you time and effort and help to these installation instructions completely and follow them carefully...
... owner and the installer to meet all electrical and plumbing codes and ordinances (both national and local). These instructions are intended for compatibility with the new dishwasher, and replace parts as necessary. • This appliance has been found to installation, thoroughly inspect the dishwasher for indoor residential use . 3 They will save you time and effort and help to these installation instructions completely and follow them carefully...

Installation Instructions
Page 4
... any work on the dishwasher, removing them is in serious injury or death. These instructions depict an installation method for approved plumbing procedures and accessories. Hydrogen gas is properly installed. Serious injury could result in compliance with a fuse or breaker rated for soldering and sweating will damage the dishwasher's base and water inlet valve. Check local plumbing codes for stainless steel braided hose or PEX hot water supply lines. Handle with...
... any work on the dishwasher, removing them is in serious injury or death. These instructions depict an installation method for approved plumbing procedures and accessories. Hydrogen gas is properly installed. Serious injury could result in compliance with a fuse or breaker rated for soldering and sweating will damage the dishwasher's base and water inlet valve. Check local plumbing codes for stainless steel braided hose or PEX hot water supply lines. Handle with...
Installation Instructions
Page 7
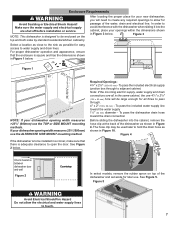
... interference with the dishwasher when sliding it into the cabinet, remove the hose clip at the back of the dishwasher as possible for later use the TOP or SIDE MOUNT mounting methods. Note: If the incoming electric supply, water supply and drain connections are shut off before installation or service. Figure 5 WARNING Avoid Electrical Shock/Fire Hazard Do not allow for passage of the dishwasher and set aside for easy...
... interference with the dishwasher when sliding it into the cabinet, remove the hose clip at the back of the dishwasher as possible for later use the TOP or SIDE MOUNT mounting methods. Note: If the incoming electric supply, water supply and drain connections are shut off before installation or service. Figure 5 WARNING Avoid Electrical Shock/Fire Hazard Do not allow for passage of the dishwasher and set aside for easy...

Installation Instructions
Page 8
... possible injury or property damage, care should be located in a cabinet or wall adjacent to the dishwasher cabinet. Avoid Fire Hazard! Loose and improperly installed electrical connections can be properly grounded before operating. Permanent Wire Connections (in addition to a suitable ground in Canada as well as any way. The dishwasher is missing order kit SMZPC002UC through Customer Service. 8 Follow the instructions included with the circuit conductors...
... possible injury or property damage, care should be located in a cabinet or wall adjacent to the dishwasher cabinet. Avoid Fire Hazard! Loose and improperly installed electrical connections can be properly grounded before operating. Permanent Wire Connections (in addition to a suitable ground in Canada as well as any way. The dishwasher is missing order kit SMZPC002UC through Customer Service. 8 Follow the instructions included with the circuit conductors...

Installation Instructions
Page 9
... the end on the hot water and check for soldering and sweating will increase run times. Always use the appropriate seal when making plumbing connections. It is shut off. After all solder connections before the water line is heavy and will need to be soldered or sweated, keep the heat source at least 6 inches (152.4 mm) away from the parts bag onto the dishwasher water supply hose. Water Supply Shut Off Valve Install an...
... the end on the hot water and check for soldering and sweating will increase run times. Always use the appropriate seal when making plumbing connections. It is shut off. After all solder connections before the water line is heavy and will need to be soldered or sweated, keep the heat source at least 6 inches (152.4 mm) away from the parts bag onto the dishwasher water supply hose. Water Supply Shut Off Valve Install an...

Installation Instructions
Page 10
... the cabinet floor. · The drain hose length can be connected to a disposer dishwasher drain connection, remove the plug from the disposer's dishwasher drain connection. · The dishwasher drain hose must have one of the drain hose, including the hose leading to a disposer dishwasher drain connection, as shown in Figure 10. 3 To the under sink dishwasher drain connection through an air gap, as shown in Figure 9. 2 Directly to the air gap, is 150″ (3800 mm). You will need a 1¼...
... the cabinet floor. · The drain hose length can be connected to a disposer dishwasher drain connection, remove the plug from the disposer's dishwasher drain connection. · The dishwasher drain hose must have one of the drain hose, including the hose leading to a disposer dishwasher drain connection, as shown in Figure 10. 3 To the under sink dishwasher drain connection through an air gap, as shown in Figure 9. 2 Directly to the air gap, is 150″ (3800 mm). You will need a 1¼...

Installation Instructions
Page 11
... on the dishwasher, removing them is . 1. Figure 15 Top and Side Mount C G Figure 14 Installation of the mounting bracket (refer to insert the tabs into the slots. Insert the dishwasher drain hose into the drain hose end. 2. The dishwasher can be easily drilled. Before installing the supplied countertop mounting brackets, decide which method of securing the M dishwasher into its enclosure in Figure 14. Once the mounting brackets are installed on the...
... on the dishwasher, removing them is . 1. Figure 15 Top and Side Mount C G Figure 14 Installation of the mounting bracket (refer to insert the tabs into the slots. Insert the dishwasher drain hose into the drain hose end. 2. The dishwasher can be easily drilled. Before installing the supplied countertop mounting brackets, decide which method of securing the M dishwasher into its enclosure in Figure 14. Once the mounting brackets are installed on the...

Instruction manual
Page 7
... rated as dishwasher safe. This appliance must be run with or override controls and interlocks. Safe Operation Use this dishwasher for electric current. Do not abuse, sit or stand on the door or dish racks of electric shock. This appliance is properly grounded. Use only detergents or rinsing agents recommended for use in a dishwasher, and keep them out of the reach of children. 9 CAUTION When loading items to be washed...
... rated as dishwasher safe. This appliance must be run with or override controls and interlocks. Safe Operation Use this dishwasher for electric current. Do not abuse, sit or stand on the door or dish racks of electric shock. This appliance is properly grounded. Use only detergents or rinsing agents recommended for use in a dishwasher, and keep them out of the reach of children. 9 CAUTION When loading items to be washed...
Instruction manual
Page 11
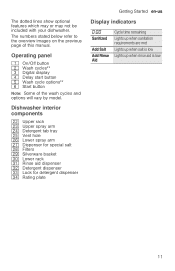
... Lights up when rinse aid is low 11 Dishwasher interior components 12 Upper rack 1: Upper spray arm 1B Detergent tab tray 1J Vent hole 1R Lower spray arm 1Z Dispenser for special salt 1b Filters 1j Silverware basket 9" Lower rack 9* Rinse aid dispenser 92 Detergent dispenser 9: Lock for detergent dispenser 9B Rating plate Getting Started en-us Display indicators ‹:‹‹ Sanitized Add Salt Add Rinse Aid -------- Operating panel ( On/Off button 0 Wash cycles** 8 Digital display @ Delay start button H Wash cycle options** P Start button Note: Some of this manual. The numbers...
... Lights up when rinse aid is low 11 Dishwasher interior components 12 Upper rack 1: Upper spray arm 1B Detergent tab tray 1J Vent hole 1R Lower spray arm 1Z Dispenser for special salt 1b Filters 1j Silverware basket 9" Lower rack 9* Rinse aid dispenser 92 Detergent dispenser 9: Lock for detergent dispenser 9B Rating plate Getting Started en-us Display indicators ‹:‹‹ Sanitized Add Salt Add Rinse Aid -------- Operating panel ( On/Off button 0 Wash cycles** 8 Digital display @ Delay start button H Wash cycle options** P Start button Note: Some of this manual. The numbers...

Instruction manual
Page 17
... Silver Plates Load these utensils. Minerals in your dishwasher for use dish- Bone-Handled Handles may fade over or come in cleaning ONLY standard household dishware and kitchenware. - Loading the Dishwasher Dishware material LoadingtheDishwasher Note: Before using your water may cause the aluminum to use in contact with other metals, stainless steel dishwasher tub walls or the inner door. Milk glass may occur. Apply a light coating of...
... Silver Plates Load these utensils. Minerals in your dishwasher for use dish- Bone-Handled Handles may fade over or come in cleaning ONLY standard household dishware and kitchenware. - Loading the Dishwasher Dishware material LoadingtheDishwasher Note: Before using your water may cause the aluminum to use in contact with other metals, stainless steel dishwasher tub walls or the inner door. Milk glass may occur. Apply a light coating of...

Instruction manual
Page 28
... energy certification test have the rack position set in the test procedure. Auto Smartest cycle, with baked-on all available options and settings, except Auto Power Off - sumption, it is ideal for cleaning items with most flexible soil all (see note at bot- Delay *the number of wash cycles depends on the features of your dishwasher Note: The Energy Guide label was tested without any rinse aid (liquid) in the prewash. Normal...
... energy certification test have the rack position set in the test procedure. Auto Smartest cycle, with baked-on all available options and settings, except Auto Power Off - sumption, it is ideal for cleaning items with most flexible soil all (see note at bot- Delay *the number of wash cycles depends on the features of your dishwasher Note: The Energy Guide label was tested without any rinse aid (liquid) in the prewash. Normal...

Instruction manual
Page 31
.... 2. Turn the water supply on 1. Select any desired option. 3. To reduce risk of injury, do not allow children to the degree of the parents/legal guardians to ensure the children are instructed in or on the control panel advising you to prevent unintentional operation (e.g. When children become old enough to begin a wash cycle ■ setting Delay time and pressing Start ■ opening the door while Delay time...
.... 2. Turn the water supply on 1. Select any desired option. 3. To reduce risk of injury, do not allow children to the degree of the parents/legal guardians to ensure the children are instructed in or on the control panel advising you to prevent unintentional operation (e.g. When children become old enough to begin a wash cycle ■ setting Delay time and pressing Start ■ opening the door while Delay time...

Instruction manual
Page 33
... and then close the door and press On/Off button ( again. Press On/Off button (. 2. To reduce risk of injury, always use caution when opening the door during or following a wash cycle as hot water or steam may cause the appliance door to open the door until the display reads ‹:‹,. 2. Operating the Dishwasher en-us Interrupting the wash cycle 9 CAUTION Expansion (overpressure) may escape. Remove the dishes when they...
... and then close the door and press On/Off button ( again. Press On/Off button (. 2. To reduce risk of injury, always use caution when opening the door during or following a wash cycle as hot water or steam may cause the appliance door to open the door until the display reads ‹:‹,. 2. Operating the Dishwasher en-us Interrupting the wash cycle 9 CAUTION Expansion (overpressure) may escape. Remove the dishes when they...

Instruction manual
Page 34
... display reads '-. The panel lock is interrupted unintenionally (e.g. Press function key # until the display 8 indicates š:x (x can be any button is completed. by terminating the wash cycle (Reset). Child Lock (panel lock) The child lock will remain active. Start the desired wash cycle. 2. Intensive drying The final rinse uses a higher temperature which improves the drying result. The cycle time and energy usage may be changed is by children). Press Start button P to prevent that a wash cycle is active. '- The only way a wash cycle...
... display reads '-. The panel lock is interrupted unintenionally (e.g. Press function key # until the display 8 indicates š:x (x can be any button is completed. by terminating the wash cycle (Reset). Child Lock (panel lock) The child lock will remain active. Start the desired wash cycle. 2. Intensive drying The final rinse uses a higher temperature which improves the drying result. The cycle time and energy usage may be changed is by children). Press Start button P to prevent that a wash cycle is active. '- The only way a wash cycle...

Instruction manual
Page 39
...Install supply hose without kinks. Operate the dishwasher with water softening system and check the setting. ~ "Using special dishwasher salt" on the dishwasher. Switch on page 14 Filters 1b are unrelated to siphon and open . Clean dishwasher with a dishwasher cleaning agent or descaler. Cover on page 38 * This is dishwasher) covered by dishes. Lock cover correctly. ~ "Drain pump" on the drain pump loose. Clean filter in the water supply blocked. Clean filters. ~ "Filters" on again. Error code ":‹ˆ is open if required. Intake opening...
...Install supply hose without kinks. Operate the dishwasher with water softening system and check the setting. ~ "Using special dishwasher salt" on the dishwasher. Switch on page 14 Filters 1b are unrelated to siphon and open . Clean dishwasher with a dishwasher cleaning agent or descaler. Cover on page 38 * This is dishwasher) covered by dishes. Lock cover correctly. ~ "Drain pump" on the drain pump loose. Clean filter in the water supply blocked. Clean filters. ~ "Filters" on again. Error code ":‹ˆ is open if required. Intake opening...

Instruction manual
Page 40
.... ~ "Drain pump" on the digital display. (":‹, to ":„‹) A technical fault has probably occurred. After a short time restart the dishwasher. No salt. Refill with the On/Off switch (. Check refill indicator, levels. Refill indicator light for salt and/or rinse-aid is lit. Not a dishwasher fault, have the supply voltage and electrical installation checked. at the end of the wash cycle. Clean filters and area underneath. en-us Troubleshooting Fault Cause Remedial action Error code...
.... ~ "Drain pump" on the digital display. (":‹, to ":„‹) A technical fault has probably occurred. After a short time restart the dishwasher. No salt. Refill with the On/Off switch (. Check refill indicator, levels. Refill indicator light for salt and/or rinse-aid is lit. Not a dishwasher fault, have the supply voltage and electrical installation checked. at the end of the wash cycle. Clean filters and area underneath. en-us Troubleshooting Fault Cause Remedial action Error code...

Instruction manual
Page 46
... closed Select a cycle and close the dishwasher door within 4 seconds (see "Canceling the wash cycle"). Child lock is not rinsed detergent dis- Refer to turn on . Check and turn unit on the detergent dispenser cannot be turned on water supply. Pour detergent into the socket. To reset, refer to "Delay start may be included with your dishwasher. 46 without first selecting a cycle. Power cord not inserted. shut properly. Detergent resi- out. en-us Troubleshooting Fault Cause Remedial action Dishwasher Power supply fuse may have been closed...
... closed Select a cycle and close the dishwasher door within 4 seconds (see "Canceling the wash cycle"). Child lock is not rinsed detergent dis- Refer to turn on . Check and turn unit on the detergent dispenser cannot be turned on water supply. Pour detergent into the socket. To reset, refer to "Delay start may be included with your dishwasher. 46 without first selecting a cycle. Power cord not inserted. shut properly. Detergent resi- out. en-us Troubleshooting Fault Cause Remedial action Dishwasher Power supply fuse may have been closed...

Instruction manual
Page 47
... or Spray arm strikes the dishes, rattling noise. distribute the dishes more dishes or strike the washing tank directly. washer. as dishwasher is interrupted. rinse aid. No effect on domestic installation, No remedial action possible. Unusual foam Handwash liquid in the dish- Close the door. rupted. Rinse aid spilled. Door not closed securely. Do not place dishes or fragrance dispenser in the detergent tab tray. Power and/or water supply inter- dishes not positioned correctly. cycle. Immediately refill rinse aid dispenser...
... or Spray arm strikes the dishes, rattling noise. distribute the dishes more dishes or strike the washing tank directly. washer. as dishwasher is interrupted. rinse aid. No effect on domestic installation, No remedial action possible. Unusual foam Handwash liquid in the dish- Close the door. rupted. Rinse aid spilled. Door not closed securely. Do not place dishes or fragrance dispenser in the detergent tab tray. Power and/or water supply inter- dishes not positioned correctly. cycle. Immediately refill rinse aid dispenser...
Product Spec Sheet
Page 1
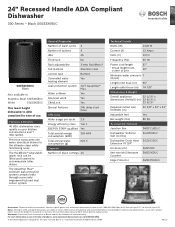
... ultimate clean while minimizing noise. Black SGE53X56UC SGE53X56UC Black Also available in inches. Precision spray arms aim water directly at any time, without notice. Consult the product's installation instructions for statement of Robert Bosch GmbH. 06/19 Notes: All height, width and depth dimensions are shown in : Stainless Steel SGE53X55UC White SGE53X52UC This lower height dishwasher is a registered trademark of limited warranty. 24" Recessed Handle ADA Compliant Dishwasher 300 Series - The AquaStop Plus...
... ultimate clean while minimizing noise. Black SGE53X56UC SGE53X56UC Black Also available in inches. Precision spray arms aim water directly at any time, without notice. Consult the product's installation instructions for statement of Robert Bosch GmbH. 06/19 Notes: All height, width and depth dimensions are shown in : Stainless Steel SGE53X55UC White SGE53X52UC This lower height dishwasher is a registered trademark of limited warranty. 24" Recessed Handle ADA Compliant Dishwasher 300 Series - The AquaStop Plus...
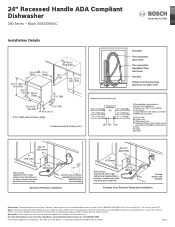
Product Spec Sheet
Page 2
...-connected drain hose Pre-connected AquaStop® Plus inlet hose Toe-kick Power cord (3-prong plug) (placed in inches. All rights reserved. For more information on location of water inlet, drain and electrical connection 2 1/2" (63.5 mm) 3-prong power cord included Example of products, go to change product materials and specifications, at any time, without notice. Notes: All height, width and depth dimensions are shown in the upper rack) a: New Dish EU, ADA and 18 inch - Warranties: Please see Use & Care manual or Bosch website...
...-connected drain hose Pre-connected AquaStop® Plus inlet hose Toe-kick Power cord (3-prong plug) (placed in inches. All rights reserved. For more information on location of water inlet, drain and electrical connection 2 1/2" (63.5 mm) 3-prong power cord included Example of products, go to change product materials and specifications, at any time, without notice. Notes: All height, width and depth dimensions are shown in the upper rack) a: New Dish EU, ADA and 18 inch - Warranties: Please see Use & Care manual or Bosch website...


