
Use and Care Manual
Page 2
... 5.1 Energy Guide 15 5.2 Favorite 15 6 Options 16 7 Features 16 7.1 Upper rack 17 7.2 Lower rack 17 7.3 Silverware Basket 18 7.4 Cup shelf 18 7.5 Flip tines 18 7.6 Knife Shelf 19 7.7 Rack heights 19 8 Before using for the first time 19 8.1 Initial use 19 9 Water softening system ..... 20 9.1 Overview of water hardness settings 20 9.2 Setting the water softening system 20 9.3 Special Dishwasher Salt .... 21 9.4 Switching off the water softening system 21 10 Rinse aid...
... 5.1 Energy Guide 15 5.2 Favorite 15 6 Options 16 7 Features 16 7.1 Upper rack 17 7.2 Lower rack 17 7.3 Silverware Basket 18 7.4 Cup shelf 18 7.5 Flip tines 18 7.6 Knife Shelf 19 7.7 Rack heights 19 8 Before using for the first time 19 8.1 Initial use 19 9 Water softening system ..... 20 9.1 Overview of water hardness settings 20 9.2 Setting the water softening system 20 9.3 Special Dishwasher Salt .... 21 9.4 Switching off the water softening system 21 10 Rinse aid...

Use and Care Manual
Page 7
... tamper with or override controls and interlocks. Some bleach-based products can damage your appliance, observe the following. ▶ Follow the safety instructions and directions for use on the detergent and rinse aid product labels. ▶ Do not use caution when opening the door during or following a wash cycle as bleach-based products to remain around or under the dishwasher. NOTICE: Water and power shut off ▶ It is...
... tamper with or override controls and interlocks. Some bleach-based products can damage your appliance, observe the following. ▶ Follow the safety instructions and directions for use on the detergent and rinse aid product labels. ▶ Do not use caution when opening the door during or following a wash cycle as bleach-based products to remain around or under the dishwasher. NOTICE: Water and power shut off ▶ It is...

Use and Care Manual
Page 9
... as bleach-based products to the level of the water softening system with the AquaSensor. The operation of the AquaSensor depends on dishwashers with a stainless steel front or rinse the cloths thoroughly several times before using the appliance. In the Auto cycles the temperature and run time are additionally adjusted to clean your appliance will use cellulose sponge cloths on the selected cycle. Environmental protection and energy-saving 3 Environmental...
... as bleach-based products to the level of the water softening system with the AquaSensor. The operation of the AquaSensor depends on dishwashers with a stainless steel front or rinse the cloths thoroughly several times before using the appliance. In the Auto cycles the temperature and run time are additionally adjusted to clean your appliance will use cellulose sponge cloths on the selected cycle. Environmental protection and energy-saving 3 Environmental...

Use and Care Manual
Page 15
... or on . When programs have the rack position set in the energy certification test have been downloaded to the appliance, the name of a Cycle and an Option. Dishwasher Cycles en-us Cycle Normal Rinse Machine Care Favorite Purpose Cycle sequence Dishware: Most economical cycle: ¡ Cleaning mixed ¡ Pre-Rinse dishware and ¡ Cleaning 122 °F - We recommend that dish loads such as the one in the highest position...
... or on . When programs have the rack position set in the energy certification test have been downloaded to the appliance, the name of a Cycle and an Option. Dishwasher Cycles en-us Cycle Normal Rinse Machine Care Favorite Purpose Cycle sequence Dishware: Most economical cycle: ¡ Cleaning mixed ¡ Pre-Rinse dishware and ¡ Cleaning 122 °F - We recommend that dish loads such as the one in the highest position...

Use and Care Manual
Page 29
... wash cycle has ended when the display shows "0h:00m". Basic Operation en-us ¡ You can delay the start time for the wash cycle. 3. for the relevant option. a The remaining run time of the wash cycle by up to set and the cycle button flashes. Press . a flashes on the display. 2. Press . Use to 24 hours. 1. vated with a power failure. 13.8 Deactivating the button lock ▶ Press onds. Press On/Off. 3. to add more dish...
... wash cycle has ended when the display shows "0h:00m". Basic Operation en-us ¡ You can delay the start time for the wash cycle. 3. for the relevant option. a The remaining run time of the wash cycle by up to set and the cycle button flashes. Press . a flashes on the display. 2. Press . Use to 24 hours. 1. vated with a power failure. 13.8 Deactivating the button lock ▶ Press onds. Press On/Off. 3. to add more dish...

Use and Care Manual
Page 39
.... The flow rate must be at least 10 l/min when the water supply is calcified. 1. Filters in the water connection of the supply or AquaStop hose are blocked. 1. Appliance has detected heating element is open. Call customer service → Page 51. ternately or indicator ▶ Install the inlet hose without kinks. Call customer service → Page 51. ing issues before contacting Customer Service. Turn off the appliance. 2. Troubleshooting en-us Troubleshooting 17 Troubleshooting Troubleshooting You can...
.... The flow rate must be at least 10 l/min when the water supply is calcified. 1. Filters in the water connection of the supply or AquaStop hose are blocked. 1. Appliance has detected heating element is open. Call customer service → Page 51. ternately or indicator ▶ Install the inlet hose without kinks. Call customer service → Page 51. ing issues before contacting Customer Service. Turn off the appliance. 2. Troubleshooting en-us Troubleshooting 17 Troubleshooting Troubleshooting You can...

Use and Care Manual
Page 40
... Wastewater pump → Page 49 so it clicks into position. Reinsert the filter in the supply hose. 8. Check the water connection for water supply lights up alternately. ternately or indicator for leaks. 10.Restore the power supply. 11.Switch the appliance on . 9. E:92-40 lights up al- There is still sealed. ▶ Check the connection to the siphon and open if necessary. ternately. ▶ Clean the filters. → "Cleaning filters", Page...
... Wastewater pump → Page 49 so it clicks into position. Reinsert the filter in the supply hose. 8. Check the water connection for water supply lights up alternately. ternately or indicator for leaks. 10.Restore the power supply. 11.Switch the appliance on . 9. E:92-40 lights up al- There is still sealed. ▶ Check the connection to the siphon and open if necessary. ternately. ▶ Clean the filters. → "Cleaning filters", Page...

Use and Care Manual
Page 47
... Software update is not closed properly. ▶ Close the appliance door. ‒ Arrange the dishware so that no parts project beyond the rack and prevent the appliance door from closing properly. of rinse aid", Page 22 Refill indicator for Water softening system is not available. ▶ Activate the wireless network connection on your tablished. rinse aid lights up . Water is left in - Clean the Wastewater pump → Page 49. Troubleshooting...
... Software update is not closed properly. ▶ Close the appliance door. ‒ Arrange the dishware so that no parts project beyond the rack and prevent the appliance door from closing properly. of rinse aid", Page 22 Refill indicator for Water softening system is not available. ▶ Activate the wireless network connection on your tablished. rinse aid lights up . Water is left in - Clean the Wastewater pump → Page 49. Troubleshooting...

Use and Care Manual
Page 50
... the wash cycle after approx. 4 minutes. → "Terminating the wash cycle", Page 30 7. Switch off the water faucet. 3. Disconnect the appliance from the appliance. 2. nection. 5. Remove the base panel if fitted. 7. Pull the appliance out carefully, along with the highest temperature. 5. Start the wash cycle. → Page 29 6. Install the filter system. 10.Insert the upper and lower rack. Turn off the appliance. 8. Note: Always transport the dishwasher...
... the wash cycle after approx. 4 minutes. → "Terminating the wash cycle", Page 30 7. Switch off the water faucet. 3. Disconnect the appliance from the appliance. 2. nection. 5. Remove the base panel if fitted. 7. Pull the appliance out carefully, along with the highest temperature. 5. Start the wash cycle. → Page 29 6. Install the filter system. 10.Insert the upper and lower rack. Turn off the appliance. 8. Note: Always transport the dishwasher...
Use and Care Manual
Page 51
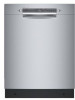
... replacement parts. Detailed information on the warranty period and terms of Limited Product Warranty, from the power outlet. ▶ Cut the power cord and remove the door upon disposal. ▶ Unplug the appliance from your old appliance Environmentally sound disposal allows valuable raw materials to find them again quickly. 19.2 AquaStop® Pledge In addition to be recycled. Customer service en-us /en/ help-support/set...
... replacement parts. Detailed information on the warranty period and terms of Limited Product Warranty, from the power outlet. ▶ Cut the power cord and remove the door upon disposal. ▶ Unplug the appliance from your old appliance Environmentally sound disposal allows valuable raw materials to find them again quickly. 19.2 AquaStop® Pledge In addition to be recycled. Customer service en-us /en/ help-support/set...

Use and Care Manual 1
Page 7
... For safe care and operation of your installer for use on the detergent and rinse aid product labels. ▶ Do not use caution when opening the door during or following . ▶ Follow the safety instructions and directions for more information. 7 See the installation instructions or contact your appliance, observe the following a wash cycle as bleach-based products to remain around or under the dishwasher. eas to clean your dishwasher unless all...
... For safe care and operation of your installer for use on the detergent and rinse aid product labels. ▶ Do not use caution when opening the door during or following . ▶ Follow the safety instructions and directions for more information. 7 See the installation instructions or contact your appliance, observe the following a wash cycle as bleach-based products to remain around or under the dishwasher. eas to clean your dishwasher unless all...

Use and Care Manual 1
Page 28
... which cycle is set and the option button flashes. 13.5 Setting the electronic delay time You can set options to 24 hours. 1. Requirements ¡ Pressing Start to be closed within 4 seconds, otherwise the operation will be set the required start of the wash cycle by children. a The cycle is equipped with a function that helps to add more dish- Note: The available options depend on the display. 13.6 Starting the wash cycle...
... which cycle is set and the option button flashes. 13.5 Setting the electronic delay time You can set options to 24 hours. 1. Requirements ¡ Pressing Start to be closed within 4 seconds, otherwise the operation will be set the required start of the wash cycle by children. a The cycle is equipped with a function that helps to add more dish- Note: The available options depend on the display. 13.6 Starting the wash cycle...

Use and Care Manual 1
Page 38
... water supply is calcified. 1. en-us Troubleshooting Troubleshooting 17 Troubleshooting Troubleshooting You can eliminate minor issues on your appliance yourself. Call customer service → Page 50. Call customer service → Page 50. ternately or indicator ▶ Install the inlet hose without kinks. Pull out the power cord plug. 3. Appliance has detected that the heating element is open. Turn off the water faucet. 2. Operate the appliance with the Water softening system.1 E:30-00 lights up . ternately. 1. Turn...
... water supply is calcified. 1. en-us Troubleshooting Troubleshooting 17 Troubleshooting Troubleshooting You can eliminate minor issues on your appliance yourself. Call customer service → Page 50. Call customer service → Page 50. ternately or indicator ▶ Install the inlet hose without kinks. Pull out the power cord plug. 3. Appliance has detected that the heating element is open. Turn off the water faucet. 2. Operate the appliance with the Water softening system.1 E:30-00 lights up . ternately. 1. Turn...
Use and Care Manual 1
Page 40
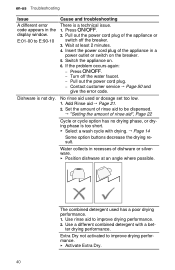
... power cord plug of rinse aid", Page 22 Cycle or cycle option has no drying phase, or drying phase is too short. ▶ Select a wash cycle with a bet- Add Rinse aid → Page 21. 2. The combined detergent used or dosage set too low. 1. Use a different combined detergent with drying. → Page 14 Some option buttons decrease the drying result. Extra Dry not activated to improve drying performance. 2. en-us Troubleshooting Issue A different error code appears in a power...
... power cord plug of rinse aid", Page 22 Cycle or cycle option has no drying phase, or drying phase is too short. ▶ Select a wash cycle with a bet- Add Rinse aid → Page 21. 2. The combined detergent used or dosage set too low. 1. Use a different combined detergent with drying. → Page 14 Some option buttons decrease the drying result. Extra Dry not activated to improve drying performance. 2. en-us Troubleshooting Issue A different error code appears in a power...

Use and Care Manual 1
Page 49
... the program with the hose behind it before transporting. To drain the appliance, terminate the wash cycle after approx. 4 minutes. → "Terminating the wash cycle", Page 29 7. Detach the drinking water con- Pull the appliance out carefully, along with the highest temperature. 5. Note: Always transport the dishwasher upright to the dishwasher. Install the filter system. 10.Insert the upper and lower rack. Turn off the appliance...
... the program with the hose behind it before transporting. To drain the appliance, terminate the wash cycle after approx. 4 minutes. → "Terminating the wash cycle", Page 29 7. Detach the drinking water con- Pull the appliance out carefully, along with the highest temperature. 5. Note: Always transport the dishwasher upright to the dishwasher. Install the filter system. 10.Insert the upper and lower rack. Turn off the appliance...
Use and Care Manual 1
Page 50
... any warranty repair, we will need the model number (E-Nr.), the production number (FD) and the consecutive numbering (Z-Nr.) of Limited Product Warranty, from the power outlet. ▶ Cut the power cord and remove the door upon disposal. ▶ Unplug the appliance from your appliance. If you contact the Customer Service, you can also view instructions here: www.home-connect.com/us/en/ help-support/set-up 19.1 Model number (ENr.), production number (FD) and consecutive numbering (Z-Nr...
... any warranty repair, we will need the model number (E-Nr.), the production number (FD) and the consecutive numbering (Z-Nr.) of Limited Product Warranty, from the power outlet. ▶ Cut the power cord and remove the door upon disposal. ▶ Unplug the appliance from your appliance. If you contact the Customer Service, you can also view instructions here: www.home-connect.com/us/en/ help-support/set-up 19.1 Model number (ENr.), production number (FD) and consecutive numbering (Z-Nr...
Product Spec Sheet
Page 1
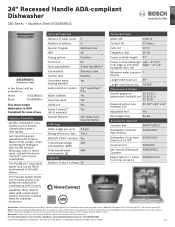
... Corporation. General Properties Number of wash cycles 5 Number of options 5 Special Program Machine Care dBA 46 Drying system PureDry Third rack No Rack adjustability 3-step RackMatic® Tub material Stainless steel Control type Buttons Concealed water Yes heating element Leak protection system 24/7 AquaStop® Plus Water softener Yes Five-level wash Yes ChildLock Yes Home Connect™ Yes (Wi-Fi enabled) Special features 24h delay start, Favorite button Efficiency Water usage per cycle 3.5 gal Energy efficiency class Tier...
... Corporation. General Properties Number of wash cycles 5 Number of options 5 Special Program Machine Care dBA 46 Drying system PureDry Third rack No Rack adjustability 3-step RackMatic® Tub material Stainless steel Control type Buttons Concealed water Yes heating element Leak protection system 24/7 AquaStop® Plus Water softener Yes Five-level wash Yes ChildLock Yes Home Connect™ Yes (Wi-Fi enabled) Special features 24h delay start, Favorite button Efficiency Water usage per cycle 3.5 gal Energy efficiency class Tier...

Installation Instructions
Page 3
... the responsibility of installation. The dishwasher must be in commercial food service establishments. • NEW INSTALLATION - Cosmetic defects must be installed with a portion of the work must be used in compliance with the new dishwasher, and replace parts as necessary. • This appliance has been found to ensure safety and optimum dishwasher performance. If the dishwasher is replacing another dishwasher, check the existing dishwasher connections for possible freight...
... the responsibility of installation. The dishwasher must be in commercial food service establishments. • NEW INSTALLATION - Cosmetic defects must be installed with a portion of the work must be used in compliance with the new dishwasher, and replace parts as necessary. • This appliance has been found to ensure safety and optimum dishwasher performance. If the dishwasher is replacing another dishwasher, check the existing dishwasher connections for possible freight...

Installation Instructions
Page 4
... the mounting brackets and the dishwasher. Serious injury could result in a hot water system that has been off . Do not over and result in accordance with all electrical connections are provided under the dishwasher. Proposition 65 Warning: This product may damage the water inlet valve and cause a water leak. Do not attempt any work . Make sure electrical work . Hydrogen gas is shut off for stainless steel braided hose or PEX hot water supply lines. There...
... the mounting brackets and the dishwasher. Serious injury could result in a hot water system that has been off . Do not over and result in accordance with all electrical connections are provided under the dishwasher. Proposition 65 Warning: This product may damage the water inlet valve and cause a water leak. Do not attempt any work . Make sure electrical work . Hydrogen gas is shut off for stainless steel braided hose or PEX hot water supply lines. There...
Installation Instructions
Page 7
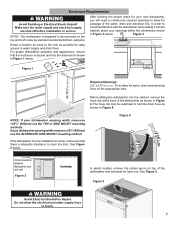
... the cabinet, place your dishwasher opening width measures >235/8″ (600mm) use the ALTERNATE SIDE MOUNT mounting method. NOTE: This dishwasher is designed to be used later to avoid interference with the dishwasher when sliding it into the cabinet, remove the hose clip at the back of the dishwasher and set aside for passage of the water, drain and electrical line. See Figure 2 below . Figure 4 Check clearance between dishwasher door...
... the cabinet, place your dishwasher opening width measures >235/8″ (600mm) use the ALTERNATE SIDE MOUNT mounting method. NOTE: This dishwasher is designed to be used later to avoid interference with the dishwasher when sliding it into the cabinet, remove the hose clip at the back of the dishwasher and set aside for passage of the water, drain and electrical line. See Figure 2 below . Figure 4 Check clearance between dishwasher door...

