Installation Instructions
Page 2
...controlled landfill, and though this has a negative impact on the nearest collection facility. 1 Dear Customer, We thank and congratulate you on your every need, achieving perfect cooking...manual contains important information, not only for this appliance to a recyclable material collection facility. Before you render it . These materials have reduced our packaging to guarantee unbeatable results from the first use of these simple instructions in order for use...will be taken to thorough quality control in the manufacturing process, and meticulously tested in order ...
...controlled landfill, and though this has a negative impact on the nearest collection facility. 1 Dear Customer, We thank and congratulate you on your every need, achieving perfect cooking...manual contains important information, not only for this appliance to a recyclable material collection facility. Before you render it . These materials have reduced our packaging to guarantee unbeatable results from the first use of these simple instructions in order for use...will be taken to thorough quality control in the manufacturing process, and meticulously tested in order ...
Installation Instructions
Page 3
... usage 4 Important instructions 6 For your safety 6 Before set-up 9 For appliance usage 9 This is what your new cooktop looks like 10 Gas burners 11 Cooking tips 12 Appropriate cooking utensils 12 Cooktop usage warnings 13 Steel: cleaning and care 14 Home troubleshooting 15 Installation instructions 16 Installing the cooktop on the kitchen unit: Fitting measurements 16 Electrical connection 18 Change of gas type: from 6" W.C. to propane 19 Convert the pressure regulator: from natural gas to 10" W.C. 20 Warranty conditions 21 2
... usage 4 Important instructions 6 For your safety 6 Before set-up 9 For appliance usage 9 This is what your new cooktop looks like 10 Gas burners 11 Cooking tips 12 Appropriate cooking utensils 12 Cooktop usage warnings 13 Steel: cleaning and care 14 Home troubleshooting 15 Installation instructions 16 Installing the cooktop on the kitchen unit: Fitting measurements 16 Electrical connection 18 Change of gas type: from 6" W.C. to propane 19 Convert the pressure regulator: from natural gas to 10" W.C. 20 Warranty conditions 21 2
Installation Instructions
Page 4
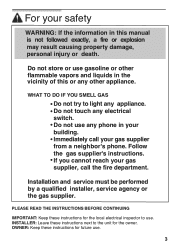
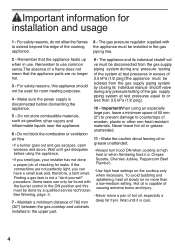
Follow the gas supplier's instructions. INSTALLER: Leave these instructions next to use gasoline or other appliance. Installation and service must be performed by a qualified installer, service agency or the gas supplier. OWNER: Keep these instructions for the local electrical inspector to the unit for future use any phone in the vicinity of this manual is not followed exactly, a fire or explosion may result causing property damage...
Follow the gas supplier's instructions. INSTALLER: Leave these instructions next to use gasoline or other appliance. Installation and service must be performed by a qualified installer, service agency or the gas supplier. OWNER: Keep these instructions for the local electrical inspector to the unit for future use any phone in the vicinity of this manual is not followed exactly, a fire or explosion may result causing property damage...
Installation Instructions
Page 5
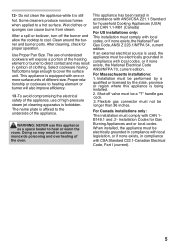
.... appliance. 10 - piping line. 2 - To avoid bubbling and splattering, heat oil slowly on the cooktop only when necessary. Wait until gas dissipates •Always turn hood ON when cooking at test pressures equal to countertops of hot. 3.5 kPa (1/2 psig).The appliance must be used for leaks. Finding a gas leak is disconnected before dismantling the piping system at high before using an especially 5 - Do not...
.... appliance. 10 - piping line. 2 - To avoid bubbling and splattering, heat oil slowly on the cooktop only when necessary. Wait until gas dissipates •Always turn hood ON when cooking at test pressures equal to countertops of hot. 3.5 kPa (1/2 psig).The appliance must be used for leaks. Finding a gas leak is disconnected before dismantling the piping system at high before using an especially 5 - Do not...
Installation Instructions
Page 6
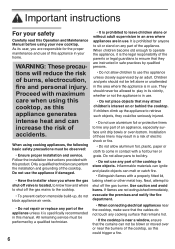
... has been tested in ignition of Burning Appliances and or local codes. Shut-off the burner and allow the cooktop to cover the surface unit. with one or more surface units of the appliance. Use Proper Pan Size. tionship or cookware to a hot surface. The name plate is equipped with CSA Standard C22.1-Canadian Electrical Code, Part I (current). 5 B149.1 and .2- 12 - Do not clean the appliance while...
... has been tested in ignition of Burning Appliances and or local codes. Shut-off the burner and allow the cooktop to cover the surface unit. with one or more surface units of the appliance. Use Proper Pan Size. tionship or cookware to a hot surface. The name plate is equipped with CSA Standard C22.1-Canadian Electrical Code, Part I (current). 5 B149.1 and .2- 12 - Do not clean the appliance while...
Installation Instructions
Page 7
...; Do not use of an appliance, especially surface unit drip bowls or oven bottom. If children climb up , do not touch any part of the cooktop to line any part of this appliance in this manual. If flames are not extinguished immediately, evacuate the premises and notify the fire department. • When connecting electrical appliances near the burners of the cooktop, as this...
...; Do not use of an appliance, especially surface unit drip bowls or oven bottom. If children climb up , do not touch any part of the cooktop to line any part of this appliance in this manual. If flames are not extinguished immediately, evacuate the premises and notify the fire department. • When connecting electrical appliances near the burners of the cooktop, as this...
Installation Instructions
Page 8
... lid, cookie sheet, or metal tray, then turn hood ON when cooking at high settings. Grease should not be placed into contact with a burner or the grate of the pot or pan. d) Use an extinguisher ONLY if: 1) You know you already know how to hot surfaces. Do not use a grate if damaged. • Never leave the cooktop unattended. In the event that the hot flame only touches...
... lid, cookie sheet, or metal tray, then turn hood ON when cooking at high settings. Grease should not be placed into contact with a burner or the grate of the pot or pan. d) Use an extinguisher ONLY if: 1) You know you already know how to hot surfaces. Do not use a grate if damaged. • Never leave the cooktop unattended. In the event that the hot flame only touches...
Installation Instructions
Page 9
... can remain exposed and set to off the gas supply. • Always use a sponge or damp cloth to clean the cooktop while hot. If cabinet storage is reserved. 8 Let hot grease cool before handling it from the outlet and shut off and that projects horizontally a minimum of 5 inches beyond the bottom of the cabinet. • When stirring or turning food, hold the handle of...
... can remain exposed and set to off the gas supply. • Always use a sponge or damp cloth to clean the cooktop while hot. If cabinet storage is reserved. 8 Let hot grease cool before handling it from the outlet and shut off and that projects horizontally a minimum of 5 inches beyond the bottom of the cabinet. • When stirring or turning food, hold the handle of...
Installation Instructions
Page 10
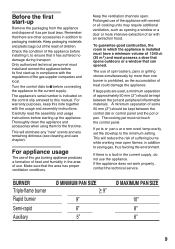
... dirtiness (see cleaning and care chapter). BURNER Triple-flame burner Rapid burner Semi-rapid Auxiliary Ø MINIMUM PAN SIZE _> 9" 9" 6" 5" Ø MAXIMUM PAN SIZE 10" 8" 6" 9 Check the condition of some 50 mm (2") should be kept between the pot and peripheral inflammable materials. Turn the control dials to the current supply. For warranty purposes, keep this manual. The appliance's serial number is a fault in addition to the minimum setting. Keep the...
... dirtiness (see cleaning and care chapter). BURNER Triple-flame burner Rapid burner Semi-rapid Auxiliary Ø MINIMUM PAN SIZE _> 9" 9" 6" 5" Ø MAXIMUM PAN SIZE 10" 8" 6" 9 Check the condition of some 50 mm (2") should be kept between the pot and peripheral inflammable materials. Turn the control dials to the current supply. For warranty purposes, keep this manual. The appliance's serial number is a fault in addition to the minimum setting. Keep the...
Installation Instructions
Page 12
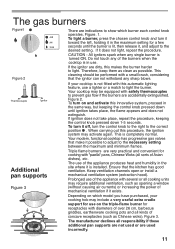
... lighting feature, use a lighter or a match to light the burner. Figure. 1. If it exists. Therefore, keep them as clean as Chinese woks). If your cooking hob may be performed with a small brush, considering that make it possible to adjust to the necessary setting between the maximum and minimum flames. Your cooktop may include a very useful extra cradle support for use of the appliance with "paella" pans...
... lighting feature, use a lighter or a match to light the burner. Figure. 1. If it exists. Therefore, keep them as clean as Chinese woks). If your cooking hob may be performed with a small brush, considering that make it possible to adjust to the necessary setting between the maximum and minimum flames. Your cooktop may include a very useful extra cradle support for use of the appliance with "paella" pans...
Installation Instructions
Page 13
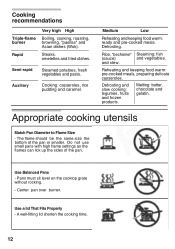
... Triple-flame burner Rapid Very high High Boiling, cooking, roasting, browning, "paellas" and Asian dishes (Wok). Rice, "bechamel" Steaming: fish (sauce) and vegetables. Auxiliary Cooking: casseroles, rice pudding and caramel. and stew. Do not use small pans with high flame settings as the flames can lick up the sides of the pan or smaller. Appropriate cooking utensils Match Pan Diameter to Flame Size - Pans must sit level on the cooktop grate...
... Triple-flame burner Rapid Very high High Boiling, cooking, roasting, browning, "paellas" and Asian dishes (Wok). Rice, "bechamel" Steaming: fish (sauce) and vegetables. Auxiliary Cooking: casseroles, rice pudding and caramel. and stew. Do not use small pans with high flame settings as the flames can lick up the sides of the pan or smaller. Appropriate cooking utensils Match Pan Diameter to Flame Size - Pans must sit level on the cooktop grate...
Installation Instructions
Page 14
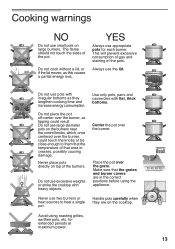
... consumption of gas and staining of the pot. Never place pots directly on the cooktop. Avoid using the appliance. Do not use small pots on the burners near the control knobs, which, once centered over the burner. The flame should not touch the sides of the pots. for each burner. Cooking warnings NO Do not use excessive weights or strike the cooktop with heavy...
... consumption of gas and staining of the pot. Never place pots directly on the cooktop. Avoid using the appliance. Do not use small pots on the burners near the control knobs, which, once centered over the burner. The flame should not touch the sides of the pots. for each burner. Cooking warnings NO Do not use excessive weights or strike the cooktop with heavy...
Installation Instructions
Page 15
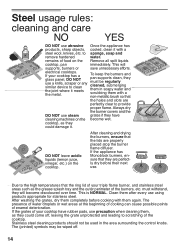
... of your cooktop has a glass panel, DO NOT use precaution when cleaning them after every use abrasive Once the appliance has products, sharp objects, cooled, clean it with a steel wool, knives, etc. Stainless steel cleaning products should not be wiped off , leaving the grate unprotected and leading to provide proper flame. Steel usage rules: cleaning and care NO YES DO NOT use using products appropriate for stainless steel. to clean the...
... of your cooktop has a glass panel, DO NOT use precaution when cleaning them after every use abrasive Once the appliance has products, sharp objects, cooled, clean it with a steel wool, knives, etc. Stainless steel cleaning products should not be wiped off , leaving the grate unprotected and leading to provide proper flame. Steel usage rules: cleaning and care NO YES DO NOT use using products appropriate for stainless steel. to clean the...

Installation Instructions
Page 16
... the outlets are turned off through a mid-pipe valve. - Once the burner is malfunctioning The electric ignitor does not work -A gas valve has been left on the gas outlets are not set correctly. -The different parts of the various burners do not always need to the gas and electrical systems. What's wrong? Home troubleshooting You do not work Cause Probable Solution -Defective fuse. -The automatic circuit breaker has tripped or...
... the outlets are turned off through a mid-pipe valve. - Once the burner is malfunctioning The electric ignitor does not work -A gas valve has been left on the gas outlets are not set correctly. -The different parts of the various burners do not always need to the gas and electrical systems. What's wrong? Home troubleshooting You do not work Cause Probable Solution -Defective fuse. -The automatic circuit breaker has tripped or...
Installation Instructions
Page 17
... recommend to coat the cut in the work properly. The technician must show the owner the location of the required size in the kitchen unit. Electrical cables must not come into contact with installation, adjustment and adaptation to LP gas to be vented outside. PRECAUTION: Before connecting the appliance, ensure that it from all tasks related with heat zones. Installation instructions IMPORTANT INFORMATION Read these recommendations...
... recommend to coat the cut in the work properly. The technician must show the owner the location of the required size in the kitchen unit. Electrical cables must not come into contact with installation, adjustment and adaptation to LP gas to be vented outside. PRECAUTION: Before connecting the appliance, ensure that it from all tasks related with heat zones. Installation instructions IMPORTANT INFORMATION Read these recommendations...

Installation Instructions
Page 18
... Fig. 2b. Once the hob is to the lower part of cabinets installed above cooktop: 13" (330 mm.) Appliance installation 3 - For disassembly, unscrew the clip and proceed in the factory, remove the pan supports and the gas burner covers and diffusers from your cooking hob, and turn it is fitted you should turn the clip and tighten the screw as shown in the middle...
... Fig. 2b. Once the hob is to the lower part of cabinets installed above cooktop: 13" (330 mm.) Appliance installation 3 - For disassembly, unscrew the clip and proceed in the factory, remove the pan supports and the gas burner covers and diffusers from your cooking hob, and turn it is fitted you should turn the clip and tighten the screw as shown in the middle...
Installation Instructions
Page 19
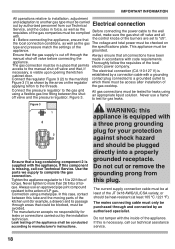
... be plugged directly into a properly Ensure that all the control knobs of the kitchen unit (for example, a drawer) and its passage through and connected by an authorised specialist. the gas cooktop. Connection using an appropriate liquid solution. In this case, contact between the shutoff valve and the pressure regulator. If this is visible upon opening the kitchen cabinet door. Before connecting the appliance, ensure that permits electric power...
... be plugged directly into a properly Ensure that all the control knobs of the kitchen unit (for example, a drawer) and its passage through and connected by an authorised specialist. the gas cooktop. Connection using an appropriate liquid solution. In this case, contact between the shutoff valve and the pressure regulator. If this is visible upon opening the kitchen cabinet door. Before connecting the appliance, ensure that permits electric power...

Installation Instructions
Page 20
... indicated on the specifications plate. NATURAL PROPANE Gas pressure for the type of primary air must be followed. B) Reduced consumption adjustment of the burner. 2 - IMPORTANT INFORMATION Gas type changing: From natural gas to propane It is to be supplied. IMPORTANT: Before you begin, turn off the gas and electricity supply to the minimum setting. 2 - Before connecting up the appliance to the installation, first check that it has been adjusted for use Burner Burner tip marker Rapid Consumption Rated...
... indicated on the specifications plate. NATURAL PROPANE Gas pressure for the type of primary air must be followed. B) Reduced consumption adjustment of the burner. 2 - IMPORTANT INFORMATION Gas type changing: From natural gas to propane It is to be supplied. IMPORTANT: Before you begin, turn off the gas and electricity supply to the minimum setting. 2 - Before connecting up the appliance to the installation, first check that it has been adjusted for use Burner Burner tip marker Rapid Consumption Rated...
Installation Instructions
Page 21
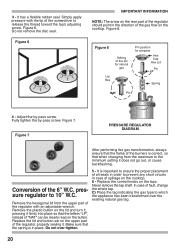
... and turn it, pressing it firmly into place so that the flame of the burners is in the direction of the gas flow on the upper part of the regulator should point in place. Never remove the tap shaft. Do not remove the disc seal. Figure 8 Setting of the 6" W.C. Conversion of the pin for natural gas Lid Hex NAT Pin position for propane Hex Cap Hex...
... and turn it, pressing it firmly into place so that the flame of the burners is in the direction of the gas flow on the upper part of the regulator should point in place. Never remove the tap shaft. Do not remove the disc seal. Figure 8 Setting of the 6" W.C. Conversion of the pin for natural gas Lid Hex NAT Pin position for propane Hex Cap Hex...

Installation Instructions
Page 22
... sold by an unauthorized agency. Service must include the model number, serial number and date of charge. Damage or repairs due to province. Keep your dated receipt or other connecting facilities. • Reset circuit breakers or replace home fuses. 3 - Customer Support 5551 McFadden Ave., Huntington Beach, CA 92649 6 - Should the appliance be repaired or replaced free of original purchase/installation. (See back cover). 21 BOSCH DOES NOT ASSUME ANY RESPONSIBILITY...
... sold by an unauthorized agency. Service must include the model number, serial number and date of charge. Damage or repairs due to province. Keep your dated receipt or other connecting facilities. • Reset circuit breakers or replace home fuses. 3 - Customer Support 5551 McFadden Ave., Huntington Beach, CA 92649 6 - Should the appliance be repaired or replaced free of original purchase/installation. (See back cover). 21 BOSCH DOES NOT ASSUME ANY RESPONSIBILITY...


