Use & Care Manual (all languages)
Page 7
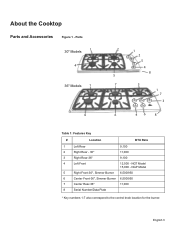
About the Cooktop Parts and Accessories Figure 1 - English 3 NGT Model 15,000 - Parts 30" Models 1 4 36" Models 1 4 2 1 2 5 4 8 5 7 3 1 7 3 6 46 8 Table 1: Features Key # Location BTU Rate 1 Left Rear 9,100 2 Right Rear - 30" 11,000 3 Right Rear-36" 9,100 4 Left Front 12,500 - NGP Model 5 Right Front-30", Simmer Burner 6,500/950 6 Center Front-36", Simmer Burner 6,500/950 7 Center Rear-36" 11,000 8 Serial Number/Data Plate * Key numbers 1-7 also correspond to the control knob location for the burner.
About the Cooktop Parts and Accessories Figure 1 - English 3 NGT Model 15,000 - Parts 30" Models 1 4 36" Models 1 4 2 1 2 5 4 8 5 7 3 1 7 3 6 46 8 Table 1: Features Key # Location BTU Rate 1 Left Rear 9,100 2 Right Rear - 30" 11,000 3 Right Rear-36" 9,100 4 Left Front 12,500 - NGP Model 5 Right Front-30", Simmer Burner 6,500/950 6 Center Front-36", Simmer Burner 6,500/950 7 Center Rear-36" 11,000 8 Serial Number/Data Plate * Key numbers 1-7 also correspond to the control knob location for the burner.
Use & Care Manual (all languages)
Page 8
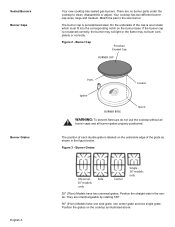
... only Center Single 36" models only 30" (76cm) Models have one side grate, one center grate and one locator which must fit into the corresponding notch on the cooktop as shown in the center. Figure 3 - Sealed Burners Burner Caps Burner Grates English 4 Your new cooktop has sealed gas burners. Your cooktop has two different burner cap sizes, large and medium...
... only Center Single 36" models only 30" (76cm) Models have one side grate, one center grate and one locator which must fit into the corresponding notch on the cooktop as shown in the center. Figure 3 - Sealed Burners Burner Caps Burner Grates English 4 Your new cooktop has sealed gas burners. Your cooktop has two different burner cap sizes, large and medium...
Use & Care Manual (all languages)
Page 13
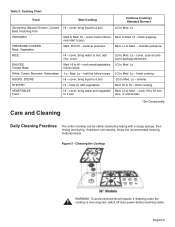
... cooktop is ever required, switch off main power before reaching inside. Med. finish popping. Lo to Med. Lo follow the recommended cleaning methods below. Lo - LO to Med. - Med. If stubborn soil remains, follow recipe. Table 3: Cooking Chart Food Start Cooking Continue Cooking / Standard Burners...to Med. Figure 5 - HI - to Med. Lo - HI to Med. - simmer. Lo to Hl - cook 10 to Hl - Lo - HI to 30 min- melt fat, follow recipe. finish cooking. cover, bring water and vegetable Med. nels start to a boil. SOUPS, STEWS Hl - Lo - to package ...
... cooktop is ever required, switch off main power before reaching inside. Med. finish popping. Lo to Med. Lo follow the recommended cleaning methods below. Lo - LO to Med. - Med. If stubborn soil remains, follow recipe. Table 3: Cooking Chart Food Start Cooking Continue Cooking / Standard Burners...to Med. Figure 5 - HI - to Med. Lo - HI to Med. - simmer. Lo to Hl - cook 10 to Hl - Lo - HI to 30 min- melt fat, follow recipe. finish cooking. cover, bring water and vegetable Med. nels start to a boil. SOUPS, STEWS Hl - Lo - to package ...
Installation Manual
Page 5
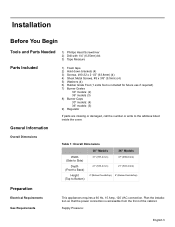
...cover. Plan the installation so that the power connection is included for future use if required) 7) Burner Grates 30" models: (2) 36" models (3) 8) Burner Caps 30" models: (4) 36" models: (5) 9) Regulator If parts are missing or damaged, call the number or write to ...Bottom) 30" Models 31" (787.4 mm) 36" Models 37" (939.8 mm) 21" (533.4 mm) 21" (533.4 mm) 4" (Below Countertop) 4" (Below Countertop) Preparation Electrical Requirements Gas Requirements This ...
...cover. Plan the installation so that the power connection is included for future use if required) 7) Burner Grates 30" models: (2) 36" models (3) 8) Burner Caps 30" models: (4) 36" models: (5) 9) Regulator If parts are missing or damaged, call the number or write to ...Bottom) 30" Models 31" (787.4 mm) 36" Models 37" (939.8 mm) 21" (533.4 mm) 21" (533.4 mm) 4" (Below Countertop) 4" (Below Countertop) Preparation Electrical Requirements Gas Requirements This ...
Installation Manual
Page 6
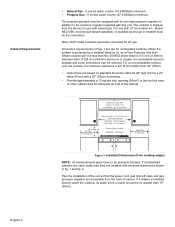
... Floor Protector and Wall Shield covered with this unit. Above Counter - 30" (76 cm) min. The propane gas tank must be equipped with its depth (front to back) should be converted for LP use. Note: NGP model cooktops cannot be no greater than 15" (38cm). Dimension requirements in the ... a noncombustible surface over the cooktop, the minimum clearance is shipped from cooktop edges) NOTE: All measurements given have to Combustible Surface NGT(P)7x - 30" (76cm) min. Depth from the front of the unit so that the power cord, gas shut-off valve and gas pressure regulator are based on ...
... Floor Protector and Wall Shield covered with this unit. Above Counter - 30" (76 cm) min. The propane gas tank must be equipped with its depth (front to back) should be converted for LP use. Note: NGP model cooktops cannot be no greater than 15" (38cm). Dimension requirements in the ... a noncombustible surface over the cooktop, the minimum clearance is shipped from cooktop edges) NOTE: All measurements given have to Combustible Surface NGT(P)7x - 30" (76cm) min. Depth from the front of the unit so that the power cord, gas shut-off valve and gas pressure regulator are based on ...
Installation Manual
Page 7
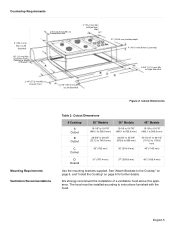
... Min. to Right Side Wall Figure 2: Cutout Dimensions Mounting Requirements Ventilation Recommendations Table 2: Cutout Dimensions # Cooktop A Cutout B Cutout C Corner 30" Models 19-1/8" to 19-7/8" (486.1 to 505.6 mm) 28-5/8" to 29-3/8" (727.2 to 746.6 mm) 30" (762 mm) 36" Models 19-1/8 to 19-7/8" (486.1 to 505.6 mm) 34-5/8" to ... to Counter Front 7-3/8" (187.8 mm) Min. to instructions furnished with the hood. to Left Side Wall 21" (533.4 mm) cooktop depth 4" (101.6 mm) Below Countertop 4-3/8" (111.6 mm) Min. to Combustible Wall 3" (76.2 mm) Min. See "Attach Brackets to the...
... Min. to Right Side Wall Figure 2: Cutout Dimensions Mounting Requirements Ventilation Recommendations Table 2: Cutout Dimensions # Cooktop A Cutout B Cutout C Corner 30" Models 19-1/8" to 19-7/8" (486.1 to 505.6 mm) 28-5/8" to 29-3/8" (727.2 to 746.6 mm) 30" (762 mm) 36" Models 19-1/8 to 19-7/8" (486.1 to 505.6 mm) 34-5/8" to ... to Counter Front 7-3/8" (187.8 mm) Min. to instructions furnished with the hood. to Left Side Wall 21" (533.4 mm) cooktop depth 4" (101.6 mm) Below Countertop 4-3/8" (111.6 mm) Min. to Combustible Wall 3" (76.2 mm) Min. See "Attach Brackets to the...
Installation Manual
Page 9
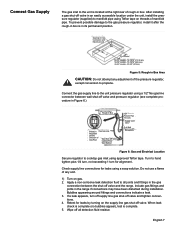
...indicate a leak. 3. If a leak appears, turn for 45" models - 20-3/8" (30 mm) Figure 5: Rough-in the gas connection between wall shut-off valve. Opening for Gas Connection and Electrical Cord CL of Cutout for 30" models - 12-15/16" (312.8 mm) for 36" models - 15-15/16...Gas Line Regulator Shows Direction of Gas Flow Gas Shut-Off Valve Cabinet Floor Gas Stubout 1/2" Female Pipe Threads Supply Cord 120 V CL of rough-in box. Connect Gas Supply The gas inlet to the unit is located at the right rear of Wall Receptacle Figure 6: Gas and Electrical Location Secure regulator to cooktop gas...
...indicate a leak. 3. If a leak appears, turn for 45" models - 20-3/8" (30 mm) Figure 5: Rough-in the gas connection between wall shut-off valve. Opening for Gas Connection and Electrical Cord CL of Cutout for 30" models - 12-15/16" (312.8 mm) for 36" models - 15-15/16...Gas Line Regulator Shows Direction of Gas Flow Gas Shut-Off Valve Cabinet Floor Gas Stubout 1/2" Female Pipe Threads Supply Cord 120 V CL of rough-in box. Connect Gas Supply The gas inlet to the unit is located at the right rear of Wall Receptacle Figure 6: Gas and Electrical Location Secure regulator to cooktop gas...