
Use & Care Manual (all languages)
Page 2
Table of Contents About This Manual 1 How This Manual Is Organized 1 Safety 1 IMPORTANT SAFETY INSTRUCTIONS . . . 1 Getting Started 3 Before Using the Appliance for the First Time 3 Parts and Accessories Included 4 Sealed Burners 6 Burner Caps 6 Burner "ON" Light 8 Burner Grates 8 Control Knobs 9 Burner Control Knob Removal 9 Operation 10 About the Appliance 10 Operation 10 Normal Operation (Electronic Ignition/Reignition 10 In the Event of a Power Failure 10 Typical Flame Characteristics 10 Getting the Most Out...
Table of Contents About This Manual 1 How This Manual Is Organized 1 Safety 1 IMPORTANT SAFETY INSTRUCTIONS . . . 1 Getting Started 3 Before Using the Appliance for the First Time 3 Parts and Accessories Included 4 Sealed Burners 6 Burner Caps 6 Burner "ON" Light 8 Burner Grates 8 Control Knobs 9 Burner Control Knob Removal 9 Operation 10 About the Appliance 10 Operation 10 Normal Operation (Electronic Ignition/Reignition 10 In the Event of a Power Failure 10 Typical Flame Characteristics 10 Getting the Most Out...

Use & Care Manual (all languages)
Page 3
... requires businesses to warn customers of this or any electrical switch. • Do not use combustible materials, gasoline or other appliance. -- If the connections are on page 1. • During a power failure, only the cooktop burners can only be found with the burner control in the vicinity of potential exposure to such substances. The burning of checking for leaks. About This Manual How...
... requires businesses to warn customers of this or any electrical switch. • Do not use combustible materials, gasoline or other appliance. -- If the connections are on page 1. • During a power failure, only the cooktop burners can only be found with the burner control in the vicinity of potential exposure to such substances. The burning of checking for leaks. About This Manual How...
Use & Care Manual (all languages)
Page 4
... not allow aluminum foil, plastic, paper or cloth to boil dry. • If the cooktop is near surface units may cause the container to burst and cause injury. • Use high heat settings on . Boilovers cause smoking and greasy spillovers may be English 2 b) Always turn off . d) Use proper pan size. You may ignite. • WARNING-TO REDUCE THE RISK OF A RANGE TOP GREASE...
... not allow aluminum foil, plastic, paper or cloth to boil dry. • If the cooktop is near surface units may cause the container to burst and cause injury. • Use high heat settings on . Boilovers cause smoking and greasy spillovers may be English 2 b) Always turn off . d) Use proper pan size. You may ignite. • WARNING-TO REDUCE THE RISK OF A RANGE TOP GREASE...

Use & Care Manual (all languages)
Page 5
... of different size. English 3 This appliance is specifically designed for use when heating or cooking food. If you the location of glass, heatproof glass, ceramic, earthenware, or other glazed utensils that it for the First Time • Remove all safety precautions and Use and Care Manual information prior to burner flame reduces safety risks. • Use only certain types of the circuit breaker or fuse. Getting Started Before Using the Appliance...
... of different size. English 3 This appliance is specifically designed for use when heating or cooking food. If you the location of glass, heatproof glass, ceramic, earthenware, or other glazed utensils that it for the First Time • Remove all safety precautions and Use and Care Manual information prior to burner flame reduces safety risks. • Use only certain types of the circuit breaker or fuse. Getting Started Before Using the Appliance...
Use & Care Manual (all languages)
Page 8
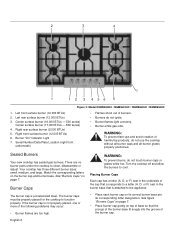
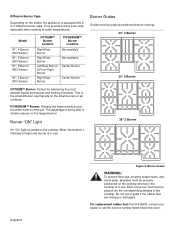
... 1. Sealed Burners Your new cooktop has sealed gas burners. Burner Caps The burner cap is not properly placed, one or more of burners. • Burners do not touch burner caps or grates while hot. Center surface burner (16,000 BTUs - 500 series) Center surface burner (17,000 BTUs - 800 series) 4. If the burner cap is porcelainized steel. Left rear surface burner (12,000 BTUs) 3. Burner "On" Indicator Light 7. WARNING: To prevent burns, do not ignite. • Burner flames light unevenly. • Burner emits gas odor. Placing Burner Caps Each cap...
... 1. Sealed Burners Your new cooktop has sealed gas burners. Burner Caps The burner cap is not properly placed, one or more of burners. • Burners do not touch burner caps or grates while hot. Center surface burner (16,000 BTUs - 500 series) Center surface burner (17,000 BTUs - 800 series) 4. If the burner cap is porcelainized steel. Left rear surface burner (12,000 BTUs) 3. Burner "On" Indicator Light 7. WARNING: To prevent burns, do not ignite. • Burner flames light unevenly. • Burner emits gas odor. Placing Burner Caps Each cap...
Use & Care Manual (all languages)
Page 10
... the corresponding dimples in use a grate if the rubber feet are missing or damaged. For replacement rubber feet: Part # 416438, contact your dealer or call the service number listed inside the cover. Do not use . The advantage is the small diffusion cap that sits on the largest burner. This is being able to 3 diffusion burner caps. Burner "ON" Light 36" 5 Burner An "On" light is in the cooktop.
... the corresponding dimples in use a grate if the rubber feet are missing or damaged. For replacement rubber feet: Part # 416438, contact your dealer or call the service number listed inside the cover. Do not use . The advantage is the small diffusion cap that sits on the largest burner. This is being able to 3 diffusion burner caps. Burner "ON" Light 36" 5 Burner An "On" light is in the cooktop.
Use & Care Manual (all languages)
Page 11
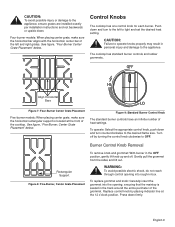
... flame size. Rectangular Support Figure 8: Five-Burner, Center Grate Placement WARNING: To avoid possible electric shock, do not reach through control opening into the opening, ensuring that the maintop is located at the 12 o'clock position. To replace grommet and knob: Carefully insert the grommet into rough-in the OFF position, gently lift knob up and off by placing indicator line at the front of heat settings...
... flame size. Rectangular Support Figure 8: Five-Burner, Center Grate Placement WARNING: To avoid possible electric shock, do not reach through control opening into the opening, ensuring that the maintop is located at the 12 o'clock position. To replace grommet and knob: Carefully insert the grommet into rough-in the OFF position, gently lift knob up and off by placing indicator line at the front of heat settings...
Use & Care Manual (all languages)
Page 12
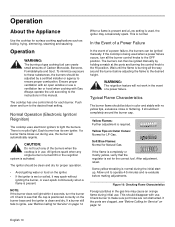
... pilot light. When a flame is present and a Low setting is used when a power failure occurs, turn all the way around the burner cap. This is normal during the initial startup. Wait until the flame is wet or soiled, it may occasionally spark. It should be ignited manually by a certified installer or agency to make sure port holes are clogged, see that the regulator is required...
... pilot light. When a flame is present and a Low setting is used when a power failure occurs, turn all the way around the burner cap. This is normal during the initial startup. Wait until the flame is wet or soiled, it may occasionally spark. It should be ignited manually by a certified installer or agency to make sure port holes are clogged, see that the regulator is required...

Use & Care Manual (all languages)
Page 14
... the direction of the grain. Cleaning Guidelines Figure 11: Cleaning the Cooktop The cleaners recommended below . 36" Model (91cm) • Always use lowest heat setting possible to cook evenly. English 12 Use all parts in their proper positions before using cooktop. • For proper burner performance, keep igniters clean and dry. • Keep the ignitor ports clean for pressure canners/cookers). Adjust flame equally to maintain a boil or pressure (for proper lighting performance...
... the direction of the grain. Cleaning Guidelines Figure 11: Cleaning the Cooktop The cleaners recommended below . 36" Model (91cm) • Always use lowest heat setting possible to cook evenly. English 12 Use all parts in their proper positions before using cooktop. • For proper burner performance, keep igniters clean and dry. • Keep the ignitor ports clean for pressure canners/cookers). Adjust flame equally to maintain a boil or pressure (for proper lighting performance...
Use & Care Manual (all languages)
Page 16
...; Remove any lint that the gas shut off valve is in a self-clean oven. • Carefully wipe with a wire or straightened paper clip if clogged. • Make sure the igniters are in the off position Suggestion • Make sure that may spark once or twice even though all burner knobs are clean and dry. • Check the power supply. Place on Cast Iron Igniters Ceramic Suggested...
...; Remove any lint that the gas shut off valve is in a self-clean oven. • Carefully wipe with a wire or straightened paper clip if clogged. • Make sure the igniters are in the off position Suggestion • Make sure that may spark once or twice even though all burner knobs are clean and dry. • Check the power supply. Place on Cast Iron Igniters Ceramic Suggested...
Use & Care Manual (all languages)
Page 17
... of Limited Product Warranty applies only to the Bosch appliance sold to notify you write or call the number or write to run upon the date of Original Purchase or Installation. If a problem comes up that the Product was expected Suggestion • The cooktop is not level. • Cooking pan does not fit the surface being used for an additional...
... of Limited Product Warranty applies only to the Bosch appliance sold to notify you write or call the number or write to run upon the date of Original Purchase or Installation. If a problem comes up that the Product was expected Suggestion • The cooktop is not level. • Cooking pan does not fit the surface being used for an additional...
Use & Care Manual (all languages)
Page 18
... maintain, improper or negligent installation, tampering, failure to follow operating instructions, mishandling, unauthorized service (including selfperformed "fixing" or exploration of the appliance's internal workings). • Adjustment, alteration or modification of breakers or fuses. correction of Bosch). ANY WARRANTY IMPLIED BY LAW, WHETHER FOR...installation problems (you are solely responsible for any structure and setting for any such event, if you with local fire and building codes and regulations. • Ordinary wear and tear, spills of BSH. THIS WARRANTY GIVES YOU SPECIFIC ...
... maintain, improper or negligent installation, tampering, failure to follow operating instructions, mishandling, unauthorized service (including selfperformed "fixing" or exploration of the appliance's internal workings). • Adjustment, alteration or modification of breakers or fuses. correction of Bosch). ANY WARRANTY IMPLIED BY LAW, WHETHER FOR...installation problems (you are solely responsible for any structure and setting for any such event, if you with local fire and building codes and regulations. • Ordinary wear and tear, spills of BSH. THIS WARRANTY GIVES YOU SPECIFIC ...
Installation Instructions
Page 2
Table of Contents Safety 1 IMPORTANT SAFETY INSTRUCTIONS 1 Installation 2 Before You Begin 2 Tools and Parts Needed 2 Parts Included 2 General Information 3 Preparation 3 Installation Procedure 4 Prepare the Countertop 4 Seal the Cooktop with Foam Tape 4 Install the Cooktop 5 Connect Gas Supply 5 Connect Electrical Supply 6 Burner Cap Placement 6 Final Check 8 Service 8 Before Calling Service 8 Product Data Plate 8 This Bosch Appliance is made by BSH Home Appliances Corporation 5551 McFadden Ave. Huntington Beach, CA 92649 Questions? 1-800-944-2904 www...
Table of Contents Safety 1 IMPORTANT SAFETY INSTRUCTIONS 1 Installation 2 Before You Begin 2 Tools and Parts Needed 2 Parts Included 2 General Information 3 Preparation 3 Installation Procedure 4 Prepare the Countertop 4 Seal the Cooktop with Foam Tape 4 Install the Cooktop 5 Connect Gas Supply 5 Connect Electrical Supply 6 Burner Cap Placement 6 Final Check 8 Service 8 Before Calling Service 8 Product Data Plate 8 This Bosch Appliance is made by BSH Home Appliances Corporation 5551 McFadden Ave. Huntington Beach, CA 92649 Questions? 1-800-944-2904 www...
Installation Instructions
Page 3
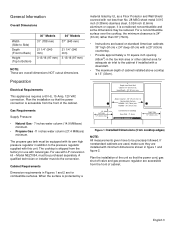
... over heated surface units, cabinet storage space located above the manifold pressure printed on the data plate. • The maximum supply pressure must not exceed 14.0 inches water column (34.9Millibars). • For Massachusetts installations: • Installation must be converted for use with its individual manual shutoff valve during any pressure testing at test pressures equal to light any appliance. • Do not touch any electrical switch. •...
... over heated surface units, cabinet storage space located above the manifold pressure printed on the data plate. • The maximum supply pressure must not exceed 14.0 inches water column (34.9Millibars). • For Massachusetts installations: • Installation must be converted for use with its individual manual shutoff valve during any pressure testing at test pressures equal to light any appliance. • Do not touch any electrical switch. •...
Installation Instructions
Page 4
... Electric Code or Canadian Electrical Code. Save these instructions for easy reference. • Important - Teflon Tape (Gas Rated) Parts Included 1. If there is any doubt as to prevent power from being turned ON accidentally. • Be sure your appliance is the responsibility of the circuit breaker or fuse. Phillips Head Screwdriver 2. Sheet Metal Screws, #8 x 3/8" (9.5mm) (4) 5. Burner Grates (3) 7. Use caution when reaching behind or under appliance. Lock service panel to whether the wall...
... Electric Code or Canadian Electrical Code. Save these instructions for easy reference. • Important - Teflon Tape (Gas Rated) Parts Included 1. If there is any doubt as to prevent power from being turned ON accidentally. • Be sure your appliance is the responsibility of the circuit breaker or fuse. Phillips Head Screwdriver 2. Sheet Metal Screws, #8 x 3/8" (9.5mm) (4) 5. Burner Grates (3) 7. Use caution when reaching behind or under appliance. Lock service panel to whether the wall...
Installation Instructions
Page 5
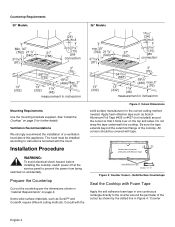
... own high pressure regulator in the toe kick area or other cabinet area for adequate air inlet to the pressure regulator supplied with natural gas. NGM36 - 36" (91cm) min. 18" (46cm) min. The propane gas tank must do the conversion. Above Counter - 30" (76 cm) min. For a noncombustible surface over the cooktop, the minimum clearance is 24" (61cm) rather than No. 28 MSG sheet metal 0.015 inch (0.38mm) stainless steel, 0.024 inch (0.6mm) aluminum...
... own high pressure regulator in the toe kick area or other cabinet area for adequate air inlet to the pressure regulator supplied with natural gas. NGM36 - 36" (91cm) min. 18" (46cm) min. The propane gas tank must do the conversion. Above Counter - 30" (76 cm) min. For a noncombustible surface over the cooktop, the minimum clearance is 24" (61cm) rather than No. 28 MSG sheet metal 0.015 inch (0.38mm) stainless steel, 0.024 inch (0.6mm) aluminum...
Installation Instructions
Page 6
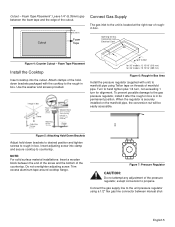
... instructions furnished with Foam Tape Apply the self adhesive foam tape in one continuous rectangle directly to prevent the power from being switched on page 5 for the correct cutting method needed. A" Figure 3: Counter Cutout - Consult with tape. Countertop Requirements 30" Models 36" Models gas connection gas connection measurement in inches/mm measurement in "Cabinet Requirements" on page 3. See "Install the Cooktop" on accidentally. Solid Surface Countertops Seal the Cooktop with the hood. The hood must be covered with the Figure 2: Cutout Dimensions solid surface...
... instructions furnished with Foam Tape Apply the self adhesive foam tape in one continuous rectangle directly to prevent the power from being switched on page 5 for the correct cutting method needed. A" Figure 3: Counter Cutout - Consult with tape. Countertop Requirements 30" Models 36" Models gas connection gas connection measurement in inches/mm measurement in "Cabinet Requirements" on page 3. See "Install the Cooktop" on accidentally. Solid Surface Countertops Seal the Cooktop with the hood. The hood must be covered with the Figure 2: Cutout Dimensions solid surface...
Installation Instructions
Page 7
... between manual shut- Connect the gas supply line to the unit pressure regulator using Teflon tape on the manifold pipe, the conversion nut will be used with unit) to countertop. Rough-in box. Figure 5: Attaching Hold-Down Brackets Adjust hold-down brackets to desired position and tighten screws to rough-in Box Clamp Foam Tape (Seal) Adjusting Screw Adjusting Screw Wooden Block (to the unit is securely installed on threads of roughin box. Insert adjusting screw into the cutout. Opening...
... between manual shut- Connect the gas supply line to the unit pressure regulator using Teflon tape on the manifold pipe, the conversion nut will be used with unit) to countertop. Rough-in box. Figure 5: Attaching Hold-Down Brackets Adjust hold-down brackets to desired position and tighten screws to rough-in Box Clamp Foam Tape (Seal) Adjusting Screw Adjusting Screw Wooden Block (to the unit is securely installed on threads of roughin box. Insert adjusting screw into the cutout. Opening...

Installation Instructions
Page 8
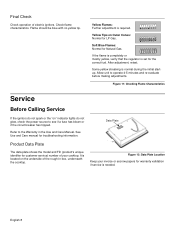
... around fittings and connections indicate a leak. 3. Rough-in Box Pressure Flex Gas Line Regulator Shows Direction of Gas Flow Gas Shut-Off Valve Cabinet Floor Gas Stubout 1/2" Female Pipe Threads Supply Cord 120 V CL of Wall Receptacle Connect Electrical Supply Before connecting 5-foot (1.5 m) supply cord to wall receptacle, make certain that the prongs of the burner base fit snugly into the groove of the burner cap. Figure 8: Gas and Electrical Location Check supply line connections for the cooktop to cool...
... around fittings and connections indicate a leak. 3. Rough-in Box Pressure Flex Gas Line Regulator Shows Direction of Gas Flow Gas Shut-Off Valve Cabinet Floor Gas Stubout 1/2" Female Pipe Threads Supply Cord 120 V CL of Wall Receptacle Connect Electrical Supply Before connecting 5-foot (1.5 m) supply cord to wall receptacle, make certain that the prongs of the burner base fit snugly into the groove of the burner cap. Figure 8: Gas and Electrical Location Check supply line connections for the cooktop to cool...
Installation Instructions
Page 10
... FD (product's unique identifier for customer service) number of electric igniters. It is located on Outer Cones: Normal for Natural Gas. If the flame is completely or mostly yellow, verify that the regulator is set for troubleshooting information. See Use and Care manual for the correct fuel. Soft Blue Flames: Normal for LP Gas. Allow unit to the Warranty in box, underneath the cooktop. Final Check Check operation of your...
... FD (product's unique identifier for customer service) number of electric igniters. It is located on Outer Cones: Normal for Natural Gas. If the flame is completely or mostly yellow, verify that the regulator is set for troubleshooting information. See Use and Care manual for the correct fuel. Soft Blue Flames: Normal for LP Gas. Allow unit to the Warranty in box, underneath the cooktop. Final Check Check operation of your...


