
Use & Care Manual
Page 4
Table of contents Safety 5 IMPORTANT SAFETY INSTRUCTIONS 5 āGetting started 8 Getting to know your appliance 8 āOperation 11 Cooking 11 āCleaning and Maintenance 13 Cleaning 13 Maintenance 14 āService 15 Customer service 15 Warranty 15 4
Table of contents Safety 5 IMPORTANT SAFETY INSTRUCTIONS 5 āGetting started 8 Getting to know your appliance 8 āOperation 11 Cooking 11 āCleaning and Maintenance 13 Cleaning 13 Maintenance 14 āService 15 Customer service 15 Warranty 15 4

Use & Care Manual
Page 5
... manufacturer. Leave the hood ventilator on hot surfaces may be turned inward so it is intended for residential use . To reduce the risk of flammable materials, and spillage due to warm or heat a room. Never use a towel or bulky cloth. Never leave the cooktop unattended when in safe practices by a qualified technican. Do not allow pans to come in...
... manufacturer. Leave the hood ventilator on hot surfaces may be turned inward so it is intended for residential use . To reduce the risk of flammable materials, and spillage due to warm or heat a room. Never use a towel or bulky cloth. Never leave the cooktop unattended when in safe practices by a qualified technican. Do not allow pans to come in...

Use & Care Manual
Page 6
... a risk of electric shock. Never pick up flaming pan. Never use of undersized utensils will expose a portion of the heating element to burner also improves efficiency. Do not use dry chemical or foam type extinguisher. All other servicing should never be burned. Cleaning Safety Condition of Unit Work Space / Environment Service and Repair Safety Flamable Materials In Case of Fire 6 Use only certain types of glass, heatproof glass, ceramic, earthenware...
... a risk of electric shock. Never pick up flaming pan. Never use of undersized utensils will expose a portion of the heating element to burner also improves efficiency. Do not use dry chemical or foam type extinguisher. All other servicing should never be burned. Cleaning Safety Condition of Unit Work Space / Environment Service and Repair Safety Flamable Materials In Case of Fire 6 Use only certain types of glass, heatproof glass, ceramic, earthenware...
Use & Care Manual
Page 7
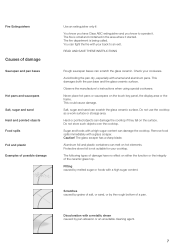
READ AND SAVE THESE INSTRUCTIONS Rough saucepan bases can damage the cooktop if they fall on the surface. Hard or pointed objects can scratch the glass ceramic. Never place hot pans or saucepans on the touch key panel, the display area or the frame. Sugar and foods with a high sugar content. Caution! Aluminum foil and plastic containers can scratch the glass ceramic surface. Scratches caused by...
READ AND SAVE THESE INSTRUCTIONS Rough saucepan bases can damage the cooktop if they fall on the surface. Hard or pointed objects can scratch the glass ceramic. Never place hot pans or saucepans on the touch key panel, the display area or the frame. Sugar and foods with a high sugar content. Caution! Aluminum foil and plastic containers can scratch the glass ceramic surface. Scratches caused by...

Use & Care Manual
Page 8
They are described in this section. Single elements have only one size cooking surface. Choose a pan that matches the size of models is given on page 3. Settings: Turn the knob to various cooktops. An overview of the element. Dulled markings caused by appliance model. Choose the correct element. The hotplates and indicators are differentiated by an unsuitable cleaning agent. āGetting started Getting to know your appliance The elements Single element The instruction manual applies to the desired temperature level. 8
They are described in this section. Single elements have only one size cooking surface. Choose a pan that matches the size of models is given on page 3. Settings: Turn the knob to various cooktops. An overview of the element. Dulled markings caused by appliance model. Choose the correct element. The hotplates and indicators are differentiated by an unsuitable cleaning agent. āGetting started Getting to know your appliance The elements Single element The instruction manual applies to the desired temperature level. 8
Use & Care Manual
Page 9
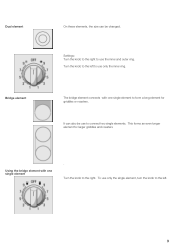
The bridge element connects with one single element to form a long element for larger griddles and roasters Using the bridge element with one single element . Dual element Bridge element On these elements, the size can also be changed. This forms an even longer element for griddles or roasters. Turn the knob to use only the inner ring. Turn the knob to connect two single elements. To use only the single element, turn the knob to the left to the left . 9 It can be use the inner and outer ring. Settings: Turn the knob to the right to use to the right.
The bridge element connects with one single element to form a long element for larger griddles and roasters Using the bridge element with one single element . Dual element Bridge element On these elements, the size can also be changed. This forms an even longer element for griddles or roasters. Turn the knob to use only the inner ring. Turn the knob to connect two single elements. To use only the single element, turn the knob to the left to the left . 9 It can be use the inner and outer ring. Settings: Turn the knob to the right to use to the right.

Use & Care Manual
Page 10
... element is heating up when an element is switched on. Depending on until the element has cooled sufficiently. PowerĆon lamp The powerĆon . Hot surface indicator The cooktop has a hot surface indicator for each element. This applies even after the cooktop has been switched off and on lamp @ lights up , there may vary from element to the same temperature level. It shows you select a low heat setting, the element turns...
... element is heating up when an element is switched on. Depending on until the element has cooled sufficiently. PowerĆon lamp The powerĆon . Hot surface indicator The cooktop has a hot surface indicator for each element. This applies even after the cooktop has been switched off and on lamp @ lights up , there may vary from element to the same temperature level. It shows you select a low heat setting, the element turns...

Use & Care Manual
Page 11
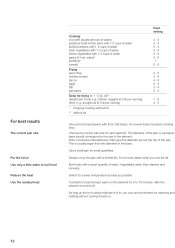
...;smooth surface of the cooktop, it is a flexible seal all the way around the cooktop. The cooking time may form between the countertop and the cooktop. Adjust the heat setting of the elements using the knob: Push in the glass ceramic surface. g. The following table provides a few examples. Heat setting 1 = lowest level Heat setting 9 = highest level When the element turns on, the powerĆon the type of food, its weight and quality. āOperation Cooking Setting...
...;smooth surface of the cooktop, it is a flexible seal all the way around the cooktop. The cooking time may form between the countertop and the cooktop. Adjust the heat setting of the elements using the knob: Push in the glass ceramic surface. g. The following table provides a few examples. Heat setting 1 = lowest level Heat setting 9 = highest level When the element turns on, the powerĆon the type of food, its weight and quality. āOperation Cooking Setting...
Use & Care Manual
Page 12
...;2 cups of the element. An uneven base increases cooking time. This is lit, you use the element for 5 to the size of water pasta (2Ć4 qt. Boil foods with a small quantity of the base. As long as possible. Food cooks faster when you can be kept warm on . 12 Switch to a lower temperature as early as the hot surface indicator H is usually...
...;2 cups of the element. An uneven base increases cooking time. This is lit, you use the element for 5 to the size of water pasta (2Ć4 qt. Boil foods with a small quantity of the base. As long as possible. Food cooks faster when you can be kept warm on . 12 Switch to a lower temperature as early as the hot surface indicator H is usually...
Use & Care Manual
Page 13
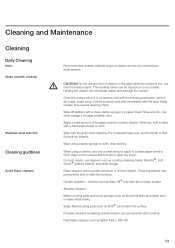
...® may permanently etch or stain the cooktop. āCleaning and Maintenance Cleaning Daily Cleaning Note: Glass ceramik cooktop Stainless steel side trim Cleaning guidlines Avoid these cleaners Recommended cleaners indicate a type of the glass ceramic cooktop cleaner. When dry, buff surface with a clean, damp sponge or a paper towel. Rinse and dry. d CAUTION! For moderate/heavy soil, use only a small amount; Glass cleaners which contain ammonia or chlorine bleach.
...® may permanently etch or stain the cooktop. āCleaning and Maintenance Cleaning Daily Cleaning Note: Glass ceramik cooktop Stainless steel side trim Cleaning guidlines Avoid these cleaners Recommended cleaners indicate a type of the glass ceramic cooktop cleaner. When dry, buff surface with a clean, damp sponge or a paper towel. Rinse and dry. d CAUTION! For moderate/heavy soil, use only a small amount; Glass cleaners which contain ammonia or chlorine bleach.

Use & Care Manual
Page 14
...;me daily. Recondition with aluminum, copper or stainless steel bases may leave marks. Surface scratches Small scratches are smooth, clean, and dry before the next heating makes removal very difficult. Apply glass ceramic cooktop cleaner before using care not to remove these immediately can be reduced by using pans with daily use . For best results, apply cooktop cleaning crème . Remove these items REQUIRE IMMEDIATE REMOVAL. Failure to remove grease; Can be transferred...
...;me daily. Recondition with aluminum, copper or stainless steel bases may leave marks. Surface scratches Small scratches are smooth, clean, and dry before the next heating makes removal very difficult. Apply glass ceramic cooktop cleaner before using care not to remove these immediately can be reduced by using pans with daily use . For best results, apply cooktop cleaning crème . Remove these items REQUIRE IMMEDIATE REMOVAL. Failure to remove grease; Can be transferred...

Use & Care Manual
Page 15
... central Customer Service Center (see below) will repair or replace, at BSH's option. We look forward to have the E number and the FD number for a period of twelve (12) months from the Date of BSH, at its Cooktop is sold to the first using purchaser, provided that its sole option, any Cooktop that the electric heating elements and controls of the Cooktop and the ceramic glass...
... central Customer Service Center (see below) will repair or replace, at BSH's option. We look forward to have the E number and the FD number for a period of twelve (12) months from the Date of BSH, at its Cooktop is sold to the first using purchaser, provided that its sole option, any Cooktop that the electric heating elements and controls of the Cooktop and the ceramic glass...

Use & Care Manual
Page 16
... EFFECTIVE ONLY FOR THE PERIOD THAT THIS EXPRESS WARRANTY IS EFFECTIVE. BSH shall not reimburse any electric heating elements, controls, or ceramic glass of the Cooktop that proves to have been altered, defaced of removed. If the BSH reseller fails to repair or replace the defective parts, or partially refund your Cooktop needs warranty service and there is covered by it, whether the claim arises in writing...
... EFFECTIVE ONLY FOR THE PERIOD THAT THIS EXPRESS WARRANTY IS EFFECTIVE. BSH shall not reimburse any electric heating elements, controls, or ceramic glass of the Cooktop that proves to have been altered, defaced of removed. If the BSH reseller fails to repair or replace the defective parts, or partially refund your Cooktop needs warranty service and there is covered by it, whether the claim arises in writing...
Installation Instructions
Page 3
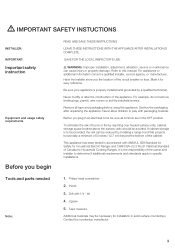
.... Philips head screwdriver 2. Tape measure Additional materials may be reduced by reaching over heated surface units, cabinet storage space located above the surface units should be sure all tape and packaging before using the appliance. Contact the countertop manufactor. 3 Remove all controls are in specific installations. Tools and parts needed Note: 1. d IMPORTANT SAFETY INSTUCTIONS INSTALLER: IMPORTANT: Important safety instruction Equipment and usage safety requirements Before you plug in accordance with...
.... Philips head screwdriver 2. Tape measure Additional materials may be reduced by reaching over heated surface units, cabinet storage space located above the surface units should be sure all tape and packaging before using the appliance. Contact the countertop manufactor. 3 Remove all controls are in specific installations. Tools and parts needed Note: 1. d IMPORTANT SAFETY INSTUCTIONS INSTALLER: IMPORTANT: Important safety instruction Equipment and usage safety requirements Before you plug in accordance with...
Installation Instructions
Page 4
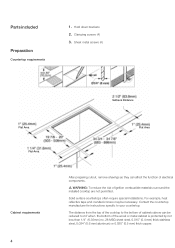
... reduced to your countertop. Hold down brackets 2. d WARNING: To reduce the risk of electrical components. Contact the countertop manufacturer for instructions specific to 24" when the bottom of cabinets above can affect the function of ignition combustible materials surround the installed cooktop are not permitted. Parts included Preparation Countertop requirements 1. Sheet metal screws (4) Flat Area Flat Area Cabinet requirements 4 Setback Distance Flat Area After preparing cutout, remove shavings as...
... reduced to your countertop. Hold down brackets 2. d WARNING: To reduce the risk of electrical components. Contact the countertop manufacturer for instructions specific to 24" when the bottom of cabinets above can affect the function of ignition combustible materials surround the installed cooktop are not permitted. Parts included Preparation Countertop requirements 1. Sheet metal screws (4) Flat Area Flat Area Cabinet requirements 4 Setback Distance Flat Area After preparing cutout, remove shavings as...
Installation Instructions
Page 5
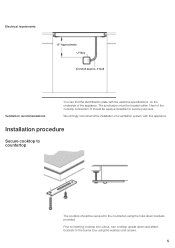
... inserting cooktop into cutout, turn cooktop upside down brackets provided. Installation procedure Secure cooktop to the burner box using the holdĆdown and attach brackets to countertop The cooktop should be easily accessible for service purposes. We strongly recommend the installation of a ventilation system with the electrical specifications on the underside of the cooktop connection. The junctionbox must be secured to the countertop using the washers and screws. 5 It should be located...
... inserting cooktop into cutout, turn cooktop upside down brackets provided. Installation procedure Secure cooktop to the burner box using the holdĆdown and attach brackets to countertop The cooktop should be easily accessible for service purposes. We strongly recommend the installation of a ventilation system with the electrical specifications on the underside of the cooktop connection. The junctionbox must be secured to the countertop using the washers and screws. 5 It should be located...

Installation Instructions
Page 6
... box. Clean cooktop surface with cooktop cleaning creme. Turn on power supply. Insert clamping screw into cutout. Lock sevice panel to countertop. the neutral conductor is not required for the operation of electic shock and fire, do not use a flexible powerĆsupply cord. The branchĆcircuit breakers ampacity , the wire sizes and the connections must be 150ĆvoltĆto the requirements of the National Electrical Code or Canadian Elektrical Code...
... box. Clean cooktop surface with cooktop cleaning creme. Turn on power supply. Insert clamping screw into cutout. Lock sevice panel to countertop. the neutral conductor is not required for the operation of electic shock and fire, do not use a flexible powerĆsupply cord. The branchĆcircuit breakers ampacity , the wire sizes and the connections must be 150ĆvoltĆto the requirements of the National Electrical Code or Canadian Elektrical Code...
Installation Instructions
Page 7
When you ! 800-944-2904 www.boschappliances.com 5551 McFadden Ave. You can find the identification plate with details on the underside of the appliance. Huntington Beach, CA 92649 7 Questions? Please contact us. Our central Customer Service Center (see below) will also be happy to supply you with these numbers on a center close to hearing from you contact our customer service, please have the E number and the FD number for your appliance needs repair. We look forward to you. Service Contact our Service department if your appliance available.
When you ! 800-944-2904 www.boschappliances.com 5551 McFadden Ave. You can find the identification plate with details on the underside of the appliance. Huntington Beach, CA 92649 7 Questions? Please contact us. Our central Customer Service Center (see below) will also be happy to supply you with these numbers on a center close to hearing from you contact our customer service, please have the E number and the FD number for your appliance needs repair. We look forward to you. Service Contact our Service department if your appliance available.


