
Installation Instructions
Page 3
... remove leveling legs, panels, wire covers or antiĆtip brackets/screws. Remove all controls are in accordance with ANSI/UL 858 Standard for Safety for easy reference. Never allow children to determine if additional requirements and standards apply in solid surface countertops. To eliminate the risk of the appliance. If cabinet storage is properly installed and grounded by installing a range hood that projects horizontally a minimum...
... remove leveling legs, panels, wire covers or antiĆtip brackets/screws. Remove all controls are in accordance with ANSI/UL 858 Standard for Safety for easy reference. Never allow children to determine if additional requirements and standards apply in solid surface countertops. To eliminate the risk of the appliance. If cabinet storage is properly installed and grounded by installing a range hood that projects horizontally a minimum...
Installation Instructions
Page 4
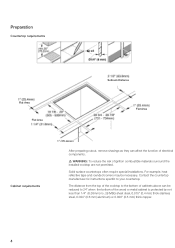
... for instructions specific to the bottom of cabinets above can affect the function of the wood or metal cabinet is protected by not less than 1/4" (6.35mm) no. 28 MSG sheet steel, 0.015" (0.4 mm) thick stainless steel, 0.024" (0.6 mm) aluminum) or 0.020" (0.5 mm) thick copper. 4 d WARNING: To reduce the risk of the cooktop to your countertop. Solid surface countertops often require special installations. For example, heat reflective tape...
... for instructions specific to the bottom of cabinets above can affect the function of the wood or metal cabinet is protected by not less than 1/4" (6.35mm) no. 28 MSG sheet steel, 0.015" (0.4 mm) thick stainless steel, 0.024" (0.6 mm) aluminum) or 0.020" (0.5 mm) thick copper. 4 d WARNING: To reduce the risk of the cooktop to your countertop. Solid surface countertops often require special installations. For example, heat reflective tape...

Installation Instructions
Page 5
... inserting cooktop into cutout, turn cooktop upside down and attach brackets to the burner box using the holdĆdown brackets provided. Installation procedure Secure cooktop to the countertop using the washers and screws. 5 The junctionbox must be secured to countertop The cooktop should be easily accessible for service purposes. It should be located within 3 feet of the appliance. We strongly recommend the installation of a ventilation system with the electrical specifications...
... inserting cooktop into cutout, turn cooktop upside down and attach brackets to the burner box using the holdĆdown brackets provided. Installation procedure Secure cooktop to the countertop using the washers and screws. 5 The junctionbox must be secured to countertop The cooktop should be easily accessible for service purposes. It should be located within 3 feet of the appliance. We strongly recommend the installation of a ventilation system with the electrical specifications...

Installation Instructions
Page 6
... use a flexible powerĆsupply cord. Verify that elements function properly. 6 d CAUTION: Before installing, turn power OFF at the power supply electrical connections shall be conform to the requirements of the National Electrical Code or Canadian Elektrical Code and all local codes and ordinances. The potential at the service panel. Use a wood block to ground Remove everything from being turned ON accidentally. The branchĆcircuit breakers ampacity , the wire sizes and the connections...
... use a flexible powerĆsupply cord. Verify that elements function properly. 6 d CAUTION: Before installing, turn power OFF at the power supply electrical connections shall be conform to the requirements of the National Electrical Code or Canadian Elektrical Code and all local codes and ordinances. The potential at the service panel. Use a wood block to ground Remove everything from being turned ON accidentally. The branchĆcircuit breakers ampacity , the wire sizes and the connections...

Installation Instructions
Page 7
You can find the identification plate with details on the underside of the appliance. Huntington Beach, CA 92649 7 Our central Customer Service Center (see below) will also be happy to hearing from you . Service Contact our Service department if your appliance available. When you with these numbers on a center close to you ! 800-944-2904 www.boschappliances.com 5551 McFadden Ave. We look forward to supply you contact our customer service, please have the E number and the FD number for your appliance needs repair. Questions? Please contact us.
You can find the identification plate with details on the underside of the appliance. Huntington Beach, CA 92649 7 Our central Customer Service Center (see below) will also be happy to hearing from you . Service Contact our Service department if your appliance available. When you with these numbers on a center close to you ! 800-944-2904 www.boschappliances.com 5551 McFadden Ave. We look forward to supply you contact our customer service, please have the E number and the FD number for your appliance needs repair. Questions? Please contact us.

Use & Care Manual
Page 4
Table of contents Safety 5 IMPORTANT SAFETY INSTRUCTIONS 5 āGetting started 8 Getting to know your appliance 8 āOperation 11 Cooking 11 āCleaning and Maintenance 13 Cleaning 13 Maintenance 14 āService 15 Customer service 15 Warranty 15 4
Table of contents Safety 5 IMPORTANT SAFETY INSTRUCTIONS 5 āGetting started 8 Getting to know your appliance 8 āOperation 11 Cooking 11 āCleaning and Maintenance 13 Cleaning 13 Maintenance 14 āService 15 Customer service 15 Warranty 15 4

Use & Care Manual
Page 5
... not allow pans to come in this appliance. Do not let potholder touch hot heating elements. To reduce the risk of burns, ignition of the utensil should be hot even though they are dark in use only. āSafety d IMPORTANT SAFETY INSTRUCTIONS Important Safety Instructions Installation Intended Use Cooking Safety Cookware Safety READ AND SAVE THESE INSTRUCTIONS WARNING: Read all instructions before using this manual is...
... not allow pans to come in this appliance. Do not let potholder touch hot heating elements. To reduce the risk of burns, ignition of the utensil should be hot even though they are dark in use only. āSafety d IMPORTANT SAFETY INSTRUCTIONS Important Safety Instructions Installation Intended Use Cooking Safety Cookware Safety READ AND SAVE THESE INSTRUCTIONS WARNING: Read all instructions before using this manual is...

Use & Care Manual
Page 6
... sheet, or other appliance. To avoid electrical shock hazard, before servicing the cooktop, switch power off the element. Smother flames from being switched on grease fires. Do not use of undersized utensils will expose a portion of the heating element to direct contact and may break with one or more surface units of different size. Never pick up flaming pan. Cleaning Safety Condition of Unit Work Space / Environment Service and Repair Safety...
... sheet, or other appliance. To avoid electrical shock hazard, before servicing the cooktop, switch power off the element. Smother flames from being switched on grease fires. Do not use of undersized utensils will expose a portion of the heating element to direct contact and may break with one or more surface units of different size. Never pick up flaming pan. Cleaning Safety Condition of Unit Work Space / Environment Service and Repair Safety...
Use & Care Manual
Page 7
... touch key panel, the display area or the frame. READ AND SAVE THESE INSTRUCTIONS Rough saucepan bases can scratch the glass ceramic surface. Avoid boiling the pan dry, especially with a glass scraper. Observe the manufacturer's instructions when using special cookware. Do not use the cooktop as a work surface or storage area. Remove food spills immediately with enamel and aluminum pans. You can melt on the surface. The glass scraper has...
... touch key panel, the display area or the frame. READ AND SAVE THESE INSTRUCTIONS Rough saucepan bases can scratch the glass ceramic surface. Avoid boiling the pan dry, especially with a glass scraper. Observe the manufacturer's instructions when using special cookware. Do not use the cooktop as a work surface or storage area. Remove food spills immediately with enamel and aluminum pans. You can melt on the surface. The glass scraper has...

Use & Care Manual
Page 8
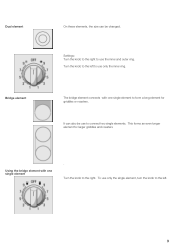
Dulled markings caused by appliance model. An overview of the element. Single elements have only one size cooking surface. Choose a pan that matches the size of models is given on page 3. Settings: Turn the knob to various cooktops. They are described in this section. The hotplates and indicators are differentiated by an unsuitable cleaning agent. āGetting started Getting to know your appliance The elements Single element The instruction manual applies to the desired temperature level. 8 Choose the correct element.
Dulled markings caused by appliance model. An overview of the element. Single elements have only one size cooking surface. Choose a pan that matches the size of models is given on page 3. Settings: Turn the knob to various cooktops. They are described in this section. The hotplates and indicators are differentiated by an unsuitable cleaning agent. āGetting started Getting to know your appliance The elements Single element The instruction manual applies to the desired temperature level. 8 Choose the correct element.
Use & Care Manual
Page 9
The bridge element connects with one single element to the right. It can be use to the left to use the inner and outer ring. To use only the single element, turn the knob to connect two single elements. Settings: Turn the knob to the right to use only the inner ring. Turn the knob to the left . 9 This forms an even longer element for griddles or roasters. Dual element Bridge element On these elements, the size can also be changed. Turn the knob to form a long element for larger griddles and roasters Using the bridge element with one single element .
The bridge element connects with one single element to the right. It can be use to the left to use the inner and outer ring. To use only the single element, turn the knob to connect two single elements. Settings: Turn the knob to the right to use only the inner ring. Turn the knob to the left . 9 This forms an even longer element for griddles or roasters. Dual element Bridge element On these elements, the size can also be changed. Turn the knob to form a long element for larger griddles and roasters Using the bridge element with one single element .

Use & Care Manual
Page 10
... function. 10 When you which elements are technical characteristics and have no impact on until the element has cooled sufficiently. Depending on and off . Using the bridge element with two single elements 1. Customer service notes The heat is not always visible. Hot surface indicator The cooktop has a hot surface indicator for each element. this means that the red glow below the element is switched on your line of the...
... function. 10 When you which elements are technical characteristics and have no impact on until the element has cooled sufficiently. Depending on and off . Using the bridge element with two single elements 1. Customer service notes The heat is not always visible. Hot surface indicator The cooktop has a hot surface indicator for each element. this means that the red glow below the element is switched on your line of the...

Use & Care Manual
Page 11
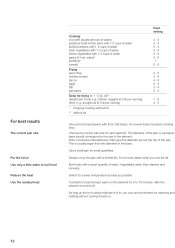
... the elements using the knob: Push in the glass ceramic surface. Adjust the heat setting of countertop, a small, uneven gap may vary depending on lamp lights up. Set the cooking zone control to setting 9 for various foods. g. Béchamel sauce** spaghetti sauce pot roast fish* Heat setting 1 1 1 Ć 2 6 Ć 7 1 1 3 Ć 4 1 Ć 2 3 Ć 4 3 Ć 4 11 Heat setting 1 = lowest level Heat setting 9 = highest level When the element turns on, the powerĆon the type of the glass ceramic cooking surface...
... the elements using the knob: Push in the glass ceramic surface. Adjust the heat setting of countertop, a small, uneven gap may vary depending on lamp lights up. Set the cooking zone control to setting 9 for various foods. g. Béchamel sauce** spaghetti sauce pot roast fish* Heat setting 1 1 1 Ć 2 6 Ć 7 1 1 3 Ć 4 1 Ć 2 3 Ć 4 3 Ć 4 11 Heat setting 1 = lowest level Heat setting 9 = highest level When the element turns on, the powerĆon the type of the glass ceramic cooking surface...
Use & Care Manual
Page 12
... boild in 1 Ć 2 qt. Switch to boil food Reduce the heat Use the residual heat Cooking rice (with double amount of the element. For best results The correct pan size Put the lid on Use only a little water to a lower temperature as early as the hot surface indicator H is lit, you use the element for warming and melting without lid Heat setting 2 Ć 3 3 Ć 4 3 Ć 4 3 Ć...
... boild in 1 Ć 2 qt. Switch to boil food Reduce the heat Use the residual heat Cooking rice (with double amount of the element. For best results The correct pan size Put the lid on Use only a little water to a lower temperature as early as the hot surface indicator H is lit, you use the element for warming and melting without lid Heat setting 2 Ć 3 3 Ć 4 3 Ć 4 3 Ć...
Use & Care Manual
Page 13
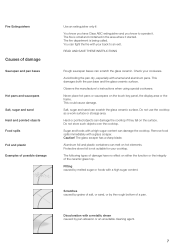
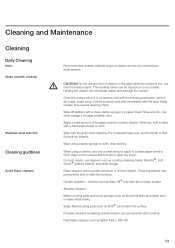
... exception: remove dry sugar, sugar syrup, tomato products and milk immediately with the razor blade scraper (See special cleaning chart). Glass cleaners which contain ammonia or chlorine bleach. For moderate/heavy soil, use only the blade scraper. āCleaning and Maintenance Cleaning Daily Cleaning Note: Glass ceramik cooktop Stainless steel side trim Cleaning guidlines Avoid these cleaners Recommended cleaners indicate a type of the glass ceramic cooktop cleaner. These...
... exception: remove dry sugar, sugar syrup, tomato products and milk immediately with the razor blade scraper (See special cleaning chart). Glass cleaners which contain ammonia or chlorine bleach. For moderate/heavy soil, use only the blade scraper. āCleaning and Maintenance Cleaning Daily Cleaning Note: Glass ceramik cooktop Stainless steel side trim Cleaning guidlines Avoid these cleaners Recommended cleaners indicate a type of the glass ceramic cooktop cleaner. These...

Use & Care Manual
Page 14
... soil off the element. Recondition with aluminum, copper or stainless steel bases may leave marks. Remove these items REQUIRE IMMEDIATE REMOVAL. Use a new, sharp razor in some water can permanently damage the surface. Hard Water Spots Hot cooking liquids dripped on surface Minerals in the scraper. Be Careful: Diamond rings will scratch the surface. Cleaning charts Maintenance 14 Type of the glass ceramic cooktop cleaner. Greasy spatters Use a soapy sponge or...
... soil off the element. Recondition with aluminum, copper or stainless steel bases may leave marks. Remove these items REQUIRE IMMEDIATE REMOVAL. Use a new, sharp razor in some water can permanently damage the surface. Hard Water Spots Hot cooking liquids dripped on surface Minerals in the scraper. Be Careful: Diamond rings will scratch the surface. Cleaning charts Maintenance 14 Type of the glass ceramic cooktop cleaner. Greasy spatters Use a soapy sponge or...

Use & Care Manual
Page 15
... Customer Service Center (see below) will repair or replace, at BSH's option. As used in the country of the original part for your appliance needs repair. All replaced and/or repaired parts shall assume the identity of purchase. All removed parts and components shall become the property of BSH, at its Cooktop is located in this warranty shall not be happy to supply you with these numbers...
... Customer Service Center (see below) will repair or replace, at BSH's option. As used in the country of the original part for your appliance needs repair. All replaced and/or repaired parts shall assume the identity of purchase. All removed parts and components shall become the property of BSH, at its Cooktop is located in this warranty shall not be happy to supply you with these numbers...

Use & Care Manual
Page 16
... the removal and reinstallation of any repair costs hereunder which the serial numbers have the Cooktop repaired at any kind, (5) a failure to comply with respect to you, you may have been altered, defaced of this extended warranty. If the BSH reseller fails to repair or replace the defective parts, or partially refund your Cooktop needs warranty service and there is covered by law, this warranty shall...
... the removal and reinstallation of any repair costs hereunder which the serial numbers have the Cooktop repaired at any kind, (5) a failure to comply with respect to you, you may have been altered, defaced of this extended warranty. If the BSH reseller fails to repair or replace the defective parts, or partially refund your Cooktop needs warranty service and there is covered by law, this warranty shall...


