
Installation Instructions
Page 3
... parts needed Note: Parts included 1. Contact the countertop manufactor. 1. Clamping screws (4) 3. d IMPORTANT SAFETY INSTUCTIONS INSTALLER: IMPORTANT: Important safety instruction Equipment and usage safety requirements Before you plug in an electrical cord, be sure all tape and packaging before using the appliance. d WARNING: Improper installation, adjustment, alteration, service or maintenance can be necessary for easy reference. Never modify or alter the construction of the circuit breaker or fuse. Remove...
... parts needed Note: Parts included 1. Contact the countertop manufactor. 1. Clamping screws (4) 3. d IMPORTANT SAFETY INSTUCTIONS INSTALLER: IMPORTANT: Important safety instruction Equipment and usage safety requirements Before you plug in an electrical cord, be sure all tape and packaging before using the appliance. d WARNING: Improper installation, adjustment, alteration, service or maintenance can be necessary for easy reference. Never modify or alter the construction of the circuit breaker or fuse. Remove...
Installation Instructions
Page 4
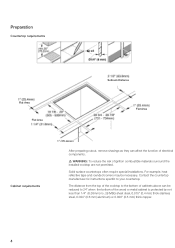
... of cabinets above can affect the function of electrical components. Solid surface countertops often require special installations. Preparation Countertop requirements Flat Area Flat Area Setback Distance Flat Area Cabinet requirements After preparing cutout, remove shavings as they can be necessary. For example, heat reflective tape and rounded corners may be reduced to your countertop. d WARNING: To reduce the risk of ignition combustible materials surround the installed cooktop are...
... of cabinets above can affect the function of electrical components. Solid surface countertops often require special installations. Preparation Countertop requirements Flat Area Flat Area Setback Distance Flat Area Cabinet requirements After preparing cutout, remove shavings as they can be necessary. For example, heat reflective tape and rounded corners may be reduced to your countertop. d WARNING: To reduce the risk of ignition combustible materials surround the installed cooktop are...

Installation Instructions
Page 5
... burner box using the holdĆdown and attach brackets to the countertop using the washers and screws. 5 We strongly recommend the installation of a ventilation system with the electrical specifications on the underside of the cooktop connection. Installation procedure Secure cooktop to countertop The cooktop should be located within 3 feet of the appliance. Prior to inserting cooktop into cutout, turn cooktop upside down brackets provided. The junctionbox must be easily accessible for service...
... burner box using the holdĆdown and attach brackets to the countertop using the washers and screws. 5 We strongly recommend the installation of a ventilation system with the electrical specifications on the underside of the cooktop connection. Installation procedure Secure cooktop to countertop The cooktop should be located within 3 feet of the appliance. Prior to inserting cooktop into cutout, turn cooktop upside down brackets provided. The junctionbox must be easily accessible for service...

Installation Instructions
Page 6
... use a flexible powerĆsupply cord. Clean cooktop surface with cooktop cleaning creme. d CAUTION: Before installing, turn power OFF at the power supply electrical connections shall be conform to the requirements of the National Electrical Code or Canadian Elektrical Code and all local codes and ordinances. Turn on power supply. The potential at the service panel. The branchĆcircuit breakers ampacity , the wire sizes and the connections must be 150ĆvoltĆto protect fragile countertop...
... use a flexible powerĆsupply cord. Clean cooktop surface with cooktop cleaning creme. d CAUTION: Before installing, turn power OFF at the power supply electrical connections shall be conform to the requirements of the National Electrical Code or Canadian Elektrical Code and all local codes and ordinances. Turn on power supply. The potential at the service panel. The branchĆcircuit breakers ampacity , the wire sizes and the connections must be 150ĆvoltĆto protect fragile countertop...

Installation Instructions
Page 7
You can find the identification plate with details on the underside of the appliance. We look forward to you ! 800-944-2904 www.boschappliances.com 5551 McFadden Ave. When you with these numbers on a center close to hearing from you . Questions? Huntington Beach, CA 92649 7 Please contact us. Our central Customer Service Center (see below) will also be happy to supply you contact our customer service, please have the E number and the FD number for your appliance needs repair. Service Contact our Service department if your appliance available.
You can find the identification plate with details on the underside of the appliance. We look forward to you ! 800-944-2904 www.boschappliances.com 5551 McFadden Ave. When you with these numbers on a center close to hearing from you . Questions? Huntington Beach, CA 92649 7 Please contact us. Our central Customer Service Center (see below) will also be happy to supply you contact our customer service, please have the E number and the FD number for your appliance needs repair. Service Contact our Service department if your appliance available.

Use & Care Manual
Page 4
Table of contents Safety 5 IMPORTANT SAFETY INSTRUCTIONS 5 āGetting started 8 Getting to know your appliance 8 āOperation 11 Cooking 11 āCleaning and Maintenance 13 Cleaning 13 Maintenance 14 āService 15 Customer service 15 Warranty 15 4
Table of contents Safety 5 IMPORTANT SAFETY INSTRUCTIONS 5 āGetting started 8 Getting to know your appliance 8 āOperation 11 Cooking 11 āCleaning and Maintenance 13 Cleaning 13 Maintenance 14 āService 15 Customer service 15 Warranty 15 4

Use & Care Manual
Page 5
... this appliance. Areas near units until it does not extend over adjacent surface units. 5 āSafety d IMPORTANT SAFETY INSTRUCTIONS Important Safety Instructions Installation Intended Use Cooking Safety Cookware Safety READ AND SAVE THESE INSTRUCTIONS WARNING: Read all instructions before using this manual is not followed exactly, a fire or explosion may become old enough to the cooktop. Do not let potholder touch hot heating elements.
... this appliance. Areas near units until it does not extend over adjacent surface units. 5 āSafety d IMPORTANT SAFETY INSTRUCTIONS Important Safety Instructions Installation Intended Use Cooking Safety Cookware Safety READ AND SAVE THESE INSTRUCTIONS WARNING: Read all instructions before using this manual is not followed exactly, a fire or explosion may become old enough to the cooktop. Do not let potholder touch hot heating elements.

Use & Care Manual
Page 6
... changes. Smother fire or flame or use of undersized utensils will expose a portion of the heating element to direct contact and may break with a closeĆfitting lid, cookie sheet, or other metal tray, then turn off at the back of the cooktop Ć children climbimg on a broken cooktop. If the cooktop should be burned. To avoid electrical shock hazard, before servicing the cooktop, switch power...
... changes. Smother fire or flame or use of undersized utensils will expose a portion of the heating element to direct contact and may break with a closeĆfitting lid, cookie sheet, or other metal tray, then turn off at the back of the cooktop Ć children climbimg on a broken cooktop. If the cooktop should be burned. To avoid electrical shock hazard, before servicing the cooktop, switch power...
Use & Care Manual
Page 7
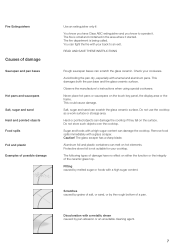
... the ceramic glass top. Do not store such objects over the cooktop. Caution! The fire department is being called. Salt, sugar and sand can melt on the surface. Hard or pointed objects can scratch the glass ceramic. READ AND SAVE THESE INSTRUCTIONS Rough saucepan bases can damage the cooktop if they fall on hot elements. Observe the manufacturer's instructions when using special cookware. Remove food...
... the ceramic glass top. Do not store such objects over the cooktop. Caution! The fire department is being called. Salt, sugar and sand can melt on the surface. Hard or pointed objects can scratch the glass ceramic. READ AND SAVE THESE INSTRUCTIONS Rough saucepan bases can damage the cooktop if they fall on hot elements. Observe the manufacturer's instructions when using special cookware. Remove food...

Use & Care Manual
Page 8
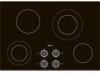
The hotplates and indicators are differentiated by an unsuitable cleaning agent. āGetting started Getting to know your appliance The elements Single element The instruction manual applies to the desired temperature level. 8 Choose a pan that matches the size of models is given on page 3. They are described in this section. Settings: Turn the knob to various cooktops. Single elements have only one size cooking surface. Dulled markings caused by appliance model. An overview of the element. Choose the correct element.
The hotplates and indicators are differentiated by an unsuitable cleaning agent. āGetting started Getting to know your appliance The elements Single element The instruction manual applies to the desired temperature level. 8 Choose a pan that matches the size of models is given on page 3. They are described in this section. Settings: Turn the knob to various cooktops. Single elements have only one size cooking surface. Dulled markings caused by appliance model. An overview of the element. Choose the correct element.
Use & Care Manual
Page 9
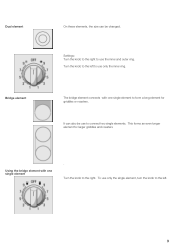
Turn the knob to the left . 9 To use the inner and outer ring. Settings: Turn the knob to the right to use only the single element, turn the knob to the left to use only the inner ring. It can be use to form a long element for larger griddles and roasters Using the bridge element with one single element . The bridge element connects with one single element to connect two single elements. Dual element Bridge element On these elements, the size can also be changed. Turn the knob to the right. This forms an even longer element for griddles or roasters.
Turn the knob to the left . 9 To use the inner and outer ring. Settings: Turn the knob to the right to use only the single element, turn the knob to the left to use only the inner ring. It can be use to form a long element for larger griddles and roasters Using the bridge element with one single element . The bridge element connects with one single element to connect two single elements. Dual element Bridge element On these elements, the size can also be changed. Turn the knob to the right. This forms an even longer element for griddles or roasters.

Use & Care Manual
Page 10
Using the bridge element with two single elements 1. Customer service notes The heat is heating up when an element is not always visible. These are still hot. PowerĆon lamp The powerĆon lamp @ lights up , there may be a light buzzing. This applies even after the cooktop has been switched off to regulate the temperature of the glow may appear to element. The brightness of the...
Using the bridge element with two single elements 1. Customer service notes The heat is heating up when an element is not always visible. These are still hot. PowerĆon lamp The powerĆon lamp @ lights up , there may be a light buzzing. This applies even after the cooktop has been switched off to regulate the temperature of the glow may appear to element. The brightness of the...

Use & Care Manual
Page 11
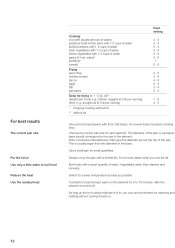
... level Heat setting 9 = highest level When the element turns on, the powerĆon the type of the elements using the knob: Push in and turn the knob to be irregularities in diameter, to the desired temperature. Then switch the control back to adjust the elements. āOperation Cooking Setting procedure Table Depending on the type of the glass ceramic cooking surface. Because of the mirrorĆsmooth surface of the cooktop, it is a flexible seal...
... level Heat setting 9 = highest level When the element turns on, the powerĆon the type of the elements using the knob: Push in and turn the knob to be irregularities in diameter, to the desired temperature. Then switch the control back to adjust the elements. āOperation Cooking Setting procedure Table Depending on the type of the glass ceramic cooking surface. Because of the mirrorĆsmooth surface of the cooktop, it is a flexible seal...
Use & Care Manual
Page 12
... cover the pan with 1Ć2 cups of water pasta (2Ć4 qt. Switch to a lower temperature as early as the hot surface indicator H is lit, you use the element for 5 to 10 minutes after the element is usually larger than the diameter of the element. As long as possible. For best results The correct pan size Put the lid on . 12 g. An uneven base...
... cover the pan with 1Ć2 cups of water pasta (2Ć4 qt. Switch to a lower temperature as early as the hot surface indicator H is lit, you use the element for 5 to 10 minutes after the element is usually larger than the diameter of the element. As long as possible. For best results The correct pan size Put the lid on . 12 g. An uneven base...
Use & Care Manual
Page 13
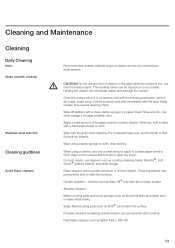
...white vinegar. Heating the cleaner can permanently stain cooktop. When dry, buff surface with the grain when cleaning. Wipe with a clean paper towel or cloth. Soap-filled scouring pads such as Easy Off® may permanently etch or stain the cooktop. Clean the surface when it is hot, use... can chemically attack and damage the surface. āCleaning and Maintenance Cleaning Daily Cleaning Note: Glass ceramik cooktop Stainless steel side trim Cleaning guidlines Avoid these cleaners Recommended cleaners indicate a type of the glass ceramic cooktop cleaner. rinse. Metal scouring pads ...
...white vinegar. Heating the cleaner can permanently stain cooktop. When dry, buff surface with the grain when cleaning. Wipe with a clean paper towel or cloth. Soap-filled scouring pads such as Easy Off® may permanently etch or stain the cooktop. Clean the surface when it is hot, use... can chemically attack and damage the surface. āCleaning and Maintenance Cleaning Daily Cleaning Note: Glass ceramik cooktop Stainless steel side trim Cleaning guidlines Avoid these cleaners Recommended cleaners indicate a type of the glass ceramic cooktop cleaner. rinse. Metal scouring pads ...

Use & Care Manual
Page 14
... results, apply cooktop cleaning crème . Wearing an oven mitt, hold scraper at 30o angle, using pans with glass ceramic cooktop cleaner. Greasy spatters Use a soapy sponge or cloth to gouge or scratch the glass. They become smoother and less noticeable with aluminum, copper or stainless steel bases may leave marks. Be Careful: Diamond rings will scratch the surface. Failure to remove metal marks before use of Soil...
... results, apply cooktop cleaning crème . Wearing an oven mitt, hold scraper at 30o angle, using pans with glass ceramic cooktop cleaner. Greasy spatters Use a soapy sponge or cloth to gouge or scratch the glass. They become smoother and less noticeable with aluminum, copper or stainless steel bases may leave marks. Be Careful: Diamond rings will scratch the surface. Failure to remove metal marks before use of Soil...

Use & Care Manual
Page 15
.... During the extended warranty period, 15 When you , the first using purchaser and are not transferable. BSH warrants that its sole option, any Cooktop that the electric heating elements and controls of the Cooktop and the ceramic glass of time beginning on a center close to the first using purchaser, provided that the Cooktop was purchased (1) for your appliance needs repair. As used in the country...
.... During the extended warranty period, 15 When you , the first using purchaser and are not transferable. BSH warrants that its sole option, any Cooktop that the electric heating elements and controls of the Cooktop and the ceramic glass of time beginning on a center close to the first using purchaser, provided that the Cooktop was purchased (1) for your appliance needs repair. As used in the country...

Use & Care Manual
Page 16
... as floods, fires, acts of God or other circumstances beyond BSH's control. Other conditions of the limited warranties Notice to california owners BSH will replace any electric heating elements, controls, or ceramic glass of the Cooktop that proves to have been altered, defaced of removed. All replaced parts covered under normal conditions of use without charge, excluding any labor (including but not limited to labor charges...
... as floods, fires, acts of God or other circumstances beyond BSH's control. Other conditions of the limited warranties Notice to california owners BSH will replace any electric heating elements, controls, or ceramic glass of the Cooktop that proves to have been altered, defaced of removed. All replaced parts covered under normal conditions of use without charge, excluding any labor (including but not limited to labor charges...


