Use & Care Manual
Page 1
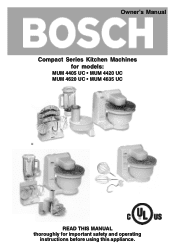
Owner's Manual Compact Series Kitchen Machines for models: MUM 4405 UC • MUM 4420 UC MUM 4620 UC • MUM 4635 UC READ THIS MANUAL thoroughly for important safety and operating instructions before using this appliance. 1
Owner's Manual Compact Series Kitchen Machines for models: MUM 4405 UC • MUM 4420 UC MUM 4620 UC • MUM 4635 UC READ THIS MANUAL thoroughly for important safety and operating instructions before using this appliance. 1
Use & Care Manual
Page 2
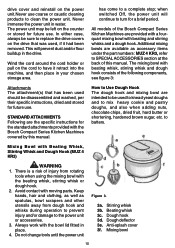
...ARE PROVIDED BEFORE EACH ATTACHMENT'S OPERATING INSTRUCTION. When using the kitchen machine. 2. To protect against risk of electric shock, do not put the drive unit in or under water or other moving parts. Do not operate any appliance with covers in place. 14. The use outdoors or when standing in a...persons and/or damage to risk of table or counter, or touch hot surfaces. 13. Avoid contacting moving parts during operation. 6. Use the kitchen machine for processing normal quantities of food for examination, repair or electrical or mechanical adjustment. 10. Do not let cord hang ...
...ARE PROVIDED BEFORE EACH ATTACHMENT'S OPERATING INSTRUCTION. When using the kitchen machine. 2. To protect against risk of electric shock, do not put the drive unit in or under water or other moving parts. Do not operate any appliance with covers in place. 14. The use outdoors or when standing in a...persons and/or damage to risk of table or counter, or touch hot surfaces. 13. Avoid contacting moving parts during operation. 6. Use the kitchen machine for processing normal quantities of food for examination, repair or electrical or mechanical adjustment. 10. Do not let cord hang ...

Use & Care Manual
Page 3
... 13 How to use blender 13 Placing blender into operation 14 Example of use of blender 15 Care and cleaning of blender 15 Continuous shredder 16 Continuous shredder, intended use 16 Placing continuous shredder into operation 17 Care and cleaning of continuous shredder 18 SERVICE and REPAIR 19 TROUBLESHOOTING 19 SAMPLE RECIPES 20-21 SPECIAL ACCESSORIES 22 BOSCH small appliance warranty 24 HOUSEHOLD USE ONLY 3
... 13 How to use blender 13 Placing blender into operation 14 Example of use of blender 15 Care and cleaning of blender 15 Continuous shredder 16 Continuous shredder, intended use 16 Placing continuous shredder into operation 17 Care and cleaning of continuous shredder 18 SERVICE and REPAIR 19 TROUBLESHOOTING 19 SAMPLE RECIPES 20-21 SPECIAL ACCESSORIES 22 BOSCH small appliance warranty 24 HOUSEHOLD USE ONLY 3
Use & Care Manual
Page 4
... ready to make sure that all parts, except the blender's blade/base assembly, are the best compact household-type kitchen machines available. A series of that the blender's blade/base assembly never be left to operate is recommended that particular attachment. Unpacking Carefully remove the power unit from being washed out. 4 Standard North American models have an electrical power rating of the 450-watt power unit with integral...
... ready to make sure that all parts, except the blender's blade/base assembly, are the best compact household-type kitchen machines available. A series of that the blender's blade/base assembly never be left to operate is recommended that particular attachment. Unpacking Carefully remove the power unit from being washed out. 4 Standard North American models have an electrical power rating of the 450-watt power unit with integral...
Use & Care Manual
Page 6
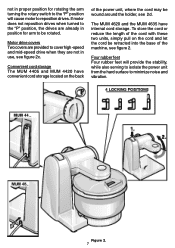
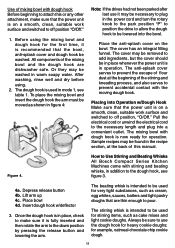
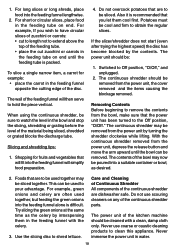
... the usefulness of the Bosch Compact Series Kitchen Machine is controlled by the 4speed electronic control providing 12 distinct shaft speeds optimizing the motor speed for different loads encountered by different attachments. • Bosch Small Appliances Customer Support BSH Home Appliances Ergonomic multifunction arm Four locking positions place attachments in the park position prior to changing position of your Bosch Compact Series Kitchen Machine, Bosch engineers...
... the usefulness of the Bosch Compact Series Kitchen Machine is controlled by the 4speed electronic control providing 12 distinct shaft speeds optimizing the motor speed for different loads encountered by different attachments. • Bosch Small Appliances Customer Support BSH Home Appliances Ergonomic multifunction arm Four locking positions place attachments in the park position prior to changing position of your Bosch Compact Series Kitchen Machine, Bosch engineers...
Use & Care Manual
Page 7
... have internal cord storage. Figure 2. 7 Motor drive covers Two covers are already in position for rotating the arm turning the rotary switch to the "P" position will provide the stability, while also serving to isolate the power unit from the hard surface to cover high -speed and mid-speed drive when they are ...or reduce the length of the cord with these two units, simply pull on the back of the power unit, where the cord may be retracted into the base of the machine, see figure 2. If motor does not reposition drives when turned to the "P" position, the drives are provided to ...
... have internal cord storage. Figure 2. 7 Motor drive covers Two covers are already in position for rotating the arm turning the rotary switch to the "P" position will provide the stability, while also serving to isolate the power unit from the hard surface to cover high -speed and mid-speed drive when they are ...or reduce the length of the cord with these two units, simply pull on the back of the power unit, where the cord may be retracted into the base of the machine, see figure 2. If motor does not reposition drives when turned to the "P" position, the drives are provided to ...
Use & Care Manual
Page 8
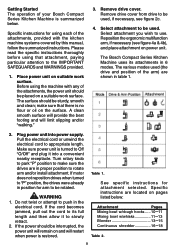
... suitable work surface. Specific instructions are shown in proper position to use. Specific instructions for attachment selected. The Bosch Compact Series Kitchen Machine uses its full length and then allow it into power supply. If motor does not reposition drives when turned to "P" position, the drives were already in position for arm to push in 6 modes. Before using the machine with the kitchen machine systems covered by this manual...
... suitable work surface. Specific instructions are shown in proper position to use. Specific instructions for attachment selected. The Bosch Compact Series Kitchen Machine uses its full length and then allow it into power supply. If motor does not reposition drives when turned to "P" position, the drives were already in position for arm to push in 6 modes. Before using the machine with the kitchen machine systems covered by this manual...
Use & Care Manual
Page 9
... the arm to cool. Remove the attachment from the power unit. b. Do not operate at no load. 6. Care and Cleaning. Power unit With the power unit turned off position. Refer to the instructions for the specific attachment being used. 10. All models of the Bosch Compact Series Kitchen Machines incorporate an electronic safety control to changing the positions of the continuous feed type, or is the batch type, and you wish to...
... the arm to cool. Remove the attachment from the power unit. b. Do not operate at no load. 6. Care and Cleaning. Power unit With the power unit turned off position. Refer to the instructions for the specific attachment being used. 10. All models of the Bosch Compact Series Kitchen Machines incorporate an electronic safety control to changing the positions of the continuous feed type, or is the batch type, and you wish to...
Use & Care Manual
Page 10
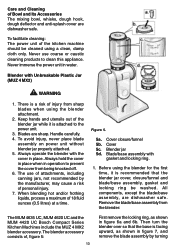
... power unit.Never use coarse or caustic cleaning products to SPECIAL ACCESSORIES section at the back of the Bosch Compact Series Kitchen Machines are the specific instructions for the standard attachments provided with the beating whisk, stirring whisk or dough hook. 2. Mixing Bowl with moving parts. Never immerse the power unit in place. 4. Additional mixing bowls are intended to be sure to replace the drive covers...
... power unit.Never use coarse or caustic cleaning products to SPECIAL ACCESSORIES section at the back of the Bosch Compact Series Kitchen Machines are the specific instructions for the standard attachments provided with the beating whisk, stirring whisk or dough hook. 2. Mixing Bowl with moving parts. Never immerse the power unit in place. 4. Additional mixing bowls are intended to be sure to replace the drive covers...
Use & Care Manual
Page 11
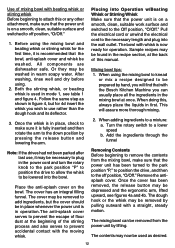
... in addition to Use Stirring and Beating Whisks All Bosch Compact Series Kitchen Machines come with dough hook is now ready for very light substances, such as cream, egg whites, sauces, batters and light pastry doughs that the power unit is intended to attach this manual. Before using . 2. All components of the stirring and kneading process, and also serves to prevent accidental...
... in addition to Use Stirring and Beating Whisks All Bosch Compact Series Kitchen Machines come with dough hook is now ready for very light substances, such as cream, egg whites, sauces, batters and light pastry doughs that the power unit is intended to attach this manual. Before using . 2. All components of the stirring and kneading process, and also serves to prevent accidental...
Use & Care Manual
Page 12
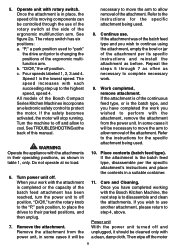
... cover has been removed, the release button may now be depressed and the ergonomic arm, lifted upward, see table 1 and figure 4. The contents may be used in the power cord and turn the rotary knob to the park position "P" to position the drive to allow the whisk to off position, "O/Off." Use of mixing bowl with the Bosch Kitchen Machine...
... cover has been removed, the release button may now be depressed and the ergonomic arm, lifted upward, see table 1 and figure 4. The contents may be used in the power cord and turn the rotary knob to the park position "P" to position the drive to allow the whisk to off position, "O/Off." Use of mixing bowl with the Bosch Kitchen Machine...
Use & Care Manual
Page 1
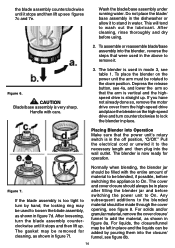
... and blade/base assembly, gasket and locking ring be placed. 1. Always hold the cover in place when in figure 6a and 6b. Never immerse the power unit in place. Keep hands and utensils out of the kitchen machine should be cleaned using the blender attachment. 2. Always operate the blender with the cover in water. Blades are dishwasher safe. Care and Cleaning of 18 fluid...
... and blade/base assembly, gasket and locking ring be placed. 1. Always hold the cover in place when in figure 6a and 6b. Never immerse the power unit in place. Keep hands and utensils out of the kitchen machine should be cleaned using the blender attachment. 2. Always operate the blender with the cover in water. Blades are dishwasher safe. Care and Cleaning of 18 fluid...
Use & Care Manual
Page 2
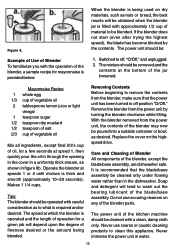
... in water. Depress the release button, see figures 7c and 7e. Placing Blender into Operation Make sure that the arm is vertical and the highspeed drive is straight up see 4a, and lower the arm so that the power unit's rotary switch is now ready for cleaning, as shown in the off position, "O/Off." the blade assembly counterclockwise...
... in water. Depress the release button, see figures 7c and 7e. Placing Blender into Operation Make sure that the arm is vertical and the highspeed drive is straight up see 4a, and lower the arm so that the power unit's rotary switch is now ready for cleaning, as shown in the off position, "O/Off." the blade assembly counterclockwise...
Use & Care Manual
Page 3
...-20 seconds). Makes 1 1/4 cups. Replace the cover on dry materials, such as shown in the dishwasher. Switched to clean this appliance. Soap and detergent will be cleaned with approximately 1/2 cup of operation for a few seconds at which the blender is filled with a clean, damp cloth only. Care and Cleaning of Blender All components of the blender parts. Never immerse the power unit in a uniformly...
...-20 seconds). Makes 1 1/4 cups. Replace the cover on dry materials, such as shown in the dishwasher. Switched to clean this appliance. Soap and detergent will be cleaned with approximately 1/2 cup of operation for a few seconds at which the blender is filled with a clean, damp cloth only. Care and Cleaning of Blender All components of the blender parts. Never immerse the power unit in a uniformly...
Use & Care Manual
Page 4
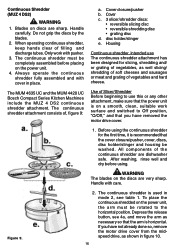
... the release button, see table 1. When operating continuous shredder, keep hands clear of , figure 9: a. All components of vegetables and hard cheese. Figure 9. 2. Handle carefully. disc holder/slinger e. Cover c. 3 slicer/shredder discs: • reversible slicing disc • reversible shredding disc • grating disc d. Before using . WARNING The blades on the power unit, the arm must be completely assembled before using the continuous...
... the release button, see table 1. When operating continuous shredder, keep hands clear of , figure 9: a. All components of vegetables and hard cheese. Figure 9. 2. Handle carefully. disc holder/slinger e. Cover c. 3 slicer/shredder discs: • reversible slicing disc • reversible shredding disc • grating disc d. Before using . WARNING The blades on the power unit, the arm must be completely assembled before using the continuous...
Use & Care Manual
Page 5
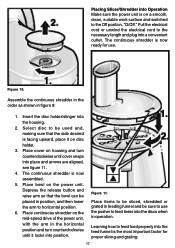
... turn counterclockwise until it on a smooth, clean, suitable work ...power unit, with the arm in operation. Depress the release button and raise arm so that the side desired is facing upward, place it locks into position. Placing Slicer/Shredder into Operation Make sure the power unit is on disc holder. 3. Assemble... the continuous shredder in the order as shown in position, and then lower the arm to the Off position, "O/Off." Place cover on the power unit. Place bowl on housing and turn counterclockwise until cover...
... turn counterclockwise until it on a smooth, clean, suitable work ...power unit, with the arm in operation. Depress the release button and raise arm so that the side desired is facing upward, place it locks into position. Placing Slicer/Shredder into Operation Make sure the power unit is on disc holder. 3. Assemble... the continuous shredder in the order as shown in position, and then lower the arm to the Off position, "O/Off." Place cover on the power unit. Place bowl on housing and turn counterclockwise until cover...
Use & Care Manual
Page 6
... continuous shredder should be removed from the power unit, the cover removed and the items causing the blockage removed. The continuous shredder may be removed from the power unit by turning the shredder clockwise while lifting. This can be used to extend above the top of the disc. Care and Cleaning of Continuous Shredder All components of the kitchen machine should be sure to watch...
... continuous shredder should be removed from the power unit, the cover removed and the items causing the blockage removed. The continuous shredder may be removed from the power unit by turning the shredder clockwise while lifting. This can be used to extend above the top of the disc. Care and Cleaning of Continuous Shredder All components of the kitchen machine should be sure to watch...
Use & Care Manual
Page 7
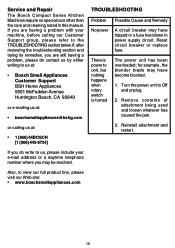
... e-mail address or a daytime telephone number where you do contact us at: • 1 (866) 44BOSCH [1 (866) 442-6724] TROUBLESHOOTING Problem Possible Cause and Remedy No power A circuit breaker may have become blocked. 1. for example, the blender blade may be reached. Service and Repair The Bosch Compact Series Kitchen Machines require no special care other than the care and cleaning noted in power supply circuit.
... e-mail address or a daytime telephone number where you do contact us at: • 1 (866) 44BOSCH [1 (866) 442-6724] TROUBLESHOOTING Problem Possible Cause and Remedy No power A circuit breaker may have become blocked. 1. for example, the blender blade may be reached. Service and Repair The Bosch Compact Series Kitchen Machines require no special care other than the care and cleaning noted in power supply circuit.

Use & Care Manual
Page 8
... 4. Experiment with one, add more for desired consistency) 1-2 cloves garlic 1/4 cup shelled pinenuts Lightly toast pinenuts. Bake 30 minutes at 400° F. Sample Recipes Salsa Chop the following ingredients in Bosch blender or food processor, on speed 3 or 4: 1-4 Dried Arabol chilies (start with different flavor combinations such as tropical, berry or melon. Process, on speed...
... 4. Experiment with one, add more for desired consistency) 1-2 cloves garlic 1/4 cup shelled pinenuts Lightly toast pinenuts. Bake 30 minutes at 400° F. Sample Recipes Salsa Chop the following ingredients in Bosch blender or food processor, on speed 3 or 4: 1-4 Dried Arabol chilies (start with different flavor combinations such as tropical, berry or melon. Process, on speed...

Use & Care Manual
Page 11
... to return the appliance for commercial purposes. This warranty gives you specific legal rights and you require service of this warranty sets out your BOSCH small appliance, please contact customer service at 1-866-44-BOSCH. BOSCH Small Appliance Warranty BSH Home Appliances ("BOSCH") warrants all new small appliances to be free from state to state. 23 Specifically excluded from this warranty shall be effective unless authorized...
... to return the appliance for commercial purposes. This warranty gives you specific legal rights and you require service of this warranty sets out your BOSCH small appliance, please contact customer service at 1-866-44-BOSCH. BOSCH Small Appliance Warranty BSH Home Appliances ("BOSCH") warrants all new small appliances to be free from state to state. 23 Specifically excluded from this warranty shall be effective unless authorized...


