
Use and Care Guide
Page 5
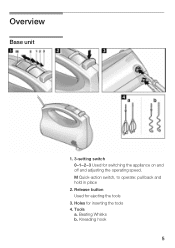
Release button Used for switching the appliance on and off and adjusting the operating speed. Overview Base unit 1. 3Ćsetting switch 0-1-2-3 Used for ejecting the tools 3. M QuickĆaction switch, to operate: pull back and hold in place 2. Tools a. Beating Whisks b. Kneading hook 5 Holes for inserting the tools 4.
Release button Used for switching the appliance on and off and adjusting the operating speed. Overview Base unit 1. 3Ćsetting switch 0-1-2-3 Used for ejecting the tools 3. M QuickĆaction switch, to operate: pull back and hold in place 2. Tools a. Beating Whisks b. Kneading hook 5 Holes for inserting the tools 4.
Use and Care Guide
Page 7
... time. 2. Use the appliance for processing normal quantities of the processed food. 7 Please keep the operating instructions. Clean the appliance and tools before taking it out of food for domestic use only. After using the container. 7. Use the quickĆ action setting (M) for ... if briefly using the appliance, set the switch to the base unit and lock into outlet. 5. Attach the desired tool to 0" and disconnect and remove the tools by pressing the release button. These operating instructions refer to a third party, always include the operating instructions. 1. If...
... time. 2. Use the appliance for processing normal quantities of the processed food. 7 Please keep the operating instructions. Clean the appliance and tools before taking it out of food for domestic use only. After using the container. 7. Use the quickĆ action setting (M) for ... if briefly using the appliance, set the switch to the base unit and lock into outlet. 5. Attach the desired tool to 0" and disconnect and remove the tools by pressing the release button. These operating instructions refer to a third party, always include the operating instructions. 1. If...
Use and Care Guide
Page 8
... off, it clicks" into position. 5. Use a brush and take hold of injury! Connect the base unit to 0" and press the release button. Do not change tools until it continues running briefly. After using the appliance, set the switch to the appliance and press down firmly. 6. when the appliance is at a stand...
... off, it clicks" into position. 5. Use a brush and take hold of injury! Connect the base unit to 0" and press the release button. Do not change tools until it continues running briefly. After using the appliance, set the switch to the appliance and press down firmly. 6. when the appliance is at a stand...
Use and Care Guide
Page 9
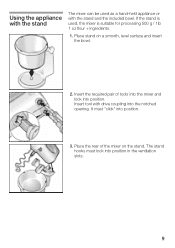
Place stand on the stand. It must lock into position. Place the rear of tools into the mixer and lock into position in the ventilation slots. 9 Insert tool with drive coupling into position. 3. If the stand is suitable for processing 500 g / 1lb 1Ăoz flour + ingredients. 1. The stand hooks must "click" into the...
Place stand on the stand. It must lock into position. Place the rear of tools into the mixer and lock into position in the ventilation slots. 9 Insert tool with drive coupling into position. 3. If the stand is suitable for processing 500 g / 1lb 1Ăoz flour + ingredients. 1. The stand hooks must "click" into the...
Use and Care Guide
Page 10
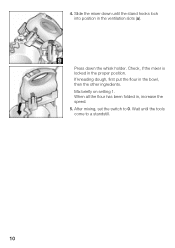
Press down until the tools come to 0. If kneading dough, first put the flour in the proper position. Wait until the stand hooks lock into position in , increase the speed. 5. Mix briefly on setting 1. Check, if the mixer is locked in the bowl, then the other ingredients. After mixing, set the switch to a standstill. 10 When all the flour has been folded in the ventilation slots (a). Slide the mixer down the whisk holder. 4.
Press down until the tools come to 0. If kneading dough, first put the flour in the proper position. Wait until the stand hooks lock into position in , increase the speed. 5. Mix briefly on setting 1. Check, if the mixer is locked in the bowl, then the other ingredients. After mixing, set the switch to a standstill. 10 When all the flour has been folded in the ventilation slots (a). Slide the mixer down the whisk holder. 4.
Use and Care Guide
Page 11
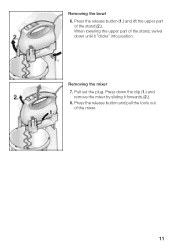
When lowering the upper part of the stand, swivel down the clip (1.) and remove the mixer by sliding it "clicks" into position. Removing the mixer 7. Press down until it forwards (2.). 8. Pull out the plug. Removing the bowl 6. Press the release button (1.) and lift the upper part of the mixer. 11 Press the release button and pull the tools out of the stand (2.).
When lowering the upper part of the stand, swivel down the clip (1.) and remove the mixer by sliding it "clicks" into position. Removing the mixer 7. Press down until it forwards (2.). 8. Pull out the plug. Removing the bowl 6. Press the release button (1.) and lift the upper part of the mixer. 11 Press the release button and pull the tools out of the stand (2.).
Use and Care Guide
Page 12
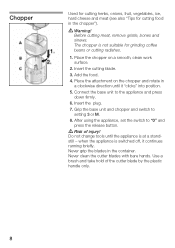
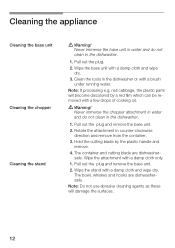
... drops of cooking oil. d Warning! Note: Do not use abrasive cleaning agents as these will become discolored by the plastic handle and remove. 4. Clean the tools in the dishwasher. 1. Note: If processing e.g. Never immerse the base unit in water and do not clean in counterĆclockwise direction and remove from...
... drops of cooking oil. d Warning! Note: Do not use abrasive cleaning agents as these will become discolored by the plastic handle and remove. 4. Clean the tools in the dishwasher. 1. Note: If processing e.g. Never immerse the base unit in water and do not clean in counterĆclockwise direction and remove from...