
Use and Care Guide
Page 3
... from beaters during operation. • Unplug from outlet immediately. As a safety feature, this hand mixer for examination, repair or electrical or mechanical adjustment. • The use of the table or countertop or touch hot surfaces. • To avoid damage to the mixer. • Remove beaters from outlet. • Avoid conecting moving parts. IMPORTANT SAFEGUARDS READ AND SAVE THESE INSTRUCTIONS HOUSEHOLD USE ONLY When using an electrical...
... from beaters during operation. • Unplug from outlet immediately. As a safety feature, this hand mixer for examination, repair or electrical or mechanical adjustment. • The use of the table or countertop or touch hot surfaces. • To avoid damage to the mixer. • Remove beaters from outlet. • Avoid conecting moving parts. IMPORTANT SAFEGUARDS READ AND SAVE THESE INSTRUCTIONS HOUSEHOLD USE ONLY When using an electrical...
Use and Care Guide
Page 4
... mixing, beating and whipping - All models feature: - 300Ćwatt powerful Bosch motor - 3 speed settings plus pulse function for maximum comfort and superior handling. 4 A series of the Bosch hand mixers. The MFQ2600UC With 2 stainless steel beating and whipping whisks, 2Ăstainless steel kneading hooks and the chopper accessory with stainless steel blade, suction feet and lid for stability and convenience. The MFQ2700UC With 2 stainless steel beating and whipping whisks, 2Ăstainless steel kneading hooks and a mixing stand and bowl for storage. The Bosch hand mixers...
... mixing, beating and whipping - All models feature: - 300Ćwatt powerful Bosch motor - 3 speed settings plus pulse function for maximum comfort and superior handling. 4 A series of the Bosch hand mixers. The MFQ2600UC With 2 stainless steel beating and whipping whisks, 2Ăstainless steel kneading hooks and the chopper accessory with stainless steel blade, suction feet and lid for stability and convenience. The MFQ2700UC With 2 stainless steel beating and whipping whisks, 2Ăstainless steel kneading hooks and a mixing stand and bowl for storage. The Bosch hand mixers...
Use and Care Guide
Page 5
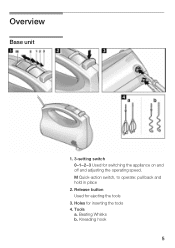
Release button Used for switching the appliance on and off and adjusting the operating speed. Tools a. Overview Base unit 1. 3Ćsetting switch 0-1-2-3 Used for ejecting the tools 3. Kneading hook 5 Holes for inserting the tools 4. Beating Whisks b. M QuickĆaction switch, to operate: pull back and hold in place 2.
Release button Used for switching the appliance on and off and adjusting the operating speed. Tools a. Overview Base unit 1. 3Ćsetting switch 0-1-2-3 Used for ejecting the tools 3. Kneading hook 5 Holes for inserting the tools 4. Beating Whisks b. M QuickĆaction switch, to operate: pull back and hold in place 2.

Use and Care Guide
Page 6
Particulary good resuls are achieved when the whisks are used to produce a light dough or sponge mixture. Chopper A Attachment B Cutting blade C Container D Lid Stand with bowl E Bowl F Stand As the whisks or dough hooks rotate opposite to the bowl, it only takes a short time to whip cream or eggĆwhites. 6
Particulary good resuls are achieved when the whisks are used to produce a light dough or sponge mixture. Chopper A Attachment B Cutting blade C Container D Lid Stand with bowl E Bowl F Stand As the whisks or dough hooks rotate opposite to the bowl, it only takes a short time to whip cream or eggĆwhites. 6
Use and Care Guide
Page 7
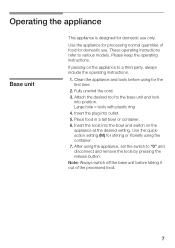
... it out of food for domestic use only. Attach the desired tool to a third party, always include the operating instructions. 1. Insert the plug into the bowl and switch on the appliance to the base unit and lock into position. Note: Always switch off the base unit before using for stirring or if briefly using the appliance, set the switch to various models. Operating the appliance...
... it out of food for domestic use only. Attach the desired tool to a third party, always include the operating instructions. 1. Insert the plug into the bowl and switch on the appliance to the base unit and lock into position. Note: Always switch off the base unit before using for stirring or if briefly using the appliance, set the switch to various models. Operating the appliance...
Use and Care Guide
Page 8
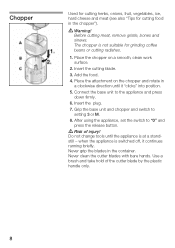
... rotate in a clockwise direction until the appliance is at a standĆ still - Place the attachment on a smooth, clean work surface. 2. when the appliance is not suitable for cutting food in the container. The chopper is switched off, it clicks" into position. 5. Insert the cutting blade. 3. Insert the plug. 7. d Risk of the cutter blade by the plastic handle only. 8 Connect the...
... rotate in a clockwise direction until the appliance is at a standĆ still - Place the attachment on a smooth, clean work surface. 2. when the appliance is not suitable for cutting food in the container. The chopper is switched off, it clicks" into position. 5. Insert the cutting blade. 3. Insert the plug. 7. d Risk of the cutter blade by the plastic handle only. 8 Connect the...
Use and Care Guide
Page 9
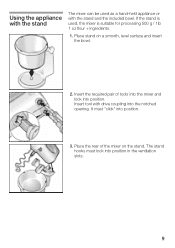
... stand. Insert tool with the stand and the included bowl. The stand hooks must "click" into position. Insert the required pair of the mixer on a smooth, level surface and insert the bowl. 2. It must lock into the notched opening. Place the rear of tools into the mixer and lock into position. 3. Using the appliance with the stand The mixer can be used , the mixer is used as a hand...
... stand. Insert tool with the stand and the included bowl. The stand hooks must "click" into position. Insert the required pair of the mixer on a smooth, level surface and insert the bowl. 2. It must lock into the notched opening. Place the rear of tools into the mixer and lock into position. 3. Using the appliance with the stand The mixer can be used , the mixer is used as a hand...
Use and Care Guide
Page 10
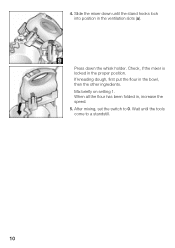
4. After mixing, set the switch to a standstill. 10 When all the flour has been folded in the proper position. Slide the mixer down the whisk holder. Mix briefly on setting 1. Wait until the stand hooks lock into position in the bowl, then the other ingredients. Check, if the mixer is locked in , increase the speed. 5. Press down until the tools come to 0. If kneading dough, first put the flour in the ventilation slots (a).
4. After mixing, set the switch to a standstill. 10 When all the flour has been folded in the proper position. Slide the mixer down the whisk holder. Mix briefly on setting 1. Wait until the stand hooks lock into position in the bowl, then the other ingredients. Check, if the mixer is locked in , increase the speed. 5. Press down until the tools come to 0. If kneading dough, first put the flour in the ventilation slots (a).
Use and Care Guide
Page 11
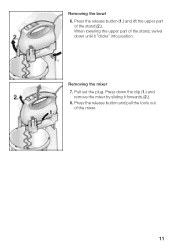
Pull out the plug. Press the release button and pull the tools out of the stand (2.). Press down until it forwards (2.). 8. When lowering the upper part of the stand, swivel down the clip (1.) and remove the mixer by sliding it "clicks" into position. Removing the mixer 7. Removing the bowl 6. Press the release button (1.) and lift the upper part of the mixer. 11
Pull out the plug. Press the release button and pull the tools out of the stand (2.). Press down until it forwards (2.). 8. When lowering the upper part of the stand, swivel down the clip (1.) and remove the mixer by sliding it "clicks" into position. Removing the mixer 7. Removing the bowl 6. Press the release button (1.) and lift the upper part of the mixer. 11
Use and Care Guide
Page 12
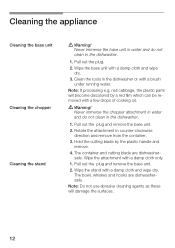
.... 2. Hold the cutting blade by a red film which can be reĆ moved with a few drops of cooking oil. The bowl, whiskes and hooks are dishwasherĆ safe. Note: Do not use abrasive cleaning agents as these will become discolored by the plastic handle and remove. 4. red cabbage, the plastic parts will damage the surfaces. 12 Rotate the attachment in the dishwasher...
.... 2. Hold the cutting blade by a red film which can be reĆ moved with a few drops of cooking oil. The bowl, whiskes and hooks are dishwasherĆ safe. Note: Do not use abrasive cleaning agents as these will become discolored by the plastic handle and remove. 4. red cabbage, the plastic parts will damage the surfaces. 12 Rotate the attachment in the dishwasher...
Use and Care Guide
Page 13
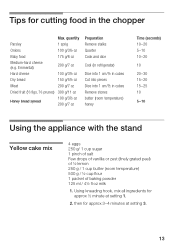
... for approx 3-4 minutes at setting 1, 2. Tips for cutting food in cubes Remove stones butter (room temperature) honey Time (seconds) 10-20 5-10 10-20 10 20-30 15-20 15-25 10 5-10 Using the appliance with the stand Yellow cake mix 4 eggs 250 g/ 1 cup sugar 1 pinch of salt Few ...Preparation Remove stalks Quarter Cook and dice Cool (in refrigerator) Dice into 1 cm/½ in cubes Cut into pieces Dice into 1 cm/½ in the chopper Max. Using kneading hook, mix all ingredients for approx ½ minute at setting 3. 13 quantity Parsley 1 sprig Onions 100 g/3½ oz Baby food 175...
... for approx 3-4 minutes at setting 1, 2. Tips for cutting food in cubes Remove stones butter (room temperature) honey Time (seconds) 10-20 5-10 10-20 10 20-30 15-20 15-25 10 5-10 Using the appliance with the stand Yellow cake mix 4 eggs 250 g/ 1 cup sugar 1 pinch of salt Few ...Preparation Remove stalks Quarter Cook and dice Cool (in refrigerator) Dice into 1 cm/½ in cubes Cut into pieces Dice into 1 cm/½ in the chopper Max. Using kneading hook, mix all ingredients for approx ½ minute at setting 3. 13 quantity Parsley 1 sprig Onions 100 g/3½ oz Baby food 175...

Use and Care Guide
Page 14
... replacement small appliances and parts shall be the same or as possible to the original for the purposes of normal use for commercial purposes. BOSCH Small Appliance Warranty BSH Home Appliances (BOSCH") warrants all new small appliances to be free from original defects in appearance as close in design, materials and workmanship for one (1) year after the sale to the original owner...
... replacement small appliances and parts shall be the same or as possible to the original for the purposes of normal use for commercial purposes. BOSCH Small Appliance Warranty BSH Home Appliances (BOSCH") warrants all new small appliances to be free from original defects in appearance as close in design, materials and workmanship for one (1) year after the sale to the original owner...
Use and Care Guide
Page 15
BSH Home Appliances Corporation 5551 McFadden Avenue Huntington Beach, CA 92649 USA Web site: www.boschsmallappliances.com Customer Service (toll free): 1-866-44BOSCH (1-866-442-6724) Appelez le serviceĆclient (gratuit) : 1-866-44BOSCH (1-866-442-6724) Servicio al cliente (libre de cargo): 1-866-44BOSCH (1-866-442-6724) 0103 509045????
BSH Home Appliances Corporation 5551 McFadden Avenue Huntington Beach, CA 92649 USA Web site: www.boschsmallappliances.com Customer Service (toll free): 1-866-44BOSCH (1-866-442-6724) Appelez le serviceĆclient (gratuit) : 1-866-44BOSCH (1-866-442-6724) Servicio al cliente (libre de cargo): 1-866-44BOSCH (1-866-442-6724) 0103 509045????