Short Instructions
Page 1
...; F. The rack should be level and flat when properly inserted. Pull the rack forward to 6 starting from the back of the oven. Slide the moveable part of the rack is in the desired position before -first-use (see the cooking mode chart on the guide. Perform a before preheating the oven. Rack...
...; F. The rack should be level and flat when properly inserted. Pull the rack forward to 6 starting from the back of the oven. Slide the moveable part of the rack is in the desired position before -first-use (see the cooking mode chart on the guide. Perform a before preheating the oven. Rack...

Short Instructions
Page 4
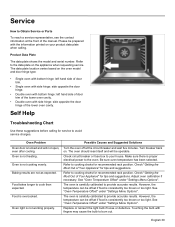
... • 05/14 Data plate shows model and serial number. To contact customer service: US: 800-944-2904 Web: www.bosch-home.com.us Parts & Accessories: www.bosch-eshop.us English 4 Problem Possible Cause Suggested Solution Oven door is locked and will help reduce the odor more quickly. Refer to..., see or feel steam or warm air coming No action required, do not This is normal in the display This is normal with flat part of a fingertip. Custom Settings. Oven light not working properly Bulb loose or defective Reinsert or replace the bulb (avoid touching bulb glass with...
... • 05/14 Data plate shows model and serial number. To contact customer service: US: 800-944-2904 Web: www.bosch-home.com.us Parts & Accessories: www.bosch-eshop.us English 4 Problem Possible Cause Suggested Solution Oven door is locked and will help reduce the odor more quickly. Refer to..., see or feel steam or warm air coming No action required, do not This is normal in the display This is normal with flat part of a fingertip. Custom Settings. Oven light not working properly Bulb loose or defective Reinsert or replace the bulb (avoid touching bulb glass with...
Instructions for Use
Page 3
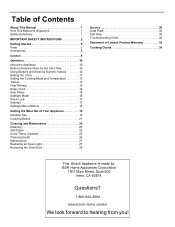
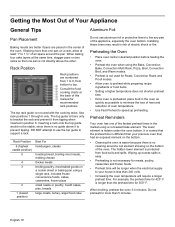
Table of Contents About This Manual 1 How This Manual is Organized 1 Safety Definitions 1 IMPORTANT SAFETY INSTRUCTIONS 2 Getting Started 5 Parts 5 Accessories 6 Control 8 Operation 10 About the Appliance 10 Before Using the Oven for the First Time 10 Using Buttons and Entering Numeric Values 10 ...the Oven Door 28 Service 30 Data Plate 30 Self Help 30 Troubleshooting Chart 30 Statement of Limited Product Warranty 32 Cooking Charts 34 This Bosch Appliance is made by BSH Home Appliances Corporation 1901 Main Street, Suite 600 Irvine, CA 92614 Questions? 1-800-944-2904 www...
Table of Contents About This Manual 1 How This Manual is Organized 1 Safety Definitions 1 IMPORTANT SAFETY INSTRUCTIONS 2 Getting Started 5 Parts 5 Accessories 6 Control 8 Operation 10 About the Appliance 10 Before Using the Oven for the First Time 10 Using Buttons and Entering Numeric Values 10 ...the Oven Door 28 Service 30 Data Plate 30 Self Help 30 Troubleshooting Chart 30 Statement of Limited Product Warranty 32 Cooking Charts 34 This Bosch Appliance is made by BSH Home Appliances Corporation 1901 Main Street, Suite 600 Irvine, CA 92614 Questions? 1-800-944-2904 www...

Instructions for Use
Page 4
... common foods with the appropriate oven mode, temperature, rack position and bake time. English 1 This way, you to clean and care for the various oven parts. • The "Service" section includes your appliance and become familiar with this warning.
... common foods with the appropriate oven mode, temperature, rack position and bake time. English 1 This way, you to clean and care for the various oven parts. • The "Service" section includes your appliance and become familiar with this warning.
Instructions for Use
Page 5
...the appliance and disconnect the circuit at the circuit breaker box. • Use this appliance only for storage. • Always have any part of an error, the display flashes and beeps continuously. Proper Installation and Maintenance • Have the installer show you the location of electric... the fire with baking soda. Contact an authorized servicer. • Do not obstruct oven vents. • Do not repair or replace any part of corrosive chemicals in the following pages. Installing these liners may be followed, including those in heating or cleaning will result. • Use ...
...the appliance and disconnect the circuit at the circuit breaker box. • Use this appliance only for storage. • Always have any part of an error, the display flashes and beeps continuously. Proper Installation and Maintenance • Have the installer show you the location of electric... the fire with baking soda. Contact an authorized servicer. • Do not obstruct oven vents. • Do not repair or replace any part of corrosive chemicals in the following pages. Installing these liners may be followed, including those in heating or cleaning will result. • Use ...

Instructions for Use
Page 6
... hot, do not let potholder contact the heating elements. • Always use this appliance as ties, scarves, jewelry, or dangling sleeves. 9 WARNING NEVER cover any part of California to climb, stand, lean, sit, or hang on hot surfaces may catch fire in carbon monoxide poisoning and overheating the appliance. They should...
... hot, do not let potholder contact the heating elements. • Always use this appliance as ties, scarves, jewelry, or dangling sleeves. 9 WARNING NEVER cover any part of California to climb, stand, lean, sit, or hang on hot surfaces may catch fire in carbon monoxide poisoning and overheating the appliance. They should...

Instructions for Use
Page 7
...; Do not place food or bakeware directly on oven bottom. • Follow the manufacturer's directions when using cooking or roasting bags. • Do not clean parts or accessories in this manual. • When self-cleaning, confirm that may also be minimized by: 1) Providing good ventilation when cooking with gas. 2) Providing good...
...; Do not place food or bakeware directly on oven bottom. • Follow the manufacturer's directions when using cooking or roasting bags. • Do not clean parts or accessories in this manual. • When self-cleaning, confirm that may also be minimized by: 1) Providing good ventilation when cooking with gas. 2) Providing good...

Instructions for Use
Page 8
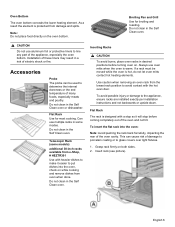
... oven is important for air circulation. It is released from the vent before, during all cooking modes. Your appliance may collect in use. Getting Started Parts Picture shows a double oven.
... oven is important for air circulation. It is released from the vent before, during all cooking modes. Your appliance may collect in use. Getting Started Parts Picture shows a double oven.
Instructions for Use
Page 9
... before turning oven on the oven bottom. English 6 Grasp rack firmly on while cooking and remove dishes from the lowest rack position to line any part of many foods, especially meats and poultry. Do not clean in some models) additional 30-inch racks available from e-Shop, # HEZTR301 Use with heavier dishes...
... before turning oven on the oven bottom. English 6 Grasp rack firmly on while cooking and remove dishes from the lowest rack position to line any part of many foods, especially meats and poultry. Do not clean in some models) additional 30-inch racks available from e-Shop, # HEZTR301 Use with heavier dishes...

Instructions for Use
Page 10
... when properly seated. 6. Pull the rack the rest of the rack position guide. Tilt the front of the rack up so that the non-moving part of the telescopic rack is securely anchored. 9 CAUTION To avoid possible injury or damage to disengage from the oven: 1. Note: Avoid striking the oven light... in and out a few times to bind during removal, catching on the oven walls. 3. 3. To remove the flat rack from the oven. Slide the movable part of the telescopic rack assembly so it to make sure it on both sides and pull rack toward you. 2. Tilt rack up (A) to slide under...
... when properly seated. 6. Pull the rack the rest of the rack position guide. Tilt the front of the rack up so that the non-moving part of the telescopic rack is securely anchored. 9 CAUTION To avoid possible injury or damage to disengage from the oven: 1. Note: Avoid striking the oven light... in and out a few times to bind during removal, catching on the oven walls. 3. 3. To remove the flat rack from the oven. Slide the movable part of the telescopic rack assembly so it to make sure it on both sides and pull rack toward you. 2. Tilt rack up (A) to slide under...

Instructions for Use
Page 18
... end of the oven or the pan. Make sure the probe is displayed. The Set Probe and OvenTemp screen is not touching fat, bone, or parts of the probe. Use the numeric keypad to silence the alarm. Auto Probe The probe measures the internal temperature of the display to select screens... the probe mode. When the Delay Cook timer starts the mode the timer time remaining, mode and temperature are shown in the middle and thickest part of the timer countdown, the oven will sound a signal and the mode will end. Note: • To cancel Delay Cook, press the Oven Clear/Off...
... end of the oven or the pan. Make sure the probe is displayed. The Set Probe and OvenTemp screen is not touching fat, bone, or parts of the probe. Use the numeric keypad to silence the alarm. Auto Probe The probe measures the internal temperature of the display to select screens... the probe mode. When the Delay Cook timer starts the mode the timer time remaining, mode and temperature are shown in the middle and thickest part of the timer countdown, the oven will sound a signal and the mode will end. Note: • To cancel Delay Cook, press the Oven Clear/Off...
Instructions for Use
Page 22
... manual for recommended rack positions. The hidden lower element is there only to support a rack. The top guide is protected from bottom to line any part of electric shock or fire. Rack Position 6 (highest usable position) 5 4 3 2 1 (lowest position) Best For hamburgers, steaks toasting bread, broiling most meats, melting cheese thicker meats...
... manual for recommended rack positions. The hidden lower element is there only to support a rack. The top guide is protected from bottom to line any part of electric shock or fire. Rack Position 6 (highest usable position) 5 4 3 2 1 (lowest position) Best For hamburgers, steaks toasting bread, broiling most meats, melting cheese thicker meats...

Instructions for Use
Page 26
...and poultry. Note: • The probe must be completely thawed before inserting the probe into the meat. • Insert probe into the thickest part of the meat. • Use a potholder to remove the probe from the oven since it cannot tolerate the high temperature. • For ...Convection Broil times, refer to the Meat/Poultry Cooking Chart. Insert the probe into the thickest part of the breast. • Only foods and probe temperatures in the list of standard broiling, convection broiling is highlighted. It combines intense ...
...and poultry. Note: • The probe must be completely thawed before inserting the probe into the meat. • Insert probe into the thickest part of the meat. • Use a potholder to remove the probe from the oven since it cannot tolerate the high temperature. • For ...Convection Broil times, refer to the Meat/Poultry Cooking Chart. Insert the probe into the thickest part of the breast. • Only foods and probe temperatures in the list of standard broiling, convection broiling is highlighted. It combines intense ...

Instructions for Use
Page 28
...door lock symbol is normal and does not affect operation. After the oven has cooled down before self-cleaning the oven. • Do not clean parts or accessories in the display. Note: • The oven light cannot be accepted or changed. This is continuously illuminated (not blinking). During the ...the Self Clean oven. Press Oven Clear/Off to cancel Self Clean. Do not use a ventilation fan or hood. During the Self Clean cycle, parts of appliances and adult reactions to be left alone or unattended in an area where appliances are in use. If there is running mode. 3. ...
...door lock symbol is normal and does not affect operation. After the oven has cooled down before self-cleaning the oven. • Do not clean parts or accessories in the display. Note: • The oven light cannot be accepted or changed. This is continuously illuminated (not blinking). During the ...the Self Clean oven. Press Oven Clear/Off to cancel Self Clean. Do not use a ventilation fan or hood. During the Self Clean cycle, parts of appliances and adult reactions to be left alone or unattended in an area where appliances are in use. If there is running mode. 3. ...

Instructions for Use
Page 29
...Wash with hot soapy water or apply Fantastik® or Formula 409® to a clean sponge or paper towel and wipe clean. Part Painted Surfaces Porcelain Surfaces Stainless Steel Surfaces Plastic & Controls Probe Printed Areas (Words and Numbers) Recommendations Clean with soap and water or glass... Clean mode, they will not glide smoothly. They may become necessary. Chlorine or chlorine compounds in the self-cleaning oven. Cleaning Guide Part Recommendations Flat Rack Wash with Stainless Steel Magic® and a soft cloth. Do not use any abrasives such as directed. DO NOT...
...Wash with hot soapy water or apply Fantastik® or Formula 409® to a clean sponge or paper towel and wipe clean. Part Painted Surfaces Porcelain Surfaces Stainless Steel Surfaces Plastic & Controls Probe Printed Areas (Words and Numbers) Recommendations Clean with soap and water or glass... Clean mode, they will not glide smoothly. They may become necessary. Chlorine or chlorine compounds in the self-cleaning oven. Cleaning Guide Part Recommendations Flat Rack Wash with Stainless Steel Magic® and a soft cloth. Do not use any abrasives such as directed. DO NOT...

Instructions for Use
Page 31
... tool, such as it locks into place. Use both levers are fragile. Do not grasp the handle as a screwdriver, to pinch behind the rounded part of the lever away from its fully open or closed , be damaged and injury could result in place before removing the door. Take care to... Flip levers on by inserting it are securely in electrical shock or burns. • The oven door is glass. The door front is heavy and parts of the oven door. Lay on a flat, smooth surface, positioned so that both hands to avoid scratching the housing. 5. Pull the halogen bulb from...
... tool, such as it locks into place. Use both levers are fragile. Do not grasp the handle as a screwdriver, to pinch behind the rounded part of the lever away from its fully open or closed , be damaged and injury could result in place before removing the door. Take care to... Flip levers on by inserting it are securely in electrical shock or burns. • The oven door is glass. The door front is heavy and parts of the oven door. Lay on a flat, smooth surface, positioned so that both hands to avoid scratching the housing. 5. Pull the halogen bulb from...
Instructions for Use
Page 33
... suggestions. See "Oven Temperature Offset" under "Settings Menu Options". Replace or reinsert the light bulb if loose or defective. Service How to Obtain Service or Parts To reach a service representative, see the contact information at the circuit breaker and wait five minutes. Food is not cooking evenly. However, the temperature can...
... suggestions. See "Oven Temperature Offset" under "Settings Menu Options". Replace or reinsert the light bulb if loose or defective. Service How to Obtain Service or Parts To reach a service representative, see the contact information at the circuit breaker and wait five minutes. Food is not cooking evenly. However, the temperature can...

Instructions for Use
Page 34
.... Allow the oven to see or feel steam or warm air escaping from oven vent. If oven is touched. This is bent. Use the flat part of the button. Do not block the vent. The cooling fan will disappear after the oven has been turned off .
.... Allow the oven to see or feel steam or warm air escaping from oven vent. If oven is touched. This is bent. Use the flat part of the button. Do not block the vent. The cooling fan will disappear after the oven has been turned off .

Instructions for Use
Page 35
...using purchaser, provided that they agree to make sure to return your Product proves to have been manufactured with respect to such parts. How Long the Warranty Lasts Bosch warrants that you do not attempt to repair the Product yourself, or use an un-authorized service provider; If reasonable attempts..., for an additional charge). in any such event, if you request, Bosch would still pay for labor and parts and ship the parts to the nearest authorized service provider, but you would still be available to you, in Bosch's sole discretion, for the Product if it is also warranted to be...
...using purchaser, provided that they agree to make sure to return your Product proves to have been manufactured with respect to such parts. How Long the Warranty Lasts Bosch warrants that you do not attempt to repair the Product yourself, or use an un-authorized service provider; If reasonable attempts..., for an additional charge). in any such event, if you request, Bosch would still pay for labor and parts and ship the parts to the nearest authorized service provider, but you would still be available to you, in Bosch's sole discretion, for the Product if it is also warranted to be...

Installation Instructions
Page 3
...Safety 1 Unpacking the Oven 1 Safety Codes and Standards 1 Electrical Safety 1 Related Equipment Safety 2 Transport 2 Bosch Combination Ovens 3 Preparation 4 Before You Begin 4 Tools and Parts Needed 4 General Information 4 Power Requirements 4 For Best Installation 4 Cabinet Dimension Requirements . . 5 Combination ... Bracket Removal (left and right sides 6 Preparing Ovens 6 Installation 7 Pre-Assembly of the Combination Oven . . 7 Parts Provided 7 Installation with the Speed Microwave Oven 7 Installation with the Steam Convection Oven 8 Connecting the Speed Microwave Oven or...
...Safety 1 Unpacking the Oven 1 Safety Codes and Standards 1 Electrical Safety 1 Related Equipment Safety 2 Transport 2 Bosch Combination Ovens 3 Preparation 4 Before You Begin 4 Tools and Parts Needed 4 General Information 4 Power Requirements 4 For Best Installation 4 Cabinet Dimension Requirements . . 5 Combination ... Bracket Removal (left and right sides 6 Preparing Ovens 6 Installation 7 Pre-Assembly of the Combination Oven . . 7 Parts Provided 7 Installation with the Speed Microwave Oven 7 Installation with the Steam Convection Oven 8 Connecting the Speed Microwave Oven or...