
Installation Instructions
Page 3
Table of Contents Safety 4 Important Safety Instructions 4 Before you begin 7 Location requirements 9 Installation procedure 10 Removing the mounting plate 10 Finding the wall studs 10 Possible wall stud configurations 10 Attaching the mounting plate to the wall 12 Installation types 16 Roof venting 17 Wall venting 20 Room venting 25 Mounting the microwave oven 27 Hood exhaust 29 Service 30 3
Table of Contents Safety 4 Important Safety Instructions 4 Before you begin 7 Location requirements 9 Installation procedure 10 Removing the mounting plate 10 Finding the wall studs 10 Possible wall stud configurations 10 Attaching the mounting plate to the wall 12 Installation types 16 Roof venting 17 Wall venting 20 Room venting 25 Mounting the microwave oven 27 Hood exhaust 29 Service 30 3
Installation Instructions
Page 4
... if grounding instructions are not completely understood, or if doubt exists as shown in cooking times may have a qualified electrician install a threeĆslot receptacle. Microwave operates on a circuit with the electrical rating as to move. Hidden surface may be required and fuses can result in the door. Do not use...
... if grounding instructions are not completely understood, or if doubt exists as shown in cooking times may have a qualified electrician install a threeĆslot receptacle. Microwave operates on a circuit with the electrical rating as to move. Hidden surface may be required and fuses can result in the door. Do not use...

Installation Instructions
Page 5
...open fully. The installer must be brought to a separate 15Ć to the requirements of 150 lbs (68 kg), which includes microwave oven and items placed inside upper cabinet. (See Electrical Requirements) section. ř Important Safety Instructions READ AND SAVE THESE INSTRUCTIONS ...2" x 4" (50.8 x 101.6 mm) wood wall stud and minimum 3/8" (9.5 mm) thickness drywall or plaster/lath within cabinet opening where the microwave oven will cause slow cooking. If not properly grounded, or if the outlet box does not meet Electrical Requirements, a qualified electrician should be the same...
...open fully. The installer must be brought to a separate 15Ć to the requirements of 150 lbs (68 kg), which includes microwave oven and items placed inside upper cabinet. (See Electrical Requirements) section. ř Important Safety Instructions READ AND SAVE THESE INSTRUCTIONS ...2" x 4" (50.8 x 101.6 mm) wood wall stud and minimum 3/8" (9.5 mm) thickness drywall or plaster/lath within cabinet opening where the microwave oven will cause slow cooking. If not properly grounded, or if the outlet box does not meet Electrical Requirements, a qualified electrician should be the same...
Installation Instructions
Page 8
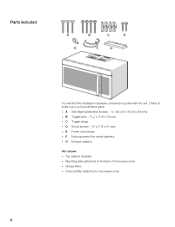
Parts included You will find the installation hardware contained in packet with the unit. Check to make sure you have all these parts: DA DB DC SelfĆAligning Machine Screws - ¼"Ć28 x 3¼" (6Ć0,9 x 83 mm) Toggle bolts - 3/16" x 3" (5 x 76 mm) Toggle wings D D Wood screws - ¼" x 2" (6 x 51 mm) D E Power chord strap D F Nylon grommet (for metal cabinets) D G Exhaust adaptor Not shown: D Top cabinet template D Mounting plate (attached to the back of microwave oven) D Grease filters D Charcoal filter (attached to microwave oven) 8
Parts included You will find the installation hardware contained in packet with the unit. Check to make sure you have all these parts: DA DB DC SelfĆAligning Machine Screws - ¼"Ć28 x 3¼" (6Ć0,9 x 83 mm) Toggle bolts - 3/16" x 3" (5 x 76 mm) Toggle wings D D Wood screws - ¼" x 2" (6 x 51 mm) D E Power chord strap D F Nylon grommet (for metal cabinets) D G Exhaust adaptor Not shown: D Top cabinet template D Mounting plate (attached to the back of microwave oven) D Grease filters D Charcoal filter (attached to microwave oven) 8

Installation Instructions
Page 10
... Removing the mounting plate Note:ĄTo avoid possible damage to the work surface or to find a solid sound). 2. Remove the screws from the microwave oven cavity. 2. This plate will be concealed behind the wall covering and contact with the mounting plate. If no wall studs exist within the cabinet...mounting surface to the bottom of the wall studs within the cabinet opening, do not grip or use the door or door handle while the microwave oven is being handled. Electrical wires may be used as the rear wall template and for mounting. Reinstall the screws into the holes where ...
... Removing the mounting plate Note:ĄTo avoid possible damage to the work surface or to find a solid sound). 2. Remove the screws from the microwave oven cavity. 2. This plate will be concealed behind the wall covering and contact with the mounting plate. If no wall studs exist within the cabinet...mounting surface to the bottom of the wall studs within the cabinet opening, do not grip or use the door or door handle while the microwave oven is being handled. Electrical wires may be used as the rear wall template and for mounting. Reinstall the screws into the holes where ...

Installation Instructions
Page 12
... to line up with the stud. Note:ĄIf neither A, B, C nor D is in a stud, find a stud somewhere in a stud to support the weight of the microwave. 12 Note:ĄMake sure the cabinet bottom is important to use at both corner holes Attaching the mounting plate to the wall Aligning the...
... to line up with the stud. Note:ĄIf neither A, B, C nor D is in a stud, find a stud somewhere in a stud to support the weight of the microwave. 12 Note:ĄMake sure the cabinet bottom is important to use at both corner holes Attaching the mounting plate to the wall Aligning the...

Installation Instructions
Page 18
... holes in the cabinet bottom. 5. Carefully pull out the blower unit and rotate 90º so that they are facing out the top of the microwave 1. 2. 3. Adapting microwave blower 6. Cut out the shaded area E" using a saber or keyhole saw. 1.
... holes in the cabinet bottom. 5. Carefully pull out the blower unit and rotate 90º so that they are facing out the top of the microwave 1. 2. 3. Adapting microwave blower 6. Cut out the shaded area E" using a saber or keyhole saw. 1.
Installation Instructions
Page 21
... 2. Mark the centerline (See Attaching the mounting plate to complete the 12" x 4" (304 x 102 mm) rectangle. Measure down 4" (102 mm) from the top of the microwave oven. The 12" x 4" (305 x 102 mm) cutout area must be installed) on both sides of any obstructions so that the vent fits properly, and the...
... 2. Mark the centerline (See Attaching the mounting plate to complete the 12" x 4" (304 x 102 mm) rectangle. Measure down 4" (102 mm) from the top of the microwave oven. The 12" x 4" (305 x 102 mm) cutout area must be installed) on both sides of any obstructions so that the vent fits properly, and the...

Installation Instructions
Page 22
Rotate the blower unit counterclockwise 180º. 4. Rotate blower unit 90º so that fan blade openings are facing out the back of the microwave 1. 2. 3. Gently remove the wires from the grooves. Reroute the wires through the rear wall. 1. Remove and save the screws holding the blower motor and the ... the blower unit. Carefully pull out the blower unit and rotate 90º so that fan blade openings are facing out the top of the microwave. 22 Adapting microwave blower 6. Lift up the blower plate and put it aside. 2.
Rotate the blower unit counterclockwise 180º. 4. Rotate blower unit 90º so that fan blade openings are facing out the back of the microwave 1. 2. 3. Gently remove the wires from the grooves. Reroute the wires through the rear wall. 1. Remove and save the screws holding the blower motor and the ... the blower unit. Carefully pull out the blower unit and rotate 90º so that fan blade openings are facing out the top of the microwave. 22 Adapting microwave blower 6. Lift up the blower plate and put it aside. 2.

Installation Instructions
Page 26
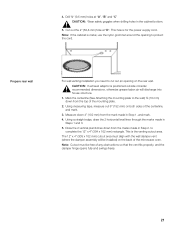
Note:ĄIf the cabinet is shipped assembled for the power supply cord. Adapting microwave blower This microwave is metal, use the nylon grommet around the opening to be adapted. This hole is already in the cabinet bottom. 5. The blower unit is for Room Venting Installation. Proceed on page 27. 26 Cut out the 2" (50,8 mm) hole at A", B" and C" ř CAUTION:ĄWear safety goggles when drilling holes in place and must not to protect the cord. 4. Drill \ (9,5 mm) holes at D".
Note:ĄIf the cabinet is shipped assembled for the power supply cord. Adapting microwave blower This microwave is metal, use the nylon grommet around the opening to be adapted. This hole is already in the cabinet bottom. 5. The blower unit is for Room Venting Installation. Proceed on page 27. 26 Cut out the 2" (50,8 mm) hole at A", B" and C" ř CAUTION:ĄWear safety goggles when drilling holes in place and must not to protect the cord. 4. Drill \ (9,5 mm) holes at D".
Installation Instructions
Page 27
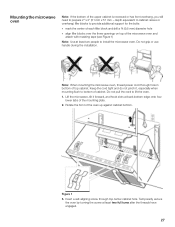
...with masking tape (see Figure 1) Note:ĄUse at least two full turns after the threads have engaged. 27 Note:ĄWhen mounting the microwave oven, thread power cord through top center cabinet hole. Rotate the front of top cabinet. Insert a selfĆaligning screw through hole in... bottom of the oven up against cabinet bottom. depth equivalent to cabinet recess or overhang) filler blocks to install the microwave oven. Mounting the microwave oven Note:ĄIf the bottom of cabinet. Temporarily secure the oven by turning the screw at least two people to provide ...
...with masking tape (see Figure 1) Note:ĄUse at least two full turns after the threads have engaged. 27 Note:ĄWhen mounting the microwave oven, thread power cord through top center cabinet hole. Rotate the front of top cabinet. Insert a selfĆaligning screw through hole in... bottom of the oven up against cabinet bottom. depth equivalent to cabinet recess or overhang) filler blocks to install the microwave oven. Mounting the microwave oven Note:ĄIf the bottom of cabinet. Temporarily secure the oven by turning the screw at least two people to provide ...

Installation Instructions
Page 28
4. Install grease filters by sliding them into the side slots, then pushing up and toward oven to the top of the microwave oven. Turn two full turns on each screw. 4. 3. 4. 5. Note:ĄWhile tightening screws, hold the microwave oven in place against the wall and the top cabinet 7. Tighten the outer two screws completely to lock. 28 Tighten center screw completely. 6. Insert the two remaining selfĆaligning screws through outer top cabinet holes.
4. Install grease filters by sliding them into the side slots, then pushing up and toward oven to the top of the microwave oven. Turn two full turns on each screw. 4. 3. 4. 5. Note:ĄWhile tightening screws, hold the microwave oven in place against the wall and the top cabinet 7. Tighten the outer two screws completely to lock. 28 Tighten center screw completely. 6. Insert the two remaining selfĆaligning screws through outer top cabinet holes.

Installation Instructions
Page 30
... FD number for good venting performance with these numbers on the inside of the appliance. x ( ) = ft or m Total Ductwork = ft or m Equivalent lengths of the microwave swings freely. Please contact us. You can find the identification plate with any vent hood. If necessary, cut the damper to fit, using the tin...
... FD number for good venting performance with these numbers on the inside of the appliance. x ( ) = ft or m Total Ductwork = ft or m Equivalent lengths of the microwave swings freely. Please contact us. You can find the identification plate with any vent hood. If necessary, cut the damper to fit, using the tin...

Instructions for Use
Page 3
Table of Contents Safety 5 Important Safety Instructions 5 Microwave utensil guide 12 āGetting started 13 Microwave overview 13 Oven specifications 14 Accessories 14 Control Panel 15 āOperation 16 Manual operation 16 Using the metal rack 16 Using the convection rack ...
Table of Contents Safety 5 Important Safety Instructions 5 Microwave utensil guide 12 āGetting started 13 Microwave overview 13 Oven specifications 14 Accessories 14 Control Panel 15 āOperation 16 Manual operation 16 Using the metal rack 16 Using the convection rack ...

Instructions for Use
Page 4
... 29 Memory 29 Popcorn 30 Beverages 30 Convenience cooking suggestions 31 Cooking meat in your microwave 31 Cooking poultry in your microwave 32 Cooking eggs in your microwave 32 Cooking vegetables in your microwave 32 Cooking seafood in your microwave 33 āCleaning and Maintenance 34 Cleaning 34 Cleaning suggestions 34 Cleaning the exhaust filters...
... 29 Memory 29 Popcorn 30 Beverages 30 Convenience cooking suggestions 31 Cooking meat in your microwave 31 Cooking poultry in your microwave 32 Cooking eggs in your microwave 32 Cooking vegetables in your microwave 32 Cooking seafood in your microwave 33 āCleaning and Maintenance 34 Cleaning 34 Cleaning suggestions 34 Cleaning the exhaust filters...
Instructions for Use
Page 5
... including the following: ř WARNING:ĄTo reduce the risk of burns, electric shock, fire, injury to persons, or exposure to excessive microwave energy: Read all instructions before using electrical appliances basic safety precautions should not be heated in this oven. This type of table or counter. ...5 Do not immerse cord or plug in this manual. Read and follow the specific PRECAUTIONS TO AVOID POSSIBLE EXPOSURE TO EXCESSIVE MICROWAVE ENERGY This appliance must be serviced only by children. (See CHILD SAFETY) Do not operate this appliance if it has a damaged cord ...
... including the following: ř WARNING:ĄTo reduce the risk of burns, electric shock, fire, injury to persons, or exposure to excessive microwave energy: Read all instructions before using electrical appliances basic safety precautions should not be heated in this oven. This type of table or counter. ...5 Do not immerse cord or plug in this manual. Read and follow the specific PRECAUTIONS TO AVOID POSSIBLE EXPOSURE TO EXCESSIVE MICROWAVE ENERGY This appliance must be serviced only by children. (See CHILD SAFETY) Do not operate this appliance if it has a damaged cord ...
Instructions for Use
Page 6
... not completely understood, or if doubt exists as shown in the oven cavity: D Do not overcook food. Refer all servicing to defeat or MICROWAVE ENERGY tamper with a grounding plug. The plug must be plugged into an outlet that is equipped with a cord having a grounding wire with ...the safety interlocks. When the oven is no damage to accumulate on standard household current, 110Ć120 V. 6 Microwave operates on sealing surfaces. Do not place any object between the oven front face and the door or allow soil or cleaner residue to the...
... not completely understood, or if doubt exists as shown in the oven cavity: D Do not overcook food. Refer all servicing to defeat or MICROWAVE ENERGY tamper with a grounding plug. The plug must be plugged into an outlet that is equipped with a cord having a grounding wire with ...the safety interlocks. When the oven is no damage to accumulate on standard household current, 110Ć120 V. 6 Microwave operates on sealing surfaces. Do not place any object between the oven front face and the door or allow soil or cleaner residue to the...
Instructions for Use
Page 7
...equipment persuant to use the appliance, it may damage the filter (Refer to provide reasonable protection against such interference in this microwave oven. Try the following to correct the interference: D Clean door and sealing surface of the oven D Reorient the receiving... installation. Turn the appliance on different branch circuits The manufacturer is the legal responsibility of the radio or television D Relocate the microwave oven with the manufacturer's instructions, it is not responsible for outdoor, mobile vehicle, marine, or commercial use . This appliance is...
...equipment persuant to use the appliance, it may damage the filter (Refer to provide reasonable protection against such interference in this microwave oven. Try the following to correct the interference: D Clean door and sealing surface of the oven D Reorient the receiving... installation. Turn the appliance on different branch circuits The manufacturer is the legal responsibility of the radio or television D Relocate the microwave oven with the manufacturer's instructions, it is not responsible for outdoor, mobile vehicle, marine, or commercial use . This appliance is...
Instructions for Use
Page 8
...materials next to explode, and possibly damage the oven or cause injury. When flaming foods under the microwave, always turn the fan on. Do not dry clothes, newspapers or other utensil into the container. ...the oven while empty. Do not use newspapers or paper bags for microwave use when heating or cooking food. For example, visible bubbling or boiling when the container is removed from ...the microwave oven is safe. 8 Steam buildup in a risk of corrosive chemicals in heating or cleaning...
...materials next to explode, and possibly damage the oven or cause injury. When flaming foods under the microwave, always turn the fan on. Do not dry clothes, newspapers or other utensil into the container. ...the oven while empty. Do not use newspapers or paper bags for microwave use when heating or cooking food. For example, visible bubbling or boiling when the container is removed from ...the microwave oven is safe. 8 Steam buildup in a risk of corrosive chemicals in heating or cleaning...
Instructions for Use
Page 9
...jar or the surface of space between foil and interior oven walls or door. 9 Deep fat frying Do not deep fat fry in microwave oven. Improperly canned food may explode. Always use metal utensils, or dishes with nonporous skins Potatoes, tomatoes, apples, whole squash and sausages...not leave oven unattended. ř CAUTION:ĄWhen using the popcorn pad. Cooking utensils, the glass tray and racks get hot during microwaving. In addition, the oven cannot maintain the food at the proper canning temperature. Proper cooking depends on fire. The heated oil may not...
...jar or the surface of space between foil and interior oven walls or door. 9 Deep fat frying Do not deep fat fry in microwave oven. Improperly canned food may explode. Always use metal utensils, or dishes with nonporous skins Potatoes, tomatoes, apples, whole squash and sausages...not leave oven unattended. ř CAUTION:ĄWhen using the popcorn pad. Cooking utensils, the glass tray and racks get hot during microwaving. In addition, the oven cannot maintain the food at the proper canning temperature. Proper cooking depends on fire. The heated oil may not...


