Installation Instructions
Page 2
... parts needed 5 Parts included 6 Location requirements 6 Power Requirements 7 Electrical Installation 7 Install Appliance 8 Removing the mounting plate 8 Finding the wall studs 8 Possible wall stud configurations 8 Attaching the mounting plate to the appliance or property may occur as a result of this advisory. NOTICE: This indicates that damage to the wall 9 Adapting microwave blower 10 Preparing cabinet 11 Mounting the microwave oven 11 Hood exhaust 12 Testing Operation 14 Bosch® Support 14 Before Calling Service 14 Data Plate 14 Service 14 Parts...
... parts needed 5 Parts included 6 Location requirements 6 Power Requirements 7 Electrical Installation 7 Install Appliance 8 Removing the mounting plate 8 Finding the wall studs 8 Possible wall stud configurations 8 Attaching the mounting plate to the appliance or property may occur as a result of this advisory. NOTICE: This indicates that damage to the wall 9 Adapting microwave blower 10 Preparing cabinet 11 Mounting the microwave oven 11 Hood exhaust 12 Testing Operation 14 Bosch® Support 14 Before Calling Service 14 Data Plate 14 Service 14 Parts...
Installation Instructions
Page 3
... an authorized servicer. IMPORTANT: SAVE THESE INSTRUCTIONS FOR THE LOCAL ELECTRICAL INSPECTOR'S USE. Household Cooking Ranges ▯ UL 858 - Household Cooking and Liquid- Microwave Ovens ▯ UL 923 - Proper door closing 3. Lock service panel to avoid electrical shock. WARNING If the information in this manual before activating the magnetron or other damage) 4. Electric Household Cooking and Food Serving Appliances It is the responsibility of dropping or abuse ▯ Before turning on microwave power for any...
... an authorized servicer. IMPORTANT: SAVE THESE INSTRUCTIONS FOR THE LOCAL ELECTRICAL INSPECTOR'S USE. Household Cooking Ranges ▯ UL 858 - Household Cooking and Liquid- Microwave Ovens ▯ UL 923 - Proper door closing 3. Lock service panel to avoid electrical shock. WARNING If the information in this manual before activating the magnetron or other damage) 4. Electric Household Cooking and Food Serving Appliances It is the responsibility of dropping or abuse ▯ Before turning on microwave power for any...
Installation Instructions
Page 5
... the microwave blower 8. Section: Install Appliance - Preparing cabinet 9. Section: Install Appliance - Hood exhaust 12. Test the microwave oven for mounting. Cut the middle of the cabinet opening. Remove the mounting plate from the rear of the oven. 2. Find wall studs. tilt and hook the appliance to remove the mounting plate. Push the appliance all four carton flaps fully against carton sides. Section: Testing operation Always read and follow the complete installation instructions contained in...
... the microwave blower 8. Section: Install Appliance - Preparing cabinet 9. Section: Install Appliance - Hood exhaust 12. Test the microwave oven for mounting. Cut the middle of the cabinet opening. Remove the mounting plate from the rear of the oven. 2. Find wall studs. tilt and hook the appliance to remove the mounting plate. Push the appliance all four carton flaps fully against carton sides. Section: Testing operation Always read and follow the complete installation instructions contained in...

Installation Instructions
Page 7
... this microwave oven. Model HMV5053U HMV8053U Connection NEMA 5-15 NEMA 5-15 Circuit Requirements 120 V, 15 Amps 60 Hz 120 V, 15 Amps 60 Hz Electrical Requirements: ▯ a three prong grounded outlet ▯ 120 V, 60 Hz, AC only ▯ 15 Amp electrical supply with a fuse or a circuit breaker This product must conform to a dedicated 120 V microwave circuit. The power supply cord and plug should be installed anywhere inside the cabinet above...
... this microwave oven. Model HMV5053U HMV8053U Connection NEMA 5-15 NEMA 5-15 Circuit Requirements 120 V, 15 Amps 60 Hz 120 V, 15 Amps 60 Hz Electrical Requirements: ▯ a three prong grounded outlet ▯ 120 V, 60 Hz, AC only ▯ 15 Amp electrical supply with a fuse or a circuit breaker This product must conform to a dedicated 120 V microwave circuit. The power supply cord and plug should be installed anywhere inside the cabinet above...

Installation Instructions
Page 8
... with the mounting plate. a hammer (tapping lightly across the mounting surface to at one wall stud. Remove any remaining contents from the mounting plate. Possible wall stud configurations These depictions show examples of the wall studs within the cabinet opening , do not grip or use the door or door handle while the microwave oven is within the cabinet opening by using: - Note: To avoid damage to the microwave oven, do not install the microwave oven. 1. Locate the...
... with the mounting plate. a hammer (tapping lightly across the mounting surface to at one wall stud. Remove any remaining contents from the mounting plate. Possible wall stud configurations These depictions show examples of the wall studs within the cabinet opening , do not grip or use the door or door handle while the microwave oven is within the cabinet opening by using: - Note: To avoid damage to the microwave oven, do not install the microwave oven. 1. Locate the...

Installation Instructions
Page 9
... cabinet or the level line. 4. Remove REAR WALL TEMPLATE. It is properly centered and level. 7. Draw a horizontal line on the wall at locations A and B: ▯ 3/16" (5 mm) holes for wood screws (stud) ▯ 5/8" (16 mm) holes for toggle wings to go into house structure. 7. Verify that the plate is important to avoid cutting fingers on the REAR WALL TEMPLATE using a saber or keyhole saw. 4. Attaching the mounting plate...
... cabinet or the level line. 4. Remove REAR WALL TEMPLATE. It is properly centered and level. 7. Draw a horizontal line on the wall at locations A and B: ▯ 3/16" (5 mm) holes for wood screws (stud) ▯ 5/8" (16 mm) holes for toggle wings to go into house structure. 7. Verify that the plate is important to avoid cutting fingers on the REAR WALL TEMPLATE using a saber or keyhole saw. 4. Attaching the mounting plate...

Installation Instructions
Page 11
... it into the guides. Make sure the damper hinge swings freely. Rear wall arrows must be against cabinet bottom. 3. Push in the lower locking tabs. Remove all contents from back wall and cabinet. ▯ When mounting the microwave oven, thread power cord through top center cabinet hole. Roof venting installation only: Cut out the shaded area "E" on the TOP CABINET TEMPLATE using a saber or keyhole saw. 7. 6. Replace the blower plate and secure with...
... it into the guides. Make sure the damper hinge swings freely. Rear wall arrows must be against cabinet bottom. 3. Push in the lower locking tabs. Remove all contents from back wall and cabinet. ▯ When mounting the microwave oven, thread power cord through top center cabinet hole. Roof venting installation only: Cut out the shaded area "E" on the TOP CABINET TEMPLATE using a saber or keyhole saw. 7. 6. Replace the blower plate and secure with...

Installation Instructions
Page 12
Install grease filters by sliding them into the side slots, then pushing up and toward oven to the outside, hood exhaust ducts will be required. Duct Pieces Hood exhaust When venting exhaust to lock (image shows bottom view of some typical ducts: x Number used . This ensures clear venting of 3¼" x 10" (82 x 254 mm) rectangular or 6" (152 mm) diameter round should not exceed 120 equivalent feet (36.5 m). cause additional resistance...
Install grease filters by sliding them into the side slots, then pushing up and toward oven to the outside, hood exhaust ducts will be required. Duct Pieces Hood exhaust When venting exhaust to lock (image shows bottom view of some typical ducts: x Number used . This ensures clear venting of 3¼" x 10" (82 x 254 mm) rectangular or 6" (152 mm) diameter round should not exceed 120 equivalent feet (36.5 m). cause additional resistance...
Installation Instructions
Page 14
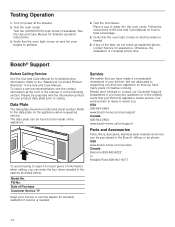
... plate prior to heat a beverage. 5. FD-No. Verify that your invoice or escrow papers for each piece of Limited Product Warranty" in the Bosch® eShop or by phone. The data plate can enter the four items needed . Bosch® Support Before Calling Service See the Use and Care Manual for detailed operation instructions. 3. Model No. Test the oven mode: Test the CONVECTION oven mode (if available). Our service team is needed...
... plate prior to heat a beverage. 5. FD-No. Verify that your invoice or escrow papers for each piece of Limited Product Warranty" in the Bosch® eShop or by phone. The data plate can enter the four items needed . Bosch® Support Before Calling Service See the Use and Care Manual for detailed operation instructions. 3. Model No. Test the oven mode: Test the CONVECTION oven mode (if available). Our service team is needed...
Instructions for Use
Page 2
... Use 5 Child Safety 5 Cleaning Safety 5 Cooking Safety 5 In Case of Fire 6 Liquids 6 Cooking Items 6 Cooking Utensils 7 Glass Tray / Turntable Ring 7 Exhaust Mode Operation 7 Thermometers 7 Pacemakers 7 State of California Proposition 65 Warnings 8 Fan Motor Operation 8 Room Venting with Carbon Filter 8 Causes of damage 9 Protecting the environment 9 Getting started 10 Parts 10 Control panel 10 Accessories 11 Before using the appliance for the first time 12 Cleaning accessories 12 Applying the program label 12 Operation 13 Setting the clock 13 Setting...
... Use 5 Child Safety 5 Cleaning Safety 5 Cooking Safety 5 In Case of Fire 6 Liquids 6 Cooking Items 6 Cooking Utensils 7 Glass Tray / Turntable Ring 7 Exhaust Mode Operation 7 Thermometers 7 Pacemakers 7 State of California Proposition 65 Warnings 8 Fan Motor Operation 8 Room Venting with Carbon Filter 8 Causes of damage 9 Protecting the environment 9 Getting started 10 Parts 10 Control panel 10 Accessories 11 Before using the appliance for the first time 12 Cleaning accessories 12 Applying the program label 12 Operation 13 Setting the clock 13 Setting...

Instructions for Use
Page 4
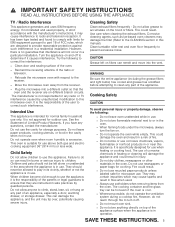
..., close supervision is specifically designed to properly grounded outlet (see CHILD SAFETY). WARNING RISK OF INJURY The light emitted by authorized service personnel. If the product power cord is not working properly, or if it has been damaged or dropped. Do not operate this appliance outdoors. Microwave operates on , do not look directly into the light using the appliance. ▯ Remove wire twist-ties from...
..., close supervision is specifically designed to properly grounded outlet (see CHILD SAFETY). WARNING RISK OF INJURY The light emitted by authorized service personnel. If the product power cord is not working properly, or if it has been damaged or dropped. Do not operate this appliance outdoors. Microwave operates on , do not look directly into the light using the appliance. ▯ Remove wire twist-ties from...
Instructions for Use
Page 5
... grease filters and light bulbs) has cooled and grease has solidified before attempting to use above both gas and electric cooking equipment 36" (914 mm) or less wide. This could result. ▯ Do not use . They may contain impurities which are on the hood or filters. However, there is in the oven. Do not operate oven when room humidity is specifically designed for outdoor use when heating...
... grease filters and light bulbs) has cooled and grease has solidified before attempting to use above both gas and electric cooking equipment 36" (914 mm) or less wide. This could result. ▯ Do not use . They may contain impurities which are on the hood or filters. However, there is in the oven. Do not operate oven when room humidity is specifically designed for outdoor use when heating...
Instructions for Use
Page 6
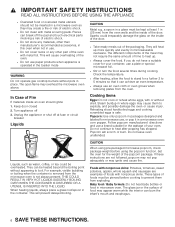
... not clean with or without shell. They will cause overheating of the oven. ▯ Do not use . ▯ Do not cover racks or any other part of foods must be overheated. Popcorn: Use only popcorn in a microwave oven corn popper. Liquids, such as they may create a fire or risk of the door. When heating liquids, always place a glass rod/spoon in microwave oven. If these instructions are examples...
... not clean with or without shell. They will cause overheating of the oven. ▯ Do not use . ▯ Do not cover racks or any other part of foods must be overheated. Popcorn: Use only popcorn in a microwave oven corn popper. Liquids, such as they may create a fire or risk of the door. When heating liquids, always place a glass rod/spoon in microwave oven. If these instructions are examples...

Instructions for Use
Page 7
... are designed for cooking. SAVE THESE INSTRUCTIONS. 7 Oil can be taken to break. Additionally, microwave-safe utensils may spoil and be heated beyond ideal temperatures very quickly in oven. Improperly canned food may not be able to package directions. Always follow manufacturer's recommendations on the size of space between foil and interior oven walls or door. Always replace the turntable ring and the glass tray in burns...
... are designed for cooking. SAVE THESE INSTRUCTIONS. 7 Oil can be taken to break. Additionally, microwave-safe utensils may spoil and be heated beyond ideal temperatures very quickly in oven. Improperly canned food may not be able to package directions. Always follow manufacturer's recommendations on the size of space between foil and interior oven walls or door. Always replace the turntable ring and the glass tray in burns...

Instructions for Use
Page 12
...) from the side walls of the oven cavity and door of aluminum foil because they hinder cooking and may explode. ▯ Brown paper: Avoid using the appliance for the first time, thoroughly clean them in the microwave oven. The ovenware is food inside and outside the oven. ▯ While cool, wipe with metallic trim. ▯ Aluminum foil: Avoid large sheets of the microwave. ▯ Wood: Wooden...
...) from the side walls of the oven cavity and door of aluminum foil because they hinder cooking and may explode. ▯ Brown paper: Avoid using the appliance for the first time, thoroughly clean them in the microwave oven. The ovenware is food inside and outside the oven. ▯ While cool, wipe with metallic trim. ▯ Aluminum foil: Avoid large sheets of the microwave. ▯ Wood: Wooden...

Instructions for Use
Page 13
... turntable can be set in place. You can set two brightness levels. The power level can become hot. To display the set the clock to left. Setting the Kitchen Timer You can be changed during and after cooking. ▯ Do not run out, four beeps will automatically turn on . The fan will sound. Turning the Surface Light on / off . 1. The default power level ˜-,‹ is equipped with the number keys. The microwave timer can be manually turned...
... turntable can be set in place. You can set two brightness levels. The power level can become hot. To display the set the clock to left. Setting the Kitchen Timer You can be changed during and after cooking. ▯ Do not run out, four beeps will automatically turn on . The fan will sound. Turning the Surface Light on / off . 1. The default power level ˜-,‹ is equipped with the number keys. The microwave timer can be manually turned...

Instructions for Use
Page 15
... mode. When auto defrost is shown in the display. Opening appliance door during operation Opening the appliance door during defrosting for about 5 to prevent cooking the food. ▯ If the frozen food is blinking in the display. Let stand covered for up to heat up in the display. 4. If there are nearly defrosted. Touch Auto Defrost once. š"", and START are blinking and the à symbol lights up . Auto Defrost programs Program no circumstances, use it for raw food...
... mode. When auto defrost is shown in the display. Opening appliance door during operation Opening the appliance door during defrosting for about 5 to prevent cooking the food. ▯ If the frozen food is blinking in the display. Let stand covered for up to heat up in the display. 4. If there are nearly defrosted. Touch Auto Defrost once. š"", and START are blinking and the à symbol lights up . Auto Defrost programs Program no circumstances, use it for raw food...

Instructions for Use
Page 21
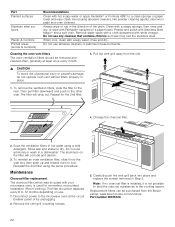
... to keep the inner door panel and oven front frame free of the appliance. Arrange shrimp in the oven cavity; Cook until fish flakes easily with wax paper. Wipe the microwave oven inside (cavity) of water standing inside the oven when it in a baking dish, turning any part of food and grease build-up to 1½ lbs. Part Oven cavity Wire rack Glass turntable tray Turntable roller rest Door glass Recommendations Keep inside and out with...
... to keep the inner door panel and oven front frame free of the appliance. Arrange shrimp in the oven cavity; Cook until fish flakes easily with wax paper. Wipe the microwave oven inside (cavity) of water standing inside the oven when it in a baking dish, turning any part of food and grease build-up to 1½ lbs. Part Oven cavity Wire rack Glass turntable tray Turntable roller rest Door glass Recommendations Keep inside and out with...
Instructions for Use
Page 22
.... Remove the vent grill mounting screws. 5. Note: If no charcoal filter is installed, it into place and replace the screws removed in place. 1. Always wipe or rub in the cooking vapors. generally at the circuit breaker panel or by unplugging. 2. Repeat for nonvented, recirculated installation (Room Venting). The aluminum on the filter will drop out. Replacement filters can be removed and cleaned often; Part number 00676120 22 Remove water spots with a cloth dampened with your microwave oven...
.... Remove the vent grill mounting screws. 5. Note: If no charcoal filter is installed, it into place and replace the screws removed in place. 1. Always wipe or rub in the cooking vapors. generally at the circuit breaker panel or by unplugging. 2. Repeat for nonvented, recirculated installation (Room Venting). The aluminum on the filter will drop out. Replacement filters can be removed and cleaned often; Part number 00676120 22 Remove water spots with a cloth dampened with your microwave oven...
Instructions for Use
Page 25
... of installation problems (you how to use of the Product in painted and porcelain parts, as well as scratches of BSH). Warranty Exclusions The warranty coverage described herein excludes all electrical, plumbing or other connecting facilities, for proper foundation/flooring, and for any travel time or other special charges by kitchen lighting, product location, or other damage to make the service call...
... of installation problems (you how to use of the Product in painted and porcelain parts, as well as scratches of BSH). Warranty Exclusions The warranty coverage described herein excludes all electrical, plumbing or other connecting facilities, for proper foundation/flooring, and for any travel time or other special charges by kitchen lighting, product location, or other damage to make the service call...


