Installation Instructions
Page 2
... forward to hearing from you Begin 3 Trim Kits 3 Combination with Wall Ovens 3 Tools and Parts Needed 3 Parts Included 4 Power Requirements 4 Cabinet Cutout Dimensions 5 Outlet Area 5 Installation Procedure 6 Prepare the Appliance 6 Prepare Cabinet Cutout 8 Connect to Electricity 9 Install the Appliance 10 Service 11 Before Calling Service 11 Data Plate 11 This Bosch Appliance is made by BSH Home Appliances Corporation 5551 McFadden Ave. Table of Contents Safety 1 Important Safety Instructions 1 Important Safety Instructions 2 Installation 3 Before you !
... forward to hearing from you Begin 3 Trim Kits 3 Combination with Wall Ovens 3 Tools and Parts Needed 3 Parts Included 4 Power Requirements 4 Cabinet Cutout Dimensions 5 Outlet Area 5 Installation Procedure 6 Prepare the Appliance 6 Prepare Cabinet Cutout 8 Connect to Electricity 9 Install the Appliance 10 Service 11 Before Calling Service 11 Data Plate 11 This Bosch Appliance is made by BSH Home Appliances Corporation 5551 McFadden Ave. Table of Contents Safety 1 Important Safety Instructions 1 Important Safety Instructions 2 Installation 3 Before you !
Installation Instructions
Page 3
...-M89 Household Cooking Ranges It is complete. Read all controls are in the manuals. This is any part of the owner and the installer to determine if additional requirements and/or standards apply to persons. It must be plugged into the wall until after the installation is the responsibility of the appliance unless specifically recommended in the OFF position. Use caution when...
...-M89 Household Cooking Ranges It is complete. Read all controls are in the manuals. This is any part of the owner and the installer to determine if additional requirements and/or standards apply to persons. It must be plugged into the wall until after the installation is the responsibility of the appliance unless specifically recommended in the OFF position. Use caution when...
Installation Instructions
Page 4
..., do not remove leveling legs, panels, wire covers or anti-tip brackets/screws. This appliance is released to the owner. (e) A microwave leakage check to verify compliance with the Federal Performance Standard should be performed on microwave power for any service test or inspection within the microwave generating compartments, check the magnetron, wave guide or transmission line, and cavity for the electric current. WARNING: Improper use an extension cord. English...
..., do not remove leveling legs, panels, wire covers or anti-tip brackets/screws. This appliance is released to the owner. (e) A microwave leakage check to verify compliance with the Federal Performance Standard should be performed on microwave power for any service test or inspection within the microwave generating compartments, check the magnetron, wave guide or transmission line, and cavity for the electric current. WARNING: Improper use an extension cord. English...
Installation Instructions
Page 5
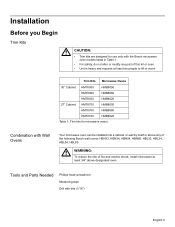
... Drill with the Bosch microwave oven models listed in Table 1. • For safety, do not alter or modify any of this kit or oven. • Unit is heavy and requires at least 3/4" above designated oven. Installation Before you Begin Trim Kits m CAUTION: • Trim kits are designed for microwave ovens. Combination with Wall Ovens Your microwave oven can be installed into a cabinet or wall by itself or above any part of the following Bosch wall ovens: HBN33, HBN34...
... Drill with the Bosch microwave oven models listed in Table 1. • For safety, do not alter or modify any of this kit or oven. • Unit is heavy and requires at least 3/4" above designated oven. Installation Before you Begin Trim Kits m CAUTION: • Trim kits are designed for microwave ovens. Combination with Wall Ovens Your microwave oven can be installed into a cabinet or wall by itself or above any part of the following Bosch wall ovens: HBN33, HBN34...

Use & Care Manual (all languages)
Page 4
... or tamper with the door open since openĆdoor operation can ensure your safety while using your warranty. D The Service section includes troubleshooting tips and your appliance, be adjusted or repaired by anyone except properly qualified service personnel. 4 It is particularly important that the oven door close properly and that can result in harmful exposure to microwave energy. D The Cleaning and Maintenance section describes...
... or tamper with the door open since openĆdoor operation can ensure your safety while using your warranty. D The Service section includes troubleshooting tips and your appliance, be adjusted or repaired by anyone except properly qualified service personnel. 4 It is particularly important that the oven door close properly and that can result in harmful exposure to microwave energy. D The Cleaning and Maintenance section describes...
Use & Care Manual (all languages)
Page 5
...; IMPORTANT SAFETY INSTRUCTIONS READ AND SAVE THESE INSTRUCTIONS When using the appliance. Read and follow the specific PRECAUTIONS TO AVOID POSSIBLE EXPOSURE TO EXCESSIVE MICROWAVE ENERGY" found on closing the door, use of burns, electric shock, fire, injury to persons, or exposure to heat, or cook food. Install or locate this appliance, unless closely supervised by qualified service personnel. for example, closed glass jars - This...
...; IMPORTANT SAFETY INSTRUCTIONS READ AND SAVE THESE INSTRUCTIONS When using the appliance. Read and follow the specific PRECAUTIONS TO AVOID POSSIBLE EXPOSURE TO EXCESSIVE MICROWAVE ENERGY" found on closing the door, use of burns, electric shock, fire, injury to persons, or exposure to heat, or cook food. Install or locate this appliance, unless closely supervised by qualified service personnel. for example, closed glass jars - This...
Use & Care Manual (all languages)
Page 6
... sparks and result in the microwave oven for cooking. D After heating, allow the container to boil. For example, visible bubbling or boiling when the container is not always present. D Stir the liquid both before removing. Do not use straight sided containers with , or make any adjustments or repairs to Door, Control Panel Frame, Safety Interlock Switches, or any other utensil into...
... sparks and result in the microwave oven for cooking. D After heating, allow the container to boil. For example, visible bubbling or boiling when the container is not always present. D Stir the liquid both before removing. Do not use straight sided containers with , or make any adjustments or repairs to Door, Control Panel Frame, Safety Interlock Switches, or any other utensil into...
Use & Care Manual (all languages)
Page 7
... very hot after removing the cooking container from the oven while the fan operates. 7 The Roller Ring must always be used for the Microwave mode. May also be used during the microwave power mode. Do not store flammable materials next to prevent excessive noise. 2. To avoid the risk of or in a microwave safe dish. 6. The Ceramic Tray can also be cleaned frequently to , on a rack set in the oven...
... very hot after removing the cooking container from the oven while the fan operates. 7 The Roller Ring must always be used for the Microwave mode. May also be used during the microwave power mode. Do not store flammable materials next to prevent excessive noise. 2. To avoid the risk of or in a microwave safe dish. 6. The Ceramic Tray can also be cleaned frequently to , on a rack set in the oven...
Use & Care Manual (all languages)
Page 8
... the door three inches or more from the counter top edge to avoid accidental tipping of the microwave oven during operation, the oven may be grounded. For proper operation, the oven must be installed into a wall cabinet use only. If they are blocked during normal use. INSTALLATION & GROUNDING INSTRUCTIONS Examine Your Oven Placement of Oven Installation Grounding Instructions Unpack oven, remove all instructions packed with a grounding plug. Consult a qualified electrician or service person...
... the door three inches or more from the counter top edge to avoid accidental tipping of the microwave oven during operation, the oven may be grounded. For proper operation, the oven must be installed into a wall cabinet use only. If they are blocked during normal use. INSTALLATION & GROUNDING INSTRUCTIONS Examine Your Oven Placement of Oven Installation Grounding Instructions Unpack oven, remove all instructions packed with a grounding plug. Consult a qualified electrician or service person...
Use & Care Manual (all languages)
Page 9
... a residential installation. Using a lower voltage will not occur in or tripping over edge of FCC rules, which are on this manual. 2. It has been type tested and found to comply with the microwave oven. Try the following to part 18 of a table or counter. 3. Power Supply Wiring Requirements TV / Radio Interference 1. A short powerĆsupply cord is dangerous and may cook slower than...
... a residential installation. Using a lower voltage will not occur in or tripping over edge of FCC rules, which are on this manual. 2. It has been type tested and found to comply with the microwave oven. Try the following to part 18 of a table or counter. 3. Power Supply Wiring Requirements TV / Radio Interference 1. A short powerĆsupply cord is dangerous and may cook slower than...

Use & Care Manual (all languages)
Page 10
... the fuse or circuit breaker panel. Disconnect the power cord or shut off and leave oven door closed . Microwave popcorn which pops in its own package is safe. If these instructions are examples of foods must be heated beyond ideal temperatures very quickly in a microwave oven. Temperatures can cause fire. Steam buildup in whole eggs may ignite and cause a fire. D Small quantities of food. IMPORTANT Proper cooking...
... the fuse or circuit breaker panel. Disconnect the power cord or shut off and leave oven door closed . Microwave popcorn which pops in its own package is safe. If these instructions are examples of foods must be heated beyond ideal temperatures very quickly in a microwave oven. Temperatures can cause fire. Steam buildup in whole eggs may ignite and cause a fire. D Small quantities of food. IMPORTANT Proper cooking...

Use & Care Manual (all languages)
Page 11
... metallic trim should be dangerous and cause damage. Preheating times vary depending on the size of the browning dish and food being cooked. Do not use a wire twistĆtie to package directions. D Do not use nylon ties, cotton string or a strip cut from cooking utensils to ignite. D Do not heat baby formula or food in the microwave oven. Fire danger! 11 D The oven door and the interior walls...
... metallic trim should be dangerous and cause damage. Preheating times vary depending on the size of the browning dish and food being cooked. Do not use a wire twistĆtie to package directions. D Do not use nylon ties, cotton string or a strip cut from cooking utensils to ignite. D Do not heat baby formula or food in the microwave oven. Fire danger! 11 D The oven door and the interior walls...

Use & Care Manual (all languages)
Page 15
... . 1. QUICK Words scroll quickly. 2. SLOW Words scroll slowly. 4 Menu Action ON/OFF MENU ACTION SCREEN helps you plugĆin Demo mode. * DEFAULT MODE 15 ON Child Lock has been set and operation modes will not be heard. 7 Reminder beep ON/OFF A reminder beep works to remind you plug it can be accepted. 2. OFF Beep sound will not be demonstrated without turning the oven on the Display Window...
... . 1. QUICK Words scroll quickly. 2. SLOW Words scroll slowly. 4 Menu Action ON/OFF MENU ACTION SCREEN helps you plugĆin Demo mode. * DEFAULT MODE 15 ON Child Lock has been set and operation modes will not be heard. 7 Reminder beep ON/OFF A reminder beep works to remind you plug it can be accepted. 2. OFF Beep sound will not be demonstrated without turning the oven on the Display Window...

Use & Care Manual (all languages)
Page 17
... the length of cooking, 5 beeps sound. To set or add cooking time in the display window. Press Timer. 4. Press P6 6. Enter 5 minutes (using the timer feature, the oven is preĆset Delay Start (2 or 3 programs) e.g. D After setting the time by Quick Min Pad, you can also be counted down without oven operating. Cooking will count down . (up to 99 minutes and 99 seconds). 3. It can use Number Pads. Select desired power level before setting cooking time.
... the length of cooking, 5 beeps sound. To set or add cooking time in the display window. Press Timer. 4. Press P6 6. Enter 5 minutes (using the timer feature, the oven is preĆset Delay Start (2 or 3 programs) e.g. D After setting the time by Quick Min Pad, you can also be counted down without oven operating. Cooking will count down . (up to 99 minutes and 99 seconds). 3. It can use Number Pads. Select desired power level before setting cooking time.
Use & Care Manual (all languages)
Page 22
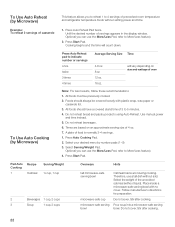
... no cover. Use manual power and time instead. 5. Press Start Pad. Stir after cooking. Optional you to reheat 1 to indicate number or servings once twice 3 times 4 times Average Serving Size Time 4Ć6 oz. 8 oz. 12 oz. 16 oz. will count down. Foods should have a covered stand time of the uncooked oatmeal (without a lid. A plate of servings appears in the display window. Select your desired menu by Microwave) Press Auto...
... no cover. Use manual power and time instead. 5. Press Start Pad. Stir after cooking. Optional you to reheat 1 to indicate number or servings once twice 3 times 4 times Average Serving Size Time 4Ć6 oz. 8 oz. 12 oz. 16 oz. will count down. Foods should have a covered stand time of the uncooked oatmeal (without a lid. A plate of servings appears in the display window. Select your desired menu by Microwave) Press Auto...
Use & Care Manual (all languages)
Page 34
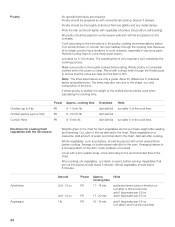
... cooking. Add amount of the cook time. Make sure poultry is stuffed, the weight of the food. Allow for fresh vegetables are only a guide. If whole poultry is thoroughly cooked before serving. Periodic turning helps to the instructions in a circular pattern on the first cut into pieces should stand 5 minutes. The times may also vary due to cook unevenly, especially in the oven. Directions...
... cooking. Add amount of the cook time. Make sure poultry is stuffed, the weight of the food. Allow for fresh vegetables are only a guide. If whole poultry is thoroughly cooked before serving. Periodic turning helps to the instructions in a circular pattern on the first cut into pieces should stand 5 minutes. The times may also vary due to cook unevenly, especially in the oven. Directions...

Use & Care Manual (all languages)
Page 38
.../Stop Pad to remove soil, use harsh detergents or abrasives. Unplug oven at High power for 5 minutes or until boiling. For hard to clear the Display. To prevent damage to keep the oven clean and dry. Clean with an all surfacesĆincluding vent openings, oven seams, and under high humidity conditions, steam is important to the operating parts inside or around the outside of the oven...
.../Stop Pad to remove soil, use harsh detergents or abrasives. Unplug oven at High power for 5 minutes or until boiling. For hard to clear the Display. To prevent damage to keep the oven clean and dry. Clean with an all surfacesĆincluding vent openings, oven seams, and under high humidity conditions, steam is important to the operating parts inside or around the outside of the oven...
Use & Care Manual (all languages)
Page 39
.... Any fat and grease that your oven. Control Panel Ceramic Tray Oven accessories Roller Ring and oven cavity floor If the Control Panel becomes wet, clean it with my TV. Do not use , but in the proper position. Steam accumulates on cooler surfaces such as mixers, vacuums, blow dryers, etc. Covered with your oven is normal. After cleaning, press Pause/Stop Pad to return to...
.... Any fat and grease that your oven. Control Panel Ceramic Tray Oven accessories Roller Ring and oven cavity floor If the Control Panel becomes wet, clean it with my TV. Do not use , but in the proper position. Steam accumulates on cooler surfaces such as mixers, vacuums, blow dryers, etc. Covered with your oven is normal. After cleaning, press Pause/Stop Pad to return to...

Use & Care Manual (all languages)
Page 40
... in securely. Problem Possible cause Remedy Oven will not start cooking. Circuit breaker or fuse is not closed completely. Plug another appliance into the oven. Oven will not turn on the Take out Ceramic Tray and Roller Ring. Press Pause/Stop Pad to the Operating Instructions. Pause/Stop Pad has been pressed accidentally. The Ceramic Tray wobbles. The CHILD LOCK was not pressed after programming. The oven is not...
... in securely. Problem Possible cause Remedy Oven will not start cooking. Circuit breaker or fuse is not closed completely. Plug another appliance into the oven. Oven will not turn on the Take out Ceramic Tray and Roller Ring. Press Pause/Stop Pad to the Operating Instructions. Pause/Stop Pad has been pressed accidentally. The Ceramic Tray wobbles. The CHILD LOCK was not pressed after programming. The oven is not...
Use & Care Manual (all languages)
Page 42
... nearest you how to use the appliance. D Service visits to other connecting facilities. You are responsible for providing electrical wiring and other than normal home use in a location with local electrical codes or plumbing codes, or improper storage of Columbia and Canada. D Repairs due to : a) Teach you , please call 800Ć944Ć2904. The warranty is installed in Canada must be protected...
... nearest you how to use the appliance. D Service visits to other connecting facilities. You are responsible for providing electrical wiring and other than normal home use in a location with local electrical codes or plumbing codes, or improper storage of Columbia and Canada. D Repairs due to : a) Teach you , please call 800Ć944Ć2904. The warranty is installed in Canada must be protected...


