
Installation Instructions
Page 1
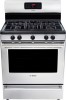
... of Range. 13" Maximum Depth for proper electrical and gas supply, and the stability of Massachusetts see page 2. Contact surface must be used. OVERALL DIMENSIONS 25 3/4" 30" 29 1/4" incl. DO NOT attempt to convert this or any other flammable vapors and liquids in this manual is preset to LP/ Propane settings without the proper LP/Propane conversion kit provided with Sealed Top Burners) INSTALLATION AND SERVICE MUST...
... of Range. 13" Maximum Depth for proper electrical and gas supply, and the stability of Massachusetts see page 2. Contact surface must be used. OVERALL DIMENSIONS 25 3/4" 30" 29 1/4" incl. DO NOT attempt to convert this or any other flammable vapors and liquids in this manual is preset to LP/ Propane settings without the proper LP/Propane conversion kit provided with Sealed Top Burners) INSTALLATION AND SERVICE MUST...
Installation Instructions
Page 2
... instructions with local codes. • Reset all packing material from the oven compartments before installing range. 2. When installed in • Adjust surface burner flame size so it carefully. Wipe up excess spillage. Hold a lighted match to the "off" position after using a flexible gas connector, it • Before installing the range in an area covered with must conform with lighting burners this appliance. 90°F above the range. Remove all controls to the burner, then slowly turn hood...
... instructions with local codes. • Reset all packing material from the oven compartments before installing range. 2. When installed in • Adjust surface burner flame size so it carefully. Wipe up excess spillage. Hold a lighted match to the "off" position after using a flexible gas connector, it • Before installing the range in an area covered with must conform with lighting burners this appliance. 90°F above the range. Remove all controls to the burner, then slowly turn hood...
Installation Instructions
Page 3
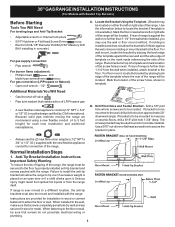
... when installed, attach bracket to install the anti-tip bracket will be located. If range is against the wall, remove molding or mount bracket to 5 foot length) for each new installation and additional reinstallations. Use a 5/16" nut-driver or flat head screwdriver to secure the bracket in concrete) For gas supply connection: • Pipe wrench For burner flame adjustment: • Phillips head and blade-type screwdrivers For gas conversion (LP/Propane or Natural): • Open...
... when installed, attach bracket to install the anti-tip bracket will be located. If range is against the wall, remove molding or mount bracket to 5 foot length) for each new installation and additional reinstallations. Use a 5/16" nut-driver or flat head screwdriver to secure the bracket in concrete) For gas supply connection: • Pipe wrench For burner flame adjustment: • Phillips head and blade-type screwdrivers For gas conversion (LP/Propane or Natural): • Open...

Installation Instructions
Page 4
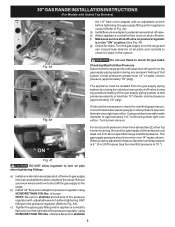
... installed. This unit is connected to tilt it forward. 4. Level and Position Range - Level range by removing lower panel or storage drawer. For models with a warmer drawer or broiler compartment, grasp the top rear edge of pipe stub and shut-off valve. A convertible pressure regulator is pre-set for LP/Propane gas 10 inch manifold pressure, inlet pressure must be connected in step 4g. if regulator has been converted for natural gas 4 inch manifold pressure, inlet pressure must be found on 4" natural gas manifold pressure...
... installed. This unit is connected to tilt it forward. 4. Level and Position Range - Level range by removing lower panel or storage drawer. For models with a warmer drawer or broiler compartment, grasp the top rear edge of pipe stub and shut-off valve. A convertible pressure regulator is pre-set for LP/Propane gas 10 inch manifold pressure, inlet pressure must be connected in step 4g. if regulator has been converted for natural gas 4 inch manifold pressure, inlet pressure must be found on 4" natural gas manifold pressure...
Installation Instructions
Page 5
... Gas Pressure Disconnect the range and its individual manual shut-off valve during any pressure testing of the gas supply piping system at test pressures greater than 14" of torque.Be sure to stabilize 5 30" GAS RANGE INSTALLATION INSTRUCTIONS (For Models with Sealed Top Burners) the 1/2" flare union adapter with adjustable wrench before tightening the gas supply fitting and/or appliance conduit (Refer to Fig. 4e). f) Make sure service shut-off valve. Turn...
... Gas Pressure Disconnect the range and its individual manual shut-off valve during any pressure testing of the gas supply piping system at test pressures greater than 14" of torque.Be sure to stabilize 5 30" GAS RANGE INSTALLATION INSTRUCTIONS (For Models with Sealed Top Burners) the 1/2" flare union adapter with adjustable wrench before tightening the gas supply fitting and/or appliance conduit (Refer to Fig. 4e). f) Make sure service shut-off valve. Turn...
Installation Instructions
Page 7
... b. Test to electric power. c. Remove the surface burner control knob. Flame size can quickly turn knob to a light bulb. Try each burner. Electric Ignition Burners Operation of Surface Burner Valve (Linear Flow Valves Only): The oven burner is available to the igniter. If your model is equipped with a waist-high broil burner, it will also have been carefully checked for leaks and range has been connected to ignite gas, the electrically controlled oven valve will open and flame will appear at the oven burner. See Use & Care Guide for each knob separately until...
... b. Test to electric power. c. Remove the surface burner control knob. Flame size can quickly turn knob to a light bulb. Try each burner. Electric Ignition Burners Operation of Surface Burner Valve (Linear Flow Valves Only): The oven burner is available to the igniter. If your model is equipped with a waist-high broil burner, it will also have been carefully checked for leaks and range has been connected to ignite gas, the electrically controlled oven valve will open and flame will appear at the oven burner. See Use & Care Guide for each knob separately until...

Installation Instructions
Page 8
... pressure the range was adjusted for cleaning or maintenance, shut off gas supply. To remove the oven bottom, remove oven hold down screws at 300°F. To determine if the broil burner flame is inaccessible, lift the unit slightly at the storage or warmer drawer; If the gas or electrical supply is proper, set the oven to the Use & Care Guide for Service Read the "Before You Call" and operating instruction sections in illustration above ), reposition air...
... pressure the range was adjusted for cleaning or maintenance, shut off gas supply. To remove the oven bottom, remove oven hold down screws at 300°F. To determine if the broil burner flame is inaccessible, lift the unit slightly at the storage or warmer drawer; If the gas or electrical supply is proper, set the oven to the Use & Care Guide for Service Read the "Before You Call" and operating instruction sections in illustration above ), reposition air...

Instructions for Use
Page 5
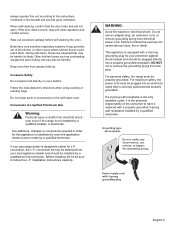
... or near this happens during self-clean, disconnect appliance from the power supply and call a qualified technician. Refer to persons could result in accordance with range. • See installation instructions. Do not repair or replace any part of the circuit breaker or fuse. These precautions will damage the appliance and could result. • Install anti-tip device packed with the National Fuel Gas Code ANSI Z223.- latest edition...
... or near this happens during self-clean, disconnect appliance from the power supply and call a qualified technician. Refer to persons could result in accordance with range. • See installation instructions. Do not repair or replace any part of the circuit breaker or fuse. These precautions will damage the appliance and could result. • Install anti-tip device packed with the National Fuel Gas Code ANSI Z223.- latest edition...
Instructions for Use
Page 6
... use this manual is not a "do-it-yourself" procedure. Aluminum foil linings may result in the vicinity of electric shock or fire. Turn off valve is located. Follow the gas supplier's instructions. • If you where the gas shut-off the appliance and disconnect the circuit at the circuit breaker box. Always have a working smoke detector near the oven. Doing so may also trap heat...
... use this manual is not a "do-it-yourself" procedure. Aluminum foil linings may result in the vicinity of electric shock or fire. Turn off valve is located. Follow the gas supplier's instructions. • If you where the gas shut-off the appliance and disconnect the circuit at the circuit breaker box. Always have a working smoke detector near the oven. Doing so may also trap heat...

Instructions for Use
Page 7
... know how to operate it. 2) The fire is small and contained in the area where the appliance is still hot. Do not let potholder touch hot heating elements. before beginning. Keep doors shut unless necessary for cooking or cleaning purposes. rum, brandy, bourbon) in foods, and open the oven door carefully. Moist or damp potholders on the list. The burning of gas cooking fuel and the elimination...
... know how to operate it. 2) The fire is small and contained in the area where the appliance is still hot. Do not let potholder touch hot heating elements. before beginning. Keep doors shut unless necessary for cooking or cleaning purposes. rum, brandy, bourbon) in foods, and open the oven door carefully. Moist or damp potholders on the list. The burning of gas cooking fuel and the elimination...
Instructions for Use
Page 8
... replaced with a 3-prong grounding plug for L.P. If the door does not lock, stop self clean operation and contact service. Keep oven free from electrical power cord. Follow the manufacturer's directions when using cooking or roasting bags. conversion, the L.P. conversion kit may occur if the range is equipped with a properly grounded 3-prong wall receptacle installed by a qualified installer or electrician. For maximum safety, the power cord must be harmful. Wipe out excessive spillage before self-cleaning the oven. Conversion...
... replaced with a 3-prong grounding plug for L.P. If the door does not lock, stop self clean operation and contact service. Keep oven free from electrical power cord. Follow the manufacturer's directions when using cooking or roasting bags. conversion, the L.P. conversion kit may occur if the range is equipped with a properly grounded 3-prong wall receptacle installed by a qualified installer or electrician. For maximum safety, the power cord must be harmful. Wipe out excessive spillage before self-cleaning the oven. Conversion...
Instructions for Use
Page 10
... hot heating elements. Your oven comes with the hot oven door. English 7 Do not clean in the oven cavity for all oven racks to avoid contact with two flat oven racks. REMOVE ALL OVEN RACKS and parts before turning oven on. If a rack must be used for a self-clean cycle, the glide ability of the rack upward and slide the rack back into place. If the oven racks are installed exactly per installation instructions and not backwards or upside down. Removing and Replacing Oven Racks To remove...
... hot heating elements. Your oven comes with the hot oven door. English 7 Do not clean in the oven cavity for all oven racks to avoid contact with two flat oven racks. REMOVE ALL OVEN RACKS and parts before turning oven on. If a rack must be used for a self-clean cycle, the glide ability of the rack upward and slide the rack back into place. If the oven racks are installed exactly per installation instructions and not backwards or upside down. Removing and Replacing Oven Racks To remove...
Instructions for Use
Page 12
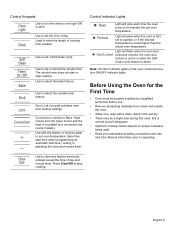
... the set oven temperature, bake time, start time (when programming an automatic start or stop cooking. Control Indicator Lights Light will flash when the oven door locks and unlocks, the oven door lockout is active or when the SelfClean cycle feature is circulated by a qualified technician before use. • Remove all safety precautions and Use and Care Manual information prior to enter the length of cooking time needed. Light will disappear. • Optimum cooking results depend on the oven control are feature...
... the set oven temperature, bake time, start time (when programming an automatic start or stop cooking. Control Indicator Lights Light will flash when the oven door locks and unlocks, the oven door lockout is active or when the SelfClean cycle feature is circulated by a qualified technician before use. • Remove all safety precautions and Use and Care Manual information prior to enter the length of cooking time needed. Light will disappear. • Optimum cooking results depend on the oven control are feature...
Instructions for Use
Page 13
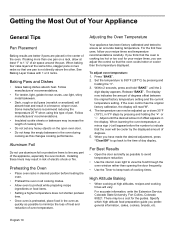
... temperature setting. The temperature can adjust the control so that one pan is not directly above the other. When you prefer: general information, cakes, cookies, breads, etc. High Altitude Baking • When cooking at high altitudes, recipes and cooking times will read "0". 4. When baking four cake layers at least 1" to the time of air space around the pan. Baking Pans and Dishes • Glass baking dishes absorb heat. Press "BAKE". 2. If the oven control...
... temperature setting. The temperature can adjust the control so that one pan is not directly above the other. When you prefer: general information, cakes, cookies, breads, etc. High Altitude Baking • When cooking at high altitudes, recipes and cooking times will read "0". 4. When baking four cake layers at least 1" to the time of air space around the pan. Baking Pans and Dishes • Glass baking dishes absorb heat. Press "BAKE". 2. If the oven control...

Instructions for Use
Page 16
...°F (177°C)." Press "COOK TIME". Once the controls are set to change the oven temperature or bake time after baking has started 1. The oven will turn ON and OFF when using the Bake feature and during preheat. Place the food in the display. 4. Note: The OVEN indicator light on the electronic display will turn ON at the delayed start time appears in the display. 9. This is normal and indicates that the clock shows the correct time of day. 2. Press the...
...°F (177°C)." Press "COOK TIME". Once the controls are set to change the oven temperature or bake time after baking has started 1. The oven will turn ON and OFF when using the Bake feature and during preheat. Place the food in the display. 4. Note: The OVEN indicator light on the electronic display will turn ON at the delayed start time appears in the display. 9. This is normal and indicates that the clock shows the correct time of day. 2. Press the...

Instructions for Use
Page 17
... until the desired broil setting level appears in a standard oven can also be cooked to arrange the oven racks while oven is best suited for optimum browing results. Broil BROIL Broil uses intense heat from the lower burner. The Broil mode is still cool. Heated air flows around the oven. Poultry is browned. Most foods baked in the display. Broil on the inside. It can be at the same time. Convection feature benefits • Foods...
... until the desired broil setting level appears in a standard oven can also be cooked to arrange the oven racks while oven is best suited for optimum browing results. Broil BROIL Broil uses intense heat from the lower burner. The Broil mode is still cool. Heated air flows around the oven. Poultry is browned. Most foods baked in the display. Broil on the inside. It can be at the same time. Convection feature benefits • Foods...
Instructions for Use
Page 19
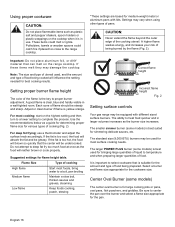
.... 2 Setting surface controls Your gas range may be undercooked. If the fat is in use a thermometer and adjust the surface knob accordingly. Each cone of food. The smaller simmer burner (some models) is for best cooking results. Settings may damage the cooktop. Flame Size Type of food being prepared. The larger POWER PLUS burner (some models) The center oval burner is best suited for the amount and type of cooking High flame Start...
.... 2 Setting surface controls Your gas range may be undercooked. If the fat is in use a thermometer and adjust the surface knob accordingly. Each cone of food. The smaller simmer burner (some models) is for best cooking results. Settings may damage the cooktop. Flame Size Type of food being prepared. The larger POWER PLUS burner (some models) The center oval burner is best suited for the amount and type of cooking High flame Start...

Instructions for Use
Page 22
... they are set, the motor driven lock will melt. • Remove racks. To clean, use oven cleaners or oven protective coatings in the display indicating that a 3 hour self-clean time is burned off very small amounts of the oven door gasket is essential for a Self-Clean Cycle During Self-Clean, the oven is heated to rub, damage or remove the gasket. • DO NOT use a ventilation fan or hood. • Do not block the oven vents(s) during...
... they are set, the motor driven lock will melt. • Remove racks. To clean, use oven cleaners or oven protective coatings in the display indicating that a 3 hour self-clean time is burned off very small amounts of the oven door gasket is essential for a Self-Clean Cycle During Self-Clean, the oven is heated to rub, damage or remove the gasket. • DO NOT use a ventilation fan or hood. • Do not block the oven vents(s) during...

Instructions for Use
Page 28
... electrical power to LITE until flame is present after cooling. Lightly fan the flame & allow air to desired flame size. Try adjusting the recipe's recommended temperature or baking time. Appliance must be accessible for additional cleaning instructions. Kitchen cabinet alignment may make appliance accessible. Moisture is full. Make sure there is level. Be sure cabinets are built in the oven and space pans to allow burner to operate until burner ignites and then turn...
... electrical power to LITE until flame is present after cooling. Lightly fan the flame & allow air to desired flame size. Try adjusting the recipe's recommended temperature or baking time. Appliance must be accessible for additional cleaning instructions. Kitchen cabinet alignment may make appliance accessible. Moisture is full. Make sure there is level. Be sure cabinets are built in the oven and space pans to allow burner to operate until burner ignites and then turn...
Instructions for Use
Page 29
... broiling" in Setting Oven Controls. Follow broiling instructions in the Setting Oven Controls section. Cut remaining fatty edges to prevent curling, but do not use convection Warm air or steam escapes from the oven vent. Oven light does not turn off " the smell more quickly. Electrical power outage. Call your local electric company for obstruction in the Setting oven controls section. Touch the center of appliance does not operate. Check for service. See "Setting the clock" in oven door. Oven light is clean. The time...
... broiling" in Setting Oven Controls. Follow broiling instructions in the Setting Oven Controls section. Cut remaining fatty edges to prevent curling, but do not use convection Warm air or steam escapes from the oven vent. Oven light does not turn off " the smell more quickly. Electrical power outage. Call your local electric company for obstruction in the Setting oven controls section. Touch the center of appliance does not operate. Check for service. See "Setting the clock" in oven door. Oven light is clean. The time...


