
Installation Instructions
Page 3
... of Contents About This Manual 1 How This Manual Is Organized 1 Safety Definitions 1 Safety 2 Preparation 4 Before You Begin 4 Tools and Parts Needed 4 Parts Included 4 Additional Parts Needed for Hard-Wired Installations . . 4 Installation Checklist 4 General Information 5 Overall Dimensions 5 Location Level and Plumb 5 Installation Hints 5 ...Flexible Conduit 10 Complete the installation 11 Testing Operation 12 Service 12 Before Calling Service 12 This Bosch Appliance is made by BSH Home Appliances Corporation 1901 Main Street, Suite 600 Irvine, CA 92614 Questions? 1-800-944-2904...
... of Contents About This Manual 1 How This Manual Is Organized 1 Safety Definitions 1 Safety 2 Preparation 4 Before You Begin 4 Tools and Parts Needed 4 Parts Included 4 Additional Parts Needed for Hard-Wired Installations . . 4 Installation Checklist 4 General Information 5 Overall Dimensions 5 Location Level and Plumb 5 Installation Hints 5 ...Flexible Conduit 10 Complete the installation 11 Testing Operation 12 Service 12 Before Calling Service 12 This Bosch Appliance is made by BSH Home Appliances Corporation 1901 Main Street, Suite 600 Irvine, CA 92614 Questions? 1-800-944-2904...

Installation Instructions
Page 5
... can result in death or serious burns to children and adults. Do not operate the range without any other part of the anti-tip bracket. WARNING: Do not repair or replace any part of the range including by the state, province or region where this appliance is being installed. • Shut-off...
... can result in death or serious burns to children and adults. Do not operate the range without any other part of the anti-tip bracket. WARNING: Do not repair or replace any part of the range including by the state, province or region where this appliance is being installed. • Shut-off...

Installation Instructions
Page 8
...Use With Hard Wire Installations) Note: Terminal lugs not necessary for your unit and the required electrical connections are present. ___ 2. Additional Parts Needed for Hard-Wired Installations Dual Fuel models only • Flexible conduit • Torque wrench Note: Power supply cord kit is ...unit all packaging from the appliance. Installation Checklist Please refer to handhold for complete installation instructions. Preparation Before You Begin Tools and Parts Needed • Dual Fuel models only - 40 or 50 Amp power supply cord kit (depending on local code). Refer to ...
...Use With Hard Wire Installations) Note: Terminal lugs not necessary for your unit and the required electrical connections are present. ___ 2. Additional Parts Needed for Hard-Wired Installations Dual Fuel models only • Flexible conduit • Torque wrench Note: Power supply cord kit is ...unit all packaging from the appliance. Installation Checklist Please refer to handhold for complete installation instructions. Preparation Before You Begin Tools and Parts Needed • Dual Fuel models only - 40 or 50 Amp power supply cord kit (depending on local code). Refer to ...

Installation Instructions
Page 14
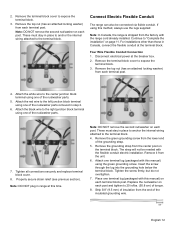
...English 11 It must stay in place to anchor the internal wiring attached to the left junction block terminal using one of the nut/washer parts. 7. Remove the green grouning screw from the center post of the grounding strap. Tighten all connections securely and replace terminal block cover. ... shock, the grounding prong on each post. Remove the terminal block cover to the right junction block terminal using one of the nut/washer parts. 8. Remove screw from each post. Volt circuit. Attach the black wire to expose the terminal block. 2. Disconnect electrical power at breaker ...
...English 11 It must stay in place to anchor the internal wiring attached to the left junction block terminal using one of the nut/washer parts. 7. Remove the green grouning screw from the center post of the grounding strap. Tighten all connections securely and replace terminal block cover. ... shock, the grounding prong on each post. Remove the terminal block cover to the right junction block terminal using one of the nut/washer parts. 8. Remove screw from each post. Volt circuit. Attach the black wire to expose the terminal block. 2. Disconnect electrical power at breaker ...
Installation Instructions
Page 15
... hole below the terminal block. Replace the nut/washer on page 11. 2. These must stay in /lbs. (50.8 cm) of the nut/washer parts. 5. Remove the green grounding screw from each post. Tighten the screw firmly, but do not overtighten. 7. Disconnect electrical power at the terminal block. ... strap will not be connected via flxible conduit. Remove it from the end of the grounding strap. 5. Attach one of the nut/washer parts removed in place to anchor the internal wiring attached to expose the terminal block. 3. Place one terminal lug (packaged with the range cord ...
... hole below the terminal block. Replace the nut/washer on page 11. 2. These must stay in /lbs. (50.8 cm) of the nut/washer parts. 5. Remove the green grounding screw from each post. Tighten the screw firmly, but do not overtighten. 7. Disconnect electrical power at the terminal block. ... strap will not be connected via flxible conduit. Remove it from the end of the grounding strap. 5. Attach one of the nut/washer parts removed in place to anchor the internal wiring attached to expose the terminal block. 3. Place one terminal lug (packaged with the range cord ...

Installation Instructions
Page 4
... is responsible for possible conversion from the gas supply piping system by BSH Home Appliances can be converted using this kit. Save the natural gas parts for the proper installation of this kit. • CAUTION: When connecting the unit to natural gas in these instructions is equipped with the manufacturer's instructions...
... is responsible for possible conversion from the gas supply piping system by BSH Home Appliances can be converted using this kit. Save the natural gas parts for the proper installation of this kit. • CAUTION: When connecting the unit to natural gas in these instructions is equipped with the manufacturer's instructions...

Installation Instructions
Page 5
... Hex Cap NA Pin NAT T Pin Position for use , the pressure supplied to the regulator. Conversion Before You Begin Tools and Parts Needed • 7 mm Socket Driver w/ 3" extension • Torx (T20)-head screwdriver • Adjustable Wrench • Flathead Screwdriver (1/8"... or smaller) • Phillips Head Screwdriver Parts Included • Conversion Kit Instructions • Conversion Sticker • 4 LP Orifices General Information Always Provide Adequate Gas Supply This appliance ...
... Hex Cap NA Pin NAT T Pin Position for use , the pressure supplied to the regulator. Conversion Before You Begin Tools and Parts Needed • 7 mm Socket Driver w/ 3" extension • Torx (T20)-head screwdriver • Adjustable Wrench • Flathead Screwdriver (1/8"... or smaller) • Phillips Head Screwdriver Parts Included • Conversion Kit Instructions • Conversion Sticker • 4 LP Orifices General Information Always Provide Adequate Gas Supply This appliance ...
