Installation Instructions
Page 3
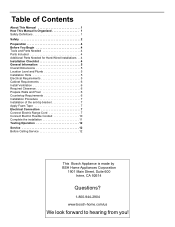
Table of Contents About This Manual 1 How This Manual Is Organized 1 Safety Definitions 1 Safety 2 Preparation 4 Before You Begin 4 Tools and Parts Needed 4 Parts Included 4 Additional Parts Needed for Hard-Wired Installations . . 4 Installation Checklist 4 General...7 Electrical Connection 7 Connect Electric Range Cord 7 Connect Electric Flexible Conduit 10 Complete the installation 11 Testing Operation 12 Service 12 Before Calling Service 12 This Bosch Appliance is made by BSH Home Appliances Corporation 1901 Main Street, Suite 600 Irvine, CA 92614 Questions? 1-800-944-2904 www...
Table of Contents About This Manual 1 How This Manual Is Organized 1 Safety Definitions 1 Safety 2 Preparation 4 Before You Begin 4 Tools and Parts Needed 4 Parts Included 4 Additional Parts Needed for Hard-Wired Installations . . 4 Installation Checklist 4 General...7 Electrical Connection 7 Connect Electric Range Cord 7 Connect Electric Flexible Conduit 10 Complete the installation 11 Testing Operation 12 Service 12 Before Calling Service 12 This Bosch Appliance is made by BSH Home Appliances Corporation 1901 Main Street, Suite 600 Irvine, CA 92614 Questions? 1-800-944-2904 www...

Installation Instructions
Page 4
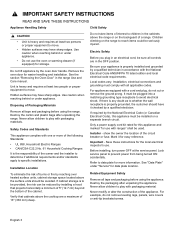
...: This alerts you to the Important Safety Instructions located at the beginning of the manual. Pay special attention to important information and/or tips. Safety Definitions 9 WARNING This indicates that death or serious injuries may occur as a result... warning. 9 CAUTION This indicates that minor or moderate injuries may occur as a result of non-observance of this advisory. About This Manual How This Manual Is Organized This manual contains several sections: • The Safety section describes important procedures that can ensure your safety while using the appliance. • The ...
...: This alerts you to the Important Safety Instructions located at the beginning of the manual. Pay special attention to important information and/or tips. Safety Definitions 9 WARNING This indicates that death or serious injuries may occur as a result... warning. 9 CAUTION This indicates that minor or moderate injuries may occur as a result of non-observance of this advisory. About This Manual How This Manual Is Organized This manual contains several sections: • The Safety section describes important procedures that can ensure your safety while using the appliance. • The ...

Installation Instructions
Page 5
...dealer to children and adults. Ensure the anti-tip bracket is engaged whenever the range is moved to follow the instrucitons. in this manual can result in death or serious burns to recommend a qualified technician and an authorized repair service. • Install only per the LP...has been CSA certified for proper installation and use with propane. Installation and service must be converted per the installation instructions provided in this manual is not followed exactly, a fire or explosion may result causing property damage or personal injury. A child or adult can cause injury...
...dealer to children and adults. Ensure the anti-tip bracket is engaged whenever the range is moved to follow the instrucitons. in this manual can result in death or serious burns to recommend a qualified technician and an authorized repair service. • Install only per the LP...has been CSA certified for proper installation and use with propane. Installation and service must be converted per the installation instructions provided in this manual is not followed exactly, a fire or explosion may result causing property damage or personal injury. A child or adult can cause injury...
Installation Instructions
Page 6
... . • Hidden surfaces may have sharp edges. Mark it checked by a qualified electician. Important - Lock service panel to children in the range Use and Care manual. It must comply with the National Electrical Code ANSI/NFPA 70 latest edition and local electrical code requirements. Related Equipment Safety Remove all tape and...
... . • Hidden surfaces may have sharp edges. Mark it checked by a qualified electician. Important - Lock service panel to children in the range Use and Care manual. It must comply with the National Electrical Code ANSI/NFPA 70 latest edition and local electrical code requirements. Related Equipment Safety Remove all tape and...

Installation Instructions
Page 8
.... Note: Not necessary for Canadian installations, cord is not necessary for your unit and the required electrical connections are present. ___ 2. Refer to the installation manual for content regarding Safety, Cabinet Dimensions, Remove Packaging, Electrical Installation, Gas Connection, Testing the Installation and Customer Service. ___ 3. (Optional) Remove the oven door to...
.... Note: Not necessary for Canadian installations, cord is not necessary for your unit and the required electrical connections are present. ___ 2. Refer to the installation manual for content regarding Safety, Cabinet Dimensions, Remove Packaging, Electrical Installation, Gas Connection, Testing the Installation and Customer Service. ___ 3. (Optional) Remove the oven door to...
Installation Instructions
Page 9
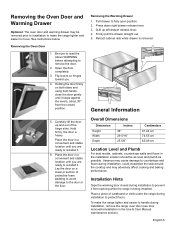
... be as level and plumb as possible. Be sure to read the above WARNING before attempting to move. Place the door in the Use & Care Manual maintenance section). Press down right drawer release lever. 3. 0Lift up and out of cardboard or cloth under the range during installation to handle during installation...
... be as level and plumb as possible. Be sure to read the above WARNING before attempting to move. Place the door in the Use & Care Manual maintenance section). Press down right drawer release lever. 3. 0Lift up and out of cardboard or cloth under the range during installation to handle during installation...

Installation Instructions
Page 10
... 120 VAC outlet can be done by the range. Verify that electrical wiring be positioned on either in the main entrance panel or in this manual. Note: In Canada, the range is shipped from the floor. Check local codes. Note the grey box (E) designating the acceptable area on gas ranges. Dual...
... 120 VAC outlet can be done by the range. Verify that electrical wiring be positioned on either in the main entrance panel or in this manual. Note: In Canada, the range is shipped from the floor. Check local codes. Note the grey box (E) designating the acceptable area on gas ranges. Dual...
Installation Instructions
Page 15
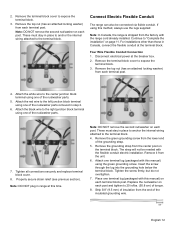
... nut/washer on page 11. Connect Electric Flexible Conduit The range can also be needed with this manual) using this time. Remove the top nut (has an attached locking washer) from the factory with this manual) on each post. Attach the black wire to the center junction block terminal using one terminal...
... nut/washer on page 11. Connect Electric Flexible Conduit The range can also be needed with this manual) using this time. Remove the top nut (has an attached locking washer) from the factory with this manual) on each post. Attach the black wire to the center junction block terminal using one terminal...

Installation Instructions
Page 16
Remove the top nut, star washer, and round washer from each wire. 6. Properly secure flexible conduit at this manual) on each clamping screw with 20" (50.8 cm) pounds of white wire (W) into the right lug. Note: DO NOT plug in place using the lug ...
Remove the top nut, star washer, and round washer from each wire. 6. Properly secure flexible conduit at this manual) on each clamping screw with 20" (50.8 cm) pounds of white wire (W) into the right lug. Note: DO NOT plug in place using the lug ...
Installation Instructions
Page 17
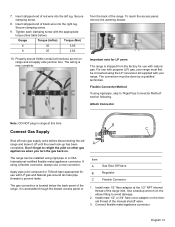
... B Regulator C Flexible Connector 1. Install male 1/2" or 3/4" flare union adapter on the elbow fitting to prevent leaks. For use a new connector. Insert stripped end of the manual shutoff valve. 3.
... B Regulator C Flexible Connector 1. Install male 1/2" or 3/4" flare union adapter on the elbow fitting to prevent leaks. For use a new connector. Insert stripped end of the manual shutoff valve. 3.

Installation Instructions
Page 20
...until the drawer clicks into both hands. 2. The drawer should insert easily. If it binds, do not result as explained above, contact Bosch service for proper lighting, proper flame characteristics on the low setting and proper flame characteristics on the housing to force it is correctly and ...MED LOW HIGH PROOF _+ ON/OFF 5. Turn on the bracket. 6. Test the oven mode. Select the BAKE mode. See the Use and Care Manual for proper ignition: 1. Verify that the ignitor/spark module clicks. Test for detailed operation instructions. 3. Verify that the oven light comes on and the ...
...until the drawer clicks into both hands. 2. The drawer should insert easily. If it binds, do not result as explained above, contact Bosch service for proper lighting, proper flame characteristics on the low setting and proper flame characteristics on the housing to force it is correctly and ...MED LOW HIGH PROOF _+ ON/OFF 5. Turn on the bracket. 6. Test the oven mode. Select the BAKE mode. See the Use and Care Manual for proper ignition: 1. Verify that the ignitor/spark module clicks. Test for detailed operation instructions. 3. Verify that the oven light comes on and the ...

Installation Instructions
Page 22
Please be prepared with the information printed on the appliance when requesting service. Data Plate The data plate shows the model and serial number. English 19 The data plate is located on the inside of the manual. Service Before Calling Service See Use and Care Manual for troubleshooting information. To reach a service representative, see the contact information at the front of the warming drawer frame. Refer to the data plate on your product data plate when calling. Refer to the Warranty in the Use and Care Manual.
Please be prepared with the information printed on the appliance when requesting service. Data Plate The data plate shows the model and serial number. English 19 The data plate is located on the inside of the manual. Service Before Calling Service See Use and Care Manual for troubleshooting information. To reach a service representative, see the contact information at the front of the warming drawer frame. Refer to the data plate on your product data plate when calling. Refer to the Warranty in the Use and Care Manual.

Installation Instructions
Page 4
... testing supply piping system: a) The appliance and its individual shut-off valve must be disconnected from the gas supply piping system by closing its individual manual shut-off valve must be a "T" handle gas cock. 3) Flexible gas connector must not be isolated from the gas supply piping system at test pressures equal...
... testing supply piping system: a) The appliance and its individual shut-off valve must be disconnected from the gas supply piping system by closing its individual manual shut-off valve must be a "T" handle gas cock. 3) Flexible gas connector must not be isolated from the gas supply piping system at test pressures equal...

Installation Instructions
Page 6
... shaft and turn bypass screw clockwise until the orifice stops turning. DO NOT OVERTIGHTEN. Place in cooktop exactly as laid out in Use and Care manual). 2. Remove oven door (See section "Removing Oven Door" in the orifice card. Reinsert screws in jet holder to hold tubing assembly in the OFF position...
... shaft and turn bypass screw clockwise until the orifice stops turning. DO NOT OVERTIGHTEN. Place in cooktop exactly as laid out in Use and Care manual). 2. Remove oven door (See section "Removing Oven Door" in the orifice card. Reinsert screws in jet holder to hold tubing assembly in the OFF position...

Installation Instructions
Page 9
... Set the oven to bake at the front of the oven regulator. Adjust Bake Flame (if necessary) Service Before Calling Service See Use and Care Manual for troubleshooting information. To reach a service representative, see the contact information at 350° F. Product Data Plate The data plate shows the model... the shutter if it . The burner will stay lit until the 350° F is reached and then shut off to the left of the manual. Loosen screw and turn shutter. It is lifting or blowing or not carrying over ; Tighten screw. Please be prepared with those in the graphic ...
... Set the oven to bake at the front of the oven regulator. Adjust Bake Flame (if necessary) Service Before Calling Service See Use and Care Manual for troubleshooting information. To reach a service representative, see the contact information at 350° F. Product Data Plate The data plate shows the model... the shutter if it . The burner will stay lit until the 350° F is reached and then shut off to the left of the manual. Loosen screw and turn shutter. It is lifting or blowing or not carrying over ; Tighten screw. Please be prepared with those in the graphic ...


