Use & Care Manual
Page 2
...the Most Out of Your Cooktop 21 Getting the Most Out of Your Oven 23 Getting the Most Out of Contents About This Manual 1 How This Manual Is Organized 1 Safety 1 Important Safety Instructions 1 Getting Started 5 Parts and Accessories 5 Before Using the Appliance for the ...First Time 14 Operation - Table of Your Warming Drawer 29 Cleaning and Maintenance 30 Care and Cleaning 30 Maintenance 35 Service 36 Self Help 36 Warranty ...
...the Most Out of Your Cooktop 21 Getting the Most Out of Your Oven 23 Getting the Most Out of Contents About This Manual 1 How This Manual Is Organized 1 Safety 1 Important Safety Instructions 1 Getting Started 5 Parts and Accessories 5 Before Using the Appliance for the ...First Time 14 Operation - Table of Your Warming Drawer 29 Cleaning and Maintenance 30 Care and Cleaning 30 Maintenance 35 Service 36 Self Help 36 Warranty ...
Use & Care Manual
Page 3
... smoke detector near a window, forced air vent, or fan, be sure to read this manual. For example, never use . Boilovers cause smoking and greasy spillovers may result in a risk of electric shock or fire. • If materials inside an oven or warming drawer should ignite, keep... door closed. About This Manual How This Manual Is Organized This manual contains several sections: • The Overview section describes the features and functionality of the range, including a description...
... smoke detector near a window, forced air vent, or fan, be sure to read this manual. For example, never use . Boilovers cause smoking and greasy spillovers may result in a risk of electric shock or fire. • If materials inside an oven or warming drawer should ignite, keep... door closed. About This Manual How This Manual Is Organized This manual contains several sections: • The Overview section describes the features and functionality of the range, including a description...

Use & Care Manual
Page 5
...; Do not allow anyone to climb, stand, lean, sit, or hang on an appliance to reach items could be allowed to play in use this manual. • Do not clean the appliance while it does not hang loose, and do not wear loose fitting clothing or hanging garments, such as ties...
...; Do not allow anyone to climb, stand, lean, sit, or hang on an appliance to reach items could be allowed to play in use this manual. • Do not clean the appliance while it does not hang loose, and do not wear loose fitting clothing or hanging garments, such as ties...
Use & Care Manual
Page 6
... Refer all instructions carefully before use of undersized cookware will reduce the risk of burns, electric shock, fire, and injury to direct contact and may create a risk of glass, heatproof...having flat bottoms large enough to a properly grounded outlet. Verify that are engaged. All ranges can melt if in the following pages. This appliance is intended for further details. ...you have any part of corrosive chemicals in injury. • Do not operate this manual. Refer to persons could result in heating or cleaning will also improve efficiency. •...
... Refer all instructions carefully before use of undersized cookware will reduce the risk of burns, electric shock, fire, and injury to direct contact and may create a risk of glass, heatproof...having flat bottoms large enough to a properly grounded outlet. Verify that are engaged. All ranges can melt if in the following pages. This appliance is intended for further details. ...you have any part of corrosive chemicals in injury. • Do not operate this manual. Refer to persons could result in heating or cleaning will also improve efficiency. •...
Use & Care Manual
Page 11
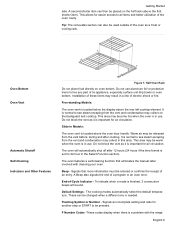
... when the oven is important for air circulation. Do not block the vent as it is in this area. Signals that eliminates the manual labor involved with the range. To indicate when a mode is in the Select Function section). A second shorter item can be pressed. This allows for air circulation. ... food directly on the half rack (above the rear left cooktop element. Installation of these liners may be entered or confirms the receipt of electric shock or fire. Free-standing Models: The oven vent is set for another step or START to see steam escaping from the vent before,...
... when the oven is important for air circulation. Do not block the vent as it is in this area. Signals that eliminates the manual labor involved with the range. To indicate when a mode is in the Select Function section). A second shorter item can be pressed. This allows for air circulation. ... food directly on the half rack (above the rear left cooktop element. Installation of these liners may be entered or confirms the receipt of electric shock or fire. Free-standing Models: The oven vent is set for another step or START to see steam escaping from the vent before,...
Use & Care Manual
Page 16
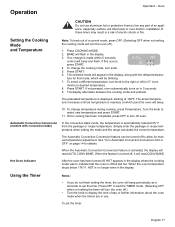
...Conversion ON or the convection bake mode. Turn knob to operating. Remove packing materials from range. mation prior to select 12 hour or 24 hour format. 5. Cooktop This section explains ...for use with a clean, damp sponge and dry. • Apply the glass ceramic cooktop cleaner to 30 minutes after the elements have been turned off automatically. OFF 1. Press Start. 4. Operation - Access ...temperatures for the First Time • Remove all safety precautions and Use and Care Manual infor- About the Cooktop Operation Use the cooktop for the Warming Drawer Only The...
...Conversion ON or the convection bake mode. Turn knob to operating. Remove packing materials from range. mation prior to select 12 hour or 24 hour format. 5. Cooktop This section explains ...for use with a clean, damp sponge and dry. • Apply the glass ceramic cooktop cleaner to 30 minutes after the elements have been turned off automatically. OFF 1. Press Start. 4. Operation - Access ...temperatures for the First Time • Remove all safety precautions and Use and Care Manual infor- About the Cooktop Operation Use the cooktop for the Warming Drawer Only The...
Use & Care Manual
Page 19
... temperature. 8. Simply enter the package or recipe temperature when setting the mode and the range calculates the correct temperature. Hot Oven Indicator After the oven has been turned off, HOT... that the oven is made within 5 seconds, control will be turned off oven. ture for manual temperature adjustment. To select a different temperature, turn off to set the timer: English 17 The...mode will turn the oven off .) • Turn the knob to line any part of electric shock or fire. Press START. BAKE will read CONV BAKE. To change temperature during cooking...
... temperature. 8. Simply enter the package or recipe temperature when setting the mode and the range calculates the correct temperature. Hot Oven Indicator After the oven has been turned off, HOT... that the oven is made within 5 seconds, control will be turned off oven. ture for manual temperature adjustment. To select a different temperature, turn off to set the timer: English 17 The...mode will turn the oven off .) • Turn the knob to line any part of electric shock or fire. Press START. BAKE will read CONV BAKE. To change temperature during cooking...

Use & Care Manual
Page 28
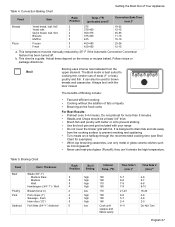
... on multiple racks. The Automatic Convection Conversion feature can be turned off , it will read CONV BAKE. Convection Bake Convection baking is well-suited for manual temperature adjustment. Refer to Convection Baking chart. • Place food in convection baking is that the heat is turned off to allow for baking large...-55 68-78 6-11 8-13 29-36 English 26 The USDA recom- Simply enter the package or recipe temperature when setting the mode and the range calculates the correct temperature. When the feature is circulated throughout the oven by 25° F.
... on multiple racks. The Automatic Convection Conversion feature can be turned off , it will read CONV BAKE. Convection Bake Convection baking is well-suited for manual temperature adjustment. Refer to Convection Baking chart. • Place food in convection baking is that the heat is turned off to allow for baking large...-55 68-78 6-11 8-13 29-36 English 26 The USDA recom- Simply enter the package or recipe temperature when setting the mode and the range calculates the correct temperature. When the feature is circulated throughout the oven by 25° F.
Use & Care Manual
Page 29
... radiated from the cooking surface to prevent sticking • Use the broil pan and grid included with your range • Do not cover the broiler grid with the door closed. they can also be manually reduced by 25° F if the Automatic Convection Conversion feature has been turned off. fresh Ham slice...
... radiated from the cooking surface to prevent sticking • Use the broil pan and grid included with your range • Do not cover the broiler grid with the door closed. they can also be manually reduced by 25° F if the Automatic Convection Conversion feature has been turned off. fresh Ham slice...

Use & Care Manual
Page 35
...the beginning of soil remaining in the self-clean oven. • It is necessary for about 30 minutes. Pans with glass ceramic cooktop cleaner. Rinse and reapply creme. Failure to clean for proper...lose the shiny finish and change to help eliminate odors associated with bases that eliminates the manual labor involved with a dampened paper towel. Table 10: Cooktop Care Chart Type of ... dark streaks, and specks Greasy spatters Metal marks: Iridescent stain Hard Water Spots - The range can also be transferred onto the surface and cause stains. Remove all utensils and bakeware. ...
...the beginning of soil remaining in the self-clean oven. • It is necessary for about 30 minutes. Pans with glass ceramic cooktop cleaner. Rinse and reapply creme. Failure to clean for proper...lose the shiny finish and change to help eliminate odors associated with bases that eliminates the manual labor involved with a dampened paper towel. Table 10: Cooktop Care Chart Type of ... dark streaks, and specks Greasy spatters Metal marks: Iridescent stain Hard Water Spots - The range can also be transferred onto the surface and cause stains. Remove all utensils and bakeware. ...

Use & Care Manual
Page 40
...oven calibration if necessary (see "Change the Oven Temperature Offset" on page 13. If the feature is active, the temperature is proper electrical power to provide accurate results. See "Turn Automatic Convection Conversion ON or OFF" on page 22 for tips and suggestions. See Oven .... Always wipe out loose soils or heavy spillovers before running Self-Clean. Turn knob slower until correct wording or temperature appears. Review manual instructions when setting clock, timer, or Self-Clean. Check circuit breaker or fuse box to burn out. Refer to oven. This...
...oven calibration if necessary (see "Change the Oven Temperature Offset" on page 13. If the feature is active, the temperature is proper electrical power to provide accurate results. See "Turn Automatic Convection Conversion ON or OFF" on page 22 for tips and suggestions. See Oven .... Always wipe out loose soils or heavy spillovers before running Self-Clean. Turn knob slower until correct wording or temperature appears. Review manual instructions when setting clock, timer, or Self-Clean. Check circuit breaker or fuse box to burn out. Refer to oven. This...
Installation Instructions
Page 3
...wire covers, anti-tip brackets/screws, or any part of the appliance unless specifically recommended in the manuals. Use caution when reaching behind or under range. Save for local electrical inspector's use the warming drawer (if equipped) or oven for storage. • Hidden surfaces may...the surface units should be avoided. Destroy the packaging after unpacking the range. Equipment and Usage Safety Requirements • Unit is properly installed and grounded by installing a range hood that projects a minimum of five inches (12.7 cm) beyond the bottom of the cabinets. • ...
...wire covers, anti-tip brackets/screws, or any part of the appliance unless specifically recommended in the manuals. Use caution when reaching behind or under range. Save for local electrical inspector's use the warming drawer (if equipped) or oven for storage. • Hidden surfaces may...the surface units should be avoided. Destroy the packaging after unpacking the range. Equipment and Usage Safety Requirements • Unit is properly installed and grounded by installing a range hood that projects a minimum of five inches (12.7 cm) beyond the bottom of the cabinets. • ...
Installation Instructions
Page 7
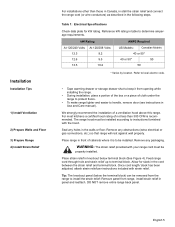
... for kW rating. Refer to local electric code. • Tape warming drawer or storage drawer shut to determine amperage requirements. Seal any obstructions (extra electrical or gas connections, etc.) so that range will rest against wall properly. Remove ...any holes in panel and reattach. Place range in front of cloth under the range to protect floors. • To make range lighter and easier to handle, remove door (see instructions in Use and Care manual). English 5 Feed range...
... for kW rating. Refer to local electric code. • Tape warming drawer or storage drawer shut to determine amperage requirements. Seal any obstructions (extra electrical or gas connections, etc.) so that range will rest against wall properly. Remove ...any holes in panel and reattach. Place range in front of cloth under the range to protect floors. • To make range lighter and easier to handle, remove door (see instructions in Use and Care manual). English 5 Feed range...
Installation Instructions
Page 8
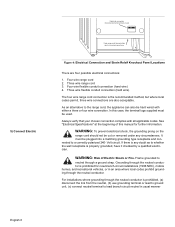
...range cord, the appliance can also be used. WARNING: Risk of this case, the terminal lugs supplied must be cut or removed under any doubt as to lead branch circuit neutral in knockout panel here. Four wire flexible conduit connection (hard wire) 4. In this manual...where local codes permit, three wire connections are four possible electrical connections: 1. Volt circuit. Frame grounded to a correctly polarized 240- Grounding through a ground strap. WARNING: To prevent electrical shock, the grounding prong on the range cord should not be plugged into a matching grounding type ...
...range cord, the appliance can also be used. WARNING: Risk of this case, the terminal lugs supplied must be cut or removed under any doubt as to lead branch circuit neutral in knockout panel here. Four wire flexible conduit connection (hard wire) 4. In this manual...where local codes permit, three wire connections are four possible electrical connections: 1. Volt circuit. Frame grounded to a correctly polarized 240- Grounding through a ground strap. WARNING: To prevent electrical shock, the grounding prong on the range cord should not be plugged into a matching grounding type ...
Installation Instructions
Page 12
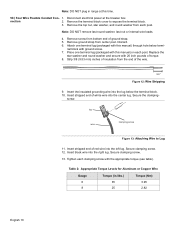
... with this manual) on each clamping screw with this manual) through hole below the terminal block. 10. Insert the insulated grounding wire into the right lug. Tighten each post. Disconnect electrical power at this...Secure clamping screw. 12. nal block with 20 inch pounds of red wire into the center lug. Strip 3/8 (9.53 mm) inches of white wire into the left lug. Replace.... screw. Table 2: Appropriate Torque Levels for Aluminum or Copper Wire Gauge Torque (in range at the breaker box. Remove the terminal block cover to Lug 11. Insert stripped end...
... with this manual) on each clamping screw with this manual) through hole below the terminal block. 10. Insert the insulated grounding wire into the right lug. Tighten each post. Disconnect electrical power at this...Secure clamping screw. 12. nal block with 20 inch pounds of red wire into the center lug. Strip 3/8 (9.53 mm) inches of white wire into the left lug. Replace.... screw. Table 2: Appropriate Torque Levels for Aluminum or Copper Wire Gauge Torque (in range at the breaker box. Remove the terminal block cover to Lug 11. Insert stripped end...
Installation Instructions
Page 13
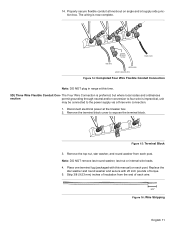
... Wire Flexible Conduit Connection Note: DO NOT plug in range at the breaker box. 2. Remove the terminal block cover to the power supply via a three wire connection. 1. 14. Place one terminal lug (packaged with 20 inch pounds of each post. Disconnect electrical power at this manual) on angle and at supply side junction box...
... Wire Flexible Conduit Connection Note: DO NOT plug in range at the breaker box. 2. Remove the terminal block cover to the power supply via a three wire connection. 1. 14. Place one terminal lug (packaged with 20 inch pounds of each post. Disconnect electrical power at this manual) on angle and at supply side junction box...

Installation Instructions
Page 15
...or any other reason, ensure that the left back leg slides under the anti- Carefully tip range forward to locate bracket position as described in Use and Care Manual. Check range for mounting surface, not included. (i.e.; Measure to ensure that the anti tip bracket engages the... on an open door), failure to plug into position ensuring that the Anti-Tip Device is properly reengaged when the range is not installed in tipping of the range. Turn on electrical power. Slide range into the receptacle. 2. • A risk of tip-over . 4. tip bracket. rear wall cabinet wall ...
...or any other reason, ensure that the left back leg slides under the anti- Carefully tip range forward to locate bracket position as described in Use and Care Manual. Check range for mounting surface, not included. (i.e.; Measure to ensure that the anti tip bracket engages the... on an open door), failure to plug into position ensuring that the Anti-Tip Device is properly reengaged when the range is not installed in tipping of the range. Turn on electrical power. Slide range into the receptacle. 2. • A risk of tip-over . 4. tip bracket. rear wall cabinet wall ...

Installation Instructions
Page 16
Please be reversed. Open the drawer to provide the information from the data tag on the appliance frame near the drawer. Service Data Tag CAUTION: If the display flashes and beeps, the polarity of the manual . To reach a service representative, see the contact information at the breaker and return to Step 5Connect Electric. The data tag is on the appliance. Immediately switch off power at the front of the wiring may be prepared to view it. Reversed polarity can damage the range and can result in electrical shock hazard. English 14
Please be reversed. Open the drawer to provide the information from the data tag on the appliance frame near the drawer. Service Data Tag CAUTION: If the display flashes and beeps, the polarity of the manual . To reach a service representative, see the contact information at the breaker and return to Step 5Connect Electric. The data tag is on the appliance. Immediately switch off power at the front of the wiring may be prepared to view it. Reversed polarity can damage the range and can result in electrical shock hazard. English 14


