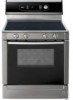
Use & Care Manual
Page 2
... Started 5 Parts and Accessories 5 Before Using the Appliance for the First Time 14 Operation - Table of Your Warming Drawer 29 Cleaning and Maintenance 30 Care and Cleaning 30 Maintenance 35 Service 36 Self Help 36 Warranty 38 Questions? 1-800-944-2904 www.boschappliances.com 5551 McFadden Ave. Cooktop 14 About the Cooktop...
... Started 5 Parts and Accessories 5 Before Using the Appliance for the First Time 14 Operation - Table of Your Warming Drawer 29 Cleaning and Maintenance 30 Care and Cleaning 30 Maintenance 35 Service 36 Self Help 36 Warranty 38 Questions? 1-800-944-2904 www.boschappliances.com 5551 McFadden Ave. Cooktop 14 About the Cooktop...
Use & Care Manual
Page 16
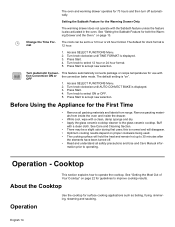
... to select 12 hour or 24 hour format. 5. Press Start. 4. Press Start to select ON or OFF. 5. Remove packing materials from range. Setting the Sabbath Feature for guidelines to 30 minutes after the elements have been turned off automatically. The default for the First Time • Remove all safety precautions and Use...
... to select 12 hour or 24 hour format. 5. Press Start. 4. Press Start to select ON or OFF. 5. Remove packing materials from range. Setting the Sabbath Feature for guidelines to 30 minutes after the elements have been turned off automatically. The default for the First Time • Remove all safety precautions and Use...
Use & Care Manual
Page 22
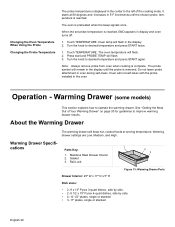
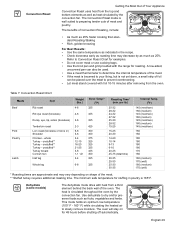
... to operate the warming drawer. The oven temperature will flash. 3. Oven will flash in the center to the left of Your Warming Drawer" on page 30 for guidelines to desired temperature and press START again. cations Parts Key: 1 1. Gasket 3. Note: Always remove probe from oven when cooking is reached, END appears...
... to operate the warming drawer. The oven temperature will flash. 3. Oven will flash in the center to the left of Your Warming Drawer" on page 30 for guidelines to desired temperature and press START again. cations Parts Key: 1 1. Gasket 3. Note: Always remove probe from oven when cooking is reached, END appears...
Use & Care Manual
Page 31
... is 165°F. per lb.) 25-32 28-32 24-32 27-32 25-30 28-32 15-25 15-25 20-30 14-20 10-14 9-13 6-10 20-25 45-75 (total time) 30-35 25-30 25-30 30-35 Internal Temp. (oF) 145 (med/rare) 160 (medium) 145 (med/rare) 160 (medium... a third element behind the back wall of meat and poultry. unstuffed** Turkey - unstuffed** Turkey - English 29 Dehydrate (some models) The dehydrate mode dries with the range for 48 hours before shutting off automatically.
... is 165°F. per lb.) 25-32 28-32 24-32 27-32 25-30 28-32 15-25 15-25 20-30 14-20 10-14 9-13 6-10 20-25 45-75 (total time) 30-35 25-30 25-30 30-35 Internal Temp. (oF) 145 (med/rare) 160 (medium) 145 (med/rare) 160 (medium... a third element behind the back wall of meat and poultry. unstuffed** Turkey - unstuffed** Turkey - English 29 Dehydrate (some models) The dehydrate mode dries with the range for 48 hours before shutting off automatically.

Use & Care Manual
Page 32
... drawer. Contact your dealer to order drying racks. • Treat fruits with paper towel Dry at 140° F. orange part of orange; English 30 Drying Time* (hours) Test for additional information. Check food at serving temperature (above 140° F) before being dried and the humidity in the air... Your Appliance For Best Results: • Dry most fruits and vegetables at 100°F for Crisp and brittle 3-5 hours Use basil leaves 3 to 4 inches from oranges 11-15 10-15 10-15 Peels: 2-4 Slices: 12-16 Towel dried. Wash and towel dry. Canned: 9-13 Fresh: 8-12 12-...
... drawer. Contact your dealer to order drying racks. • Treat fruits with paper towel Dry at 140° F. orange part of orange; English 30 Drying Time* (hours) Test for additional information. Check food at serving temperature (above 140° F) before being dried and the humidity in the air... Your Appliance For Best Results: • Dry most fruits and vegetables at 100°F for Crisp and brittle 3-5 hours Use basil leaves 3 to 4 inches from oranges 11-15 10-15 10-15 Peels: 2-4 Slices: 12-16 Towel dried. Wash and towel dry. Canned: 9-13 Fresh: 8-12 12-...

Use & Care Manual
Page 34
... with the razor blade scraper (See Cooktop Care Chart, next page). 2. Wearing an oven mitt, hold scraper at a 30° angle. Exception: Remove dry sugar, sugar syrup, tomato products and milk immediately with range) on a daily basis. rinse. 3. Use the scraper to use . Apply white vinegar if smudge remains and rinse. Be...
... with the razor blade scraper (See Cooktop Care Chart, next page). 2. Wearing an oven mitt, hold scraper at a 30° angle. Exception: Remove dry sugar, sugar syrup, tomato products and milk immediately with range) on a daily basis. rinse. 3. Use the scraper to use . Apply white vinegar if smudge remains and rinse. Be...

Use & Care Manual
Page 35
... ceramic cooktop cleaner. Use a soapy sponge or cloth to wipe up during the Self- Apply glass ceramic cooktop cleaner. Preparing the Oven for about 30 minutes. Do not clean, rub, damage or move the gasket. 1. Small scratches are left in the self-clean oven. • It is ...aluminum, copper or stainless steel bases may leave marks. During self-cleaning, the oven uses a very high temperature to clean for proper care. The range can also be expected on food soil, dark streaks, and specks Greasy spatters Metal marks: Iridescent stain Hard Water Spots - Use a plastic scrubber...
... ceramic cooktop cleaner. Use a soapy sponge or cloth to wipe up during the Self- Apply glass ceramic cooktop cleaner. Preparing the Oven for about 30 minutes. Do not clean, rub, damage or move the gasket. 1. Small scratches are left in the self-clean oven. • It is ...aluminum, copper or stainless steel bases may leave marks. During self-cleaning, the oven uses a very high temperature to clean for proper care. The range can also be expected on food soil, dark streaks, and specks Greasy spatters Metal marks: Iridescent stain Hard Water Spots - Use a plastic scrubber...
Installation Instructions
Page 4
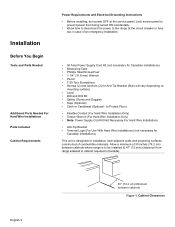
...Parts Needed For Hard Wire Installations Parts Included Cabinet Requirements Power Requirements and Electrical Grounding Instructions • Before installing, turn power OFF at the circuit breaker or fuse box in Canada). English 2 30" (76.2 cm) Minimum between cabinets where range is designed for installation near adjacent walls and projecting surfaces constructed of ... be installed (0.47" (12 mm) clearance from being turned ON accidentally. • Know how to disconnect the power to cabinet required in case of 30 inches (76.2 cm) between cabinets Figure 1: Cabinet Clearances
...Parts Needed For Hard Wire Installations Parts Included Cabinet Requirements Power Requirements and Electrical Grounding Instructions • Before installing, turn power OFF at the circuit breaker or fuse box in Canada). English 2 30" (76.2 cm) Minimum between cabinets where range is designed for installation near adjacent walls and projecting surfaces constructed of ... be installed (0.47" (12 mm) clearance from being turned ON accidentally. • Know how to disconnect the power to cabinet required in case of 30 inches (76.2 cm) between cabinets Figure 1: Cabinet Clearances

Installation Instructions
Page 5
If nonstandard cabinets are used, care should be taken to adjacent materials (see Figure 2 above : There must be a minimum clearance of 30 inches (76.2 cm) between the top of the cooking surface and the bottom of an unprotected wood or metal cabinet. 30in (76.2 cm ) min.... Clearance from backwall. Cabinets over the cooking surface and cabinets adjacent to those over the cooking surface measure 13 inches (33 cm) deep from range top to adjacent vertical walls must be at least 4" (10.2 cm). the cabinets may discolor or stain. Standard base cabinets measure 36" ...
If nonstandard cabinets are used, care should be taken to adjacent materials (see Figure 2 above : There must be a minimum clearance of 30 inches (76.2 cm) between the top of the cooking surface and the bottom of an unprotected wood or metal cabinet. 30in (76.2 cm ) min.... Clearance from backwall. Cabinets over the cooking surface and cabinets adjacent to those over the cooking surface measure 13 inches (33 cm) deep from range top to adjacent vertical walls must be at least 4" (10.2 cm). the cabinets may discolor or stain. Standard base cabinets measure 36" ...
Installation Instructions
Page 6
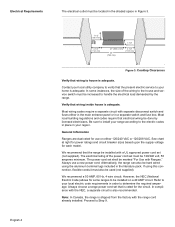
... VAC or 120/208 VAC. Note: In Canada, the range is also recommended. Electrical Requirements The electrical outlet must be marked "For Use with Ranges." We recommend that the present electric service to Step 9. The electrical rating of the wiring to be installed on either in the... English 4 7 1/2" (190.5 mm) 4 1/2" (114.3 mm) 3 1/2" (88.9 mm) 21" (533.4 mm) 30" (762 mm) 4 1/2" (114.3 mm) Figure 3: Cooktop Clearances Verify that is adequate. Verify that electrical wiring be used (not supplied). We recommend a 50 AMP, 60 Hz, 4 wire circuit; Be sure to install your region...
... VAC or 120/208 VAC. Note: In Canada, the range is also recommended. Electrical Requirements The electrical outlet must be marked "For Use with Ranges." We recommend that the present electric service to Step 9. The electrical rating of the wiring to be installed on either in the... English 4 7 1/2" (190.5 mm) 4 1/2" (114.3 mm) 3 1/2" (88.9 mm) 21" (533.4 mm) 30" (762 mm) 4 1/2" (114.3 mm) Figure 3: Cooktop Clearances Verify that is adequate. Verify that electrical wiring be used (not supplied). We recommend a 50 AMP, 60 Hz, 4 wire circuit; Be sure to install your region...