

Installation Instructions
Page 3
...block. To remove, loosen center screw (one screw) and remove cover. hole as shown. knockouts refer to Fig.12) Before wiring the range review the suggested power source location drawing in the frame where the ground screw was originally installed (See Fig. 12). 5. Refer to Fig. 9.... recommended mounting orientation on end of wires must be either three (3) or four (4) conductors (See Fig. 8). INSTALLATION INSTRUCTIONS FOR FREESTANDING ELECTRIC RANGE 2b. Insert the end connectors for 3-Wire connections. 3. for Line 1, Line 2 and Neutral and tighten securely to the frame of ...
...block. To remove, loosen center screw (one screw) and remove cover. hole as shown. knockouts refer to Fig.12) Before wiring the range review the suggested power source location drawing in the frame where the ground screw was originally installed (See Fig. 12). 5. Refer to Fig. 9.... recommended mounting orientation on end of wires must be either three (3) or four (4) conductors (See Fig. 8). INSTALLATION INSTRUCTIONS FOR FREESTANDING ELECTRIC RANGE 2b. Insert the end connectors for 3-Wire connections. 3. for Line 1, Line 2 and Neutral and tighten securely to the frame of ...
Installation Instructions
Page 4
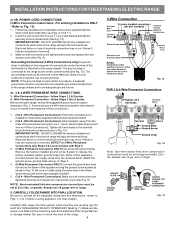
... the level of the appliance. The ground strap is installed on 4-Wire Connections). Before wiring the range, review the suggested power source location drawings in Fig. 14). Electrical failure or loss of a ground strap. Wire Permanent Connections) Make sure all connections are tightened securely... and Neutral and tighten securely to the frame of electrical connection may occur if these 3 nuts are loosened or removed. Be sure to provide all 3 wire leads to the range by the center, lowest screw (See Fig. 13). INSTALLATION INSTRUCTIONS FOR FREESTANDING ELECTRIC RANGE or 4B.
... the level of the appliance. The ground strap is installed on 4-Wire Connections). Before wiring the range, review the suggested power source location drawings in Fig. 14). Electrical failure or loss of a ground strap. Wire Permanent Connections) Make sure all connections are tightened securely... and Neutral and tighten securely to the frame of electrical connection may occur if these 3 nuts are loosened or removed. Be sure to provide all 3 wire leads to the range by the center, lowest screw (See Fig. 13). INSTALLATION INSTRUCTIONS FOR FREESTANDING ELECTRIC RANGE or 4B.