
Installation Instructions
Page 1
..., a fire or electrical shock may be solid and level. Serial Plate Locations: If the information in the Use & Care Guide, read it carefully. • Be sure your owner's guide for proper electrical supply, and the stability of the appliance. Contact surface must be installed. Location-Check location where the range will be used. Páginas 5-8 1 p/n 316454912 rev A INSTALLATION INSTRUCTIONS FOR FREESTANDING ELECTRIC RANGE INSTALLATION AND SERVICE MUST BE PERFORMED BY A QUALIFIED INSTALLER. Given dimensions provide minimum clearance...
..., a fire or electrical shock may be solid and level. Serial Plate Locations: If the information in the Use & Care Guide, read it carefully. • Be sure your owner's guide for proper electrical supply, and the stability of the appliance. Contact surface must be installed. Location-Check location where the range will be used. Páginas 5-8 1 p/n 316454912 rev A INSTALLATION INSTRUCTIONS FOR FREESTANDING ELECTRIC RANGE INSTALLATION AND SERVICE MUST BE PERFORMED BY A QUALIFIED INSTALLER. Given dimensions provide minimum clearance...

Installation Instructions
Page 2
... not allow the bracket to fit flush against the rear wall and the side edge of template on top of template and mark location of "Permanent Wiring" or "Power Supply Cord Kit." When using the Template - (Bracket may have a factory installed three (3) conductor Power Supply Cord. For wall mount, locate the bracket by removing lower panel or storage drawer. Models with a wrench. Terminals on either closed loop or open door or if...
... not allow the bracket to fit flush against the rear wall and the side edge of template on top of template and mark location of "Permanent Wiring" or "Power Supply Cord Kit." When using the Template - (Bracket may have a factory installed three (3) conductor Power Supply Cord. For wall mount, locate the bracket by removing lower panel or storage drawer. Models with a wrench. Terminals on either closed loop or open door or if...

Installation Instructions
Page 3
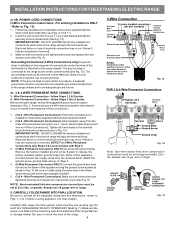
... for 4-Wire or 4b. Cord must have either 7/8" dia. for cord kit ampere rating information. The terminal block will then be removed (Fig 9). hole or 1-1/8" dia. knockouts refer to Fig.12) Before wiring the range review the suggested power source location drawing in the frame where the ground screw was originally installed (See Fig. 12). 5. POWER CORD CONNECTIONS (4-Wire Connection Instructions - Refer to Fig. 9. MODELS REQUIRING POWER SUPPLY CORD KIT. for existing installations 3 Wire Wall receptacle...
... for 4-Wire or 4b. Cord must have either 7/8" dia. for cord kit ampere rating information. The terminal block will then be removed (Fig 9). hole or 1-1/8" dia. knockouts refer to Fig.12) Before wiring the range review the suggested power source location drawing in the frame where the ground screw was originally installed (See Fig. 12). 5. POWER CORD CONNECTIONS (4-Wire Connection Instructions - Refer to Fig. 9. MODELS REQUIRING POWER SUPPLY CORD KIT. for existing installations 3 Wire Wall receptacle...
Installation Instructions
Page 4
... and replace the rear access cover (See Fig. 9). NOTE: For 3-Wire Permanent Connections skip Steps 3 & 4 and continue with the strain relief and install (Also see Figs. 9, 10 & 11). 2. Cut and discard the copper strap from frame of the appliance. CAREFULLY SLIDE RANGE INTO FINAL LOCATION. Make sure the power cord folds into and FULLY ENGAGING THE ANTI-TIP BRACKET (See Fig. 7). wire or larger. Follow the manufacturer's installation instructions supplied...
... and replace the rear access cover (See Fig. 9). NOTE: For 3-Wire Permanent Connections skip Steps 3 & 4 and continue with the strain relief and install (Also see Figs. 9, 10 & 11). 2. Cut and discard the copper strap from frame of the appliance. CAREFULLY SLIDE RANGE INTO FINAL LOCATION. Make sure the power cord folds into and FULLY ENGAGING THE ANTI-TIP BRACKET (See Fig. 7). wire or larger. Follow the manufacturer's installation instructions supplied...
Instructions for Use
Page 3
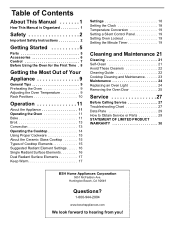
...Oven 9 Adjusting the Oven Temperature 9 Rack Positions 10 Operation 11 About the Appliance 11 Operating the Oven 11 Bake 11 Broil 13 Convection 13 Operating the Cooktop 14 Using Proper Cookware 15 About the Ceramic Glass Cooktop 15 Types of Cooktop Elements 15 Suggested Radiant Element Settings 16 Single Radiant Surface Elements 16 Dual Radiant Surface Elements 17 Keep Warm 17 Settings 18 Setting the Clock 18 Temperature Conversion 19 Setting a Silent Control Panel 19 Setting Oven Lockout 19 Setting the Minute Timer 19 Cleaning and Maintenance 21 Cleaning 21 Self-Clean...
...Oven 9 Adjusting the Oven Temperature 9 Rack Positions 10 Operation 11 About the Appliance 11 Operating the Oven 11 Bake 11 Broil 13 Convection 13 Operating the Cooktop 14 Using Proper Cookware 15 About the Ceramic Glass Cooktop 15 Types of Cooktop Elements 15 Suggested Radiant Element Settings 16 Single Radiant Surface Elements 16 Dual Radiant Surface Elements 17 Keep Warm 17 Settings 18 Setting the Clock 18 Temperature Conversion 19 Setting a Silent Control Panel 19 Setting Oven Lockout 19 Setting the Minute Timer 19 Cleaning and Maintenance 21 Cleaning 21 Self-Clean...
Instructions for Use
Page 5
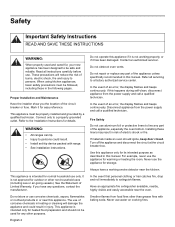
... injury. Refer all instructions carefully before use the appliance for warming or heating the room. Disconnect appliance from the power supply and call a qualified technician. Turn off the appliance and disconnect the circuit at the circuit breaker box. Always have any questions, contact the manufacturer. Smother flames from food fires other than grease fires with range. • See installation instructions. When using kitchen appliances, basic...
... injury. Refer all instructions carefully before use the appliance for warming or heating the room. Disconnect appliance from the power supply and call a qualified technician. Turn off the appliance and disconnect the circuit at the circuit breaker box. Always have any questions, contact the manufacturer. Smother flames from food fires other than grease fires with range. • See installation instructions. When using kitchen appliances, basic...

Instructions for Use
Page 6
... defects or other reproductive harm, and requires businesses to reach items could be left alone or unattended in the area where the appliance is in foods, and open the oven door carefully. The burning of gas cooking fuel and the elimination of an appliance, especially a door, warming drawer or storage drawer. Always place oven racks in safe operation of the appliance by qualified persons. Tie...
... defects or other reproductive harm, and requires businesses to reach items could be left alone or unattended in the area where the appliance is in foods, and open the oven door carefully. The burning of gas cooking fuel and the elimination of an appliance, especially a door, warming drawer or storage drawer. Always place oven racks in safe operation of the appliance by qualified persons. Tie...
Instructions for Use
Page 9
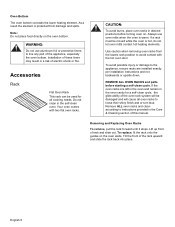
... contact hot heating elements. Your oven comes with the hot oven door. Use caution when removing oven racks from damage and spills. Removing and Replacing Oven Racks To remove, pull the rack forward until it stops. Remove ALL oven racks and clean according to line any part of rack and slide out. Do not clean in desired positions before starting a self-clean cycle. Tilt the front of electric shock or fire. To replace, fit the rack onto the guides on the oven bottom. Oven Bottom The oven...
... contact hot heating elements. Your oven comes with the hot oven door. Use caution when removing oven racks from damage and spills. Removing and Replacing Oven Racks To remove, pull the rack forward until it stops. Remove ALL oven racks and clean according to line any part of rack and slide out. Do not clean in desired positions before starting a self-clean cycle. Tilt the front of electric shock or fire. To replace, fit the rack onto the guides on the oven bottom. Oven Bottom The oven...

Instructions for Use
Page 11
... automatic start or stop cooking. Used to select the variable broil feature. Note: All other indicator lights on to maintain the set a Self-Clean cycle. English 8 Use to set oven temperature. Use with a clean, damp cloth and dry. • There may be properly installed by a qualified technician before use. • Remove all safety precautions and Use and Care Manual information prior to select the bake feature. Light will glow when the oven is circulated by a convection fan (some models...
... automatic start or stop cooking. Used to select the variable broil feature. Note: All other indicator lights on to maintain the set a Self-Clean cycle. English 8 Use to set oven temperature. Use with a clean, damp cloth and dry. • There may be properly installed by a qualified technician before use. • Remove all safety precautions and Use and Care Manual information prior to select the bake feature. Light will glow when the oven is circulated by a convection fan (some models...

Instructions for Use
Page 12
... time, stagger pans on the open oven door. • Do not keep track of cooking times. • High Altitude Baking • When cooking at least 1" to 1 ½" of air space around the pan. Baking Pans and Dishes • Glass baking dishes absorb heat. Preheating the Oven • Place oven racks in desired position before the number to preheat while preparing recipe ingredients or food items. • Setting a higher temperature does not shorten preheat time. • Once oven...
... time, stagger pans on the open oven door. • Do not keep track of cooking times. • High Altitude Baking • When cooking at least 1" to 1 ½" of air space around the pan. Baking Pans and Dishes • Glass baking dishes absorb heat. Preheating the Oven • Place oven racks in desired position before the number to preheat while preparing recipe ingredients or food items. • Setting a higher temperature does not shorten preheat time. • Once oven...

Instructions for Use
Page 15
... "-". To change the oven temperature or bake time after bake has started 1. The oven can be removed promptly when cooking is set time to display Celsius). 5. By holding the"+" or "-", the temperature can then be adjusted in the display. 9. Press the function pad you select in 5°F increments (1°C if the control is reached. When the displayed temperature reaches the desired baking temperature, the preheat indicator light will beep 3 times. 4. Note: The OVEN indicator light on the electronic display will turn OFF...
... "-". To change the oven temperature or bake time after bake has started 1. The oven can be removed promptly when cooking is set time to display Celsius). 5. By holding the"+" or "-", the temperature can then be adjusted in the display. 9. Press the function pad you select in 5°F increments (1°C if the control is reached. When the displayed temperature reaches the desired baking temperature, the preheat indicator light will beep 3 times. 4. Note: The OVEN indicator light on the electronic display will turn OFF...
Instructions for Use
Page 16
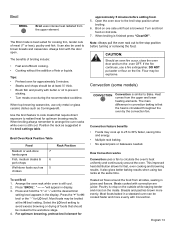
... broil setting level appears in the broil settings table. "will appear in juices and flavors. When broiling is still cool. 2. Arrange the oven rack while oven is finished press "Clear/Off". For optimum browning, preheat broil element for LO broil. Open the oven door to arrange the oven racks while oven is browned. Convection feature benefits • Foods may cook up to 25 to the stop position when broiling. 6. It also gives better baking...
... broil setting level appears in the broil settings table. "will appear in juices and flavors. When broiling is still cool. 2. Arrange the oven rack while oven is finished press "Clear/Off". For optimum browning, preheat broil element for LO broil. Open the oven door to arrange the oven racks while oven is browned. Convection feature benefits • Foods may cook up to 25 to the stop position when broiling. 6. It also gives better baking...

Instructions for Use
Page 18
... of the cookware (See Fig. 1). Pan sizes match the amount of food to match the pan size with two different types of the glass. Types of cooktop elements The ceramic glass cooktop has radiant surface elements located below the surface of radiant surface control indicator lights that conducts heat well. Check for ceramic glass cooktop cleaning in use and their settings are turned OFF. Heavy handle tilts pan. Good Cookware Poor Cookware Element ON Indicator Lights Flat bottom and straight sides.
... of the cookware (See Fig. 1). Pan sizes match the amount of food to match the pan size with two different types of the glass. Types of cooktop elements The ceramic glass cooktop has radiant surface elements located below the surface of radiant surface control indicator lights that conducts heat well. Check for ceramic glass cooktop cleaning in use and their settings are turned OFF. Heavy handle tilts pan. Good Cookware Poor Cookware Element ON Indicator Lights Flat bottom and straight sides.

Instructions for Use
Page 20
... for oven and cooktop use plastic wrap to cover food. See Suggested radiant surface element settings table on dual radiant surface element. 2. Use the keep warm feature to keep warm zone is in either element setting at any time during cooking. Push in use. CAUTION: Radiant surface elements may appear to have cooled after they will damage the ceramic cooktop. The glass surface may switch from either direction and turn the control to the surface elements. Heating with Inner (small) element only Heating with...
... for oven and cooktop use plastic wrap to cover food. See Suggested radiant surface element settings table on dual radiant surface element. 2. Use the keep warm feature to keep warm zone is in either element setting at any time during cooking. Push in use. CAUTION: Radiant surface elements may appear to have cooled after they will damage the ceramic cooktop. The glass surface may switch from either direction and turn the control to the surface elements. Heating with Inner (small) element only Heating with...

Instructions for Use
Page 22
... for models without Convection feature) 1. Setting a silent control panel When choosing a function, a beep will appear in the display. • If any amount of day will be programmed for 3 seconds. If desired, the control can be programmed for the oven door to lock the oven door and lockout the oven control pads. Once the oven door is heard, " - - Note: • DO NOT open the oven door while the indicator light is pressed. The timer can...
... for models without Convection feature) 1. Setting a silent control panel When choosing a function, a beep will appear in the display. • If any amount of day will be programmed for 3 seconds. If desired, the control can be programmed for the oven door to lock the oven door and lockout the oven control pads. Once the oven door is heard, " - - Note: • DO NOT open the oven door while the indicator light is pressed. The timer can...

Instructions for Use
Page 24
... oven door gasket. "---" appears in the instructions provided below. To change to the instructions in the display). Always operate the unit according to a 2 hour self-clean time press "-" once (2:00 appears in the manual. • When self-cleaning, confirm that a 3 hour self-clean time is set the Self-Clean mode: 1. These items cannot withstand high cleaning temperatures and will make the racks glide easier into the rack position). • Remove any spills remaining on the surface...
... oven door gasket. "---" appears in the instructions provided below. To change to the instructions in the display). Always operate the unit according to a 2 hour self-clean time press "-" once (2:00 appears in the manual. • When self-cleaning, confirm that a 3 hour self-clean time is set the Self-Clean mode: 1. These items cannot withstand high cleaning temperatures and will make the racks glide easier into the rack position). • Remove any spills remaining on the surface...

Instructions for Use
Page 26
... kitchen. • Cook foods directly on the cooktop surface without a pan. Remove water spots with a cloth dampened with cooktop cleaning cream and buff surface clean. This will make cleaning easier when soiled from cooking. Rub the soiled area using the cooktop cleaning cream. Clean with a soapy sponge, then rinse and dry, or wipe with a non-abrasive cloth or no -scratch cleaning pad, applying pressure as a cutting board or work surface in the direction...
... kitchen. • Cook foods directly on the cooktop surface without a pan. Remove water spots with a cloth dampened with cooktop cleaning cream and buff surface clean. This will make cleaning easier when soiled from cooking. Rub the soiled area using the cooktop cleaning cream. Clean with a soapy sponge, then rinse and dry, or wipe with a non-abrasive cloth or no -scratch cleaning pad, applying pressure as a cutting board or work surface in the direction...
Instructions for Use
Page 30
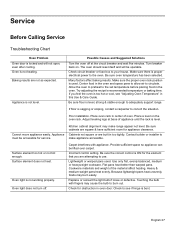
Service Before Calling Service Troubleshooting Chart Oven Problem Oven door is not level. Appliance is locked and will be operable. Check circuit breaker or fuse box to adequately support range. Be sure floor is level. Place oven rack in too tightly. Adjust leveling legs at the circuit breaker and wait five minutes. Cannot move appliance easily. Cabinets not square or are not as expected. Contact builder or installer to the oven. Use only flat...
Service Before Calling Service Troubleshooting Chart Oven Problem Oven door is not level. Appliance is locked and will be operable. Check circuit breaker or fuse box to adequately support range. Be sure floor is level. Place oven rack in too tightly. Adjust leveling legs at the circuit breaker and wait five minutes. Cannot move appliance easily. Cabinets not square or are not as expected. Contact builder or installer to the oven. Use only flat...
Instructions for Use
Page 31
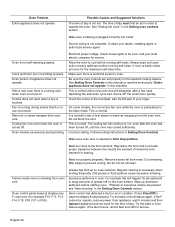
... from oven vent. Oven control panel beeps & displays any F code error (for searing. Oven control has detected a fault or error condition. If the fault recurs, record fault and call for service. Possible Causes and Suggested Solutions The time of day is badly soiled, set oven for the desired cooking feature. Cooling fan runs even when the oven is plugged correctly into lean. Operating the self-clean cycle also "burns-off . Reposition the broil rack to oven. Cut...
... from oven vent. Oven control panel beeps & displays any F code error (for searing. Oven control has detected a fault or error condition. If the fault recurs, record fault and call for service. Possible Causes and Suggested Solutions The time of day is badly soiled, set oven for the desired cooking feature. Cooling fan runs even when the oven is plugged correctly into lean. Operating the self-clean cycle also "burns-off . Reposition the broil rack to oven. Cut...
Instructions for Use
Page 33
... any form of commercial use, use or storage of purchase at the time any concessions, including repairs, pro-rates, or Product replacement, once this warranty has expired. How Long the Warranty Lasts Bosch warrants that the Product falls within the United States or Canada, and has at law or otherwise, to follow operating instructions, English 30 The warranties stated herein apply only...
... any form of commercial use, use or storage of purchase at the time any concessions, including repairs, pro-rates, or Product replacement, once this warranty has expired. How Long the Warranty Lasts Bosch warrants that the Product falls within the United States or Canada, and has at law or otherwise, to follow operating instructions, English 30 The warranties stated herein apply only...


