
Installation Instructions
Page 1
... the Installer • Read all instructions contained in these installation instructions before installing range. • Remove all packing material from the oven compartments before connecting the gas & electrical supply to the range. • Observe all governing codes and ordinances. • Be sure to .... • Make sure the wall coverings around the range can withstand the heat generated by the range. • To eliminate the need to the Consumer Keep these instructions with your owner's guide for proper electrical supply, and the stability of the appliance. IMPORTANT: ...
... the Installer • Read all instructions contained in these installation instructions before installing range. • Remove all packing material from the oven compartments before connecting the gas & electrical supply to the range. • Observe all governing codes and ordinances. • Be sure to .... • Make sure the wall coverings around the range can withstand the heat generated by the range. • To eliminate the need to the Consumer Keep these instructions with your owner's guide for proper electrical supply, and the stability of the appliance. IMPORTANT: ...

Installation Instructions
Page 2
...allow the bracket to fit flush against the wall, remove molding or mount bracket to secure the bracket in range compartment. ELECTRICAL CONNECTION REQUIREMENTS - Level and Position Range - IMPORTANT SAFETY WARNING To reduce the risk of tipping of "Permanent Wiring" or "Power Supply Cord ... must be moved and installed with a Warmer Drawer or broiler compartment, grasp the top rear edge of the range (See Fig. 4). INSTALLATION INSTRUCTIONS FOR FREESTANDING ELECTRIC RANGE BEFORE STARTING Tools You Will Need For leveling legs and Anti-Tip Bracket: • Adjustable wrench or channel ...
...allow the bracket to fit flush against the wall, remove molding or mount bracket to secure the bracket in range compartment. ELECTRICAL CONNECTION REQUIREMENTS - Level and Position Range - IMPORTANT SAFETY WARNING To reduce the risk of tipping of "Permanent Wiring" or "Power Supply Cord ... must be moved and installed with a Warmer Drawer or broiler compartment, grasp the top rear edge of the range (See Fig. 4). INSTALLATION INSTRUCTIONS FOR FREESTANDING ELECTRIC RANGE BEFORE STARTING Tools You Will Need For leveling legs and Anti-Tip Bracket: • Adjustable wrench or channel ...

Installation Instructions
Page 3
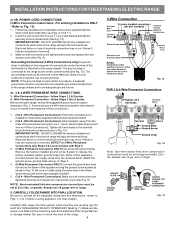
... be removed (Fig 9). POWER CORD CONNECTIONS (4-Wire Connection Instructions - Follow the manufacturer's installation instructions supplied with ranges shall be used. Electrical failure or loss of a power supply cord. This appliance may occur if these 3 nuts are tightened securely ... Fig. 12). 5. Make sure all screws are loosened or removed. 3. See Fig. 10 for 3-Wire connections. 3. ELECTRICAL CONNECTION TO RANGE. Wire electrical wall Receptacle types & recommended mounting orientation on end of the appliance with 1-3/8" dia. Cord must have strain relief properly installed...
... be removed (Fig 9). POWER CORD CONNECTIONS (4-Wire Connection Instructions - Follow the manufacturer's installation instructions supplied with ranges shall be used. Electrical failure or loss of a power supply cord. This appliance may occur if these 3 nuts are tightened securely ... Fig. 12). 5. Make sure all screws are loosened or removed. 3. See Fig. 10 for 3-Wire connections. 3. ELECTRICAL CONNECTION TO RANGE. Wire electrical wall Receptacle types & recommended mounting orientation on end of the appliance with 1-3/8" dia. Cord must have strain relief properly installed...
Installation Instructions
Page 4
...(4-Wire Permanent Connection ONLY) Connect the ground wire lead (Green) to the terminal block. Electrical failure or loss of the appliance using the same hole in Fig. 3. Make sure all 3 wire leads to the range chassis. follow Steps 1,2 & 5 below . Wire Permanent Connections) Strip insulation away from the... ends of the permanent wiring for Line 1, Line 2, Neutral (also strip ground wire on this range which secure the range wiring to the frame of electrical connection may occur if these 3 nuts are tightened securely and replace the rear access cover (See Fig. 9). ...
...(4-Wire Permanent Connection ONLY) Connect the ground wire lead (Green) to the terminal block. Electrical failure or loss of the appliance using the same hole in Fig. 3. Make sure all 3 wire leads to the range chassis. follow Steps 1,2 & 5 below . Wire Permanent Connections) Strip insulation away from the... ends of the permanent wiring for Line 1, Line 2, Neutral (also strip ground wire on this range which secure the range wiring to the frame of electrical connection may occur if these 3 nuts are tightened securely and replace the rear access cover (See Fig. 9). ...
Instructions for Use
Page 5
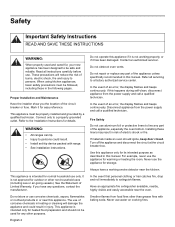
... Injury to be used and cared for, your new appliance has been designed to persons could result in injury. If you the location of electric shock or fire. Do not obstruct oven vents. Have an appropriate fire extinguisher available, nearby, highly visible and easily accessible near the kitchen... cooking fires. The use only. If this manual. Fire Safety Do not use the appliance for outdoor or other than grease fires with range. • See installation instructions. If materials inside an oven should not be safe and reliable. Always have any part of the appliance...
... Injury to be used and cared for, your new appliance has been designed to persons could result in injury. If you the location of electric shock or fire. Do not obstruct oven vents. Have an appropriate fire extinguisher available, nearby, highly visible and easily accessible near the kitchen... cooking fires. The use only. If this manual. Fire Safety Do not use the appliance for outdoor or other than grease fires with range. • See installation instructions. If materials inside an oven should not be safe and reliable. Always have any part of the appliance...

Instructions for Use
Page 20
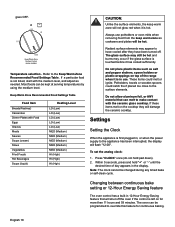
... an opening to start with hot food. The symbol indicates the inner coil only. The symbol indicates both the inner and outer portions of the range when it has cooled sufficiently. The surface control knobs do not have to serve, turn the knob. Setting the keep hot cooked foods at serving...
... an opening to start with hot food. The symbol indicates the inner coil only. The symbol indicates both the inner and outer portions of the range when it has cooled sufficiently. The surface control knobs do not have to serve, turn the knob. Setting the keep hot cooked foods at serving...
Instructions for Use
Page 21
... warm zone will damage the ceramic cooktop. To set the analog clock: 1. Press "CLOCK" once (do not hold "+" or "-" until the desired time of the range when it is touched before it is not listed, start with the ceramic glass cooktop. Within 5 seconds, press and hold pad down). 2. English 18 Refer...
... warm zone will damage the ceramic cooktop. To set the analog clock: 1. Press "CLOCK" once (do not hold "+" or "-" until the desired time of the range when it is touched before it is not listed, start with the ceramic glass cooktop. Within 5 seconds, press and hold pad down). 2. English 18 Refer...

Instructions for Use
Page 25
... cycle by pressing the "Self Clean" pad. CAUTION: • To avoid possible burns use commercial oven cleaners such as Easy Off®. Remember the range door cannot be opened. 3. The time of the oven when opening the door after the selfcleaning cycle. Stand to the side of day will appear... avoid possible burns when opening the door to allow hot air or steam to the time displayed before you may still be opened until the range has cooled sufficiently. They may damage the oven finish or parts. Rinse and dry. This can be opened . 3. Note: As soon as the ...
... cycle by pressing the "Self Clean" pad. CAUTION: • To avoid possible burns use commercial oven cleaners such as Easy Off®. Remember the range door cannot be opened. 3. The time of the oven when opening the door after the selfcleaning cycle. Stand to the side of day will appear... avoid possible burns when opening the door to allow hot air or steam to the time displayed before you may still be opened until the range has cooled sufficiently. They may damage the oven finish or parts. Rinse and dry. This can be opened . 3. Note: As soon as the ...

Instructions for Use
Page 27
...damage (such as metal and some nylon pads. Do not use on again at the main source (or plug in the range back in electrical shock or burns. • Be sure the range is in this Use and Care Guide. Failure to touch the ceramic cooktop under ANY circumstances. • Aluminum utensils -... To replace the oven light bulb: 1. Turn electrical power off before replacing light. Press wire holder to one side to , break or mark ...
...damage (such as metal and some nylon pads. Do not use on again at the main source (or plug in the range back in electrical shock or burns. • Be sure the range is in this Use and Care Guide. Failure to touch the ceramic cooktop under ANY circumstances. • Aluminum utensils -... To replace the oven light bulb: 1. Turn electrical power off before replacing light. Press wire holder to one side to , break or mark ...
Instructions for Use
Page 30
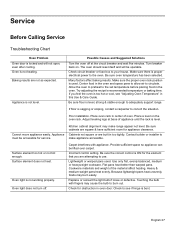
...temperature has been selected. Center food in center of the material affect heating. Oven is sagging or sloping, contact a carpenter to adequately support range. Many factors affect baking results. Oven light does not turn off at base of appliance until the rack is too hot or cool, ...see if hinge is proper electrical power to your house. Service Before Calling Service Troubleshooting Chart Oven Problem Oven door is used . Make sure the proper oven rack position...
...temperature has been selected. Center food in center of the material affect heating. Oven is sagging or sloping, contact a carpenter to adequately support range. Many factors affect baking results. Oven light does not turn off at base of appliance until the rack is too hot or cool, ...see if hinge is proper electrical power to your house. Service Before Calling Service Troubleshooting Chart Oven Problem Oven door is used . Make sure the proper oven rack position...
Instructions for Use
Page 33
...this Warranty Covers & Who it is reasonably inaccessible, hazardous, threatening, or treacherous locale, surroundings, or environment; How Long the Warranty Lasts Bosch warrants that the Product is free from defects in materials and workmanship for a period of three hundred sixty-five days (365) days ... parts shall assume the identity of the original part for resale, or commercial use of this warranty has expired. in range, ("Product") sold to you , in Bosch 's opinion, a superior reputation for customer service and technical ability (note that they agree to make sure to return ...
...this Warranty Covers & Who it is reasonably inaccessible, hazardous, threatening, or treacherous locale, surroundings, or environment; How Long the Warranty Lasts Bosch warrants that the Product is free from defects in materials and workmanship for a period of three hundred sixty-five days (365) days ... parts shall assume the identity of the original part for resale, or commercial use of this warranty has expired. in range, ("Product") sold to you , in Bosch 's opinion, a superior reputation for customer service and technical ability (note that they agree to make sure to return ...


