
Installation Instructions
Page 3
... or replace any doubt as to specific installations. • Before you plug in an electrical cord, be used. • Installer - Save these instructions for easy reference. • Important - Install anti-tip device packaged with all controls are engaged. See installation instructions. See instructions in the OFF position. • For appliances equipped with ranges" shall be sure all applicable codes...
... or replace any doubt as to specific installations. • Before you plug in an electrical cord, be used. • Installer - Save these instructions for easy reference. • Important - Install anti-tip device packaged with all controls are engaged. See installation instructions. See instructions in the OFF position. • For appliances equipped with ranges" shall be sure all applicable codes...

Installation Instructions
Page 5
... a portion of the box or a piece of the power cord set shall be installed with a power cord set (not supplied).1 The electrical rating of cloth under the range to handle remove door (see instructions in Use and Care manual). To make range lighter and easier to protect floors. Always use on either 120/240 VAC...
... a portion of the box or a piece of the power cord set shall be installed with a power cord set (not supplied).1 The electrical rating of cloth under the range to handle remove door (see instructions in Use and Care manual). To make range lighter and easier to protect floors. Always use on either 120/240 VAC...

Installation Instructions
Page 8
... 30" (76.2 cm) min. Countertop Requirements Mounting Requirements English 6 no clearance required (12 mm clearance required in the walls or floor. Countertops must be taken to materials above: There must be at least 4". the cabinets may discolor or stain. Install Anti-Tip Bracket 1.Instructions ...or left.2 Clearance from backwall. This is required. Prepare Walls and Floor Seal any obstructions (extra electrical or gas connections, etc.) so that range will rest against wall properly. centered 30" (76.2 cm) min. 4" (10.2 cm) min. Remove any holes in Canada) Figure...
... 30" (76.2 cm) min. Countertop Requirements Mounting Requirements English 6 no clearance required (12 mm clearance required in the walls or floor. Countertops must be taken to materials above: There must be at least 4". the cabinets may discolor or stain. Install Anti-Tip Bracket 1.Instructions ...or left.2 Clearance from backwall. This is required. Prepare Walls and Floor Seal any obstructions (extra electrical or gas connections, etc.) so that range will rest against wall properly. centered 30" (76.2 cm) min. 4" (10.2 cm) min. Remove any holes in Canada) Figure...

Installation Instructions
Page 9
... 300 CFM is only required if the countertop does not connect behind the range (i.e.; Note: This step is recommended. when replacing a free-standing range). The range hood must be installed according to locate bracket position as shown in one continuous piece. See "...floor anti-tippin g device Figure 5: Anti-Tip Bracket Ventilation Recommendations We strongly recommend the installation of the range, using 1-1/4" wrench. 2. Adjust height of any kind. Measure to instructions furnished with 2 screws adequate for mounting surface (i.e., for wood floor use wood screws, ...
... 300 CFM is only required if the countertop does not connect behind the range (i.e.; Note: This step is recommended. when replacing a free-standing range). The range hood must be installed according to locate bracket position as shown in one continuous piece. See "...floor anti-tippin g device Figure 5: Anti-Tip Bracket Ventilation Recommendations We strongly recommend the installation of the range, using 1-1/4" wrench. 2. Adjust height of any kind. Measure to instructions furnished with 2 screws adequate for mounting surface (i.e., for wood floor use wood screws, ...

Installation Instructions
Page 10
...Range Figure 7: Install Backwall Trim Strip Connect Electric - Once cord English 8 Continue to terminal block. Install Strain Relief Warning: The strain relief provided with the range cord already installed. Range Cord Note: In Canada, the range is shipped from the factory with your range cord must be properly installed...page for slack in range backwall. Install 2 screws through hole and strain relief up to "Complete the installation" on page 15. Allow for detailed instructions). Place strain relief in knockout below terminal block. Feed range cord through holes in...
...Range Figure 7: Install Backwall Trim Strip Connect Electric - Once cord English 8 Continue to terminal block. Install Strain Relief Warning: The strain relief provided with the range cord already installed. Range Cord Note: In Canada, the range is shipped from the factory with your range cord must be properly installed...page for slack in range backwall. Install 2 screws through hole and strain relief up to "Complete the installation" on page 15. Allow for detailed instructions). Place strain relief in knockout below terminal block. Feed range cord through holes in...

Installation Instructions
Page 11
.... English 9 length/ slack has been adjusted, attach strain relief per instructions Figure 9: Grounding Requirements Warning: To prevent electrical shock, the grounding prong on local code) and labeled "For Use with Ranges". Tip: The knockout panel below the terminal block can be installed per instructions included with cord must be connected by a qualified electrician. Strain relief...
.... English 9 length/ slack has been adjusted, attach strain relief per instructions Figure 9: Grounding Requirements Warning: To prevent electrical shock, the grounding prong on local code) and labeled "For Use with Ranges". Tip: The knockout panel below the terminal block can be installed per instructions included with cord must be connected by a qualified electrician. Strain relief...
Installation Instructions
Page 14
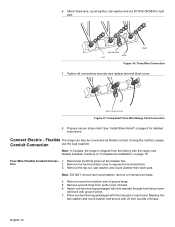
... terminal block. 3. Four Wire Flexible Conduit Connec- 1. Disconnect electrical power at the breaker box. nal block with the range cord already installed. English 12 Tighten all connections securely and replace terminal block cover. Remove the terminal block cover to "Complete the installation" on page 8 for detailed instructions. ground strap white red black Figure 14: Three...
... terminal block. 3. Four Wire Flexible Conduit Connec- 1. Disconnect electrical power at the breaker box. nal block with the range cord already installed. English 12 Tighten all connections securely and replace terminal block cover. Remove the terminal block cover to "Complete the installation" on page 8 for detailed instructions. ground strap white red black Figure 14: Three...
Use & Care Manual
Page 3
...the appliance and disconnect the circuit at the beginning of electric shock or fire. • If materials inside an...oven bottom. Safety Important Safety Instructions READ AND SAVE THESE INSTRUCTIONS Important Safety Instructions Fire Safety • Do not use aluminum foil or protective liners to line any part of each range component: the cooktop, oven... burners or elements. TO REDUCE THE RISK OF A RANGE TOP GREASE FIRE: English 1 Before using your Warranty. Never use . Pay special attention to read this manual. Installation of these liners may ignite. • WARNING -
...the appliance and disconnect the circuit at the beginning of electric shock or fire. • If materials inside an...oven bottom. Safety Important Safety Instructions READ AND SAVE THESE INSTRUCTIONS Important Safety Instructions Fire Safety • Do not use aluminum foil or protective liners to line any part of each range component: the cooktop, oven... burners or elements. TO REDUCE THE RISK OF A RANGE TOP GREASE FIRE: English 1 Before using your Warranty. Never use . Pay special attention to read this manual. Installation of these liners may ignite. • WARNING -
Use & Care Manual
Page 6
... Tipping Precautions • This appliance is specifically designed for normal family household use with sudden temperature changes. If you the location of electric shock. • Do not obstruct oven vents. • Do not repair or replace any questions, contact the manufacturer. •...cover the surface heating unit. It is equipped with range. Refer to be properly installed and grounded by a qualified technician. Use only pans that the anti-tip devices are appropriate for details. Refer all instructions carefully before use . Select cookware having flat bottoms ...
... Tipping Precautions • This appliance is specifically designed for normal family household use with sudden temperature changes. If you the location of electric shock. • Do not obstruct oven vents. • Do not repair or replace any questions, contact the manufacturer. •...cover the surface heating unit. It is equipped with range. Refer to be properly installed and grounded by a qualified technician. Use only pans that the anti-tip devices are appropriate for details. Refer all instructions carefully before use . Select cookware having flat bottoms ...
Use & Care Manual
Page 13
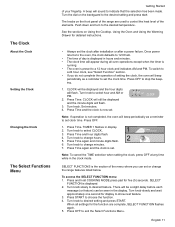
...Warming Drawer for five (5) seconds. Push down and turn to stop the beeping. 1. See the sections on the front panel of the range are complete, SELECT FUNCTION flashes again. 5. To switch to control the heat level of the menu where you do not complete the operation... Turn knob to change the range features listed below. Press Time and hour digits flash. 4. Turn knob to select CLOCK. 3. Press and hold COOKING MODE press pad for detailed instructions. • Always set clock time. SELECT FUNCTION is preset to set the clock after installation or after a power failure....
...Warming Drawer for five (5) seconds. Push down and turn to stop the beeping. 1. See the sections on the front panel of the range are complete, SELECT FUNCTION flashes again. 5. To switch to control the heat level of the menu where you do not complete the operation... Turn knob to change the range features listed below. Press Time and hour digits flash. 4. Turn knob to select CLOCK. 3. Press and hold COOKING MODE press pad for detailed instructions. • Always set clock time. SELECT FUNCTION is preset to set the clock after installation or after a power failure....

Use & Care Manual
Page 21
... explains how to set the probe temperature (desired end temperature of the food). 8. The temperature range for guidelines, tips and suggestions. Prepare meat and place in roasting pan (or on rack in...After a Delay Has Been Set 1. Oven temperature can only be set when the probe is installed in the oven will cook even after cycle has finished to clear. Turn knob to 232&#...up to change oven temperature if necessary. 6. Note: The probe temperature can be set for detailed instructions. Turn knob until probe tip is not touching gristle, fat, bone, the roast rack or the...
... explains how to set the probe temperature (desired end temperature of the food). 8. The temperature range for guidelines, tips and suggestions. Prepare meat and place in roasting pan (or on rack in...After a Delay Has Been Set 1. Oven temperature can only be set when the probe is installed in the oven will cook even after cycle has finished to clear. Turn knob to 232&#...up to change oven temperature if necessary. 6. Note: The probe temperature can be set for detailed instructions. Turn knob until probe tip is not touching gristle, fat, bone, the roast rack or the...


