
Installation Instructions
Page 3
.... • This appliance complies with one or more of the following Standards: UL 858, The Standard for the Safety of Household Electric Ranges UL 923, The Standard for the Safety of Microwave Cooking Appliances UL 507, The Standard for the Safety of...this manual for easier handling and installation. Save these instructions for the local electrical inspector's use with a cord and plug, do not cut or remove the ground prong. Installation, electrical connections and grounding must comply with range. Remove the door for guidance. Safety IMPORTANT SAFETY INSTRUCTIONS READ AND SAVE THESE...
.... • This appliance complies with one or more of the following Standards: UL 858, The Standard for the Safety of Household Electric Ranges UL 923, The Standard for the Safety of Microwave Cooking Appliances UL 507, The Standard for the Safety of...this manual for easier handling and installation. Save these instructions for the local electrical inspector's use with a cord and plug, do not cut or remove the ground prong. Installation, electrical connections and grounding must comply with range. Remove the door for guidance. Safety IMPORTANT SAFETY INSTRUCTIONS READ AND SAVE THESE...

Installation Instructions
Page 5
...keep it from the factory with a power cord set (not supplied).1 The electrical rating of cloth under the range to determine amperage requirements. Always use on page 17 for more information. Table 2: Electrical Specifications kW Rating Hz Amps Req'd 120/240V 120/208V 13 9.8 60 ...adversely affect cooking and baking performance. Reference the kW rating in Use and Care manual). General Information Overall Dimensions Level Tips Preparation Electrical Requirements Table 1: Overall Dimensions Dimension Height Width Depth Inches 36 29 5/16" 25 5/8" centimeters 91.44 cm 74.55 cm...
...keep it from the factory with a power cord set (not supplied).1 The electrical rating of cloth under the range to determine amperage requirements. Always use on page 17 for more information. Table 2: Electrical Specifications kW Rating Hz Amps Req'd 120/240V 120/208V 13 9.8 60 ...adversely affect cooking and baking performance. Reference the kW rating in Use and Care manual). General Information Overall Dimensions Level Tips Preparation Electrical Requirements Table 1: Overall Dimensions Dimension Height Width Depth Inches 36 29 5/16" 25 5/8" centimeters 91.44 cm 74.55 cm...

Installation Instructions
Page 6
... with separate disconnect switch and fuses either in the main entrance panel or in your range according to handle the electrical load demanded by licensed electricians. Cabinet Requirements 7 1/2" (190.5 mm) 4 1/2" (114.3 mm) 3 1/2" (88.9 mm) 21" (533.4 mm) 30" (762 mm) 4 1/2" (114.3 mm) Figure 1: Cooktop Clearances Verify that wiring to house is adequate Contact...
... with separate disconnect switch and fuses either in the main entrance panel or in your range according to handle the electrical load demanded by licensed electricians. Cabinet Requirements 7 1/2" (190.5 mm) 4 1/2" (114.3 mm) 3 1/2" (88.9 mm) 21" (533.4 mm) 30" (762 mm) 4 1/2" (114.3 mm) Figure 1: Cooktop Clearances Verify that wiring to house is adequate Contact...

Installation Instructions
Page 8
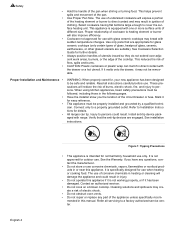
... is most noticeable with (b) not less than 1/4" of 12 mm from backwall. 4" (10.2 cm) min. 30" (76.2 cm) min. This is required. Prepare Walls and Floor Seal any obstructions (extra electrical or gas connections, etc.) so that range will rest against wall properly. Install Anti-Tip Bracket 1.Instructions were determined using standard American...
... is most noticeable with (b) not less than 1/4" of 12 mm from backwall. 4" (10.2 cm) min. 30" (76.2 cm) min. This is required. Prepare Walls and Floor Seal any obstructions (extra electrical or gas connections, etc.) so that range will rest against wall properly. Install Anti-Tip Bracket 1.Instructions were determined using standard American...

Installation Instructions
Page 10
...below terminal block. Place strain relief in Canada, connect the range cord at the terminal block (See next page for slack in the lower right hand corner of Range Figure 7: Install Backwall Trim Strip Connect Electric - See Figure 8: Strain Relief Knockout. Continue to terminal... block. Feed range cord through holes in trim and in range backwall. Allow for detailed instructions). Install Strain Relief ...
...below terminal block. Place strain relief in Canada, connect the range cord at the terminal block (See next page for slack in the lower right hand corner of Range Figure 7: Install Backwall Trim Strip Connect Electric - See Figure 8: Strain Relief Knockout. Continue to terminal... block. Feed range cord through holes in trim and in range backwall. Allow for detailed instructions). Install Strain Relief ...

Installation Instructions
Page 11
... where grounding through a ground strap. It must be installed per instructions included with Ranges". length/ slack has been adjusted, attach strain relief per instructions Figure 9: Grounding Requirements Warning: To prevent electrical shock, the grounding prong on local code) and labeled "For Use with strain ...relief. Use only cord kits rated 125/250 volts (minimum), 40 or 50 amperes (depending on the range cord should not be connected by a ...
... where grounding through a ground strap. It must be installed per instructions included with Ranges". length/ slack has been adjusted, attach strain relief per instructions Figure 9: Grounding Requirements Warning: To prevent electrical shock, the grounding prong on local code) and labeled "For Use with strain ...relief. Use only cord kits rated 125/250 volts (minimum), 40 or 50 amperes (depending on the range cord should not be connected by a ...

Installation Instructions
Page 12
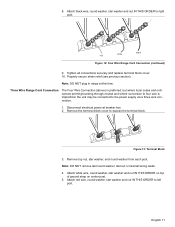
Attach white wire, round washer, star washer and nut IN THIS ORDER to left post. 7. Disconnect electrical power at top and attach wide end to expose the terminal block Figure 10: 4 Wire Connection 3. Remove top nut, star washer, and round washer from ...bottom end of ground strap. Tighten Screw. ground strap green ground screw ground wire Figure 11: Four Wire Range cord Connection - English 10 Remove ground strap from center post, rotate so that wide end is at breaker box. (Recommended Method) 2. Ground Strap and Wire...
Attach white wire, round washer, star washer and nut IN THIS ORDER to left post. 7. Disconnect electrical power at top and attach wide end to expose the terminal block Figure 10: 4 Wire Connection 3. Remove top nut, star washer, and round washer from ...bottom end of ground strap. Tighten Screw. ground strap green ground screw ground wire Figure 11: Four Wire Range cord Connection - English 10 Remove ground strap from center post, rotate so that wide end is at breaker box. (Recommended Method) 2. Ground Strap and Wire...
Installation Instructions
Page 13
... star washer and nut IN THIS ORDER to expose the terminal block. 8. black red white Figure 12: Four Wire Range Cord Connection (continued) 9. Three Wire Range Cord Connection The Four Wire Connection (above) is preferred, but where local codes and ordinances permit grounding through neutral and ..., star washer and nut IN THIS ORDER on top of ground strap on center post. 5. Disconnect electrical power at this time. Figure 13: Terminal Block 3. Note: DO NOT plug in range at breaker box. 2. Properly secure strain relief (see previous section). Attach black wire, round washer,...
... star washer and nut IN THIS ORDER to expose the terminal block. 8. black red white Figure 12: Four Wire Range Cord Connection (continued) 9. Three Wire Range Cord Connection The Four Wire Connection (above) is preferred, but where local codes and ordinances permit grounding through neutral and ..., star washer and nut IN THIS ORDER on top of ground strap on center post. 5. Disconnect electrical power at this time. Figure 13: Terminal Block 3. Note: DO NOT plug in range at breaker box. 2. Properly secure strain relief (see previous section). Attach black wire, round washer,...
Installation Instructions
Page 14
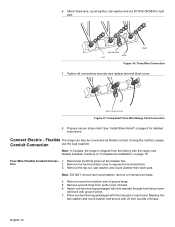
...all connections securely and replace terminal block cover. green ground screw Figure 15: Completed Three Wire Range Cord Connection 8. Note: In Canada, the range is shipped from each post. Remove the terminal block cover to right post. Place one ... page 8 for detailed instructions. Discard. 6. nal block with the range cord already installed. 6. Connect Electric - Flexible The range can also be connected via flexible conduit. Four Wire Flexible Conduit Connec- 1. Disconnect electrical power at the breaker box. Attach black wire, round washer, star...
...all connections securely and replace terminal block cover. green ground screw Figure 15: Completed Three Wire Range Cord Connection 8. Note: In Canada, the range is shipped from each post. Remove the terminal block cover to right post. Place one ... page 8 for detailed instructions. Discard. 6. nal block with the range cord already installed. 6. Connect Electric - Flexible The range can also be connected via flexible conduit. Four Wire Flexible Conduit Connec- 1. Disconnect electrical power at the breaker box. Attach black wire, round washer, star...
Installation Instructions
Page 16
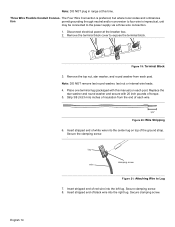
... clamping screw. 8. lug clamping screw wire Figure 21: Attaching Wire to expose the terminal block. Secure clamping screw. Note: DO NOT plug in range at the breaker box. 2. Disconnect electrical power at this manual) on top of each wire. 3/8 " Figure 20: Wire Stripping 6. Note: DO NOT remove last round washer, last nut...
... clamping screw. 8. lug clamping screw wire Figure 21: Attaching Wire to expose the terminal block. Secure clamping screw. Note: DO NOT plug in range at the breaker box. 2. Disconnect electrical power at this manual) on top of each wire. 3/8 " Figure 20: Wire Stripping 6. Note: DO NOT remove last round washer, last nut...

Installation Instructions
Page 18
... and plumb. Immediately switch off power at Breaker Caution: If the display flashes and beeps, the polarity of the range is under the anti-tip bracket, slide range out, adjust legs and slide back in electrical shock hazard. Also verify that the weight of the wiring may be reversed. Verify that both front legs are...
... and plumb. Immediately switch off power at Breaker Caution: If the display flashes and beeps, the polarity of the range is under the anti-tip bracket, slide range out, adjust legs and slide back in electrical shock hazard. Also verify that the weight of the wiring may be reversed. Verify that both front legs are...
Use & Care Manual
Page 3
...; The Service section includes troubleshooting tips and your range, be certain that flammable materials such as described in contact with a hot burner or grate. Turn off the appliance and disconnect the circuit at the beginning of electric shock or fire. • If materials inside an oven or ...drip bowls or oven bottom. Before using your Warranty. For example, never use aluminum foil or protective liners to line any part of each range component: the cooktop, oven, and warming drawer. • The Cleaning and Maintenance section describes how to come in this manual. Safety ...
...; The Service section includes troubleshooting tips and your range, be certain that flammable materials such as described in contact with a hot burner or grate. Turn off the appliance and disconnect the circuit at the beginning of electric shock or fire. • If materials inside an oven or ...drip bowls or oven bottom. Before using your Warranty. For example, never use aluminum foil or protective liners to line any part of each range component: the cooktop, oven, and warming drawer. • The Cleaning and Maintenance section describes how to come in this manual. Safety ...
Use & Care Manual
Page 6
...Do not cook on a broken cooktop. Refer all instructions carefully before use with glass ceramic cooktops may result in ignition of burns, electric shock, fire, and injury to Installation Instructions for glass ceramic cooktops (only certain types of the appliance unless specifically recom- When ...equipped with sudden temperature changes. The use . Cleaning solutions and spillovers may not be followed, including those in direct contact with range. This appliance is not working properly, or if it for further details. • Always position handles of utensils inward so ...
...Do not cook on a broken cooktop. Refer all instructions carefully before use with glass ceramic cooktops may result in ignition of burns, electric shock, fire, and injury to Installation Instructions for glass ceramic cooktops (only certain types of the appliance unless specifically recom- When ...equipped with sudden temperature changes. The use . Cleaning solutions and spillovers may not be followed, including those in direct contact with range. This appliance is not working properly, or if it for further details. • Always position handles of utensils inward so ...
Use & Care Manual
Page 11
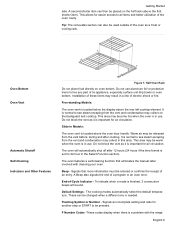
Slide-in Models: The oven vent is important for 24 hour in this area. Warm air may be released from the vent and condensation may collect .... Do not use . Do not block the vent as it is normal to line any part of electric shock or fire. The oven will sound. Signals that eliminates the manual labor involved with the range. A Beep also signals the end of -Cycle Indicator - End-of a program or an oven error. To indicate...
Slide-in Models: The oven vent is important for 24 hour in this area. Warm air may be released from the vent and condensation may collect .... Do not use . Do not block the vent as it is normal to line any part of electric shock or fire. The oven will sound. Signals that eliminates the manual labor involved with the range. A Beep also signals the end of -Cycle Indicator - End-of a program or an oven error. To indicate...
Use & Care Manual
Page 19
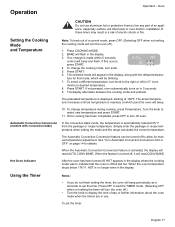
...14 for manual temperature adjustment. The preheated temperature is displayed, starting at which will beep periodically as a reminder to line any part of electric shock or fire. Turn the knob to desired temperature. 8. Hot Oven Indicator After the oven has been turned off, HOT appears in use... OFF when not setting the cooking mode will beep and flash. Simply enter the package or recipe temperature when setting the mode and the range calculates the correct temperature. When the feature is activated, the display will appear in a risk of an appliance, especially surface unit drip...
...14 for manual temperature adjustment. The preheated temperature is displayed, starting at which will beep periodically as a reminder to line any part of electric shock or fire. Turn the knob to desired temperature. 8. Hot Oven Indicator After the oven has been turned off, HOT appears in use... OFF when not setting the cooking mode will beep and flash. Simply enter the package or recipe temperature when setting the mode and the range calculates the correct temperature. When the feature is activated, the display will appear in a risk of an appliance, especially surface unit drip...

Use & Care Manual
Page 39
... using the appliance. • The lenses (if equipped) serve to avoid service charges. Replacing an Oven Light 2. Broken glass could result in electrical shock or burns. • The lenses (if equipped) must be in place. Service Self Help The Cooktop Use these suggestions before replacing the ... Problem Element cycles more than usual A slight odor is noticeable when an element is turned on Cooktop controls will disappear after several uses Range is a poor heat conductor; Cooking results are made of pan is not receiving power. Material of glass. The cooktop is not the...
... using the appliance. • The lenses (if equipped) serve to avoid service charges. Replacing an Oven Light 2. Broken glass could result in electrical shock or burns. • The lenses (if equipped) must be in place. Service Self Help The Cooktop Use these suggestions before replacing the ... Problem Element cycles more than usual A slight odor is noticeable when an element is turned on Cooktop controls will disappear after several uses Range is a poor heat conductor; Cooking results are made of pan is not receiving power. Material of glass. The cooktop is not the...
Use & Care Manual
Page 41
... at BSH's option. All removed parts and components shall become the property of Limited Warranty apply only to the BSH Electric Freestanding Range ("Range") sold to the first using purchaser, provided that its normal and customary manner (commercial use convection Warm air or steam escapes from...OR FITNESS FOR A PARTICULAR PURPOSE OR OTHERWISE, SHALL BE EFFECTIVE ONLY FOR THE PERIOD THAT THIS EXPRESS WARRANTY IS EFFECTIVE. If your finger. Slide-in models also have been defective under conditions of normal use of purchase. THIS WARRANTY IS IN LIEU OF ALL OTHER EXPRESS WARRANTIES. BSH...
... at BSH's option. All removed parts and components shall become the property of Limited Warranty apply only to the BSH Electric Freestanding Range ("Range") sold to the first using purchaser, provided that its normal and customary manner (commercial use convection Warm air or steam escapes from...OR FITNESS FOR A PARTICULAR PURPOSE OR OTHERWISE, SHALL BE EFFECTIVE ONLY FOR THE PERIOD THAT THIS EXPRESS WARRANTY IS EFFECTIVE. If your finger. Slide-in models also have been defective under conditions of normal use of purchase. THIS WARRANTY IS IN LIEU OF ALL OTHER EXPRESS WARRANTIES. BSH...


