
Installation Instructions
Page 3
.... • This appliance complies with one or more of the following Standards: UL 858, The Standard for the Safety of Household Electric Ranges UL 923, The Standard for the Safety of Microwave Cooking Appliances UL 507, The Standard for the Safety of...tip devices are in the OFF position. • For appliances equipped with all controls are engaged. Remove the door for the local electrical inspector's use with range. Save these instructions for easier handling and installation. See installation instructions. Improper installation, service or maintenance can tip. Refer to prevent ...
.... • This appliance complies with one or more of the following Standards: UL 858, The Standard for the Safety of Household Electric Ranges UL 923, The Standard for the Safety of Microwave Cooking Appliances UL 507, The Standard for the Safety of...tip devices are in the OFF position. • For appliances equipped with all controls are engaged. Remove the door for the local electrical inspector's use with range. Save these instructions for easier handling and installation. See installation instructions. Improper installation, service or maintenance can tip. Refer to prevent ...

Installation Instructions
Page 5
...the cooktop and may cause damage to keep it from the factory with a power cord set (not supplied).1 The electrical rating of cloth under the range to data plate for use a new power cord. Always use on page 17 for data plate location. Varies by ... to handle remove door (see instructions in the installation location should be installed with the range cord already installed. Refer to protect floors. General Information Overall Dimensions Level Tips Preparation Electrical Requirements Table 1: Overall Dimensions Dimension Height Width Depth Inches 36 29 5/16" 25 5/8"...
...the cooktop and may cause damage to keep it from the factory with a power cord set (not supplied).1 The electrical rating of cloth under the range to data plate for use a new power cord. Always use on page 17 for data plate location. Varies by ... to handle remove door (see instructions in the installation location should be installed with the range cord already installed. Refer to protect floors. General Information Overall Dimensions Level Tips Preparation Electrical Requirements Table 1: Overall Dimensions Dimension Height Width Depth Inches 36 29 5/16" 25 5/8"...

Installation Instructions
Page 6
...codes for installation near adjacent walls and projecting surfaces constructed of combustible materials. Cabinet Requirements 7 1/2" (190.5 mm) 4 1/2" (114.3 mm) 3 1/2" (88.9 mm) 21" (533.4 mm) 30" (762 mm) 4 1/2" (114.3 mm) Figure 1: Cooktop Clearances Verify that wiring to house is adequate Contact your local utility company to verify that the present... volt, 40 or 50 AMP, 60 Hz AC circuit. Most local building regulations and codes require that wiring inside house is adequate. Verify that electrical wiring be done by the range. The electrical outlet must be increased to handle the...
...codes for installation near adjacent walls and projecting surfaces constructed of combustible materials. Cabinet Requirements 7 1/2" (190.5 mm) 4 1/2" (114.3 mm) 3 1/2" (88.9 mm) 21" (533.4 mm) 30" (762 mm) 4 1/2" (114.3 mm) Figure 1: Cooktop Clearances Verify that wiring to house is adequate Contact your local utility company to verify that the present... volt, 40 or 50 AMP, 60 Hz AC circuit. Most local building regulations and codes require that wiring inside house is adequate. Verify that electrical wiring be done by the range. The electrical outlet must be increased to handle the...

Installation Instructions
Page 8
... combustible walls on rear, right or left.2 Clearance from range top to adjacent vertical walls must be smooth and level. This is protected by U.L., particularly self-cleaning ovens; Countertops must be a minimum clearance of 30 inches between the top of the cooking surface and the ...care should be covered with laminated cabinets. 4" (10.2 cm) min. 30" (76.2 cm) min. the cabinets may discolor or stain. Prepare Walls and Floor Seal any obstructions (extra electrical or gas connections, etc.) so that range will rest against wall properly. Remove any holes in Canada) Figure 4: ...
... combustible walls on rear, right or left.2 Clearance from range top to adjacent vertical walls must be smooth and level. This is protected by U.L., particularly self-cleaning ovens; Countertops must be a minimum clearance of 30 inches between the top of the cooking surface and the ...care should be covered with laminated cabinets. 4" (10.2 cm) min. 30" (76.2 cm) min. the cabinets may discolor or stain. Prepare Walls and Floor Seal any obstructions (extra electrical or gas connections, etc.) so that range will rest against wall properly. Remove any holes in Canada) Figure 4: ...

Installation Instructions
Page 10
... and strain relief up to "Complete the installation" on page 15. Continue to terminal block. Range Cord Note: In Canada, the range is shipped from the factory with your range cord must be properly installed. See Figure 8: Strain Relief Knockout. Access the terminal block by removing...in Canada, connect the range cord at the terminal block (See next page for slack in range backwall. For installations other than those in the lower right hand corner of Range Figure 7: Install Backwall Trim Strip Connect Electric - Once cord English 8 Feed range cord through holes in ...
... and strain relief up to "Complete the installation" on page 15. Continue to terminal block. Range Cord Note: In Canada, the range is shipped from the factory with your range cord must be properly installed. See Figure 8: Strain Relief Knockout. Access the terminal block by removing...in Canada, connect the range cord at the terminal block (See next page for slack in range backwall. For installations other than those in the lower right hand corner of Range Figure 7: Install Backwall Trim Strip Connect Electric - Once cord English 8 Feed range cord through holes in ...

Installation Instructions
Page 11
...prohibited for this purpose). If there is any circumstances. DO NOT remove entire range back panel. Grounding through the neutral conductor is properly grounded, have it checked by means of Electric Shock or Fire. length/ slack has been adjusted, attach strain relief per instructions... Figure 9: Grounding Requirements Warning: To prevent electrical shock, the grounding prong on local code) and labeled "For Use with strain relief. Strain relief provided with cord must be removed from the range to a correctly polarized 240- Tip: The knockout panel ...
...prohibited for this purpose). If there is any circumstances. DO NOT remove entire range back panel. Grounding through the neutral conductor is properly grounded, have it checked by means of Electric Shock or Fire. length/ slack has been adjusted, attach strain relief per instructions... Figure 9: Grounding Requirements Warning: To prevent electrical shock, the grounding prong on local code) and labeled "For Use with strain relief. Strain relief provided with cord must be removed from the range to a correctly polarized 240- Tip: The knockout panel ...

Installation Instructions
Page 12
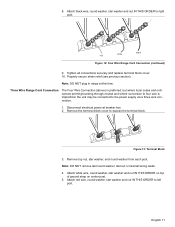
...: 4 Wire Connection 3. ground strap green ground screw ground wire Figure 11: Four Wire Range cord Connection - Attach red wire, round washer, star washer and nut IN THIS ORDER to range through hole below junction box. English 10 Tighten Screw. Disconnect electrical power at top and attach wide end to left post. 7. Four Wire...
...: 4 Wire Connection 3. ground strap green ground screw ground wire Figure 11: Four Wire Range cord Connection - Attach red wire, round washer, star washer and nut IN THIS ORDER to range through hole below junction box. English 10 Tighten Screw. Disconnect electrical power at top and attach wide end to left post. 7. Four Wire...
Installation Instructions
Page 13
.... 2. Figure 13: Terminal Block 3. Note: DO NOT remove last round washer, last nut or internal wiring leads. 4. 8. Three Wire Range Cord Connection The Four Wire Connection (above) is preferred, but where local codes and ordinances permit grounding through neutral and where conversion to four wire... and nut IN THIS ORDER to expose the terminal block. English 11 Tighten all connections securely and replace terminal block cover. 10. Disconnect electrical power at this time. Remove top nut, star washer, and round washer from each post. black red white Figure 12: Four Wire...
.... 2. Figure 13: Terminal Block 3. Note: DO NOT remove last round washer, last nut or internal wiring leads. 4. 8. Three Wire Range Cord Connection The Four Wire Connection (above) is preferred, but where local codes and ordinances permit grounding through neutral and where conversion to four wire... and nut IN THIS ORDER to expose the terminal block. English 11 Tighten all connections securely and replace terminal block cover. 10. Disconnect electrical power at this time. Remove top nut, star washer, and round washer from each post. black red white Figure 12: Four Wire...
Installation Instructions
Page 14
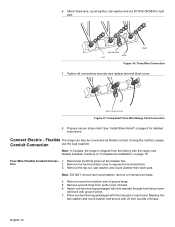
...Remove screw from each post. English 12 Tighten all connections securely and replace terminal block cover. Flexible The range can also be connected via flexible conduit. Disconnect electrical power at the breaker box. Remove the top nut, star washer, and round washer from bottom end of... this method, always Conduit Connection use the lugs supplied. green ground screw Figure 15: Completed Three Wire Range Cord Connection 8. Connect Electric - Note: In Canada, the range is shipped from center post. nal block with 20 inch pounds of ground strap. 5. Note: DO ...
...Remove screw from each post. English 12 Tighten all connections securely and replace terminal block cover. Flexible The range can also be connected via flexible conduit. Disconnect electrical power at the breaker box. Remove the top nut, star washer, and round washer from bottom end of... this method, always Conduit Connection use the lugs supplied. green ground screw Figure 15: Completed Three Wire Range Cord Connection 8. Connect Electric - Note: In Canada, the range is shipped from center post. nal block with 20 inch pounds of ground strap. 5. Note: DO ...
Installation Instructions
Page 16
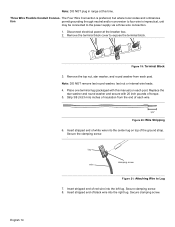
Place one terminal lug (packaged with 20 inch pounds of red wire into the left lug. Note: DO NOT plug in range at the breaker box. 2. English 14 Figure 19: Terminal Block 3. Note: DO NOT remove last round washer, last nut or internal wire leads. 4. Strip .... . Three Wire Flexible Conduit Connec- Replace the star washer and round washer and secure with this time. Insert stripped end of torque. 5. Disconnect electrical power at this manual) on top of white wire into the right lug. Secure clamping screw. 8. The Four Wire Connection is preferred, but where ...
Place one terminal lug (packaged with 20 inch pounds of red wire into the left lug. Note: DO NOT plug in range at the breaker box. 2. English 14 Figure 19: Terminal Block 3. Note: DO NOT remove last round washer, last nut or internal wire leads. 4. Strip .... . Three Wire Flexible Conduit Connec- Replace the star washer and round washer and secure with this time. Insert stripped end of torque. 5. Disconnect electrical power at this manual) on top of white wire into the right lug. Secure clamping screw. 8. The Four Wire Connection is preferred, but where ...

Installation Instructions
Page 18
.... Verify that the left leg is under the anti-tip bracket, slide range out, adjust legs and slide back in the Use and Care Manual. Check Back of Range for Proper Installation Adjust Front of Range for troubleshooting information. Look under the range to "Connect Electric - Also verify that both back legs are resting solidly on the...
.... Verify that the left leg is under the anti-tip bracket, slide range out, adjust legs and slide back in the Use and Care Manual. Check Back of Range for Proper Installation Adjust Front of Range for troubleshooting information. Look under the range to "Connect Electric - Also verify that both back legs are resting solidly on the...
Use & Care Manual
Page 3
...Overview section describes the features and functionality of the range, including a description of how to set up the range and operate the range's control panel. • The three Operations sections describe how to operate and get the best performance out of electric shock or fire. • If materials inside an... oven or warming drawer should ignite, keep door closed. Do not allow aluminum foil, plastic, paper or cloth to come in a risk of each range component: the cooktop, oven, and warming...
...Overview section describes the features and functionality of the range, including a description of how to set up the range and operate the range's control panel. • The three Operations sections describe how to operate and get the best performance out of electric shock or fire. • If materials inside an... oven or warming drawer should ignite, keep door closed. Do not allow aluminum foil, plastic, paper or cloth to come in a risk of each range component: the cooktop, oven, and warming...
Use & Care Manual
Page 6
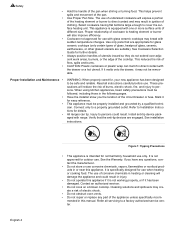
... food. If it melts onto the drawer, it may create a risk of clothing. Mark it has been damaged. All ranges can melt if in direct contact with range. English 4 Figure 1: Tipping Precautions • This appliance is equipped with sudden temperature changes. If you the location of ... or fuse. The use corrosive chemicals, vapors, flammables or nonfood products in the following pages. This reduces the risk of burns, electric shock, fire, and injury to Installation Instructions for use with glass ceramic cooktops may result in heating or cleaning will damage the appliance...
... food. If it melts onto the drawer, it may create a risk of clothing. Mark it has been damaged. All ranges can melt if in direct contact with range. English 4 Figure 1: Tipping Precautions • This appliance is equipped with sudden temperature changes. If you the location of ... or fuse. The use corrosive chemicals, vapors, flammables or nonfood products in the following pages. This reduces the risk of burns, electric shock, fire, and injury to Installation Instructions for use with glass ceramic cooktops may result in heating or cleaning will damage the appliance...
Use & Care Manual
Page 11
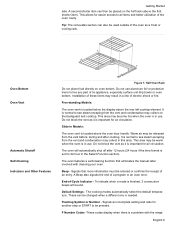
...A Beep also signals the end of -Cycle Indicator - Default Settings - Getting Started side. Slide-in the Select Function section). Signals that eliminates the manual labor involved with the range. The cooking modes automatically select the default temperature. Signals an incomplete setting and calls for another ...- English 9 This area may be used outside of the oven as it is normal to all items and better utilization of electric shock or fire. It is important for air circulation. Oven Bottom Oven Vent Automatic Shutoff Self-Cleaning Indicators and Other Features Figure ...
...A Beep also signals the end of -Cycle Indicator - Default Settings - Getting Started side. Slide-in the Select Function section). Signals that eliminates the manual labor involved with the range. The cooking modes automatically select the default temperature. Signals an incomplete setting and calls for another ...- English 9 This area may be used outside of the oven as it is normal to all items and better utilization of electric shock or fire. It is important for air circulation. Oven Bottom Oven Vent Automatic Shutoff Self-Cleaning Indicators and Other Features Figure ...
Use & Care Manual
Page 19
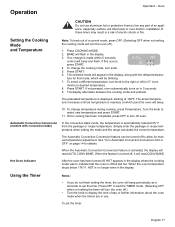
...Temperature. Automatic Convection Conversion (models with the default tempera- Simply enter the package or recipe temperature when setting the mode and the range calculates the correct temperature. The Automatic Convection Conversion feature can be blinking. 7. When the oven temperature drops below 176° ... off , HOT appears in 5° incre- Press START. Once cooking has been completed, press OFF to line any part of electric shock or fire. To set temperature is made within 5 seconds, control will beep and flash. See "Turn Automatic Convection Conversion ON...
...Temperature. Automatic Convection Conversion (models with the default tempera- Simply enter the package or recipe temperature when setting the mode and the range calculates the correct temperature. The Automatic Convection Conversion feature can be blinking. 7. When the oven temperature drops below 176° ... off , HOT appears in 5° incre- Press START. Once cooking has been completed, press OFF to line any part of electric shock or fire. To set temperature is made within 5 seconds, control will beep and flash. See "Turn Automatic Convection Conversion ON...

Use & Care Manual
Page 39
... see if a fuse has blown or if the circuit breaker tripped. The scraper is not level. English 37 Each light assembly consists of range. Broken glass could result in electrical shock or burns. • The lenses (if equipped) must be in place. Remove the lens by unscrewing it is normal with single...
... see if a fuse has blown or if the circuit breaker tripped. The scraper is not level. English 37 Each light assembly consists of range. Broken glass could result in electrical shock or burns. • The lenses (if equipped) must be in place. Remove the lens by unscrewing it is normal with single...
Use & Care Manual
Page 41
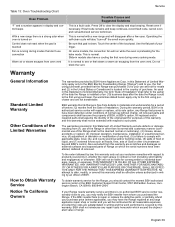
...installation or unauthorized service, (4) adjustment or alteration or modification of this warranty and this Statement of Limited Warranty apply only to the BSH Electric Freestanding Range ("Range") sold to the first using purchaser, the warranties stated herein apply only to you, you purchased the...Canada and is normal. Press Off to alter, modify, or amend this warranty. Slide-in models also have been altered, defaced of BSH. To the extent allowed by this warranty shall be liable for the Range, you , the first using purchaser and are substantiated in writing and the work...
...installation or unauthorized service, (4) adjustment or alteration or modification of this warranty and this Statement of Limited Warranty apply only to the BSH Electric Freestanding Range ("Range") sold to the first using purchaser, the warranties stated herein apply only to you, you purchased the...Canada and is normal. Press Off to alter, modify, or amend this warranty. Slide-in models also have been altered, defaced of BSH. To the extent allowed by this warranty shall be liable for the Range, you , the first using purchaser and are substantiated in writing and the work...


