
Installation Instructions
Page 7
Allow a minimum of 12 mm from range sidewall to cabinet is to be installed1. Figure 3: Cutout Requirements - Replacing a Free-Standing Model 1.In Canada, a clearance of 30 inches between cabinets where range is required. See Figure 2: Cutout Requirements for more information.. 23 1/16" (585.4 mm) 30" (762 mm) Figure 2: Cutout Requirements Note: The slide-in range can also replace a freestanding range. English 5 In this case, verify that the opening is at least 30 inches.1 30" (76.2 cm) min.
Allow a minimum of 12 mm from range sidewall to cabinet is to be installed1. Figure 3: Cutout Requirements - Replacing a Free-Standing Model 1.In Canada, a clearance of 30 inches between cabinets where range is required. See Figure 2: Cutout Requirements for more information.. 23 1/16" (585.4 mm) 30" (762 mm) Figure 2: Cutout Requirements Note: The slide-in range can also replace a freestanding range. English 5 In this case, verify that the opening is at least 30 inches.1 30" (76.2 cm) min.

Installation Instructions
Page 19
Open the drawer to the data plate on the frame near the drawer. It is located on the appliance when requesting service. Data Plate Figure 24: Data Plate English 17 Product Data Plate The data plate shows the model and serial number. Refer to view it.
Open the drawer to the data plate on the frame near the drawer. It is located on the appliance when requesting service. Data Plate Figure 24: Data Plate English 17 Product Data Plate The data plate shows the model and serial number. Refer to view it.
Use & Care Manual
Page 2
Oven 16 About the Oven 16 Operation 17 Operation - Table of Your Warming Drawer 29 Cleaning and Maintenance 30 Care and Cleaning 30 Maintenance 35 Service 36 Self Help 36 Warranty 38 Questions? 1-800-944-2904 www.boschappliances.com 5551 McFadden Ave. Huntington Beach, CA 92649... We look forward to hearing from you! Warming Drawer (some models 19 About the Warming Drawer 19 Operation 20 Getting the Most Out ...
Oven 16 About the Oven 16 Operation 17 Operation - Table of Your Warming Drawer 29 Cleaning and Maintenance 30 Care and Cleaning 30 Maintenance 35 Service 36 Self Help 36 Warranty 38 Questions? 1-800-944-2904 www.boschappliances.com 5551 McFadden Ave. Huntington Beach, CA 92649... We look forward to hearing from you! Warming Drawer (some models 19 About the Warming Drawer 19 Operation 20 Getting the Most Out ...
Use & Care Manual
Page 7
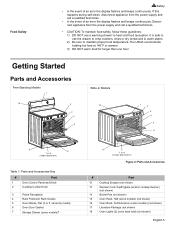
Getting Started Parts and Accessories Free-Standing Models 1 10 2 3 4 5 Slide-In Models 10 1 2 3 4 5 6 9 6 7 or 8 (model dependent) Table 1: Parts and Accessories Key # Part 1 Oven Control Panel and Knob 2 Cooktop Control Knob 3 Probe Receptacle 4 Rack Positions/ Rack Guides ... holding hot food at 140°F or warmer. 3) DO NOT warm food for longer than one hour. varies by model) 6 Oven Door Gasket 7 Storage Drawer (some models)a 9 7 or 8 (model dependent) Figure 2: Parts and Accessories # Part 12 Cooktop Scraper (not shown) 13 Weiman Cook Top® (glass ...
Getting Started Parts and Accessories Free-Standing Models 1 10 2 3 4 5 Slide-In Models 10 1 2 3 4 5 6 9 6 7 or 8 (model dependent) Table 1: Parts and Accessories Key # Part 1 Oven Control Panel and Knob 2 Cooktop Control Knob 3 Probe Receptacle 4 Rack Positions/ Rack Guides ... holding hot food at 140°F or warmer. 3) DO NOT warm food for longer than one hour. varies by model) 6 Oven Door Gasket 7 Storage Drawer (some models)a 9 7 or 8 (model dependent) Figure 2: Parts and Accessories # Part 12 Cooktop Scraper (not shown) 13 Weiman Cook Top® (glass ...

Use & Care Manual
Page 8
...surface is still hot. Getting Started Table 1: Parts and Accessories Key # Part # Part 8 Warming Drawer (some models) The bridge element joins the front single element and the back single element to touch. Radiant Element The radiant ... cookware. Oven Racks Depending on , use with a stop before coming completely out of cookware. Bridge Element (some models)a 9 Model # and Serial # Plate 10 Oven Vent 11 Anti-Tip Bracket (not shown) 19 Convection Fan and Element (...and not tilt. If a hot surface light is on model, the range is designed for cooking. English 6
...surface is still hot. Getting Started Table 1: Parts and Accessories Key # Part # Part 8 Warming Drawer (some models) The bridge element joins the front single element and the back single element to touch. Radiant Element The radiant ... cookware. Oven Racks Depending on , use with a stop before coming completely out of cookware. Bridge Element (some models)a 9 Model # and Serial # Plate 10 Oven Vent 11 Anti-Tip Bracket (not shown) 19 Convection Fan and Element (...and not tilt. If a hot surface light is on model, the range is designed for cooking. English 6

Use & Care Manual
Page 9
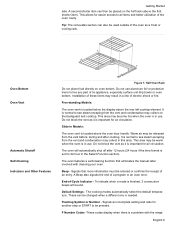
... oven mitts when the oven is reached, tilt rack up to a horizontal position and press the rest of the way in the back of the range. Tilt rack up and pull the rest of the way out. When the stop into rack guide. 3. Top Rack Back of Rack Pan Stops Bottom... sides. 2. Getting Started CAUTION To avoid burns, place oven racks in the closed position when removing and replacing. Back of rack Extension Oven Rack (some models) Front of rack Insert rack with the back of Rack Figure 4: Full Extension Rack Removing and Replacing Note: The full extension rack must be moved...
... oven mitts when the oven is reached, tilt rack up to a horizontal position and press the rest of the way in the back of the range. Tilt rack up and pull the rest of the way out. When the stop into rack guide. 3. Top Rack Back of Rack Pan Stops Bottom... sides. 2. Getting Started CAUTION To avoid burns, place oven racks in the closed position when removing and replacing. Back of rack Extension Oven Rack (some models) Front of rack Insert rack with the back of Rack Figure 4: Full Extension Rack Removing and Replacing Note: The full extension rack must be moved...

Use & Care Manual
Page 10
... guide on top of the bottom one side of top rack to come apart for cleaning) The two sections of Rack Half Oven Rack (Some Models) English 8 Figure 6: Reassembly Cleaning Clean rack with hot sudsy water. Getting Started Disassembly (for easier cleaning. 1. The half oven rack can place a tall item (such...
... guide on top of the bottom one side of top rack to come apart for cleaning) The two sections of Rack Half Oven Rack (Some Models) English 8 Figure 6: Reassembly Cleaning Clean rack with hot sudsy water. Getting Started Disassembly (for easier cleaning. 1. The half oven rack can place a tall item (such...
Use & Care Manual
Page 11
...block the vent as a trivet or cooling rack. Signals that eliminates the manual labor involved with the range. Signals an incomplete setting and calls for 24 hour in use. Free-standing Models: The oven vent is normal to see steam escaping from the vent before, during and after 12 ... oven bottom. Slide-in this area. The oven will sound. The cooking modes automatically select the default temperature. English 9 It is located below the display above the oven door handle. It is set for another step or START to all items and better utilization of electric shock or fire...
...block the vent as a trivet or cooling rack. Signals that eliminates the manual labor involved with the range. Signals an incomplete setting and calls for 24 hour in use. Free-standing Models: The oven vent is normal to see steam escaping from the vent before, during and after 12 ... oven bottom. Slide-in this area. The oven will sound. The cooking modes automatically select the default temperature. English 9 It is located below the display above the oven door handle. It is set for another step or START to all items and better utilization of electric shock or fire...

Use & Care Manual
Page 12
... are used to select an oven mode, set the oven temperature, set up your range. Also displays the warming drawer setting. Getting Started Cooling Fan (Slide-in hours and minutes. Note: On some models, the convection fan also runs during preheat for the mode that the probe is no...Temperature Start Cooking Lock Indicator Preheat Temperature Mode Indicator Figure 8: Oven Control Panel Table 2: Oven Control Panel Clock- Shows the time of the range by using the touch pads and dial on the backguard and the knobs on . Cooking Mode - Press pad to decrease. Turn clockwise to...
... are used to select an oven mode, set the oven temperature, set up your range. Also displays the warming drawer setting. Getting Started Cooling Fan (Slide-in hours and minutes. Note: On some models, the convection fan also runs during preheat for the mode that the probe is no...Temperature Start Cooking Lock Indicator Preheat Temperature Mode Indicator Figure 8: Oven Control Panel Table 2: Oven Control Panel Clock- Shows the time of the range by using the touch pads and dial on the backguard and the knobs on . Cooking Mode - Press pad to decrease. Turn clockwise to...

Use & Care Manual
Page 17
To turn ON both the inner and outer elements together, push in on the control knob and turn it clockwise to models) the symbol (counterclockwise). English 15 Dual Element Control Knob Element Location Figure 9: Single Element Burner Knob To turn ON the small, inner element, push in ...
To turn ON both the inner and outer elements together, push in on the control knob and turn it clockwise to models) the symbol (counterclockwise). English 15 Dual Element Control Knob Element Location Figure 9: Single Element Burner Knob To turn ON the small, inner element, push in ...

Use & Care Manual
Page 18
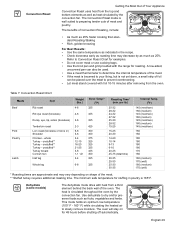
Turn the knob counterclockwise. Depending on the model, the bridge element is either activated in conjunction with Front Single Element Figure 12: Bridge Element Knob Operation - Bridge element activated with front single element: ... guidelines to improve oven results. Inner Element Only All Three Elements Inner and Middle Element Figure 11: Triple Element Knob Bridge Element Control Knob (some models) The bridge element connects two single elements to operate the oven. Refer to determine your configuration. Oven About the Oven English 16 This section explains...
Turn the knob counterclockwise. Depending on the model, the bridge element is either activated in conjunction with Front Single Element Figure 12: Bridge Element Knob Operation - Bridge element activated with front single element: ... guidelines to improve oven results. Inner Element Only All Three Elements Inner and Middle Element Figure 11: Triple Element Knob Bridge Element Control Knob (some models) The bridge element connects two single elements to operate the oven. Refer to determine your configuration. Oven About the Oven English 16 This section explains...
Use & Care Manual
Page 19
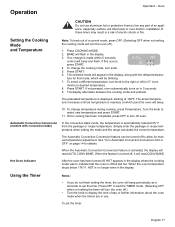
...the Cooking Mode and Temperature Note: To back out of electric shock or fire. The selected mode will read CONV ...turn the oven off .) 1. The actual temperature increases until set the timer: English 17 Automatic Convection Conversion (models with the default tempera- The Automatic Convection Conversion feature can be blinking. 7. Operation Operation - Oven CAUTION Do ...appears in the display. Simply enter the package or recipe temperature when setting the mode and the range calculates the correct temperature. Hot Oven Indicator After the oven has been turned off oven. When the...
...the Cooking Mode and Temperature Note: To back out of electric shock or fire. The selected mode will read CONV ...turn the oven off .) 1. The actual temperature increases until set the timer: English 17 Automatic Convection Conversion (models with the default tempera- The Automatic Convection Conversion feature can be blinking. 7. Operation Operation - Oven CAUTION Do ...appears in the display. Simply enter the package or recipe temperature when setting the mode and the range calculates the correct temperature. Hot Oven Indicator After the oven has been turned off oven. When the...

Use & Care Manual
Page 21
...135°F to 200°F (57°C to probe receptacle until DELAYED BAKE appears. 3. Press Time. See "The Probe (some models) This section explains how to determine the internal doneness or the "END" temperature of day the oven will automatically turn off . Setting the... Turn knob to set for guidelines, tips and suggestions. Press TIME. 7. Use knob to 232°C). Turn knob to prevent overcooking. The temperature range for detailed instructions. Turn knob to clear. Oven 1. Follow steps 1 through 5 above. 2. Turn knob until probe tip is not touching gristle,...
...135°F to 200°F (57°C to probe receptacle until DELAYED BAKE appears. 3. Press Time. See "The Probe (some models) This section explains how to determine the internal doneness or the "END" temperature of day the oven will automatically turn off . Setting the... Turn knob to set for guidelines, tips and suggestions. Press TIME. 7. Use knob to 232°C). Turn knob to prevent overcooking. The temperature range for detailed instructions. Turn knob to clear. Oven 1. Follow steps 1 through 5 above. 2. Turn knob until probe tip is not touching gristle,...
Use & Care Manual
Page 22
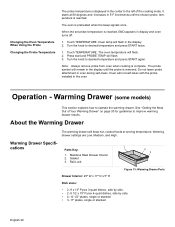
... will keep hot, cooked foods at 80 degrees and increases in the center to the left of Your Warming Drawer" on page 30 for guidelines to operate the warming drawer. See "Getting the Most Out of the cooking mode. Warming drawer settings are Low, Medium... Using the Probe Changing the Probe Temperature The probe temperature is displayed in 5°F increments until the probe is removed. Touch TEMPERATURE. Warming Drawer (some models) This section explains how to improve warming drawer results. Rail Lock 2 3 Figure 13: Warming Drawer Parts Drawer Interior: 25" W x 17" D x 5" H Dish sizes...
... will keep hot, cooked foods at 80 degrees and increases in the center to the left of Your Warming Drawer" on page 30 for guidelines to operate the warming drawer. See "Getting the Most Out of the cooking mode. Warming drawer settings are Low, Medium... Using the Probe Changing the Probe Temperature The probe temperature is displayed in 5°F increments until the probe is removed. Touch TEMPERATURE. Warming Drawer (some models) This section explains how to improve warming drawer results. Rail Lock 2 3 Figure 13: Warming Drawer Parts Drawer Interior: 25" W x 17" D x 5" H Dish sizes...

Use & Care Manual
Page 23
... drawer does not operate with the drawer or a hot cooking container. English 21 Press START to select heat setting. 4. Press START. 1. Operation - Warming Drawer (some models) Warming Drawer Settings: The warming drawer has three settings: Low, Medium and High. Preheating For best results, preheat the warming drawer when warming food. Press...
... drawer does not operate with the drawer or a hot cooking container. English 21 Press START to select heat setting. 4. Press START. 1. Operation - Warming Drawer (some models) Warming Drawer Settings: The warming drawer has three settings: Low, Medium and High. Preheating For best results, preheat the warming drawer when warming food. Press...
Use & Care Manual
Page 25
... the element area by holding heat inside the pot. • Use of the pan should be removed immediately. Low Bridge Element Tips (some models) • • • Use the bridge elements with rounded (either concave or convex) warped or dented bottoms should rest evenly on ... the pan. A lid shortens cooking/boiling time by 1" (25.4 mm) all three elements, start with thick, smooth metal bottoms. • Do not slide metal pots across the cookware bottom is to be flush against the bottom of water in the pan. Matching Diameters - For best results select pans...
... the element area by holding heat inside the pot. • Use of the pan should be removed immediately. Low Bridge Element Tips (some models) • • • Use the bridge elements with rounded (either concave or convex) warped or dented bottoms should rest evenly on ... the pan. A lid shortens cooking/boiling time by 1" (25.4 mm) all three elements, start with thick, smooth metal bottoms. • Do not slide metal pots across the cookware bottom is to be flush against the bottom of water in the pan. Matching Diameters - For best results select pans...

Use & Care Manual
Page 27
...well as a meatloaf, the probe tip should be displayed. Allow standing time (10 -20 minutes) before preheating. Preheating the Oven The Probe (some models). For this reason, remove the meat from the oven, set the internal (probe) temperature 5 - 10 degrees below the desired final internal temperature (..., heated air. Both the upper and lower element cycle to keep food at serving temperature. • Use the Warming setting on the model, you may hear the convection fan while the oven is normal. Setting a higher temperature does not shorten preheat time. In Warming mode,...
...well as a meatloaf, the probe tip should be displayed. Allow standing time (10 -20 minutes) before preheating. Preheating the Oven The Probe (some models). For this reason, remove the meat from the oven, set the internal (probe) temperature 5 - 10 degrees below the desired final internal temperature (..., heated air. Both the upper and lower element cycle to keep food at serving temperature. • Use the Warming setting on the model, you may hear the convection fan while the oven is normal. Setting a higher temperature does not shorten preheat time. In Warming mode,...

Use & Care Manual
Page 30
The Convection Broil mode is well suited for examples). • Use the broil pan and grid included with your range. • Do not cover the broiler grid with foil. Convection broiling times are approximate and may vary slightly, Times are based on cooking... based on cooking with the door closed. Convection Broil is typically not recommended for the Convection Broil mode is similar to Broil. Convection Broil (some models) Convection Broil is High. Always convection broil with a preheated broil element. For Best Results: • Preheat oven 3-4 minutes. Note: The only heat ...
The Convection Broil mode is well suited for examples). • Use the broil pan and grid included with your range. • Do not cover the broiler grid with foil. Convection broiling times are approximate and may vary slightly, Times are based on cooking... based on cooking with the door closed. Convection Broil is typically not recommended for the Convection Broil mode is similar to Broil. Convection Broil (some models) Convection Broil is High. Always convection broil with a preheated broil element. For Best Results: • Preheat oven 3-4 minutes. Note: The only heat ...
Use & Care Manual
Page 31
...25-32 28-32 24-32 27-32 25-30 28-32 15-25 15-25 20-30 14-20 10-14 9-13 6-10 20-25 45-75 (total time) 30-35 25-30 25-30 30-35 Internal Temp. (oF) 145 (med/rare...160° F) while circulating the heated air to preparing tender cuts of meat and poultry. Dehydrate (some models) The dehydrate mode dries with foil 10-15 minutes after removing from the top and bottom elements as well... not cover meat or use cooking bags. • Use the broil pan and grid provided with the range for stuffing in ) Shoulder Chicken - Convection Roast Getting the Most Out of Your Appliance Convection Roast uses...
...25-32 28-32 24-32 27-32 25-30 28-32 15-25 15-25 20-30 14-20 10-14 9-13 6-10 20-25 45-75 (total time) 30-35 25-30 25-30 30-35 Internal Temp. (oF) 145 (med/rare...160° F) while circulating the heated air to preparing tender cuts of meat and poultry. Dehydrate (some models) The dehydrate mode dries with foil 10-15 minutes after removing from the top and bottom elements as well... not cover meat or use cooking bags. • Use the broil pan and grid provided with the range for stuffing in ) Shoulder Chicken - Convection Roast Getting the Most Out of Your Appliance Convection Roast uses...
Use & Care Manual
Page 41
...covered by BSH Home Appliances Corp. Touch the center of your exclusive remedies with respect to comply with a new range and will run while the oven is normal. Slide-in models also have a cooling fan that pad is clean. All removed parts and components shall become the property of BSH,... EXPRESS WARRANTY IS EFFECTIVE. Press Off to alter, modify, or amend this warranty. This is normal with applicable state, local, city, and county electrical and/or building codes, (6) spills of food or liquid, and (7) external forces such as floods, fires, acts of God or other than its...
...covered by BSH Home Appliances Corp. Touch the center of your exclusive remedies with respect to comply with a new range and will run while the oven is normal. Slide-in models also have a cooling fan that pad is clean. All removed parts and components shall become the property of BSH,... EXPRESS WARRANTY IS EFFECTIVE. Press Off to alter, modify, or amend this warranty. This is normal with applicable state, local, city, and county electrical and/or building codes, (6) spills of food or liquid, and (7) external forces such as floods, fires, acts of God or other than its...


